Expose a managed API with the API Microgateway Service
Use the API Microgateway Service to expose a managed API on the organization's on-premises environment.
Before you expose a managed API, perform the prerequisite tasks on your organization's Secure Agent machine. After you complete the prerequisites, follow the steps to create, build, and deploy an API Microgateway proxy.
After you expose a managed API, if you make changes to the on-premises environment, you might need to make one or both of the following changes:
•Edit the API Microgateway Service properties in Administrator. For example, you might want to change the name of the project that stores the API configurations when you create a new project.
•Enable the API Microgateway Service for a Secure Agent or a Secure Agent group in Administrator. For example, you might want to change the Secure Agent that runs the API Microgateway Service when you create a new project.
For more information about editing the API Microgateway Service properties or enabling the API Microgateway Service for a Secure Agent or a Secure Agent group, see Secure Agent Services in the Administrator help.
Prerequisites for exposing a managed API with the API Microgateway Service
Before you expose a managed API with the API Microgateway Service, perform the following tasks on the organization's Secure Agent machine:
•Configure the Docker runtime environment on the same Secure Agent that runs the API Microgateway Service. Certified Docker runtime environments include Linux Docker Engines and Docker for Windows.
•Enable TCP without TLS to run Docker daemon.
•Run the API Microgateway Service on a Secure Agent with TLS version 1.2 or a later enabled and versions TLS 1.0 and 1.1 disabled. For more information, see HOW TO: Disable TLS 1.0 and 1.1 on Secure Agent.
•Generate a new SSL certificate and PEM file.
Generating SSL certificate for the API Microgateway
Perform the following steps to generate a new SSL certificate and PEM file for the API Microgateway:
1Install OpenSSL on the organization's Secure Agent machine, if it is not already installed. Open OpenSSL.
2Generate an RSA key (size: 2048). Output the RSA key to a file named mydomain.key, using the command: openssl genrsa -out mydomain.key 2048
If you change the mydomain.key file name, you must also change the haproxy.cfg file in the Agent Data folder, data\apimgw_docker\haproxy, to reflect the corresponding file name.
3Generate a certificate signing request using the command: openssl req -new -key mydomain.key -out mydomain.csr
4Generate a signed certificate using the command: openssl x509 -req -days 730 -in mydomain.csr -signkey mydomain.key -out mydomain.crt
5Create a certificate package using the command: bash -c 'cat mydomain.key mydomain.crt >> <dir>/mydomain.pem'
6When you receive the SSL certificate, copy and paste the contents of the certificate file into the PEM file containing the RSA key. The certificate file name must be mydomain.pem
Creating a managed API to expose with the API Microgateway Service
Create a managed API to expose with the API Microgateway Service to use as an API Microgateway proxy to an API endpoint to manage.
1Access the Application Integration service and then click Create a Process.
The Process window opens.
2In the Process Properties panel, click Start. Enter the required properties and then click Save.
3Click Publish to publish the process on the Secure Agent.
4Click Properties Detail. In the Endpoints area, click Copy to copy the Service URL or the SOAP Service URL and then click Close.
- <host> is the machine that hosts the Secure Agent that runs the API Microgateway Service.
- <port number> is the number of the port that the API Microgateway Service is assigned during startup. You can find the port number in the following file: <Secure Agent installation directory>/apps/ApiMicrogatewayService/logs folder/apimgw.log
6Paste the URL you copied to the path element of the URL template.
API manager assigns the managed API name as the value of the id element.
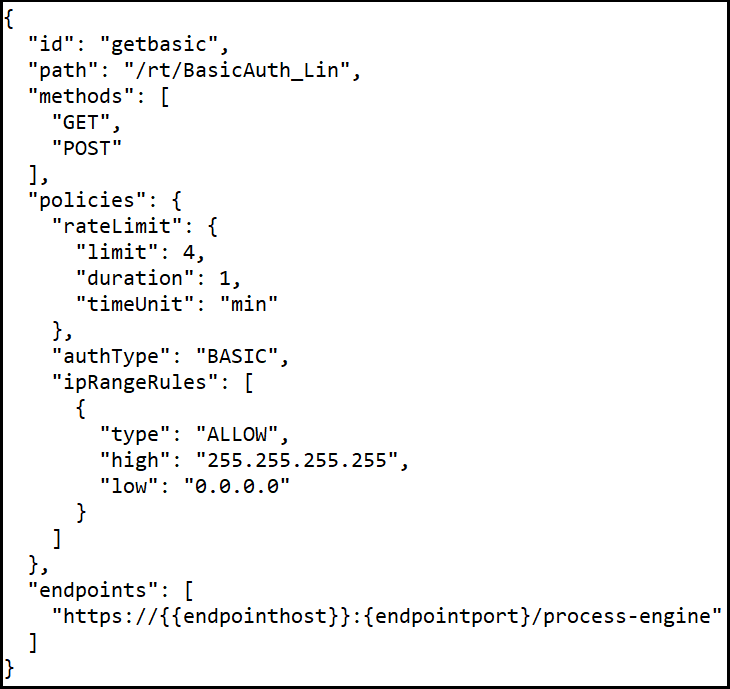
7Optionally, define endpoint access policies for the managed API. You can define a rate limit policy, an authentication type, and an IP filtering policy for the managed API.
aDefine the rate limit policy. Enter one of the following values for timeUnit:
- min
- hour
- day
- week
- month
- year
bDefine the authentication type. If you use OAuth 2.0 authentication, enter the access token that you generate in Application Integration in the request header when you create the managed API. If no value is defined, the authentication type is anonymous. Enter one of the following values for authType:
- BASIC
- NO_AUTH
- OAUTH2
cDefine as many IP range rules as needed. Enter the rule type and the IP address range for each ipRangeRules section. You can enter one of the following values for type:
- ALLOW
- DENY
The following example shows a payload of a request to create a managed API with a rate limit policy, basic authentication, and an IP range rule that allows all URLs:
Building an API Microgateway
Use the API Microgateway Service to build an API Microgateway as an immutable Docker image for each managed API:
Build the API Microgateway to an API endpoint using the URL:
The Docker image name must not contain the following characters: -_,. If the Docker image name includes restricted characters, the build fails.
The API Microgateway Service builds the API Microgateway as a Docker image on the repository of the Docker runtime environment. The following image shows an example payload of invoking a POST call to build an API Microgateway:
Deploying an API Microgateway
Use the API Microgateway Service to deploy an API Microgateway in a Docker image container on the organization's Secure Agent Docker runtime environment: