You can enable OAuth 2.0 authentication for managed APIs that invoke a Cloud Application Integration process that uses basic authentication.
OAuth 2.0 is a protocol for authorization that provides specific authorization flows for web applications and helps in the secure transmission of information between API consumers and web services such as Informatica Cloud Application Integration service APIs.
API Manager supports the client credentials grant type for OAuth 2.0 authentication.
Enabling OAuth 2.0 authentication
To enable OAuth 2.0 authentication, you perform the following tasks:
1Create an OAuth 2.0 client. Specify credentials of an organization user with access to run managed APIs, select managed APIs or managed API groups that can use the client for authentication, and generate client credentials.
2Send the following details to consumers of the managed APIs that the client applies to:
▪ Informatica Intelligent Cloud Services OAuth 2.0 server URL.
▪ Client credentials.
Invoking a managed API where OAuth 2.0 authentication is enabled
To invoke a managed API where OAuth 2.0 authentication is enabled, API consumers perform the following tasks:
1Authenticate against the Informatica Intelligent Cloud Services OAuth 2.0 server and use the OAuth 2.0 client credentials to generate an OAuth 2.0 authorization token.
2Use the OAuth 2.0 authorization token to invoke the API.
Creating an OAuth 2.0 client
Create an OAuth 2.0 client that enables managed API consumers to invoke managed APIs where OAuth 2.0 authentication is enabled.
1On the Policies page, select the Authorization tab.
2Click Add OAuth 2.0 Client.
The Add OAuth 20.0 Client wizard appears.
3Enter the user name and password of an organization user with the Service Consumer role and click Next.
The Details step appears.
4Enter a name for the client. The name is case sensitive and must be unique in the organization.
The name can contain up to 32 characters, including any letter on the ASCII table, non-Latin characters, any digit, spaces, and the special characters . _ and -. The name cannot contain any of the following characters: / " ' < > & : ~ ! @ # ; % ^ * + = { } | , \
5Optionally, enter a description of the client.
The description can contain up to 1,024 characters, including any letter on the ASCII table, non-Latin characters, any digit, spaces, and the special characters . _ and -.
6Enter a timeout value in minutes for the access token.
The minimum value is 5 minutes and the maximum value is 1440 minutes or 24 hours. Default is 60 minutes.
After a token times out, you cannot use it. You must regenerate the token.
7Click Next.
The Resources step appears.
8 Select managed APIs that the OAuth 2.0 client applies to using one of the following options:
- All API Resources. The OAuth 2.0 client applies to all the managed APIs in the organization.
- APIs and API Groups. Select managed APIs and managed API groups that the OAuth 2.0 client applies to. You can select up to 50 managed APIs and up to 10 groups.
Click Next.
API Manager creates the client. The Generated Credentials step appears.
9Copy the client credentials and send them to API consumers using one of the following methods:
- Click Copy next to OAuth 2.0 Client ID and OAuth 2.0 Client Secret to copy the credentials as plain text. API consumers use the client credentials in applications and software packages where you enter each detail separately.
Note: You cannot copy the client secret after you exit the wizard.
- Click Copy Basic Authorization Header Value to copy the credentials as an authorization header value. API consumers use the value in applications and software packages where you enter the client credentials as a value in a Basic authorization header. For example, if the value you copy is 4879857439857349857, API consumers enter the following authorization header: Basic 4879857439857349857.
Note: You can't use the DOCTYPE header in XML attachments.
10Click Finish.
11On the Authorization tab, click Copy URL and send the OAuth 2.0 server URL to API consumers.
Managing OAuth 2.0 clients
After you create an OAuth 2.0 client, you can view, edit, and delete it.
1On the Policies page, click the Authorization tab.
The OAuth 2.0 Clients section displays all the OAuth clients and their details.
2Perform one of the following tasks:
aTo view the details of an OAuth 2.0 client, double-click the client.
bTo edit an OAuth 2.0 client, click the Actions menu in the row that contains the OAuth 2.0 client, and select Edit. Make the required changes and click Save.
cTo delete an OAuth 2.0 client, click the Actions menu in the row that contains the OAuth 2.0 client, and select Delete Client.
A message appears prompting you to confirm the deletion. Click Delete to proceed with the deletion, or click Cancel to cancel the deletion.
Regenerating an OAuth 2.0 client secret
You can regenerate an OAuth 2.0 client secret if needed. When you regenerate the client secret, API Manager disables the current client secret.
1On the Policies page, click the Authorization tab.
The OAuth 2.0 Clients section displays all the OAuth clients and their details.
2To regenerate the secret, click the Actions menu in the row that contains the OAuth 2.0 client, and select Regenerate Secret.
Alternatively, you can double-click an OAuth 2.0 client, and click Regenerate Secret.
3Enter the password and click Next.
API Manager regenerates the client secret and authorization header value. You can copy the new values and send them to the API consumers.
Enabling and disabling OAuth 2.0 clients
When you create an OAuth 2.0 client, it is enabled by default. You can disable an OAuth 2.0 client if needed. API consumers cannot use disabled OAuth 2.0 clients for authentication.
1On the Policies page, click the Authorization tab.
The OAuth 2.0 Clients section displays all the OAuth clients and their details.
2To enable or disable a client, click the Actions menu in the row that contains the OAuth 2.0 client, and select Enable Client or Disable Client.
Alternatively, you can double-click an OAuth 2.0 client, and click Enable Client or Disable Client.
Note: When there are multiple bad attempts to get the token or when there are other violations for an OAuth 2.0 client, the OAuth2 Identify Provider sets the status of the client to locked. API consumers cannot use locked OAuth 2.0 clients for authentication.
How API consumers invoke an API with OAuth 2.0 authentication
To invoke a managed API where OAuth 2.0 authentication is enabled, API consumers generate an OAuth 2.0 authorization token and send the token to the managed API.
The following sections describe the stages of invoking a managed API that uses OAuth 2.0 authentication:
Generating an OAuth 2.0 authorization token
To generate the token, API consumers authenticate to the IDMC OAuth 2.0 server using the server URL and the OAuth 2.0 client credentials that you send to the API Portal administrator.
API consumers need to submit the following credential information to the OAuth 2.0 server:
- client_id=<client_name>
- client_secret=<client_secret>
- grant_type=<client_credentials>
You can submit this information using any of the following methods. Choose the method that works best based on the application or software package that you use to invoke the API.
- Method 1. Enter the client_id and client_secret in a Basic Authorization header. For the grant_type, add these to the request body as URL-encoded values. To do this, select client_credentials and add this to the request body as URL-encoded data, and enter the URL in the Access Token URL field.
- Method 2. Enter the client_id and client_secret in a Basic Authorization header. For the grant_type, add these to the URL parameter.
- Method 3. Enter the client_id, client_secret, and grant_type all within the request body as URL-encoded values.
For example, in Postman enter the details as follows and add them to the request body as URL-encoded data:
Key
Value
client_id
<client_name>
client_secret
<client_secret>
grant_type
<client_credentials>
You can find the access token URLs on the Authorization tab in the Policies page.
An access token POST URL uses the following format:
{protocol}://{host_URL}/authz-service/oauth/token
The following image shows a sample POST URL and other details:
- Method 4. Enter the client_id and client_secret to the request body as URL-encoded data. For the grant_type, add these to the URL parameter.
Other combinations such as passing all three parameters in URL are supported but not recommended for security reasons.
Note: If the parameters are duplicated and passed both in the URL and request body, the request body parameters override the URL parameters.
The following image shows an API invocation through Postman with a Basic Authorization header:
Sending the token to the managed API
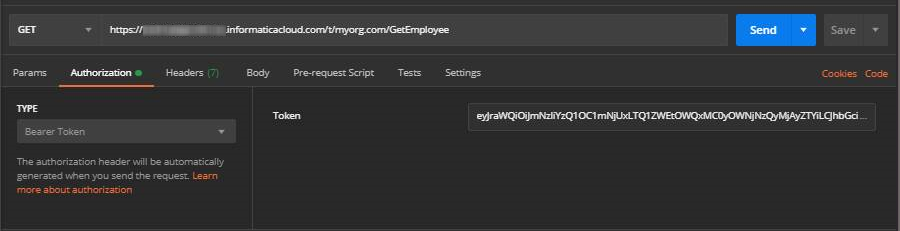
API consumers pass the token that they receive from the OAuth 2.0 server to the managed API as an Authorization header with the prefix Bearer followed by the token.
The following image shows an API invoked through Postman with a Bearer Token authorization type and the token that the API consumer entered:
Python 3 example: Invoke a managed API with OAuth 2.0 authentication
You can invoke a managed API where OAuth 2.0 authentication is enabled in Python 3.
In order to invoke a managed API with the OAuth 2.0 authentication method, API consumers must request an OAuth 2.0 token from the Informatica Intelligent Cloud Services OAuth 2.0 server.
You can use any OAuth 2.0 library, tool, or programming language to run the OAuth 2.0 authentication sequence. Before you run the OAuth 2.0 authentication, verify that you have the following information:
•URL of the Informatica Intelligent Cloud Services OAuth 2.0 server.
•OAuth 2.0 client ID and secret with permissions to run the managed API.
The following example shows the codes used for invoking a managed API with OAuth 2.0 authentication in Python 3:
import sys import requests import json import logging import time
Java example: Invoke a managed API with OAuth 2.0 authentication
You can invoke a managed API where OAuth 2.0 authentication is enabled in Java.
In order to invoke a managed API with the OAuth 2.0 authentication method, API consumers must request an OAuth 2.0 token from the Informatica Intelligent Cloud Services OAuth 2.0 server.
You can use any OAuth 2.0 library, tool, or programming language to run the OAuth 2.0 authentication sequence. Before you run the OAuth 2.0 authentication, verify that you have the following information:
•URL of the Informatica Intelligent Cloud Services OAuth 2.0 server.
•OAuth 2.0 client ID and secret with permissions to run the managed API.
The following example shows the codes used for invoking a managed API with OAuth 2.0 authentication in Java:
public class OAuthClientSample ( public static String TEST_API_URL = "https://apigw-pod1.dm-us.informaticacloud.com/t/apim.usw1.com/get_employee_details"; public static String OAUTH_SERVER_URL = "https://dm-us.informaticacloud.com/authz-service/oauth/token"; public static String CLIENT_CREDENTIALS = "YwliT1ZlMWJGRUpsOOhftenFFM8dZdjpRUjQzQXcwbes-";
OkHttpClient client = new OkHttpClient();
public static void main(String [] args) throws Exception { new OAuthClientSample().runApi(); }
// // run an OAuth 2.0 in a loop // public void runApi() throws Exception { // // obtain an OAuth 2.0 token for running the API // String token = getNewToken();
while (true)
// // run the API using the OAuth 2.0 token // Request request = new Request.Builder() -url(TEST_API_URL) -method("GET", null) -addHeader("Authorization", Bearer + token) -build(); Response response = client.newCall(request).execute();
// // If the token expired, obtain a new token // if (response.code() --401) token = getNewToken (); else System.out.printIn(response.body().string());
Thread.sleep(TimeUnit.SECONDS.toMillis(30)); } }
/** * @return a new OAuth 2.0 token from the authentication server * @throws IOException */ String getNewToken() throws IOException { String authHeader = "Basic " + CLIENT_CREDENTIALS;
if (response.code() != 200) { System.err.printIn(response.code()); System.exit(1); return null; }
Map <String, Object> jsonResponse = new Gson().fromJson(response.body().string(), Map.class); return (String)jsonResponse.get("access_token");
} }
Exporting deleted OAuth 2.0 clients
You can export deleted OAuth 2.0 clients for tracking purposes.
1On the Policies page, click the Authorization tab.
2Click Export Deleted Clients.
API Manager downloads a .csv file that shows details of the OAuth 2.0 clients that were deleted since the time the organization was created. The file shows the client ID, client name, created time, last accessed time, and deletion time for all the deleted OAuth 2.0 clients.