Option 2: Generating a Service Connector by Importing a File
You can import a Web Service Definition Language (WSDL) file, a Swagger 2.0 JSON file, or an OpenAPI 3.0 JSON or YAML file to create an Application Integration service connector.
Creating a Service Connector from a WSDL File
You can import a WSDL file to easily create a service connector with multiple operations. Use the Service Connector from WSDL wizard to import a WSDL file and create a service connector. After you specify the WSDL file, Application Integration parses the file and loads the operations.
You can also configure a list of simple types, such as check box, date, date time, integer, number, text, or time for input fields, output fields, and process object fields. Configure the list of simple types in the WSDL file before importing it as shown in the following sample image:
If an error occurs during import, the wizard displays the error under Error/Warnings on the Progress tab. You can take corrective actions and import the WSDL file again.
1In Application Integration, click New on the left navigation bar.
The New Asset dialog box appears.
The following image shows the New Asset dialog box:
2Click Service Connectors > Service Connector from WSDL, and then click Create.
The New Service Connector from WSDL dialog box appears with the WSDL Source tab open as shown in the following image:
3Specify a name, location, and description for the service connector.
4In the WSDL File section, use one of the following options to specify the WSDL file that you want to import:
- To use a WSDL file from your local system, select File, and then select the WSDL file.
You can either select a single .wsdl file or a single .zip file that contains self-contained .wsdl files and .xsd schema files.
Note:
The WSDL file and zip can have a maximum size of 5 MB. Default is 5 MB. To increase the maximum size limit, contact Informatica Global Customer Support.
- To use a URL that contains a WSDL file, select URL. The WSDL URL and Use authentication fields appear. In the WSDL URL field, enter the URL that contains the WSDL file. Select the Use authentication option to specify the user name and password to access the WSDL URL.
Note:
If the password contains an ampersand (&) character, when you test the service connector, the action fails. Additionally, if you use the same service connector in an app connection and process, the process invocation also fails.
5Click Next.
The Services and Operations tab appears.
The following image shows the Services and Operations tab:
6From the Service Name list, select the service that you want to use from the imported WSDL file.
The Service URL field displays the URL to which the service connector sends requests. You cannot edit this URL.
7From the Service Port list, select the port that you want the service connector to use.
8In the Operations section, select the operations that you want the service connector to provide.
The operations that you select will be available as actions when you create a process and use the service connector.
9Click Next.
The Summary tab appears.
The following image shows the Summary tab:
10Review the service connector configuration.
11Click Start Import.
Application Integration starts importing the WSDL file and displays the status on the Progress tab. The Progress tab indicates whether the import completed successfully, failed, or completed with warnings.
The following image shows the Progress tab:
Note:
If you close the dialog box or cancel the import, the import process stops and the service connector is not created.
If the import fails or completes with warnings, click the Error/Warnings tab to understand why the import did not complete successfully. You can fix the issues and import the WSDL file again.
The following image shows a successful import:
12Click Finish to review and save the service connector.
WSDL Files with Qualified Elements
If you have a WSDL file with user defined data types, you can add namespace prefixes and type names to create a WSDL file with qualified elements. You can use this WSDL file to create a service connector.
You can create a service connector from a WSDL file that contains user defined data types. Add namespace prefixes and type names to the user defined data to create a WSDL file with qualified elements. You can use this WSDL file to generate a service connector. The namespace prefix does not appear in the process object and you see a correct payload.
For example, consider a WSDL file that has the user defined elements RecordId and AddressComplete.
First, define a schema with the type name 'Address'. The following is a sample schema with a complexType name Address:
You can use this WSDL file to create a service connector. You will get an Address process object with two fields, RecordId and AddressComplete.
WSDL Files with Repeating Elements
You can create a service connector from a WSDL file with nested and repeating elements.
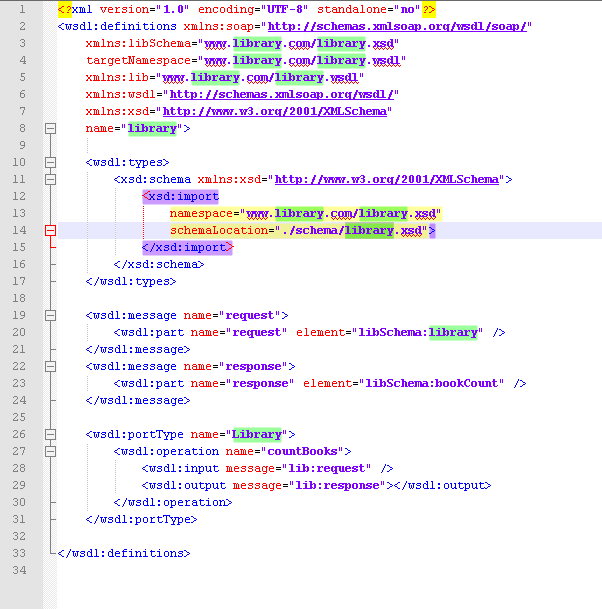
For example, consider the following WSDL and WSDL schema files with the nested, repeating elements 'shelf' and 'book':
You can use this WSDL and WSDL schema file to create a service connector using the WSDL to Service Connector tool. When you import the service connector, you see three process objects: Library, Shelf, and Book. When you select a parent object, you also see the nested object in the right side of the bottom panel.
elementFormDefault
You can use WSDL files that contain the elementFormDefault attribute in the WSDL schema.
The WSDL file can contain elementFormDefault="qualified" or elementFormDefault="unqualified".
Choice Elements
You can use choice schema elements to create a payload in a WSDL file.
Use the If element to show what should appear in the request.
The WSDL to Service Connector considers top level choice elements. This means that if a WSDL schema file has nested choice elements, the WSDL to Service Connector takes the first choice element.
Creating a Service Connector from a Swagger JSON File
You can import a Swagger 2.0 JSON file to easily create a service connector with multiple operations. Use the Service Connector from Swagger wizard to import a Swagger JSON file and create a service connector. After you specify the Swagger JSON file, Application Integration parses the file and loads the operations.
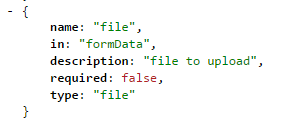
You can also configure a list of simple types, such as check box, date, date time, integer, number, text, or time for input fields, output fields, and process object fields. Configure the list of simple types in the Swagger JSON file before importing it as shown in the following sample image:
If an error occurs during import, the wizard displays the error under Error/Warnings on the Progress tab. You can take corrective actions and import the Swagger JSON file again.
1In Application Integration, click New on the left navigation bar.
The New Asset dialog box appears.
The following image shows the New Asset dialog box:
2Click Service Connectors > Service Connector from Swagger, and then click Create.
The New Service Connector from Swagger dialog box appears with the Swagger Source tab open as shown in the following image:
3Specify a name, location, and description for the service connector.
4In the Swagger File section, use one of the following options to specify the Swagger JSON file that you want to import:
- To use a Swagger JSON file from your local system, select File, and then select the Swagger JSON file.
Note:
The Swagger JSON file and zip can have a maximum size of 5 MB. Default is 5 MB. To increase the maximum size limit, contact Informatica Global Customer Support.
- To use a URL that contains a Swagger JSON file, select URL. The Swagger URL and Use authentication fields appear. In the Swagger URL field, enter the URL that contains the Swagger JSON file. Select the Use authentication option to specify the user name and password to access the Swagger JSON URL.
Note:
If the password contains an ampersand (&) character, when you test the service connector, the action fails. Additionally, if you use the same service connector in an app connection and process, the process invocation also fails.
5Click Next.
The Services and Operations tab appears.
The following image shows the Services and Operations tab:
6In the Operations section, select the operations that you want the service connector to provide.
The operations that you select will be available as actions when you create a process and use the service connector.
7Click Next.
The Summary tab appears.
The following image shows the Summary tab:
8Review the service connector configuration.
9Click Start Import.
Application Integration starts importing the Swagger JSON file and displays the status on the Progress tab. The Progress tab indicates whether the import completed successfully, failed, or completed with warnings.
The following image shows the Progress tab:
Note:
If you close the dialog box or cancel the import, the import process stops and the service connector is not created.
If the import fails or completes with warnings, click the Error/Warnings tab to understand why the import did not complete successfully. You can fix the issues and import the Swagger JSON file again.
The following image shows a successful import:
10Click Finish to review and save the service connector.
Rules and guidelines for Swagger files
Consider the following rules and guidelines when you import a Swagger file to create a service connector:
•You must import a valid Swagger file. You can use the following URL to validate the syntax of the Swagger file:
•Application Integration supports Swagger files of the JSON format. It does not support other formats such as YAML.
•Application Integration supports only single-document Swagger files. If you import a multi-document Swagger file, Application Integration does not load the dependencies.
•If you create a service connector by importing a Swagger file that has a large number of complex types and operations, the service connector editor might be affected, because the generated service connector will be complex and bulky in size.
• If you have a large Swagger file to create a service connector with multiple types and operations, you can split the Swagger file into several smaller Swagger files for improved performance and better usability. You can use a Swagger splitter tool to split the Swagger file. For more information, see the following community article:
You can also manually select a subset of operations in the import wizard to create service connectors with fewer actions.
Creating a Service Connector from a OpenAPI 3.0 File
You can import an OpenAPI 3.0 JSON or YAML file to easily create a service connector with multiple operations. Use the Service Connector from OpenAPI 3.0 wizard to import a OpenAPI 3.0 file and create a service connector. After you specify the OpenAPI 3.0 file, Application Integration parses the file and loads the operations.
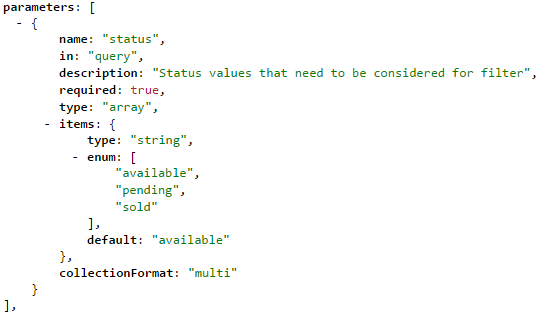
You can also configure a list of simple types, such as check box, date, date time, integer, number, text, or time for input fields, output fields, and process object fields. Configure the list of simple types in the OpenAPI 3.0 file before importing it as shown in the following sample image:
If an error occurs during import, the wizard displays the error under Error/Warnings on the Progress tab. You can take corrective actions and import the OpenAPI 3.0 file again.
1In Application Integration, click New on the left navigation bar.
The New Asset dialog box appears.
The following image shows the New Asset dialog box:
2Click Service Connectors > Service Connector from OpenAPI 3.0, and then click Create.
The New Service Connector from OpenAPI 3.0 dialog box appears with the OpenAPI 3.0 Source tab open as shown in the following image:
3Specify a name, location, and description for the service connector.
4In the OpenAPI 3.0 File section, use one of the following options to specify the OpenAPI 3.0 file that you want to import:
- To use an OpenAPI 3.0 file from your local system, select File, and then select the OpenAPI 3.0 JSON or YAML file.
You can either select a single .json or .yaml file, or a single .zip file that contains self-contained .json or .yaml files.
Note:
The OpenAPI 3.0 file and zip can have a maximum size of 5 MB. Default is 5 MB. To increase the maximum size limit, contact Informatica Global Customer Support.
- To use a URL that contains an OpenAPI 3.0 file, select URL. The OpenAPI 3.0 URL and Use authentication fields appear. In the OpenAPI 3.0 URL field, enter the URL that contains the OpenAPI 3.0 JSON or YAML file. Select the Use authentication option to specify the user name and password to access the OpenAPI 3.0 URL.
Note:
If the password contains an ampersand (&) character, when you test the service connector, the action fails. Additionally, if you use the same service connector in an app connection and process, the process invocation also fails.
5Click Next.
The Service and Operations tab appears.
The following image shows the Service and Operations tab:
6From the Service URL list, select the endpoint that you want to use from the imported OpenAPI 3.0 file to create a service connector.
7In the Operations section, select the operations that you want the service connector to provide.
The operations that you select will be available as actions when you create a process and use the service connector.
8Click Next.
The Summary tab appears.
The following image shows the Summary tab:
9Review the service connector configuration.
10Click Start Import.
Application Integration starts importing the OpenAPI 3.0 file and displays the status on the Progress tab. The Progress tab indicates whether the import completed successfully, failed, or completed with warnings.
The following image shows the Progress tab:
Note:
If you close the dialog box or cancel the import, the import process stops and the service connector is not created.
If the import fails or completes with warnings, click the Error/Warnings tab to understand why the import did not complete successfully. You can fix the issues and import the OpenAPI 3.0 file again.
11Click Finish to save the service connector.
HTTP Operations
You can import a Swagger file that contains the DELETE, PUT, POST, PATCH, and GET HTTP operations.
The service connector that you generate has actions corresponding to the HTTP operation is the Swagger file. If the Swagger file has multiple HTTP operations, the service connector will have multiple actions.
For example, if you use a Swagger file with a POST HTTP operation, you get a service connector with a POST action.
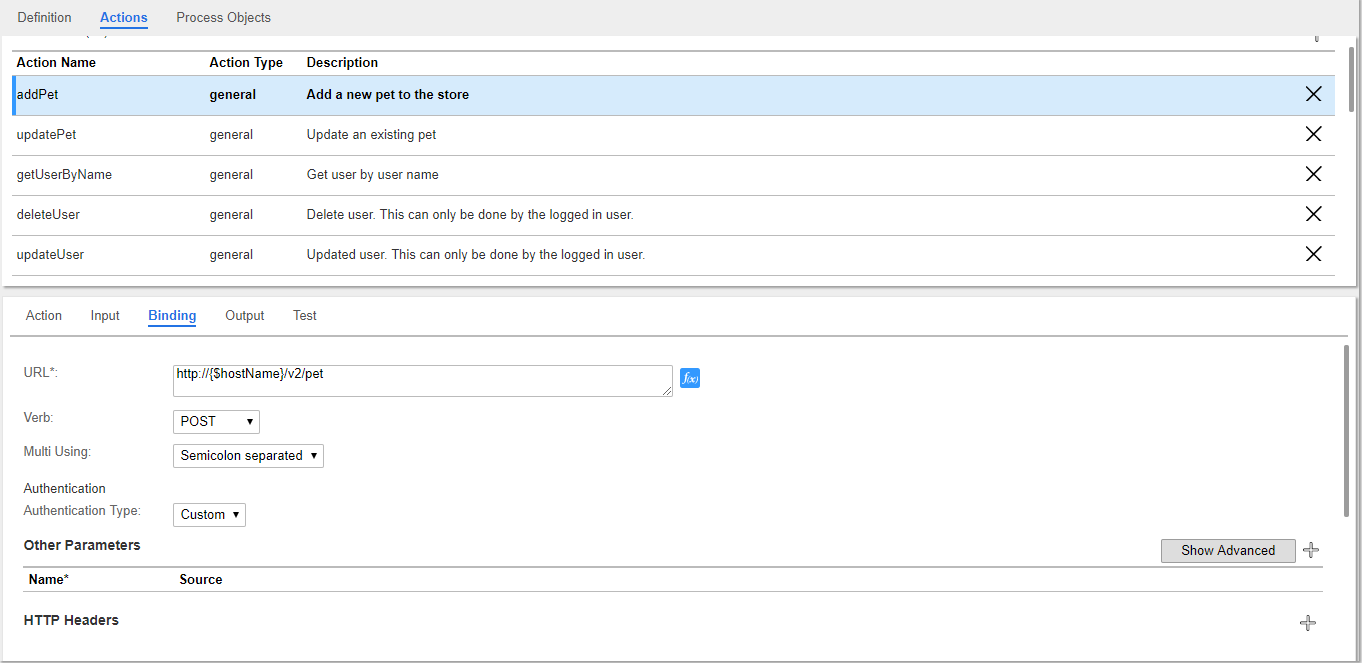
The following image shows a single POST HTTP operation within a Swagger file:
The following image shows the action in service connector that you get when you use the preceding Swagger file:
You see that the Add Pet action corresponds to the verb POST.
JSON Payload
You can import a Swagger file with different types of JSON payloads. The Service Connector you generate reflects the JSON payload of the Swagger file.
The following table shows the JSON payload features that you can use, a sample Swagger excerpt, and the Input field of the corresponding service connector:
JSON Payload Feature
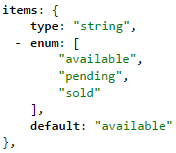
Sample Swagger Content
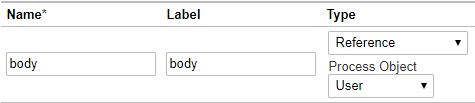
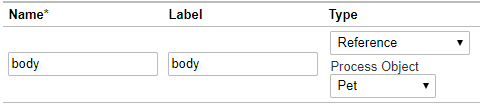
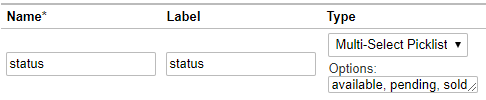
Service Connector Input Field
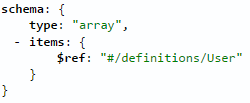
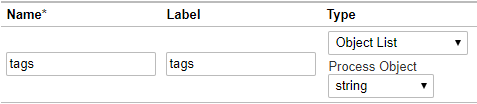
Lists of Objects
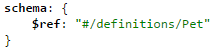
References
Single Select Enums
Simple types
Attachments
Lists of simple types
Multi Select Enums
Objects with References to Other Object Lists
Required and nullable elements
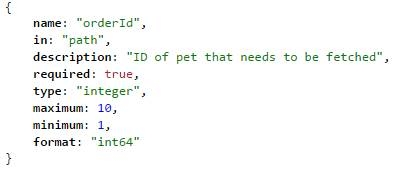
You can define process object fields as required and nullable in the WSDL, Swagger JSON, and OpenAPI 3.0 JSON or YAML files before you import the files to generate a service connector.
In a WSDL file, to define a field as nullable, set the nillable attribute to "true" in the field element. If you do not specify the nillable attribute, the field is set to not nullable by default. If you do not want to set a field as required, set the minOccurs attribute to "0" in the field element. If you do not specify the minOccurs attribute, the field is considered as required by default.
For example, consider a WSDL file that has a schema named ProcessObjectReq. The schema is of a complex type and contains two elements called as Name and ID. To set the ID field as nullable and not required, set the nillable attribute to "true" and the minOccurs attribute to "0" as shown in the following sample:
When you import the WSDL file, the nullable and required field elements defined in the WSDL file are propagated to the process object as shown in the following image:
Similarly, you can set the required and nullable field elements in the Swagger JSON file and create a service connector as shown in the following sample:
If you use a process object with nullable fields in a process, and generate the Swagger JSON file for the process, the generated Swagger JSON file might not contain the x-nullable field defined in the process object. The field is set to not nullable by default. Therefore, Informatica recommends that you use a WSDL file or OpenAPI 3.0 file to preserve the nullable field values.
The following image shows the required and nullable fields selection from the imported Swagger JSON file:
When you use this process object in a process, the fields marked as required and nullable use the same restrictions in the generated WSDL file, Swagger file, and OpenAPI 3.0 file.
Creating a service connector from a Postman collection
You can create a service connector by importing a Postman collection using a defined structure of REST APIs. The service connector inherits the APIs' operations and data structures.
To create a service connector from a Postman collection, perform the following steps:
1In Application Integration, click New > Service Connectors.
The New Asset dialog box appears. The following image shows the New Asset dialog box:
2Click Service Connector from Postman Collection, and then click Create.
The Service Connector from Postman Collection page appears.
3Define the following basic properties for the service connector on the Postman Collection JSON File tab:
- Name: Required. The name by which the service connector is made available for processes. The name must start with a letter or number, and can contain only alphanumeric characters, multibyte characters, spaces, underscores (_), and hyphens (-). The name must not exceed 128 characters.
- Location: Specify the project or folder to save the service connector.
- Description: Optionally, enter a description for the service connector.
- On the Postman Collection JSON File tab, drag and drop the Postman collection JSON file.
Note:
The maximum source file size limit is 5 MB for all file types. To increase the maximum size limit, contact Informatica Global Customer Support.
The following image shows the Postman Collection JSON File tab:
4Click Next.
The operations and the descriptions defined in the Postman collection file appear on the Services and Operations tab.
The following image shows the Services and Operations tab:
5Select one or more operations from the list.
6Click Next.
The Summary tab appears.
7Review the service connector configuration such as the service connector name, location, service URL, and the protocol before importing the Postman collection.
The following image shows the Summary tab:
8Click Start Import.
The Progress tab appears.
The tab displays the status of the import process in the Status page. If an error occurs during import, the wizard displays the error under Error/Warnings on the Progress tab. You can take corrective actions and import the Postman collection file again.
Note:
If you close the dialog box during the import process, the process will stop and the service connector will not be created.
The following image shows the Progress tab:
Rules and guidelines for Postman collections
Consider the following rules and guidelines when you import a Postman collection to create a service connector:
•If the Postman collections exist in a nested folder structure and you use basic authentication, fields are not created. You must create the fields manually.
•You can't use Japanese characters in the request name when you import a Postman collection to create a service connector. The Japanese characters are not parsed correctly.
•You can't provide multiple host names in the Postman collection. You must add new actions with different hosts to the service connector after you create the service connector by importing the Postman collection.
•The query parameter values that are provided in the Postman collection do not get imported at the time of creating a service connector. You can only create fields with keys from the payload. You must enter the values manually after creating the service connector from the Postman collection.
•The body payload that you provide in the Postman collection does not get imported to the service connector. You must pass the body values manually after creating the service connector from the Postman collection.
•When you create multiple requests with the same host name and same methods but with different query parameters, only the last request gets imported to the service connector. You must create additional requests manually after creating the service connector from the Postman collection.