Within a step, you may want your users to select one or more object. You can display this information in a variety of ways:
•A pop-up search dialog for searching for objects by name
•A picklist from which they can select one object
•A multi-select picklist for selecting more than one
•A table of objects, and you can select which of the object's fields it should display in separate column
If only one object can be selected, Guide Designer adds a column containing radio buttons; otherwise, it adds checkboxes.
Note: If you are just displaying one object, you can display the object's fields as a one-row, multi-column table.
By default, Guide Designer displays a search dialog box when users are searching for information for fields that can be updateable. You can override the default and tell Guide Designer to display object information using either a picklist or table. Picklists and tables are populated using a query that filters the possible objects down to just those that should be presented. For example, Guide Designer could show only the contacts that are associated with an account.
You can customize the fields being shown for each object. If only one field from these objects is displayed, Guide Designer shows this information as a list. However, if you are displaying more than one (for example, a lead's first and last name), Guide Designer shows each within its own column in a table.
Note: Object queries are not available when the field you are updating can reference more than one type of object (that is, the Reference To control within the Field Properties dialog includes multiple object types). If this is your situation (that is, you cannot use a regular query), you must select and use an advanced query.
Inserting Fields Using Picklists
There are many places where you add or use field names.
When a user runs a guide, Process Designer replaces the field with the value within the object. For example, if an Account Type field was inserted and the Account Type is "Grade 1", users will see "Grade 1" instead of the field name when they are running the guide.
Three kinds of lists exist in steps:
•Read-Only Field: A read-only field is a field whose value cannot be changed. You can tell that it is read-only field because it displays in gray.
The text in front of the field was added as descriptive text in front of the field. If you didn't add a description, the user might not know what information was being displayed.
Note: When an object ID is placed in a canvas as a read-only field or put into a column in a table, it displays as a link to the object. If you want to show the object ID's value, insert it into a text field as "{!Id}".
•Editable Field: An editable field lets the user see the current value of the field as well as modify its value.
A field can be virtual; that is, the object has a field that is actually a composite key or a composite field. When Guide Designer displays the name of this virtual and autogenerated field, it displays it as "Object_name" + "_IID".
Inserting Fields in Tables
When you insert a field into a step, clicking on the field's name in a picklist inserts a label and a text field into which the field information will display. If you are inserting more than one field, the step can be hard to read and does not look good. Placing the elements within a table can solve both of these problems.
Here's an example:
When handling fields in a table:
•If the cursor is not in the right-most cell, Guide Designer inserts the label at the current cursor position. The field is inserted into the cell to the right of the cursor. If the cell to the right has something in it, Guide Designer appends the field to this information.
•If the cursor is in the right-most cell and the cell isn't empty, Guide Designer places the label and the field into the first two columns of the row that follows. If that row has text in it, Guide Designer inserts a row immediately beneath the current row, and then inserts the label and field. If that row is empty, just write place the information into the cell.
•If the cursor is in an empty right-most cell or if the table has only one column, Guide Designer places the field (not the label) into this cell.
Entering Fields as Text
You can enter text and the value of a field as the information you type in text boxes such as the one in the following.
To specify a field value, choose Content as the Source and then click the small icon to the right of the text box. From the list of fields that displays, select the field you want to enter. If you know the name of the field, you can also type it in the text box as {$name_of_field}.
This example shows the values of four fields from the current object as the Content for the Description field.
You can add other text to display with the field values. For example, you could specify:
The name is: {$name}
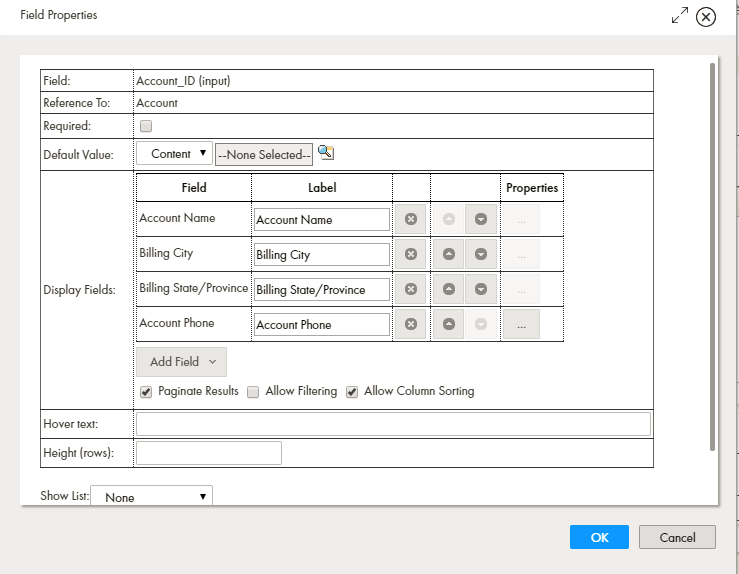
Displaying Columns
Use the Display Fields field to tell Guide Designer which of the object's fields it should display in a table. If the field can be updated, each row also has either a radio button if users can only select one object or a checkbox if they can select more than one.
Use the Add Field Column button to add columns. You can use the arrow buttons to the right of the name to change the order. If you do not want to use the default column heading, enter the text you prefer.
Here's a four column table:
The three check boxes are as follows:
•Paginate Result: When selected, the output is paginated.
•Allow Filtering: When selected, the user can enter text in a text box to select some of the displayed results.
•Allow User Column Sorting: When selected, the user can click on a column heading to sort the results by that column's contents.
Note: When an ID field is included in a result from a Lookup dialog, the ID's value displays.