You can tell Guide Designer about the source of the values that will be assigned to a field. The following figure shows part of a Create step where fields have different sources:
•Add: If the field being entered is of type ObjectList, selecting this item will let you append an item to that list.
•Content: The values used by the step is what you define here and does not change. For example, the Rating field, which was defined as having one of three values, will be set to one of these three as you are designing this guide. The value you set here is what will be used when this object is created. However, if this were text, the text may also have embedded fields. This example has three different kinds of content fields. The differ because Process Designer knows what kind of data is being set. For example, Converted was defined as a checkbox, Rating as a picklist with predefined values, and Zip/Postal Code is defined as text.
•Field: The value comes from a field in an object.
•Formula: You will use numeric operators such as:
- +
- -
- *
- div
- mod
You can use built-in and XQuery functions to set a value.
•Query: (This is not shown.) You tell Guide Designer which information it should locate. For example, Guide Designer might look for a company whose name is "Acme".
•Screen: (Guides only) You must insert an input field within the Input Screen tab's editing area.
Setting Source Values: Content
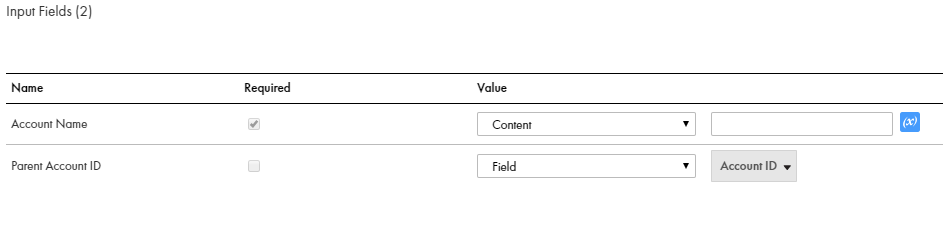
A Content source is one in which the person designing the guide is deciding the value that is passed as input to a step. For example, you could use Content to set the Description field of a Create step creating an event to "Demonstrate the product" rather than requiring the guide's user to provide the description.
Sometimes, you want to create content that contains text and field values. For example, you could have a "mailing" field that contains a person's name and address. You would add this information by including field strings.
Click the (x) icon to see a list if fields.
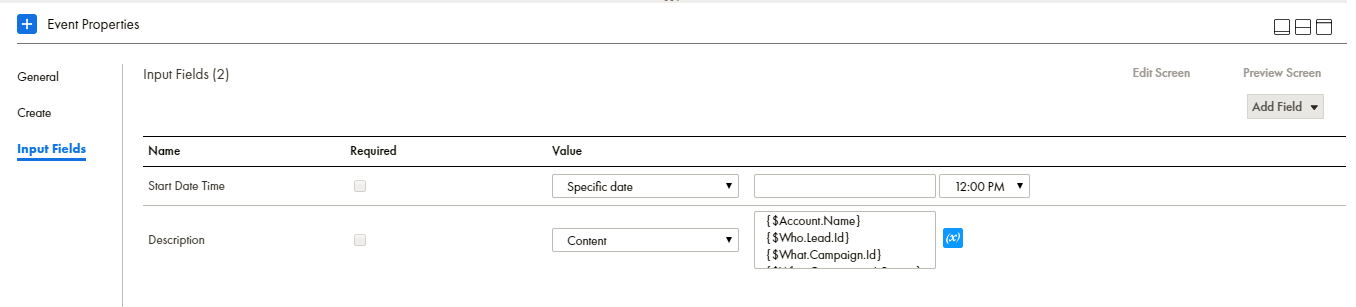
After you select a field, Process Designer places a field code into the text box at the cursor's position. You can individually select as many fields as you need; however, you can only select one item at a time.
Here's an example:
You can also add text to this inserted field indicator. For example, In front of {$Account.name}, you could type "Name: ".
When Process Designer executes this step, it replaces each field indicator with the text extracted from the field.
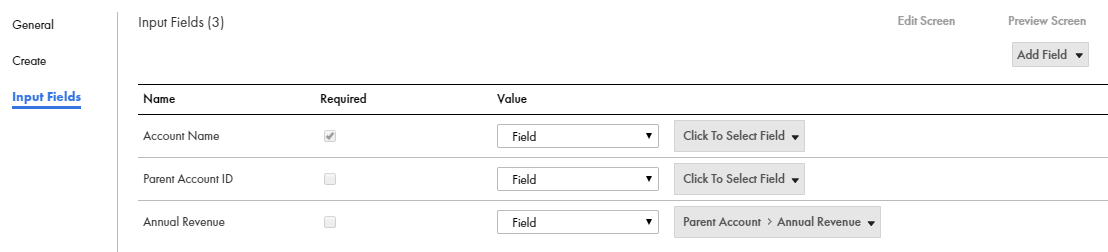
Setting Source Values: Field
If you select Field for the Source, Process Designer displays a collapsed list to the right. You can now select the field whose value Process Designer will write into the object when this step executes. As with other places where you select fields, the bottom of the picklist may show related objects whose fields can be used.
Setting Source Values: Formula
Fields that take numeric input fields can use a formula to set a value. For example, you can use this with the Assignment step to add a number to an existing field. Use numeric operators such as +, -, *, div, and mod to perform an operation upon fields.
Process Designer evaluates formulas as you might expect. Note that:
•$Field1.Field2.Field3 is pre-processed to de-reference down to the contents of Field3 and would bind the contents to its value.
•Special characters in field names are removed. Fields that start with numbers are given an "x" prefix.
•If $Account is a by-value object, you must use an XPath path expression to get at its contents; for example, $Account/Owner/Name.
•Object lists should be sequences containing either ID values (for by-reference object lists) or the XML representation of the records. For example, two object lists can be appended using the following expression: ($a,$b).
•Object references within a list are separated by semi-colons; for example, (a; b; c).
For information on available functions, see Using Functions.
Setting Source Values: Query
Use a query to retrieve object information from all of the objects that are selected by the Where Clause.
Query controls appear in different steps and in some dialogs so what you may see may differ slightly.
What you will be doing is creating an SQL WHERE clause. While you can enter your condition directly into the text area, it is usually far easier to click the Add Condition button and the Order By picklist. After Process Designer inserts this information, you can edit it if you need to. Letting Process Designer do the work is recommended as it is sometimes not obvious what the field's internal name is. The text entered here is a standard SQL WHERE clause. Also, this text does not include the WHERE keyword.
Each condition has four parts:
•The name of a field in the object. In this example, the field is one of those contained within the object.
•An operator that Process Designer uses when it compares the field value on the left with values on the right.
•The kind of data that will be compared. Your choices are Content, Field, or Formula. If you choose Field, you are comparing the contents within the first field in the current object (the one on the extreme left of the Condition dialog) with the contents of the field in the type of object being queried.
•The data to which the field on the left is being compared. If the source is Content and you click within this area, a small icon appears to the right. After selecting it, Process Designer displays a picklist from which you can select the name of a field in another object that will be used when making the comparison.
Pressing the Order By picklist button lets you select the fields that the query sorts upon when it displays information. For example, you might want to sort the displayed information by a person's last name. You can add additional keys by reselecting a field from this picklist. The Order By clause is placed within the text box. This lets you edit it after it is inserted. You can also directly type the Order By clause here as well.
Note: You can add an SQL LIMIT clause to your query by entering it in the Where clause text box. For example, you can limit the number of retrieved rows to 200 by typing "Limit 200". When adding this clause, be sure to add a space after the where information or place it on its own line after the where. ("Limit" can be in upper, lower, or mixed case.) By default, 100 rows are returned. If your guide requires more than 100, you must add this clause.
Specifying Conditions in a WHERE Clause
Your ability to define a condition within a WHERE clause depends upon what Produce Designer is interacting with.
Direct Interaction with a Relational Database
Most databases fully support the SQL WHERE operator. If you encounter problems, you should consult the documentation for that database.
Using an Informatica Connector
If you need more than one condition, only simple cognations (field operator values) are supported. You may join multiple conditions using either AND or OR. You can also use the NOT operator to invert the meaning of the condition.
Salesforce
The WHERE condition must conform to SOQL requirements. Consult the Salesforce SOQL documentation for more information.
Using a WHERE Clause When No Answer Is Expected
One common situation, and a situation that isn't at all unique to Process Designer, is that you are creating a WHERE clause that is based on a multiple criteria. However, not all of the criteria will have values. For example, an account and a territory, and the territory is optional. Setting up a WHERE clause such as Account={$account) AND Territory={$territory} wouldn't work if no territory value was used.
The solution for creating a WHERE clause with fields that are optional is to use the LIKE operator; for example, Account LIKE '%{$account}%' AND Territory LIKE '%{$territory)%'. If territory doesn't exist, this would be the same and entering Account LIKE '%{$account}%' AND Territory LIKE '%%'. The LIKE following the AND will always evaluate to true.
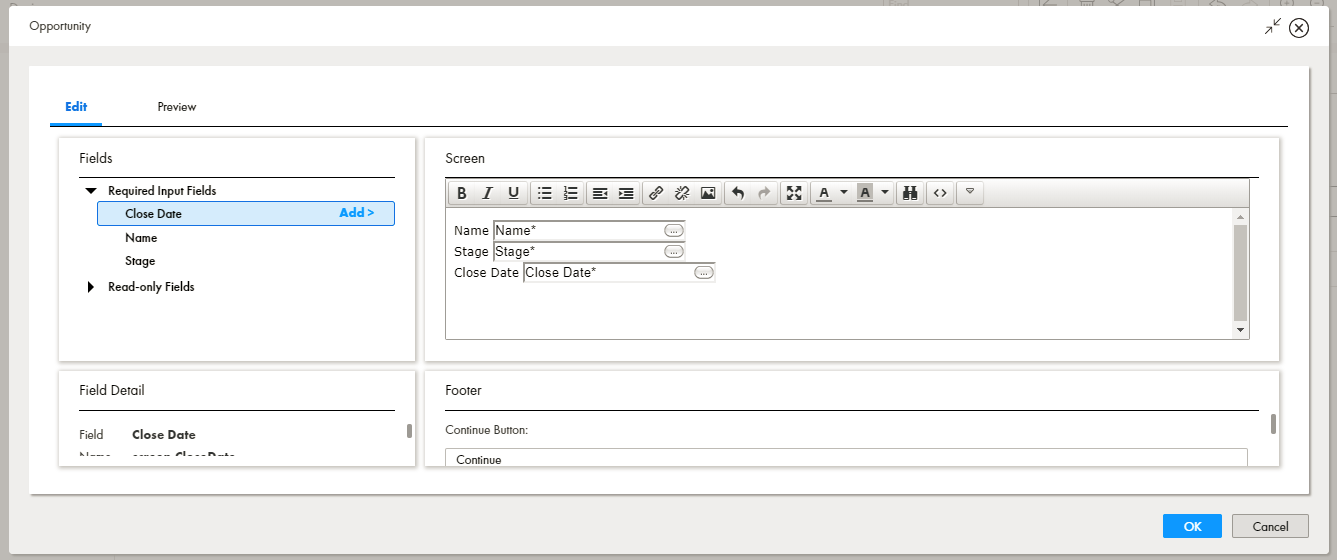
Setting Source Values: Screen
If you select Screen for the Source, the end user provides data for this field. This means that you must add a field to the step's Input Screen tab so that the guide's user can type information. In the following example, the source on the Input tab for three fields was set to Screen:
Note: The text you enter will look better if placed in tables.
Like all fields, you can click within it to display a properties dialog.