1In Data Integration, click New > Mapping, and then click Create.
2Specify the name, location, and description. Click Ok
You can use alphanumeric characters and underscores (_) in the mapping name.
3Click Source to configure the source properties.
4In the Properties panel, on the General tab, enter a name and description.
5Click the Source tab and configure source details. If necessary, configure the advanced source properties.
Source details and advanced source properties appear based on the connection type.
For more information, see Transformations.
Note: For the delete, download, and upload Box operations, you must configure a flat file source.
6To add a transformation, on the Transformation palette, click the transformation name. Or, drag the transformation onto the mapping canvas.
- aOn the General tab, you can enter a name and description for the transformation.
- bDraw a link to connect the previous transformation to the transformation.
- cTo preview fields, configure the field rules, or rename fields, click Incoming Fields.
- dConfigure additional transformation properties, as needed.
- eTo add another transformation, repeat these steps.
When you link transformations, the downstream transformation inherits the incoming fields from the previous transformation.
For a Joiner transformation, draw a master link and a detail link.
The properties that you configure depend on the type of transformation you create.
For more information, see Transformations.
7To add a Box Target transformation, on the Transformation palette, click Target.
- aOn the General tab, you can enter a name and description.
- bDraw a link to connect the previous transformation to the Target transformation.
- cClick the Target tab and configure target details. If necessary, configure the advanced target properties.
- dTo preview fields, configure the field rules, or rename fields, click Incoming Fields.
- eClick Field Mapping and map the fields that you want to write to the target.
- fTo add another Target transformation, repeat these steps.
Target details and advanced target properties appear based on the connection type.
For more information, see Transformations.
8Click Save and then click Run to run the mapping.
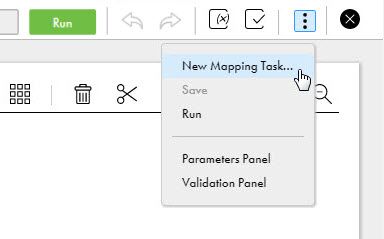
9To create a mapping task based on the mapping, while still in the Mapping Designer, click Actions and select New Mapping Task, as shown in the following image:

The Mapping Task wizard appears.
10In the Definition tab specify the task name, description, runtime environment, select task based on mapping, and import the mapping.
11Click Finish to save the mapping task.
12From the Explore page, select the task, and click Actions > Run.
In Monitor, you can monitor the status of the logs after you run the task.