You must configure a mapping that contains a Source transformation for a Db2 for z/OS source and map it to a Target transformation.
To begin creating a mapping in Data Integration, click New > Mappings > Mapping and then click Create. In the New Mapping dialog box, click Mapping > Continue.
When you define a Source transformation in a mapping, specify a name for the transformation, a Db2 for z/OS connection, the source type, and the table for the Db2 source object. You can also set some additional source properties. The PWX Bulk Metadata Adapter retrieves metadata for the source table from the Db2 database catalog.
A mapping must contain at least one Source transformation mapped to one Target transformation. Alternatively, a mapping can contain multiple Db2 for z/OS sources and multiple targets. For example, you can define multiple one-to-one mappings, map one source to multiple targets, or map multiple sources to one target. To map multiple sources to the one target, you can create multiple one-to-one mappings that map each source separately to the same target. In this case, each source must have a different primary key value.
When you define a Target transformation, specify a name for the transformation, a connection to the target and the target type. In the user's environment, the target can reside on premises or in a cloud. If you do not want to send all of the incoming fields to the target, you can define one or more exclusion field rules. As part of configuring the target, you must also map the incoming fields to the target fields. You can map fields automatically based on the field names or map them manually.
Instead of selecting specific connections and objects in the Source and Target transformations, you can define a parameter for the connection, the source or target object, or both. You then must enter a specific connection or object in the associated mapping tasks. If you want to use a parameter for the source or target connection, you must perform one of the following actions before the mapping can be successfully validated:
•Set the Source Type or Target Type field to Parameter and then enter a parameter for the source or target object in the Parameter field. On the Field Mapping tab of the Target transformation, you must set the map option to Automatic for the mapping to be validated.
•If you want to use a specific source or target object with a connection parameter, first select a specific connection, set the Source Type or Target Type field to Single Object, select a source or target object in the Object field, validate the mapping, and then enter the connection parameter.
Tip: If you want to validate the source-to-target field mappings, map the fields in the Target transformation before validating the mapping. After the mapping is confirmed as valid, enter connection parameters.
You can also completely or partially parameterize field mappings, and then define specific mappings in the mapping tasks.
Db2 for z/OS source properties in mappings
When you create a mapping, you configure a Source transformation for a Db2 for z/OS source and set some source properties for the Source transformation.
Click the Source transformation box on the mapping canvas. Then configure the source properties in the Source Properties panel below the mapping canvas.
If you have multiple Source transformations in a mapping, configure source properties for each source. If you use a specific connection instead of a connection parameter, enter the same connection for all sources.
Note: If a mapping includes source tables or columns that have special characters in their names, the associated mapping task fails because it cannot import the source metadata. Special characters include s #, $, @, %, *, !, and ~. Therefore, ensure that none of the source tables and mapped columns have names with any special character. Rename the tables and columns if necessary.
The Source Properties panel contains the following tabs on which you can enter information:
•General tab. Specify a user-defined name and optional description for the Db2 for z/OS source.
•Source tab. Configure the source properties under Details and under Advanced. The advanced properties are available only if you enter a specific connection for the source. If you enter a parameter for the source connection, the advanced properties are not displayed. However, you can define these properties in the associated mapping task after you select a specific source connection for the task.
The following table describes the Db2 for z/OS source properties under Details:
Property
Description
Connection
Required. Select a source connection of the type Db2 for zOS, or click New Connection to create one.
Alternatively, you can define a connection parameter in the mapping and enter a specific connection in each mapping task that is associated with the mapping.
If you want to use a connection parameter with a specific source object, you must first select a specific connection so that you can access the source to select the source object in the Object field. After you select the source object, define the connection parameter.
If you want to use parameters for both the connection and source object, you do not need to first select a specific connection. You can just define the parameters in either order.
To define a connection parameter, click New Parameter next to the Connection property and enter the following information:
- Enter a parameter name that begins with a letter and is up to 200 characters in length, including @, #, _, and alphanumeric characters.
- In the Type property, verify that connection is selected.
- Leave the Connection Type property blank.
After you click OK, the parameter appears in the Connection property.
Source Type
Required. Select one of the following options:
- Single Object lets you select a Db2 for z/OS source object in the Object property.
- Multiple Objects enables you to use implicit joins and advanced relationship with multiple objects.
- Parameter selects an existing parameter for the source object, or allows you to define a new parameter for the mapping. The parameter defines a specific source object in each mapping task associated with the mapping.
- Query lets you enter a custom SQL query for the source object.
Object
If you selected Single Object as the source type, you can select a Db2 for z/OS source object. Click Select. Then in the Select Source Object dialog box, under Packages, click a listed value. This value is the schema name. The right pane lists the tables in the selected schema.
The table metadata is stored in the Informatica Intelligent Cloud Services repository in the cloud.
Note: The Preview Data feature is not supported for Db2 for z/OS source and target objects.
Parameter
If you selected Parameter as the source type, you can identify a parameter to use for the source object. Select a parameter from the list. Alternatively, create a parameter by clicking New Parameter for the source object. Then define the parameter in the New Input Parameter dialog box.
Query
If you selected Query as the source type, you can enter a custom SQL query for the source. Select Define Query and enter the SQL query in the Edit Custom Query dialog box. Use SQL that is valid for the Db2 for z/OS database.
You can create custom queries to override the default SQL, to perform a complicated join of tables, to reduce the number of fields that enter the data flow, or to create columns for metadata. You can validate an SQL query when you add or enter it.
Note: The Preview Data button in the Edit Custom Query dialog box is not supported. If you select Preview Data, Data Integration issues an error.
Query Options
You can configure the source transformation to filter or sort data before the data enters the data flow. Use the source query options to filter or sort source data. For more information, see Transformations.
The following table describes the optional source properties under Advanced:
Property
Description
Pre SQL
Pre-SQL command to run before reading data from the source.
Post SQL
Post-SQL command to run after reading data from the source.
Sql Override
Configure SQL overrides and define constraints.
Select Distinct
Select this option to extract only distinct rows.
Output is deterministic
When you configure this property, the Secure Agent does not stage source data for recovery if transformations in the pipeline always produce repeatable data.
Output is repeatable
When the output is deterministic and the output is repeatable, the Secure Agent does not stage the source data for recovery.
Schema Name
Overrides the source schema name.
When you use a parameter for Schema Name, the default value will not be used.
Table Name
Overrides the source table name.
When you use a parameter for Table Name, the default value will not be used.
Tracing Level
Amount of detail that appears in the log for this transformation. You can choose terse, normal, verbose initialization, or verbose data. Default is normal.
•Fields tab. Select the fields that you want to use in the data flow. You can edit field metadata such as precision and scale if necessary.
Note: Ignore the Partitions tab. Key-range partitioning is not supported.
Adding multiple source objects
When you create a Source transformation, you can select Db2 for z/OS multiple objects as the source type and then configure a join to combine the tables. You can define a relationship condition or a query to join the tables.
1Click the Source transformation on the mapping canvas.
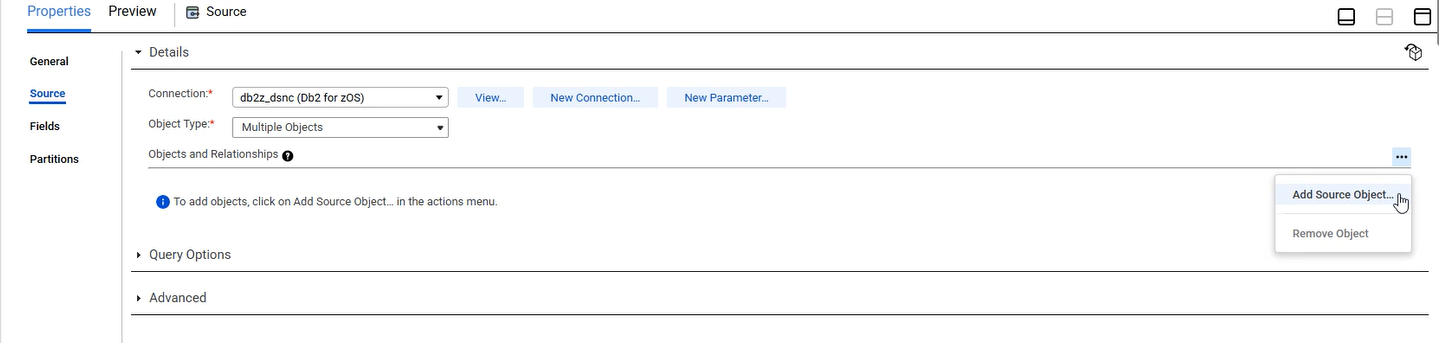
2Click the Source tab, and then select Multiple Objects in the Object Type field.
3From the Actions menu on the Objects and Relationships line, click Add Source Object.
4Select a schema package and then select a source table in the schema that you want to join to another table or create an advanced relationship for.
5Click OK.
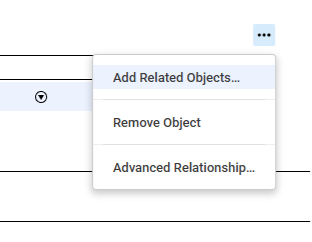
6From the Related Objects Actions Menu in the row for the added table, select Add Related Objects.
7In the Select Related Objects window, select a table from the list. Only tables that have a defined foreign key relationship with the table that was initially selected in Step 4 are listed.
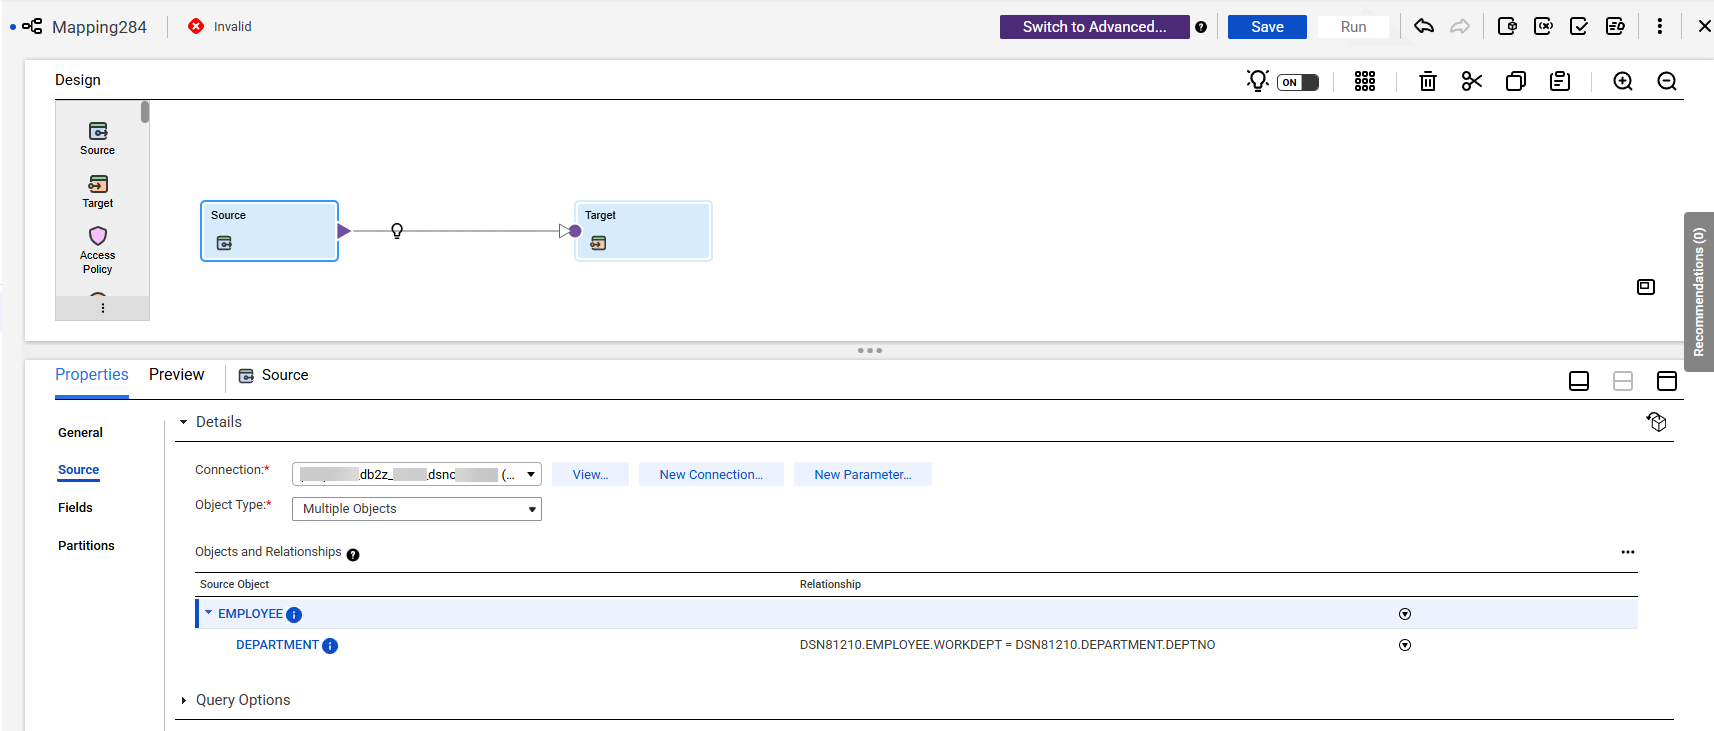
8Click OK. The Source details show the join relationship.
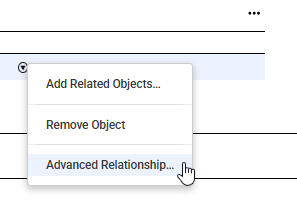
9If you have source tables for which you want to define an advanced relationship manually, for examples, tables that don't have a foreign key, select Advanced Relationship from the Related Objects Actions Menu in the row for the added object:
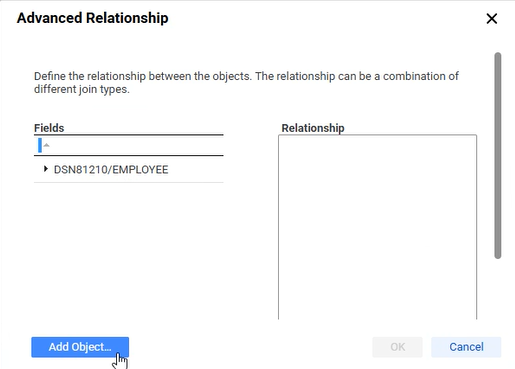
10In the Advanced Relationship window, click Add Object to add more tables.
11In the Select Source Object window, select one or more other source tables to include in the advanced relationship, and then click OK.
12In the Advanced Relationship window, select the fields in each table required to define the relationship. Then in the Relationship box, manually enter conditions between the <table>.<field> entries, or you can enter a query to define the relationship among the tables.
Note: To join two tables, you can specify a simple condition. For example, employee.department=dept.id. To join more than two tables, you must specify the complete query. For example, <schema_name>.<table_name1> LEFT OUTER JOIN <schema_name>.<table_name2> ON <schema_name>.<table_name1>.<column_name1>=<schema_name>.<table_name2>.<column_name2>
13Click OK.
The following image shows an example of a simple advanced relationship condition between two Db2 tables:
Rules and guidelines for adding multiple source objects
Consider the following rules and guidelines when you add multiple source objects:
•You cannot configure partitioning when you use the advanced relationship option.
•You must specify double quotes for the table name when you use a reserved word for the table name and the column name.
•You cannot use a self join when you add multiple source objects.
•When you use special characters in column names for an advanced relationship, the query formed is not correct and the mapping task fails.
•When you click Add Object to add more objects in the Advanced Relationship window, the table might not load or might take a long time to load. Import the object again.
•You cannot search for a schema when you add a related source object. You must scroll down and manually select the schema.
•You can use the full outer-join condition only with the =, ,, and AND operators.
•When you use the advanced relationship option and specify the join queries with the schema name override, the mapping fails. The mapping fails with the following join queries:
- inner join
- left outer-join
- right outer-join
- full outer-join
- cross join
•When you override the schema name and configure an advanced filter on a related source object, you must specify the schema name in the filter condition. Use the following syntax for the filter condition:
public.alldatatypes_src.f_smallint=1
•When you override the schema name and configure an advanced filter on a related source object, the Secure Agent applies the advanced filter only on the parent object and not on the related source object.
•When you select parent and child objects that have a primary key and foreign key relationship, and the foreign key of the related object is also a primary key in the table, the mapping task fails when you create a target.
•When you select the Multiple Objects source type, add a source object, for example, emp, and define a primary key and foreign key relationship on different columns, for example, emp.id and dept.d_id, the mapping fails with the following error:
[FATAL] Unload/Copy command failed with error: Invalid operation: column emp.d_id does not exist.
The Select Related Objects list shows the join condition for the dept related object as emp.d_id=dept.d_id, even though the emp table does not have a d_id column.
•When you select the Multiple Objects source type, ensure that the selected table names do not contain a period (.).
Targets in mappings with Db2 for z/OS sources
To configure a target in a mapping, click the Target transformation box on the mapping canvas. Then configure the target properties in the Target Properties panel below the mapping canvas.
Note: To determine which target types are supported by the Db2 for z/OS Connector, see Supported targets.
In the Target Properties panel, enter information on the following tabs:
•General tab. Specify a user-defined name and optional description for the target.
•Incoming Fields tab. Optionally review the included fields and define field exclusion rules and renaming criteria.
•Target tab. Configure the target properties under Details and under Advanced. The advanced properties are available only if you enter a specific connection for the target.
The following table describes the target properties under Details:
Property
Description
Connection
Select an existing Db2 target connection, or create a target connection that has a type of Db2.
Alternatively, you can use a connection parameter in the mapping and then enter a specific connection in each mapping task that is associated with the mapping.
If you want to use a connection parameter with a specific target object, you must first select a specific connection so that you can access the target to select the target object in the Object field. After you select the target object, define the connection parameter.
If you want to use parameters for both the connection and target object, you do not need to first select a specific connection. You can just define the parameters in either order.
To define a connection parameter, click New Parameter and enter the following information:
- Enter a parameter name that begins with a letter and is up to 200 characters in length, including @, #, _, and alphanumeric characters.
- In the Type property, verify that connection is selected.
- Leave the Connection Type property blank.
Data Driven Condition
Enables you to define expressions that flag rows for an insert, update, delete, or reject operation. Appears only when the operation type is Data Driven but is not required for this operation type.
Target Type
Select Single Object if you want to specify a target table.
Alternatively, select Parameter and then specify an input parameter for the target object in the Parameter property. When you use a parameter, you specify the target table for the parameterized object on the Targets page of each mapping task associated with the mapping.
Object
Click Select. In the Target Object dialog box, select Existing and then select an existing target table.
Parameter
Select or create a parameter for the target object. Appears only when the target type is Parameter.
Operation
Select Data Driven to properly handle insert, update, and delete rows from the source.
By default, inserts, updates, and deletes are applied as inserts, updates, and deletes, respectively.
Update Columns
Click Add to select the columns that you want to use as a logical primary key for performing update, upsert, and delete operations on the target. Appears only when the operation type is Data Driven. This field is not required if the target table already has a primary key.
The following table describes the advanced target properties that appear under Advanced:
Advanced Property
Description
Truncate target table
Select this option if you want to clear the target table each time the mapping task runs. However, if you select this option and set the Operation property to Data Driven, update operations on the target will fail.
Pre SQL
SQL statements that run on the target before the extracted data is written to a target.
Maximum length is 5000 characters.
Post SQL
SQL statements that run on the target after the extracted data is written to a target.
Maximum length is 5000 characters.
Schema Name
Overrides the target schema name.
When you use a parameter for Schema Name, the default value will not be used.
Table Name
Overrides the target table name.
When you use a parameter for Table Name, the default value will not be used.
Update Override
An override Db2 update statement to update the data in a Db2 target table. The override update statement you specify overrides the default update statements that the Secure Agent uses to update targets based on key columns. You define an override update statement to update target tables based on non-key columns. In the override statement, you must enclose all reserved words in quotation marks.
Forward Rejected Rows
Select this option to have the Target transformation pass rejected rows to a reject file that is generated in the following directory:
Note: This field is not displayed if a parameter is specified for the target connection.
•Target Fields tab. Optionally add fields, delete fields, or edit field metadata such as native data type, precision, and scale.
•Field Mapping tab. Map the incoming fields to the target fields. You can manually map an incoming field to a target field or automatically map fields based on the field names. If you entered a connection parameter, you must select Automatic as the field map option to be able to validate the mapping. Alternatively, you can completely or partially parameterize field mappings, and then define the specific field mappings in the mapping task. For more information, see Transformations > Target Transformation > Target Transformation Field Mappings in the Data Integration Help.
Lookup Transformation
You can configure a cached Lookup transformation when you use a Db2 for z/OS connection in a mapping to return data from a Db2 for z/OS source based on a specified lookup condition. However, the Db2 for z/OS Connector does not support uncached lookup.
For more information, see Cloud Data Integration Transformations.