When you configure the Amazon Bedrock catalog source, you define the settings for the metadata extraction capability and other optional capabilities.
The metadata extraction capability extracts source metadata from external source systems. You can also configure other capabilities that the catalog source includes.
You can save the catalog source configuration at any point after you enter the connection information. After you save the catalog source, you can choose to run the catalog source job. To run the job once, click Run. To run metadata extraction and other capabilities on a recurring schedule, configure schedules on the Schedule tab.
Configure metadata extraction
When you configure the Amazon Bedrock catalog source, you choose a runtime environment and enter configuration parameters for metadata extraction.
1In the Connection and Runtime area, choose a serverless runtime environment or the Secure Agent group where you want to run catalog source jobs.
Note:
Serverless runtime environment options are available if the catalog source works with a serverless runtime environment.
2Choose to retain, delete, or deprecate objects that are deleted from the source system in the catalog with the Metadata Change Option.
- Retain. Retains objects that are deleted from the source system in the catalog. If you update or add a filter, the catalog retains objects extracted from the previous job and extracts additional objects that match the current filter. Objects deleted from the source system are not deleted from the catalog. Enrichments added on deleted objects and relationships are retained.
- Delete. Deletes metadata from the catalog based on objects deleted from the source system and changes you make to the filter. Enrichments added on deleted objects and relationships are also permanently lost. Objects renamed in the source system are removed and recreated in the catalog.
- Deprecate. When objects are deleted from the source system, the catalog changes the lifecycle of the imported objects to Obsolete. The lifecycle of objects also changes to Obsolete when you add exclusion filters or reduce the scope so that objects extracted in earlier jobs are no longer included. For example, the first job includes the sales schema. The second job also includes the sales schema, but excludes the sales.transactions table. In this case, the second job marks the sales.transactions object as Obsolete, even though the first job includes it. This does not impact enrichments applied to deprecated objects and relationships. Objects renamed in the source system are removed and recreated in the catalog. When you run the catalog source job again for other capabilities such as data classification, relationship discovery, or glossary association, the job doesn't consider obsolete objects. Obsolete objects remain in the catalog until they are purged when you run a Purge Obsolete Objects job on the Explore page.
Note:
You can also change the configured metadata change option when you run a catalog source.
3In the Filters area, define one or more filter conditions to apply for metadata extraction.
To define filters, you can either select an object type and enter the path to the object as the filter value, or select an object from a list of objects available in the source system.
aSelect Yes to view filter options.
bFrom the Include/Exclude list, choose to include or exclude metadata based on the filter parameters.
cPerform one of the following steps:
▪ From the Object type list, select an object type depending on the object that you want to extract metadata from. Enter the object name as the filter value.
▪ In the filter value field, click the Search button and select an object from a list of objects available in the source system.
The Object type field updates based on the selected object.
If you select an object type and then click the Search button, the list of objects includes all object types, but you can only select objects that match the selected object type.
You can edit the filter value after you select an object from the list.
Note:
You can only search for object types that work with the search functionality. If you don't see the Search button for the selected object, enter the object path as the filter value.
Note:
If the object metadata is available in Data Governance and Catalog, a check mark appears next to the object.
Note:
To select an object, you need to have permissions on the connection to the source system.
dOptionally, to define an additional filter with an OR condition, click the Add icon.
Each pattern can contain wildcards. Use a question mark to represent a single character. For example, A? matches A1, Ab. Use an asterisk to represent multiple characters. For example, A* matches A, Ab, ABC. Filters are case-sensitive.
When you select Agent or Flow as the object type to extract metadata, metadata of any knowledge bases or agents that they use is also included.
Even if you specify a filter to exclude a specific knowledge base or agent, its metadata is still extracted if another Agent or Flow uses it.
Examples:
- To include or exclude the 'KB2024' knowledge base, select Knowledge Base as the object type and enter KB2024 in the value field.
- To include or exclude all agents with names that start with 'Agent1' followed by a single character, select Agent as the object type and enter Agent1 in the value field.
- To include or exclude all flows with names that start with 'SalesFlow*', select Flow as the object type and enter SalesFlow in the value field.
4In the Configuration Parameters area, enter configuration parameters. Click Show Advanced to view all configuration parameters.
The following table describes the property that you enter for Operational Metadata Config options:
Parameter
Description
Extract Tags
Specify whether you want to include tags assigned to the objects that you extract.
Default is Yes.
The following table describes the property that you enter for additional settings:
Note:
The Additional Settings section appears when you click Show Advanced.
Property
Description
Expert Parameters
Enter additional configuration options to be passed at runtime. Required if you need to troubleshoot the catalog source job.
Caution:
Use expert parameters when it is recommended by Informatica Global Customer Support.
5Configure additional capabilities for the catalog source by clicking on the tabs.
Configure automation
Enable the lineage discovery and autonomous enrichment capabilities to build complete lineage using CLAIRE and to receive enrichments propagated from catalog sources connected through lineage.
Enable Lineage-based Propagation on the Autonomous Enrichment tab of the Configure page before you configure this catalog source to receive enrichments. For more information, see Administration.
With the lineage-based propagation settings on this tab, you configure how this catalog source receives enrichments propagated from connected catalog sources. Enrichments propagate only to assets that don't already have enrichments.
1Click the Automation tab.
2In the Lineage Discovery section, select Enable Lineage Discovery.
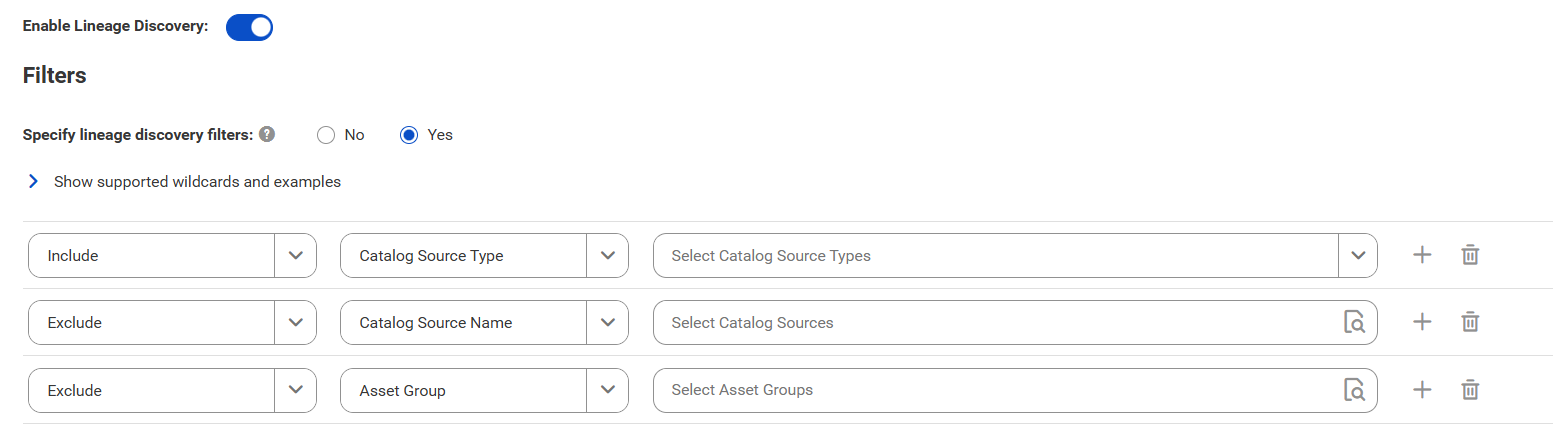
3In the Filters area, define one or more filter conditions to apply for lineage discovery.
To define filters, you can choose to select catalog source types, asset groups, or enter a catalog source name or search from a list of catalog sources.
aSelect Yes to view filter options.
bFrom the Include/Exclude list, choose to include or exclude catalog sources for lineage discovery based on the filter parameters.
cFrom the filter type list, select catalog source type, catalog source name, or asset group.
dIn the filter value field, select the required catalog source types, or click the Search button and select catalog sources or asset groups.
Filters can contain the asterisk wildcard to represent multiple characters or empty text.
The filter options appear.
Examples:
▪ To include or exclude all Oracle catalog sources, select Catalog Source Type as the filter type and select Oracle in the filter value field.
▪ To include or exclude the 'Oracle_Retail' catalog source, select Catalog Source Name as the filter type and search for the catalog source or enter Oracle_Retail in the filter value field.
▪ To include or exclude all catalog sources with names that start with 'Oracle', select Catalog Source Name as the filter type and search for the catalog source or enter Oracle* in the filter value field.
▪ To include or exclude all catalog sources with names that end with 'Retail', select Catalog Source Name as the filter type and search for the catalog source or enter *Retail in the filter value field.
▪ To include or exclude all catalog sources with names that contain 'Ret', select Catalog Source Name as the filter type and search for the catalog source or enter *Ret* in the filter value field.
▪ To include or exclude all catalog sources that are part of the 'Financial Group' asset group, select Asset Group as the filter type and search Financial Group in the filter value field.
Note:
You can't add more than one include or exclude filter for the same filter type.
eOptionally, to define an additional filter with an AND condition, click the Add icon.
4In the Autonomous Enrichment section, select Enable Lineage-based Propagation.
The lineage-based propagation settings appear.
5Select the enrichment types to receive from connected catalog sources.
You can select Classification, Description, Business Name, and Glossary Term.
6Choose how to apply received enrichments.
- Select Auto-accepted to apply received enrichments automatically.
- Select Recommended to list them as suggestions that you can curate in Data Governance and Catalog.
7Choose whether to receive enrichments only from certified assets.
Assets are certified in Data Governance and Catalog. This option is selected by default. If you clear it, this catalog source also receives enrichments from assets that are not certified, which might be less reliable.
8Choose where this catalog source receives enrichments from.
- Select Catalog Source to receive enrichments from a specific catalog source.
- Select Nearest Neighbor to receive enrichments from the closest connected catalog source based on lineage.
9If you select Catalog Source, select a catalog source from the list.
Ensure that the catalog source you select is within 15 lineage hops. Enrichments don't propagate from a catalog source beyond that distance.
10If you select Nearest Neighbor, configure the lineage settings:
aSet Lineage Direction to search upstream, downstream, or in both directions.
Upstream catalog sources feed data into this catalog source. Downstream catalog sources receive data from this catalog source. Select both directions to search upstream and downstream at the same time.
bSet Number of Hops to define how far along lineage to search.
The search stops at the first connected catalog source that has enrichments, up to a maximum of 15 hops.
11Click Save.
When you save, the catalog source begins receiving enrichments created from that point onward. Saving doesn't retrieve enrichments created prior to this date and time. To receive such enrichments, run the catalog source job manually and include the Autonomous Enrichment capability.