Use Metadata Command Center to configure a catalog source for SFTP File System and run the catalog source job.
When you configure a catalog source, you define the source system that you want to extract metadata from. Configure filters to include or exclude source system metadata before you run the job. Optionally, configure other capabilities, such as data profiling and quality, data classification, relationship discovery, and glossary association.
To provide stakeholders access to technical assets, you can assign access through stakeholder roles. You can also associate technical assets extracted from the catalog source to asset groups. If your catalog source references other source systems, you can create a connection assignment to the endpoint catalog source to view complete lineage.
Step 1. Register a catalog source
When you register a catalog source, provide general information and connection values.
Verify that Mass Ingestion is running on the Secure Agent before you test the connection.
1Log in to Informatica Intelligent Cloud Services.
The My Services page appears.
2Click Metadata Command Center.
The following image shows the Metadata Command Center box on the My Services page:
The Metadata Command Center home page appears.
3Click New.
4Select Catalog Source from the list of asset types.
5Select SFTP File System from the list of source systems.
6Click Create.
The New Catalog Source page opens.
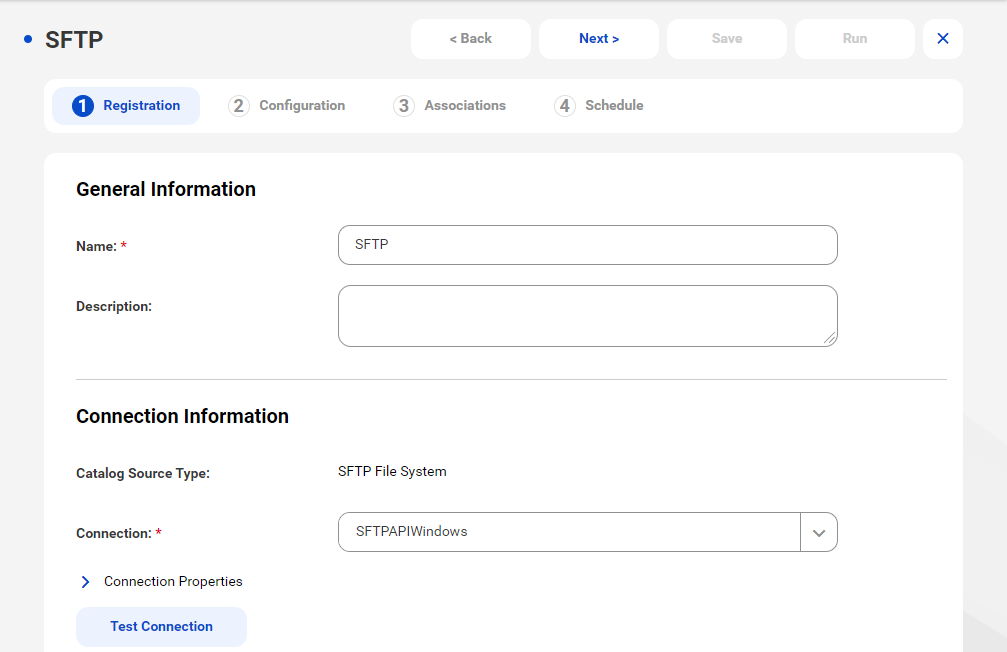
The following image shows the SFTP File System catalog source:
7In the General Information section, enter a name and an optional description for the catalog source.
8In the Connection Information area, select the connection that you created in Administrator.
9Click Connection Properties to expand and view the connection properties for the selected connection.
10Click Test Connection to test your connection to the source system.
11Click Next.
The Configuration page appears.
Step 2. Configure capabilities
When you configure the SFTP File System catalog source, you define the settings for the metadata extraction capability and other optional capabilities.
The metadata extraction capability extracts source metadata from external source systems. You can also configure other capabilities that the catalog source includes.
You can save the catalog source configuration at any point after you enter the connection information. After you save the catalog source, you can choose to run the catalog source job. To run the job once, click Run. To run metadata extraction and other capabilities on a recurring schedule, configure schedules on the Schedule tab.
Configure metadata extraction
When you configure the SFTP File System catalog source, you choose a runtime environment, define filters, and enter configuration parameters for metadata extraction.
1In the Connection and Runtime area, choose a serverless runtime environment or the Secure Agent group where you want to run catalog source jobs.
Note: Serverless runtime environment options are available if the catalog source works with a serverless runtime environment.
2Choose to retain or delete objects that are deleted from the source system in the catalog using the Metadata Change Option.
- Retain. Retains objects that are deleted from the source system in the catalog. If you update or add a filter, the catalog retains objects extracted from the previous job and extracts additional objects that match the current filter. Objects deleted from the source system are not deleted from the catalog. Enrichments added on deleted objects and relationships are retained.
- Delete. Deletes metadata from the catalog based on objects deleted from the source system and changes you make to the filter. Enrichments added on deleted objects and relationships are also permanently lost. Objects renamed in the source system are removed and recreated in the catalog.
Note: You can also change the configured metadata change option when you run a catalog source.
3In the Filters area, define one or more filter conditions to apply for metadata extraction:
aSelect Yes to view filter options.
bFrom the Include or exclude metadata list, choose to include or exclude metadata based on the filter parameters.
cFrom the Object type list, select File or Folder.
dEnter the file path or the folder path as the filter value.
Filter values can contain an asterisk as a wildcards to represent multiple characters. If a filter value contains spaces before or after the string value, enclose the value in double quotes.
Note: Wildcards in file paths are not supported.
To enter a path hierarchy, use a separator that the source system allows, such as a period or a slash.
The following image shows the filter condition options:
eOptionally, to define an additional filter with an OR condition, click the Add icon.
The following image shows the filter conditions for an SFTP File System catalog source that includes metadata from folder1 within folder2 in addition to files with names ending with file1:
4In the Configuration Parameters area, enter the configuration parameters.
The following table describes the properties that you can enter in the Catalog Source Configuration Options section:
Property
Description
Extract Group Elements from Hierarchical Files
Select one of the following options to extract group or leaf elements from hierarchical files:
- Yes. Extracts group elements from hierarchical files with the complete hierarchy of hierarchical fields. You can view the hierarchy of hierarchical files in the Hierarchy tab of assets in Data Governance and Catalog.
- No. Extracts only leaf elements from hierarchical files without the complete hierarchy of hierarchical fields.
You can extract group elements from hierarchical files for the following file types:
- AVRO. Extracts and groups hierarchical files and hierarchical fields.
- Parquet. Extracts and groups hierarchical files and hierarchical fields.
- JSON. Extracts and groups hierarchical files and hierarchical fields.
- XML. Extracts and groups elements and attributes. For XML file types, a maximum depth of 1000 elements is permitted within a single element in the hierarchy.
- XSD. Extracts and groups elements and attributes.
If you modify the Extract Group Elements from Hierarchical Files field and run the catalog source again, the asset page doesn't display the hierarchical elements in the correct hierarchy groups. If you modify the property value, purge the catalog source before you run it again.
Enable Extension-Based File Type Detection
Select one of the following options to detect file types by file extensions or by parsing the file contents:
- Yes. Detects file types by file extensions.
- No. Parses the file contents to detect file types.
Note: You can detect file types by file extensions for the following file types:
- CSV
- TSV
- TXT
- XML
Use First Row as Header of Delimited Files
Select one of the following options to use the first row as the header or detect headers automatically for delimited files:
- Yes.
Detects column headers based on the following rules:
- Duplicate headers get suffixed with ‘#’ followed by a number, for example, ABC#1, ABC#2. The detection is not case-sensitive.
- Empty column header values appear as UnknownColumn<position>, for example UnknownColumn2.
- The header row in the file is detected even if it has a different number of columns than the data rows.
- No. Detects headers automatically for delimited files.
Headers of Delimited Files
Specify values to determine headers of delimited files. Separate multiple values by commas. If any value from the list is found in the first row of the delimited file, then the first row is used as the header.
Note: This parameter appears only if you choose No for the Use First Row as Header of Delimited Files parameter.
Treat Files Without Extension As
The default file extension to identify files without an extension.
Select one of the following options:
- Parquet
- Avro
- JSON
Enter File Delimiter
Specify the file delimiter if the file from which you extract metadata uses a delimiter other than the following list of delimiters:
- Comma (,)
- Horizontal tab ( \t)
- Semicolon (;)
- Colon (:)
- Pipe symbol (|)
Enclose the delimiter in single quotes. For example, enter '$'. Use a comma to separate multiple delimiters.
Files to be excluded during partition discovery
Specify the regular expression of the files that you want to exclude during partition discovery.
Enclose each regular expression in double quotes. For example, enter ".*json","Customer.csv","Parquet.*". Use a comma to separate multiple regular expressions.
The following table describes the properties that you can enter in the Partitioned File Configuration section:
Property
Description
Custom Partition Detection Configuration File
The configuration file in JSON format to detect custom partitions in the source system. The configuration file defines the pattern of the non-Hive style custom partitions.
To detect the epoch time format, define it in JSON format as: {"CustomPartitionPatterns": ["@"]}
Partitioned Pruning Configuration Options
The configuration file in JSON format for partition pruning that contains additional information to identify partitions and determine the relevant schema in the source system.
Partition Detection
Specify if you want to enable partition detection.
Partition Pruning
Applicable if you enable partition detection. Specify if you want to enable partition pruning.
Default is Yes.
5Configure additional capabilities for the catalog source by clicking on the tabs.
Configure data classification
Enable the data classification capability to identify and organize data into relevant categories based on the functional meaning of the data.
1Click the Data Classification tab.
2Select Enable Data Classification.
3Choose one or both of the following options:
- Generated Data Classifications. CLAIRE automatically generates data classifications for the data elements.
- Data Classification Rules. Choose from predefined or custom data classifications.
1Click Add Data Classification. The following image shows the Select Data Classifications dialog box:
2Select the data classifications that you want to use.
3Click OK.
Configure glossary association
Enable the glossary association capability to associate glossary terms with technical assets, or to get recommendations for glossary terms that you can manually associate with technical assets in Data Governance and Catalog.
Metadata Command Center considers all published business terms in the glossary while making recommendations to associate your technical assets.
1Click the Glossary Association tab.
2Select Enable Glossary Association.
3Select Enable auto-acceptance to automatically accept glossary association recommendations.
4Specify the Confidence Score Threshold for Auto-Acceptance to set a threshold limit based on which the glossary association capability automatically accepts the recommended glossary terms.
Note: Specify a percentage from 80 to 100. If the score is higher than the specified limit, the glossary association capability automatically assigns a matching glossary term to the data element.
5Select Enable Below-threshold Recommendations to receive glossary association recommendations below the auto-acceptance threshold. If you enable auto-acceptance, you can enable below-threshold recommendations to receive glossary recommendations below the auto-acceptance threshold.
6Specify the Confidence Score Threshold for Recommendations to set a threshold based on which the glossary association capability makes recommendations
If you enable auto-acceptance, specify a percentage from 80 to the selected auto-acceptance threshold. You can accept or reject the recommended glossary terms that fall within this range in Data Governance and Catalog.
If you disable auto-acceptance, specify a percentage from 80 to 100 inclusive.
7Choose to automatically assign business names and descriptions to technical assets. You can then choose to retain existing assignments and only assign business names and descriptions to assets that don't have assignments, or allow overwrite of existing assignments.
By default, existing assignments are retained.
8Optional. Choose to ignore specific parts of data elements when making recommendations. Select Yes and enter prefix and suffix keyword values as needed.
Click Select to enter a keyword. You can enter multiple unique prefix and suffix keywords. Keyword values are case insensitive.
9Optional. Choose specific top-level business glossary assets to associate with technical assets. Selecting a top-level asset selects its child assets as well. Select Top-level Glossary Assets and specify the assets on the Select Assets page.
10Optional. Choose to use abbreviations and synonym definitions from lookup tables for accurate glossary association. Select Yes to enable, and then click Select to upload a lookup table.
11Click Next.
The Associations page appears.
Step 3. Associate stakeholders and asset groups
Associate users or user groups within a stakeholder role as stakeholders for technical assets in Data Governance and Catalog. Also, you can choose to assign technical assets extracted from the catalog source to asset groups. You can then use access policies to control permissions on assets that are assigned to asset groups.
Verify that the administrator assigned users and user groups to the stakeholder role that you want to associate with technical assets.
1To associate users or user groups as stakeholders with technical assets extracted from the catalog source, perform the following steps:
aOn the Associations page, click Stakeholders.
bSelect Assign Stakeholders.
c Select a stakeholder role.
dClick Select to add users and user groups from the stakeholder role as stakeholders for the technical assets.
The Add Users & User Groups dialog box displays a list of users and user groups assigned to the selected stakeholder role.
eSelect one or more users or user groups to assign as stakeholders for the technical assets, and click OK.
Only the selected users and user groups belonging to the specified stakeholder role are granted the permissions to technical assets.
fTo assign users or user groups from another stakeholder role, click Add and then repeat the steps.
2To assign asset groups to technical assets extracted from the catalog source, perform the following steps:
aOn the Associations page, click Asset Groups.
bSelect Assign Asset Groups.
cClick Select.
The Select Asset Groups dialog box displays the list of asset groups.
If you enabled an access policy that includes an asset group, you can only view assets that belong to that asset group.
3Select the asset groups to which you want to assign technical assets extracted from the catalog source, and click OK.
4Choose to save and run the job or to schedule a recurring job.
- To save and run the job, click Save and then Run.
- To schedule a recurring job, click Next to open the Schedule page.
Step 4. Run or schedule the job
Choose to run a catalog source job manually, or configure it to run on schedule.
Note: You can't run multiple jobs simultaneously.
You can choose to perform a full or an incremental metadata extraction. A full metadata extraction extracts all objects from the source to the catalog. An incremental metadata extraction extracts only the changed and new objects since the last successful catalog source job run. Incremental metadata extraction doesn’t remove deleted objects from the catalog and doesn’t extract metadata of code-based objects if applicable.
When you run an incremental metadata extraction job with a filter to include metadata from objects, the job extracts only the objects that have the latest timestamp since the last successful job.
Note: The incremental extraction option appears if it is available for the catalog source.
Run the job manually
Click Save to save the catalog source and click Run. On the Run Catalog Source Job window, click Run to run the job.
Note: You can choose incremental metadata extraction for subsequent runs only after one full metadata extraction job completes successfully.
Run the job on a schedule
You can choose to run metadata extraction and other capabilities on a recurring schedule. You can't choose incremental metadata extraction and full metadata extraction in the same schedule. To create a schedule for incremental metadata extraction, you must have completed at least one full metadata extraction job successfully. If not, first create a schedule for a full metadata extraction.
If an incremental metadata extraction is scheduled to run when the last run details aren't available, the job first performs a full metadata extraction, followed by incremental metadata extraction on subsequent runs.
For example, this can happen in the following scenarios:
•You create schedules for both incremental metadata extraction and full metadata extraction, but schedule the incremental extraction to run before the first full metadata extraction job.
•You create schedules for both incremental metadata extraction and full metadata extraction, but delete the full metadata extraction schedule before its first run.
1On the Schedule tab, select Run on Schedule.
The Schedule configuration page opens.
2Click the checkbox corresponding to each capability that you want to include in the schedule.
3Enter the start date, time zone, and the interval at which you want to run the job.
4You can manage additional schedules using the following options:
- To create a new schedule, click the Add button.
- To delete a schedule, click the Delete button.
- To enable or disable a schedule, click the Enable Schedule toggle button.
Note: You can create a maximum of one schedule per capability that you enable. If you purged a catalog source or did not run the metadata extraction job, the catalog source job runs metadata extraction before running other scheduled capabilities.
5Click Save to save the schedule.
Monitor job status
After the job runs, you can monitor the status of the job on the Overview page of the job.
When you run the catalog source job, if the catalog source references another source system, a reference catalog source and connection get created that point to the reference source system. To view the complete lineage for your catalog source, you can perform connection assignment from the reference catalog source connection to the objects in the reference source system. A reference source system might be a cloud service, such as Informatica Intelligent Cloud Services. You must first create and run an endpoint catalog source that connects to the reference source system.
Before you assign a connection, ensure that you have created and run an endpoint catalog source for each reference source system.
Note: If the source schema contains case-sensitive tables or if the reference objects contain multiple objects with the same name in different cases, perform case-sensitive connection assignment to get correct lineage.
If you enabled the lineage discovery capability for your catalog source, you can either curate the CLAIRE recommended endpoint objects on the Related Catalog Sources tab or assign connections manually.
For more information about related catalog sources and lineage discovery, see Lineage discovery.
1On the Configure page, select the Lineage tab, and then select the Lineage Discovery tab. On the Catalog Sources panel, select the required catalog source and click the Assign Connections tab.
The Assign Connections tab displays a list of assigned and unassigned connections along with details for each connection. Use filters to view the connections based on the connection names. Click the Add Filter menu to add filters.
2Select the connection to the reference source system and click Assign.
The connection name appears prefixed to the reference catalog source name on the Hierarchy tab of your catalog source in Data Governance and Catalog.
The Assign Connection dialog box appears with a list of recommended objects from the endpoint catalog sources. Click All to view all endpoint catalog source objects.
3In the Assign Connection dialog box, select one or more objects from the endpoint catalog sources and click Assign.
You can filter the list in the Assign Connection dialog box by name, type, or endpoint.
You can connect to the following referenced source systems:
- Informatica Intelligent Cloud Services
- IBM InfoSphere DataStage
When you click Assign, Metadata Command Center creates links between matching objects in the connected catalog sources, and it calculates the percentage of matched and unmatched objects. The higher the percentage of matched objects, the more accurate the lineage that you view in Data Governance and Catalog.