You can configure Access Control Service and Microsoft Entra ID authentication types to access Microsoft SharePoint Online.
Before you configure the connection properties, ensure that you perform the prerequisite steps based on the type of authentication that you select.
Access Control Service
In Microsoft SharePoint Online, you can register applications in Access Control Service for app-only access, and the administrator can restrict site access through the SharePoint admin center.
Generate the Client ID and Client Secret
The client ID and client secret are required to generate a valid access token.
Perform the following steps to generate the client ID and client secret:
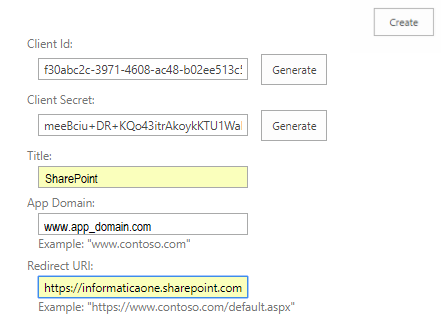
1Log in to the Microsoft Sharepoint Online account.
The value of the client ID is displayed in the Client Id field. The following image shows the App Information page where you can generate the values of the client ID and client secret:
4Click Generate next to the Client Secret field.
The value of the client secret is displayed in the Client Secret field.
5Enter an appropriate title for the App in the Title field.
6Enter an app domain name in the App Domain field.
For example, www.google.com
7Enter a URL in the Redirect URL field.
For example, https://localhost/. You must enter the same redirect URL in the connection property.
8Click Create.
The page redirects to the Microsoft Sharepoint Online page and the following message appears:
The app identifier has been successfully created.
The values of the client Id, client secret, title, and redirect URL are displayed.
Generate the Bearer Realm
A bearer realm is a unique ID provided for each user. You must generate the bearer realm to obtain the authorization code.
Perform the following steps to generate the bearer realm:
1Open the Google PostMan application.
2Enter the following site or subsite URL in the Google PostMan application:
For example, https://icloudconnectivitydev.sharepoint.com/_layouts/15/oauthauthorize.aspx?client_id=ecea5b1b-80e4-4f3e-a269-48b85c1797a8& scope=AllSites.Manage&response_type=code&redirect_uri=https%3A%2F%2Flocalhost%2F
For example, //informaticaone.sharepoint.com/sites/TEST/_layouts/15/oauthauthorize.aspx?client_id=ecea5b1b-80e4-4f3e-a269-48b85c1797a8& scope=AllSites.Manage&response_type=code&redirect_uri=https%3A%2F%2Flocalhost%2F
2Click Trust it to grant the application read access to the current site after the page redirects to the redirect URL page that you specify in the connection property.
The redirect URL page includes the authorization code as a query string in the following format:
https://<redirect_url>/?code=<authcode>
The following image shows the authorization code as a query string in the URI:
Note:
The authorization code generated is valid only for five minutes.
Generate the Refresh Token
A refresh token is required to perform the POST and GET methods in the Google PostMan application. After you generate a refresh token, it is valid for six months.
Perform the following steps to generate the refresh token:
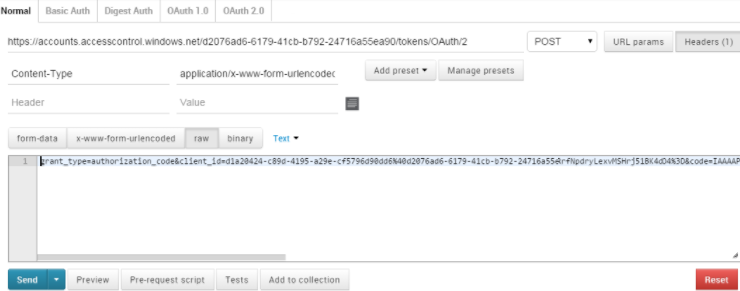
1Enter the following URL in the Google PostMan application:https://accounts.accesscontrol.windows.net/<bearer_realm>/tokens/OAuth/2
The following image shows the Normal tab in the Google PostMan application where you can configure the properties to generate the refresh token:
2Select the POST method.
3On the Header tab, enter Content-Type in the Key Name field and application/x-www-form-urlencoded in the Value field.
4On the Body tab, enter the xml request in the following format:
grant_type=authorization_code &client_id=<client_id>@<bearer_realm> &client_secret=<client_secret> &code=<auth_code> &redirect_uri=<redirect_url> &resource=< audience principal ID >/<site_host>@<bearer_realm>
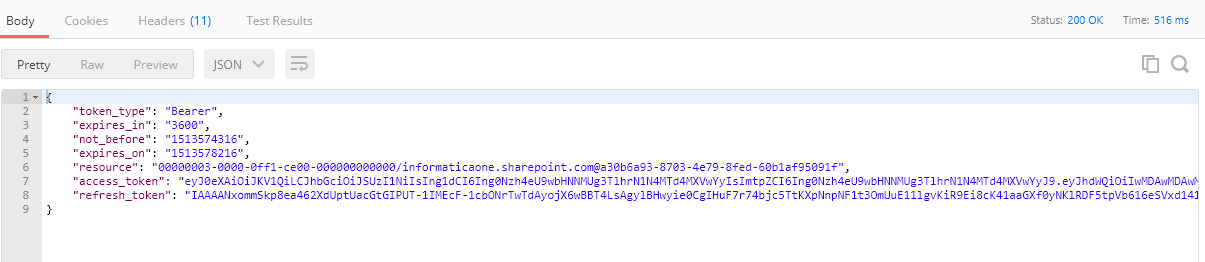
5Click Send.
The refresh token is generated in the Response tab. The following image shows the Response tab where the refresh token is generated:
Microsoft Entra ID
You can use Microsoft Entra ID to securely access and manage Microsoft SharePoint Online data.
Register the Azure application with Azure Active Directory
To establish a connection with Microsoft SharePoint Online, you need to provide the Microsoft SharePoint Online client ID and client secret in the connection properties.
You can get the client ID and client secret by registering your application in Azure Active Directory (AAD) through the Microsoft Identity platform.
1Log in to portal.azure.com using your Microsoft SharePoint Online credentials.
2Go to App Registrations in the Azure Services section.
3Click New Registration.
4Specify a display name for your application and supported account type, enter the redirect URl and then click Register.
Ensure that you select either the Single tenant or Multitenant account type. You can't use the personal Microsoft account type.
A client ID is generated. Ensure that you copy the client ID and keep it handy to use when you generate an authorization code and configure a Microsoft SharePoint connection.
5Click Add a Certificate or Secret.
6Click New client secret, and then add the description and the expiry time.
A client secret value is generated. Ensure that you copy the client secret from the Value column and keep it handy to use when you generate an authorization code and configure a Microsoft SharePoint connection.
7Now, click API permissions in the left pane.
8Click Add a permission.
9Click SharePoint, and then click Delegated permission on the Request API permissions page.
10Select the permissions that the client application must have on behalf of the signed-in user.
The following list outlines the permissions and the levels of access each permission provides:
- AllSites.FullControl. Full Control access.
- AllSites.Manage. Read and write access.
- AllSites.Read. Read access.
- AllSites.Write. Write access.
Consider selecting the AllSites.Manage permission to ensure appropriate access to Microsoft SharePoint Online.
11Click Add Permissions.
Generate the authorization code
To generate an authorization code, select the GET method with the necessary query parameters, and retrieve the code from the redirect URL after you authenticate to the SharePoint Online application.
1Open the PostMan application.
2In Postman, enter one of the following URLs based on your account type:
- For a single tenant account, enter the following URL: https://login.microsoftonline.com/<Single_Tenant_Id_value>/oauth2/v2.0/authorize
- For a multi-tenant account, enter the following URL: https://login.microsoftonline.com/organizations/oauth2/v2.0/authorize
Replace <Single_Tenant_Id_value> with the tenant ID found in the overview section of your registered application if you are working with a single tenant account. For multi-tenant accounts, use the organizations endpoint.
3Select the GET method.
4On the Params tab, enter the name and value.
To authenticate and verify access permissions, enter the following query parameters:
The scope query contains delegated permissions for your Azure application. If you selected AllSites.Manage as the delegated permission when you registered the Azure application with Azure Active Directory, specify the permission in the scope query parameter as shown in the following example:
The redirect URL page includes the authorization code as a query string in the following format:
https://<redirect_url>/?code=<authcode>
Ensure that you copy the authorization code and keep it handy to use when you generate a refresh token.
Generate the refresh token
1In the PostMan application, enter one of the following URLs based on your account type:
- For a single tenant account, enter the following URL: https://login.microsoftonline.com/<Single_Tenant_Id_value>/oauth2/v2.0/token
- For a multi-tenant account, enter the following URL: https://login.microsoftonline.com/organizations/oauth2/v2.0/token
Replace <Single_Tenant_Id_value> with the tenant ID found in the overview section of your registered application if you are working with a single tenant account. For multi-tenant accounts, use the organizations endpoint.
2Select the POST method.
3On the Header tab, enter Content-Type in the Key Name field and application/x-www-form-urlencoded in the Value field.
4On the Body tab, enter the XML request in the following format: