To register a client directly with one of Informatica’s internal authorization servers, add an OAuth client. Adding an OAuth client creates the client and registers it with the selected Informatica OAuth server.
To use direct client registration, your organization must have access to AI Agent Engineering.
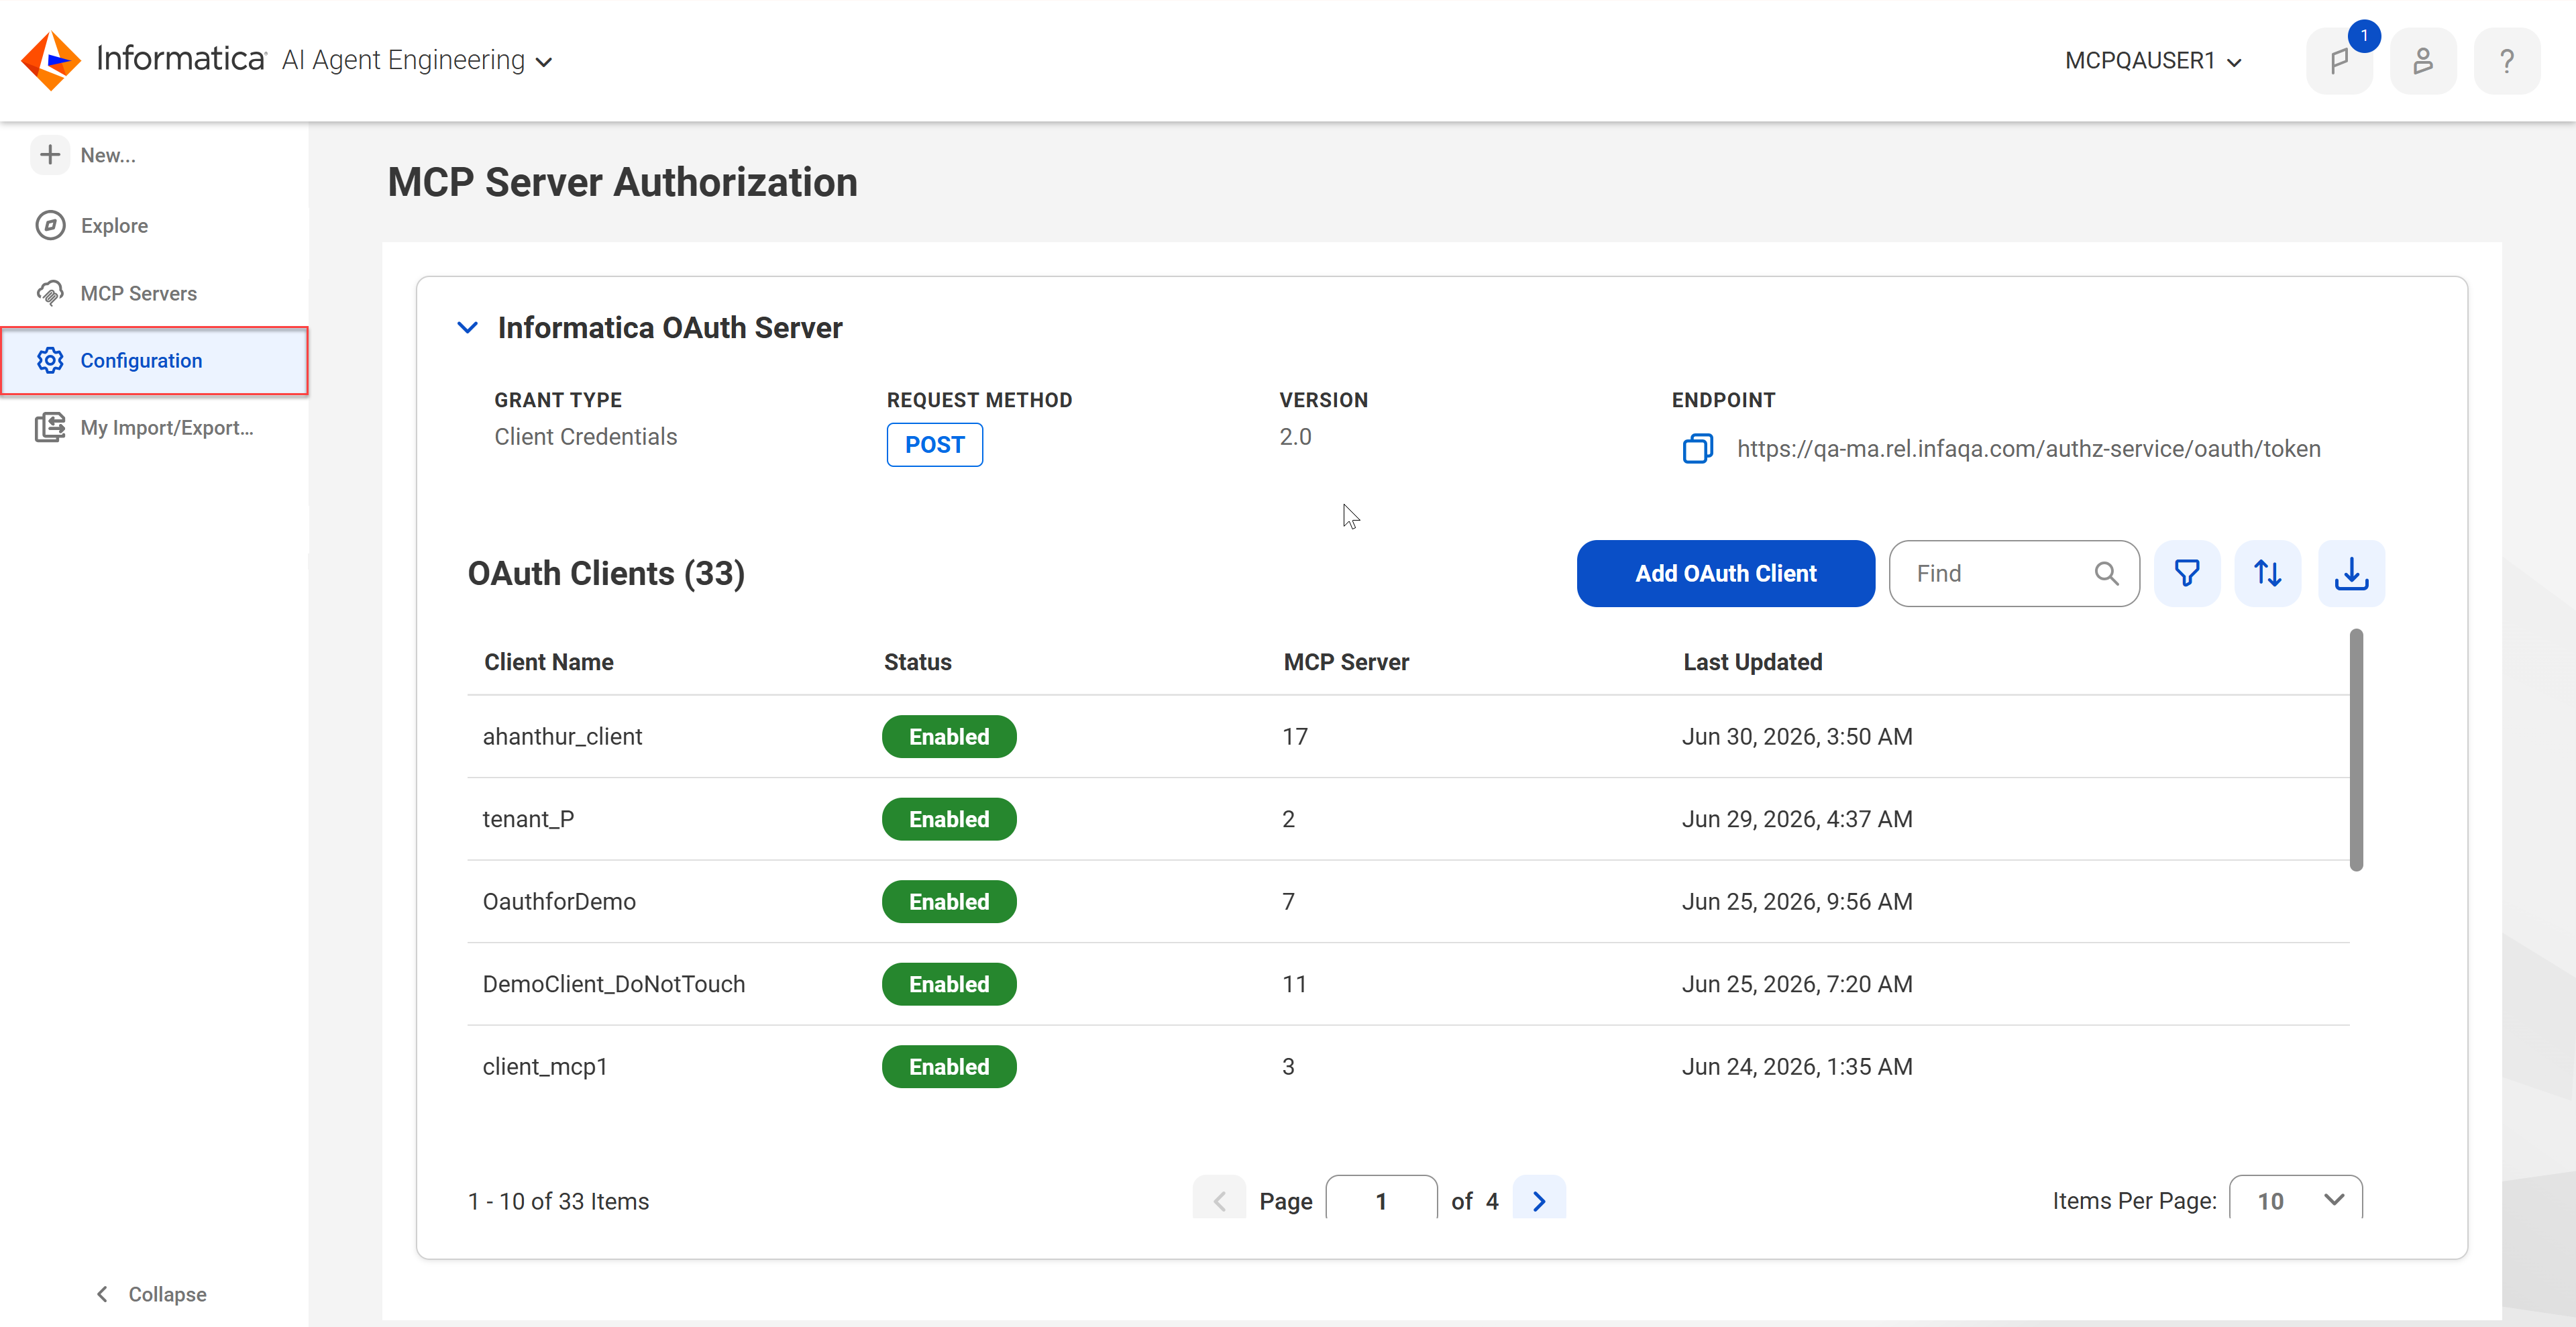
You can view information about the Informatica OAuth servers and add OAuth clients on the MCP Server Authorization page. You can access this page through the Configuration option in the left navigation menu.
The following image shows the MCP Server Authorization page:
Informatica OAuth servers
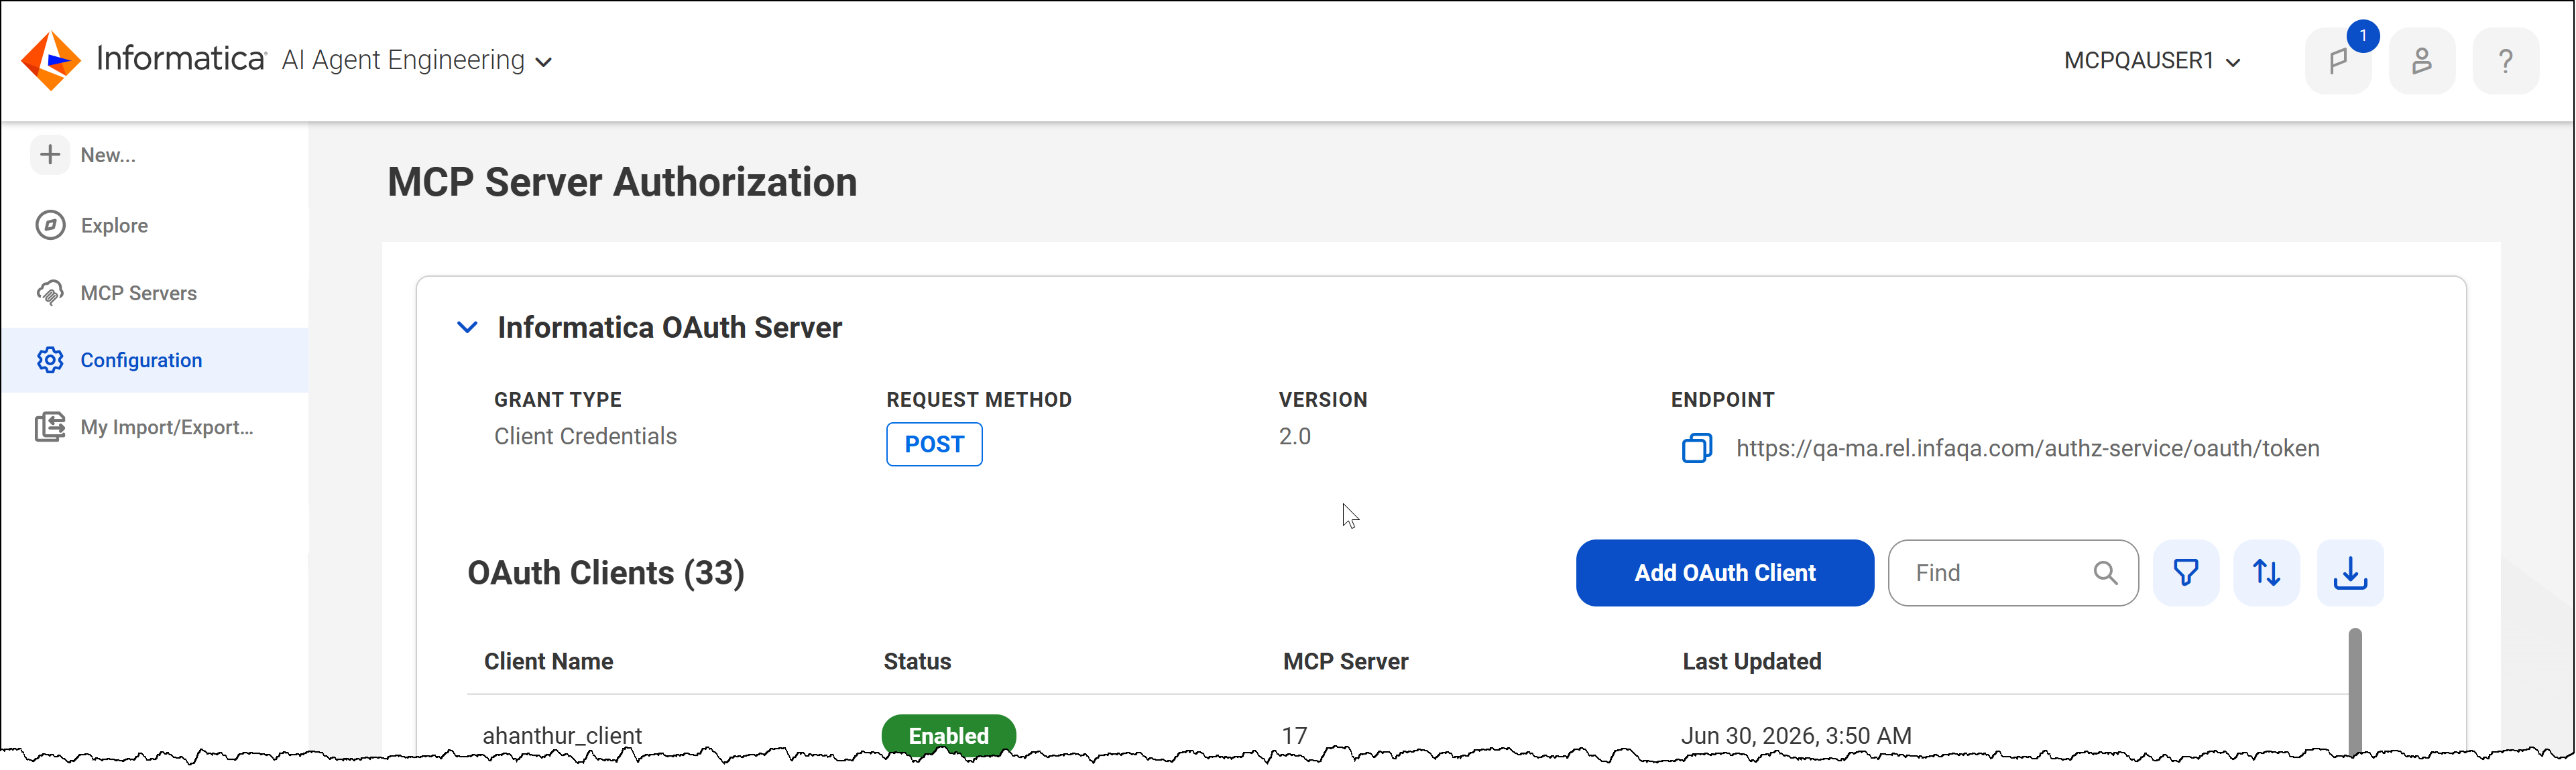
The Informatica OAuth servers manage permissions and access delegation for OAuth clients in your organization. You can view OAuth server information on the MCP Server Authorization page.
The following image shows the Informatica OAuth server information on the MCP Server Authorization page:
Each server displays the following information:
Grant type
The Informatica OAuth 2.1 server uses the Authentication Code grant type. The Informatica OAuth 2.0 server uses the Client Credentials grant type.
Request method
Request method that the application client must use to make token requests. The Informatica OAuth servers support the POST method.
Version
The OAuth version being used.
Authorization Endpoint
The authorization endpoint URL. Applies only to the Informatica OAuth 2.1 server.
Token Endpoint
The token endpoint URL.
The page also lists the OAuth clients associated with each server. Click the down arrow next to Informatica OAuth <version> Server to display them.
Each client registers with an OAuth server to establish its identity and receive a unique client ID and, if applicable, client secret. This enables your AI agents to access an Informatica MCP server without having access to your IDMC credentials.
OAuth clients
Create and register an OAuth client to allow your AI agent to access Informatica's MCP servers without having access to your IDMC user credentials.
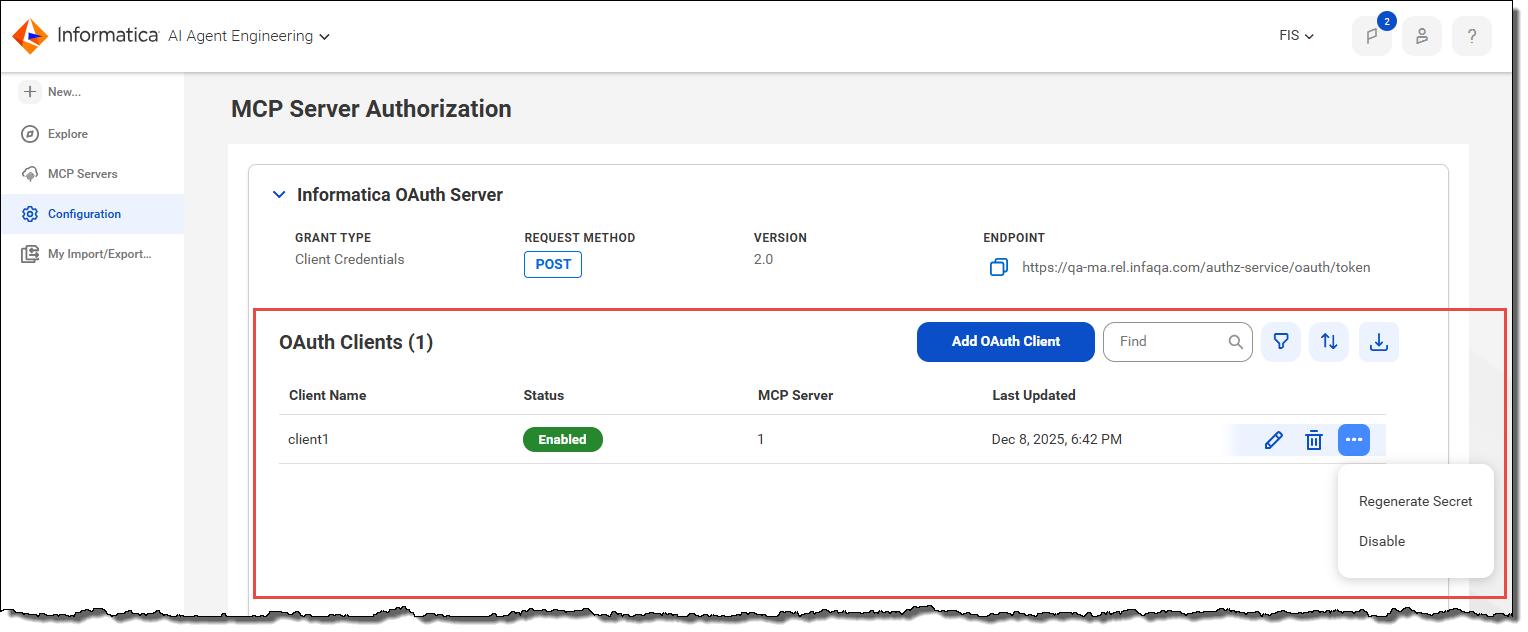
Create and update OAuth clients on the MCP Server Authorization page. The following image shows where to create and update OAuth clients:
The following table describes the actions you can perform based on the OAuth client version:
Action
OAuth version
Add, edit, and delete clients
2.0 and 2.1
Find, filter, and sort the list of clients
2.0 and 2.1
Regenerate client secrets
2.0 and 2.1
Disable clients
2.0 only
Download a report of all clients
2.0 only
Using OAuth 2.1
Use the Informatica OAuth 2.1 server for stronger security in human-in-the-loop uses cases. The Informatica OAuth 2.1 server uses the Authorization Code grant type and requires a human user to grant permission.
When you register an OAuth 2.1 client, you specify whether the client can confidentially store secrets, provide one or more redirect URIs, and select applicable MCP servers. The registration process generates a client ID and, if the client is confidential, a client secret.
When an AI agent requests access to an MCP server, the user must log in to grant permission. The OAuth server then issues a temporary authorization code. The AI agent sends the code back to the OAuth server along with a PKCE (Proof Key for Code Exchange) passcode and the client secret, if applicable, to trade for an access token. The AI agent then passes this access token to the MCP server to unlock access.
Adding an OAuth 2.1 client
Adding an OAuth 2.1 client generates the client ID and, if applicable, the secret that the Informatica OAuth 2.1 server uses to generate an authentication token.
1Click Configuration in the navigation menu on the left.
2On the MCP Server Authorization page, expand the Informatica OAuth 2.1 Server section.
3Click Add OAuth 2.1 Client.
The Add OAuth 2.1 Client wizard opens.
4On the Details page, enter a name for the OAuth client, specify whether the client is confidential or public, and click Next.
When you register a Claude Code or Cursor client, always set it as a public client.
5On the Redirect URIs page, enter one or more URIs where the OAuth server sends the user and their temporary authorization code after the user logs in and grants permission.
6On the Resources page, select the Informatica MCP servers you want to connect to and click Create.
7On the Generate Credentials page, copy the client ID and, if applicable, the client secret.
You'll use these values to generate an authorization token for the MCP server.
Note:
The client secret isn't available after you close the wizard. If you lose this value, you can regenerate a secret.
Editing an OAuth 2.1 client
Edit an OAuth 2.1 client when you want to change the name, redirect URIs, or MCP servers you want to connect to.
1Click Configuration in the navigation menu on the left.
2On the MCP Server Authorization page, expand the Informatica OAuth 2.1 Server section.
3Click the edit icon in the row that contains the client you want to edit.
The Edit OAuth 2.1 Client wizard opens.
4On the Details page, update the OAuth client name and click Next.
Note:
You can't edit the authentication method after you create the client.
5On the Redirect URIs page, add or remove URIs and click Next.
6On the Resources page, update the Informatica MCP servers you want to connect to and click Update.
Regenerating OAuth 2.1 client secrets
You can regenerate the OAuth 2.1 client secret if you want to change the credentials or if you failed to copy the secrets when you created the OAuth 2.1 client.
1Click Configuration in the navigation menu on the left.
2On the MCP Server Authorization page, open the Actions menu in the row that contains the client and click Regenerate Secret.
The Regenerate Client Secret page opens.
3Copy the client ID and client secret.
You'll use these values to generate an authorization token for the MCP server.
Note:
The client secret isn't available after you close the page. If you lose the value, you can regenerate a secret.
4Click Finish.
Using OAuth 2.0
The Informatica OAuth 2.0 server directly authenticates machine-to-machine communication without user intervention.
When you use the 2.0 server, the registration process generates a client ID and a client secret. The Informatica OAuth server generates an authentication token for the AI agent based on these credentials. The authentication token is then passed to the MCP server, allowing your AI agent to access the MCP server.
Adding an OAuth 2.0 client
Adding an OAuth 2.0 client generates the client ID and secret that the Informatica OAuth 2.0 server uses to generate an authentication token. The credentials also include the authentication header value, which is the Base64 encoding of the client ID and secret.
1Click Configuration in the navigation menu on the left.
2On the MCP Server Authorization page, expand the Informatica OAuth 2.0 Server section.
3Click Add OAuth 2.0 Client.
The Add OAuth 2.0 Client wizard opens.
4On the Authentication page, enter your IDMC user name and password and click Next.
5On the Details page, enter a name for the OAuth client, an optional description, and the access token timeout value and click Next.
The default value for the access token timeout value is 5 minutes. You can enter a value between 5 minutes and 1440 minutes (24 hours).
6On the Resources page, select the Informatica MCP servers you want to connect to and click Create.
7On the Generate Credentials page, copy either the client ID and client secret or the authentication header value.
You'll use these values to generate an authorization token for the MCP server.
Note:
The secret and authentication header values aren't available after you close the wizard. If you lose these values, you can regenerate the client secret.
8Click Finish.
Editing an OAuth 2.0 client
Edit an OAuth 2.0 client when you want to change the name, description, access token timeout value, or MCP servers you want to connect to.
1Click Configuration in the navigation menu on the left.
2On the MCP Server Authorization page, expand the Informatica OAuth 2.0 Server section.
3Click the edit icon in the row that contains the client you want to edit.
The Edit OAuth 2.0 Client wizard opens.
4On the Authentication page, enter your IDMC user name and password and click Next.
5On the Details page, update the OAuth client name, description, or access token timeout value and click Next.
The default value for the access token timeout value is 5 minutes. You can enter a value between 5 minutes and 1440 minutes (24 hours).
6On the Resources page, update the Informatica MCP servers you want to connect to and click Update.
Regenerating OAuth 2.0 client secrets
You can regenerate the OAuth 2.0 client secret if you want to change the credentials or if you failed to copy the secret when you created the OAuth 2.0 client.
1Click Configuration in the navigation menu on the left.
2On the MCP Server Authorization page, open the Actions menu in the row that contains the client and click Regenerate Secret.
The Regenerate Client Secret wizard opens.
3On the Authentication page, enter your IDMC user name and password and click Next.
4On the Generate Credentials page, copy either the OAuth 2.0 client ID and OAuth 2.0 client secret or the authentication header value.
You'll use these values to generate an authorization token for the MCP server.
Note:
The secret and authentication header values aren't available after you close the wizard. If you lose these values, you can regenerate the client secret.
5Click Finish.
Downloading an OAuth client report
You can download a CSV file that contains OAuth 2.0 client information. The file lists the name, description, status, MCP servers, and last update date for each OAuth 2.0 client.
The CSV file lists all OAuth 2.0 clients in the organization. Any filters you apply on the MCP Server Authorization page don't apply to the download file.
1Click Configuration in the navigation menu on the left.
2On the MCP Server Authorization page, expand the Informatica OAuth 2.0 Server section.
3Click the Download CSV icon.
Disabling and enabling an OAuth client
When you create an OAuth 2.0 client, it's enabled automatically. You can disable an OAuth 2.0 client to prevent it from getting tokens, for example, if the client becomes compromised. You can re-enable a disabled OAuth 2.0 client.
1Click Configuration in the navigation menu on the left.
2On the MCP Server Authorization page, expand the Informatica OAuth 2.0 Server section.
3Open the Actions menu in the row that contains the client and click Disable or Enable.
Deleting an OAuth client
You can delete an OAuth client that's no longer needed.
1Click Configuration in the navigation menu on the left.
2On the MCP Server Authorization page, click the Delete icon in the row that contains the client you want to delete.