OAuth 2.0 is a protocol for authorization that provides specific authorization flows for web applications and helps in the secure transmission of information between API consumers and web services. You can create an OAuth 2.0 authentication policy to assign to APIs or operations that invoke a process that uses basic authentication.
API Center uses the client credentials grant type for OAuth 2.0 authentication. To enable OAuth 2.0 authentication, you must create an OAuth 2.0 client. You specify the credentials of an organization user with access to run managed APIs and managed API groups that can use the client for authentication, and generate client credentials.
Client access tokens that you use for OAuth 2.0 authentication time out after a defined timeout period. After a token times out, you can't use it. You must regenerate the token. You set the timeout when you create the OAuth 2.0 client, and you can change it later.
You can now assign multiple managed APIs and managed API groups to a single OAuth 2.0 client. You can create a single OAuth 2.0 client to grant access to specific API sets, simplifying authorization control. Disabling or deleting an OAuth 2.0 client invalidates its authorization token, preventing unauthorized API access.
Creating an OAuth 2.0 client
Create an OAuth 2.0 client that enables API consumers to access APIs with a security policy that uses OAuth 2.0 authentication.
1On the Configuration page, click the Authorization tab.
2On the Informatica OAuth 2.0 Server tab, click Add OAuth 2.0 Client.
The Add OAuth 2.0 Client wizard appears.
3Enter the user name and password of an organization user and click Next.
The user information that you enter here must be an Allowed User of the Application Integration process.
The Details step appears.
4Enter a name for the client. The name is case sensitive and must be unique in the organization.
The name can contain up to 32 characters, including ASCII letters, digits, Japanese characters, and the following special characters: $ ( )[ ] . ? `
5Optionally, enter a description of the client.
The description can contain up to 255 characters.
6Enter a timeout value in minutes for the access token.
The minimum value is 5 minutes and the maximum value is 1440 minutes or 24 hours.
After a token times out, you can't use it. You must regenerate the token.
7Click Next.
The Resources step appears.
8 Select what managed APIs or managed API groups the OAuth 2.0 client applies to:
- All Resources. The OAuth 2.0 client applies to all the managed APIs and managed API groups in the organization.
- Selected Resources. Select managed APIs and/or managed API groups that the OAuth 2.0 client applies to.
The managed APIs and managed API groups are organized into distinct tabs, making it easier to locate and interact with the specific resources you need.
9Click Next.
API Center creates the client. The Generated Credentials step appears.
10Copy the client credentials and use one of the following methods to send them to API consumers:
- Click Copy next to OAuth 2.0 Client ID and OAuth 2.0 Client Secret to copy the credentials as plain text. API consumers use the client credentials in applications and software packages where you enter each detail separately.
Note:
You can't copy the client secret after you exit the wizard.
- Click Copy next to Authorization Header Value to copy the credentials as an authorization header value. API consumers use the value in applications and software packages where you enter the client credentials as a value in an authorization header.
Note:
You can't use the DOCTYPE header in XML attachments.
11Click Finish.
You can view the enabled OAuth 2.0 client on the Informatica OAuth 2.0 Server table on the Authorization tab of the Configuration page.
12Click the number in the APIs or API Groups columns to view the details of the managed APIs or managed API groups associated with the respective OAuth 2.0 client.
All APIs or All API Groups in these columns denote that the specific OAuth 2.0 client is associated with all managed APIs or managed API groups.
You can filter the managed APIs and managed API groups based on the API name.
When you create an OAuth 2.0 client, you can view all the managed APIs and managed API groups that are currently active, shared, and deprecated. When you edit an OAuth 2.0 client, you can view the list of active, shared, and deprecated managed APIs and managed API groups that are associated with the OAuth 2.0 client.
Managing OAuth 2.0 clients
After you create an OAuth 2.0 client, you can view, edit, or delete it.
1On the Informatica OAuth 2.0 Server table on the Authorization tab of the Configuration page, click to open the Actions menu of the OAuth 2.0 client.
2Perform one of the following tasks:
- To view an OAuth 2.0 client, select View. The View OAuth 2.0 Client dialog box displays the details and selected resources of the OAuth 2.0 client.
- To edit an OAuth 2.0 client, select Edit. In the Edit OAuth 2.0 Client dialog box, make the required changes and click Finish.
- To delete an OAuth 2.0 client, select Delete. In the Delete OAuth 2.0 Client dialog box, click OK.
Downloading an OAuth 2.0 clients list
You can download a list of OAuth 2.0 clients.
API Center downloads an Excel file that shows details of the OAuth 2.0 clients that were created since the time the organization was created. The file shows the client name, client description, status, the APIs that the client applies to, and the last updated time for all the OAuth 2.0 clients.
To download the list, on the Informatica OAuth 2.0 Server table on the Authorization tab of the Configuration page, click Download.
Enabling and disabling OAuth 2.0 clients
When you create an OAuth 2.0 client, it is enabled by default. You can disable the client if needed. API consumers can't use disabled OAuth 2.0 clients for authentication.
1On the Informatica OAuth 2.0 Server table on the Authorization tab of the Configuration page, click to open the Actions menu of the OAuth 2.0 client.
2Select Disable or Enable.
The OAuth 2.0 client is disabled or enabled.
Accessing an API with OAuth 2.0 authentication
To access an API, API consumers generate an OAuth 2.0 authorization token and send the token to the API.
The following sections describe the stages of accessing an API that requires OAuth 2.0 authentication:
Generating an OAuth 2.0 authorization token
To generate the token, API consumers authenticate to the IDMC OAuth 2.0 server using the server URL and the OAuth 2.0 client credentials that you send to the API Portal administrator.
API consumers need to submit the following credential information to the OAuth 2.0 server:
- client_id=<client_name>
- client_secret=<client_secret>
- grant_type=<client_credentials>
You can submit this information using any of the following methods. Choose the method that works best based on the application or software package that you use to invoke the API.
- Method 1. Enter the client_id and client_secret in a Basic Authorization header. For the grant_type, add these to the request body as URL-encoded values. To do this, select client_credentials and add this to the request body as URL-encoded data, and enter the URL in the Access Token URL field.
- Method 2. Enter the client_id and client_secret in a Basic Authorization header. For the grant_type, add these to the URL parameter.
- Method 3. Enter the client_id, client_secret, and grant_type all within the request body as URL-encoded values.
For example, in Postman enter the details as follows and add them to the request body as URL-encoded data:
Key
Value
client_id
<client_name>
client_secret
<client_secret>
grant_type
<client_credentials>
You can find the access token URLs on the Authorization tab in the Policies page.
An access token POST URL uses the following format:
{protocol}://{host_URL}/authz-service/oauth/token
The following image shows a sample POST URL and other details:
- Method 4. Enter the client_id and client_secret to the request body as URL-encoded data. For the grant_type, add these to the URL parameter.
Other combinations such as passing all three parameters in URL are supported but not recommended for security reasons.
Note:
If the parameters are duplicated and passed both in the URL and request body, the request body parameters override the URL parameters.
The following image shows an API invocation through Postman with a Basic Authorization header:
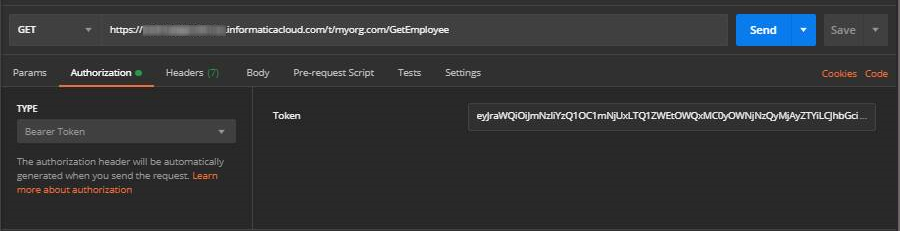
Sending the token to the managed API
API consumers pass the token that they receive from the OAuth 2.0 server to the managed API as an Authorization header with the prefix Bearer followed by the token.
The following image shows an API invoked through Postman with a Bearer Token authorization type and the token that the API consumer entered:
Regenerating an OAuth 2.0 client secret
You can regenerate an OAuth 2.0 client secret. When you regenerate the client secret, API Center disables the current client secret.
1On the Informatica OAuth 2.0 Server table on the Authorization tab of the Configuration page, click to open the Actions menu of the OAuth 2.0 client.
2Select Regenerate Secret.
3Enter the password and click Next.
API Center regenerates the client secret and authorization header value. You can copy the new values and send them to the API consumers.
4Click Finish.
Rules and guidelines for OAuth 2.0 authentication
Controlling API access is an integral part of development. Authorization is checked dynamically, allowing immediate API access without the need for a new token. Consider the following guidelines for OAuth 2.0 authentication:
•Authorization checks occur dynamically. If you remove a managed API from the OAuth2.0 client, any existing token for that API will no longer function. Conversely, if you add a managed API to the OAuth 2.0 client, any previously generated token will work for invoking the newly added API.
•When you disable or delete an OAuth 2.0 client, the existing tokens for that client remain valid, but the client authorization will fail.
•Authorization fails for all revoked access tokens, even if they were issued before the API access revocation.
•Inactive managed APIs or managed API groups do not appear for selection when you edit an OAuth 2.0 client.
•Managed APIs or managed API groups in inactive state are de-associated from all associated OAuth 2.0 clients.