On the Rules tab, you can add Data Quality assets as rules to a profile. Data Profiling also assigns rules automatically to the profile based on the chosen source object and its attributes. You can choose one or more rules for a profile run.
You can open a data quality asset from the Explore page or from within a profile in Data Profiling.
Note: To add a Data Quality asset as a rule, you need to have the Read permission on the asset.
Add rules to the profile
You can add rule specification, cleanse, parse, and verifier assets as rules to a profile. You create these assets in Data Quality. You can add a Data Quality asset as a rule if you have Read permission on the asset. You can also profile passive mapplets, which may or may not have Data Quality assets. Profiling will calculate the statistics on all the output ports of the mapplet, including value frequencies.
You can add one or more rules for a data profiling task. You can also run a profile without a rule. Data Profiling displays column statistics and rule results in collapsible sections in the results area. The results for each rule output appear in a separate row.
In Data Quality, when you create rule specification, cleanse, parse, or verifier assets, you configure inputs, rule logic, and outputs for the asset. When you add the asset as a rule in Data Profiling, the input appears as input column and the output appears as rule output. You can add single input, single output and multiple input, single output rules to profiles. When you add a rule to the profile, you assign a source column to the input column. When you run the profile, Data Profiling generates statistics based on the rule logic. The Results tab shows the rule output statistics in a separate row.
For example, a rule specification 'Validity' has an input called in_value, a rule logic, and an output called out_validity. You want to perform an analysis on a source column called 'customer-national_ID' in the Customer table. To accomplish this task, you perform the following steps:
1On the Rules tab, you click Add to add a rule to the profile.
2In the Add Rule, you select the 'Validity' rule.
3In the Rule Settings dialog box, you select the column 'customer-national_ID' as the input column. Data Profiling assigns the selected column to input 'in_value'.
4You run the profile.
5Data Profiling generates the rule statistics based on the rule logic.
6On the Results tab, the rule statistics appear in the 'out_validity' row.
When you add a single input rule, you can assign multiple columns to it. Data Profiling replicates the rule for each column. When you add a multiple input rule to a profile, you can add a column for each input in the rule. Data Profiling displays results for each selected column in a separate row.
You can add the following Data Quality assets as rules to a profile:
Rule specification
Use this asset to define a business rule with a set of conditions that you can use to evaluate your data. You can add rule specifications that have a single output.
A rule specification can also contain a single passive mapplet or nested passive mapplets. You can use mapplets that contain passive transformations in a rule specification. You can use the following assets in a mapplet:
•Parse
•Cleanse
•Labeler
•Rule specification
•Verifier
•Expression
•Java
•Mapplet that contains passive transformations
For more information about using mapplets in rule specifications, see Rule specification assets in the Data Quality documentation.
For example, you are a sales analyst and you want to analyze the retail sales in the Sales table.
1In Data Quality, you perform the following steps:
aCreate a rule specification named Reg_pyr.
bAdd Region and SalesYear as the inputs.
cCreate the rule logic and test it.
dSave the rule specification.
2In Data Profiling, you perform the following steps:
aCreate a profile on the Sales table.
bAdd Reg_pyr rule to the profile and choose Region and SalesYear source columns for the rule.
cSave and run the profile.
dView the results on the Results tab. Optionally, export the results to a Microsoft Excel file or run a query that generates the content into a delimited file for further analysis.
Cleanse
Use this asset as a rule to standardize the appearance of your data, replace incorrect values in your data, and remove unwanted values from your data.
For example, you are a data analyst and you want to convert the FirstName and LastName columns in the Customer table to title case for better readability. To accomplish this task, you can perform for the following steps:
1In Data Quality, you perform the following steps:
aCreate a cleanse asset named FN_SenC.
bAdd a step sequence and choose Title Case as casing style.
cSave the asset.
dTest the asset with sample data.
2In Data Profiling, you perform the following steps:
aCreate a profile on the Customer table.
bAdd FN_SenC rule to the profile and choose FirstName and LastName columns for the rule.
cSave and run the profile.
dView the results on the Results tab. Optionally, export the results to a Microsoft Excel file or run a query that generates the content into a delimited file for further analysis.
Verifier
Use this asset as a rule to measure and enhance the quality of your postal address data. You can add a Verifier asset in the Verification only mode to a profile.
For example, you are a data analyst and the marketing department wants to send new product brochures to potential customers in California state. They want to evaluate the accuracy and deliverability of the address records in the Leads table before they send the brochures. To accomplish this task, you perform the following steps:
1In Data Quality, you perform the following steps:
aCreate a verifier asset named Cal_addr.
bSelect appropriate address model for the input address structure and specify the input and output fields.
cIn the Process tab properties, choose Verification only as the verification mode.
dSave the asset.
2In Data Profiling, you perform the following steps:
aCreate a profile on the Leads table.
bAdd Cal_addr rule to the profile and choose Address1 and Address2 columns for the rule.
cSave and run the profile.
dView the results on the Results tab. Optionally, export the results to a Microsoft Excel file or run a query that generates the content into a delimited file for further analysis.
Parse
Use a parse asset to improve the structure of your data. A parse asset defines a set of operations that can identify discrete values in an input field and write the values to appropriate output fields.
For example, you are a data analyst and you need to find out information about potential customers from the list of email addresses. The data source includes emails of people who contacted your organization. You need to share the results with the sales department so that they can pursue the new customers. To accomplish this task, you perform the following steps:
1In Data Quality, you perform the following steps:
aCreate a parse asset named Email_parse.
bAdd the Regular Expression parse step.
cSelect the Parse Email built-in regular expression.
dEnter Name, Company, and Domain as the output fields.
eSave the asset.
2In Data Profiling, you perform the following steps:
aCreate a profile on the customer details table.
bAdd Email_parse rule to the profile and choose Email_ID source column for the rule.
cSave and run the profile.
dView the results on the Results tab. Optionally, export the results to a Microsoft Excel file or run a query that generates the content into a delimited file for further analysis.
You cannot add rules if the rule input or rule output name exceeds 4000 bytes. When you open a Data Quality asset that is associated to a profile, the Used by section on the Asset References tab shows the profile name.
For information about creating a rule specification, cleanse, verifier, or parse asset, see Data Quality in Data Quality help.
Mapplet
Use a mapplet to transform the source data. You can add passive mapplets as rules to a profile. A mapplet is reusable transformation logic that you can use to transform source data before it is loaded into the target.
For example, you are a data analyst and you want to concatenate the first name and last name of customers in the Customer table to get the full name of customers. To accomplish this task, perform the following steps:
1In Data Integration, you perform the following steps:
aCreate a mapplet asset named Concatenate_mapplet.
bAdd FirstName and LastName as the mapplet inputs.
cAdd expression transformation to the mapplet.
dAdd FullName as the mapplet output.
eValidate and save the mapplet.
2In Data Profiling, you perform the following steps:
aCreate a profile on the Customer table.
bAdd Concatenate_mapplet rule to the profile and choose FirstName and LastName source columns for the rule.
cSave and run the profile.
dView the results on the Results tab. Optionally, export the results to a Microsoft Excel file or run a query that generates the content into a delimited file for further analysis.
For information about creating mapplets, see Mapplets in Data Integration.
Adding rules to a profile
You can add one or more rules to a profile run. You can add or delete the rules in subsequent runs.
1On the Rules tab, click Add ().
2In the Add Rule dialog box, choose a rule specification, cleanse, or verifier asset.
3Click Select.
4In the Rule Settings dialog box, perform either of the following actions:
- If the Data Quality asset has a single input, choose one or more columns for the input rule.
- If the Data Quality has multiple inputs, choose one column for each input.
5Click OK.
The rule appears on the Rules tab.
6Continue to add more rules to the Rules tab as necessary.
7Click Save.
Automatic rule association with source objects
Data Profiling automatically associates Data Quality assets as rules with columns, based on the column and source object name match. By default, Data Profiling associates rules with columns of Oracle, Flat File, ODBC, and Amazon S3 V2 connections.
To enable automatic rule association, make sure that you have a valid DataQualityClaireRule package license for your organization. The DataQualityClaireRule package contains the connection-specific JSON files and a default JSON file.
Data Profiling uses the connection-specific JSON file for all the supported connections. To enable automatic rule association for the remaining connections, you can configure the DefaultAutoAssignRulesConfig.json file.
Data Profiling automatically associates rules with columns after you configure the <connection_type>AutoAssignRulesConfig.json file for the connection. You can configure the JSON file in the following location: <secureagentlocation>/apps/Data_Integration_Server/data/profiling/AutoRuleAssignmentConfig/.
Note: You need not restart the Secure Agent after you configure or customize the Config.json files.
When you configure the AutoAssignRulesConfig.json file for a specific connection, the Data Quality assets are assigned as rules to the matching column and source object names.
If the column names and source object names do not match the auto assign criteria in the connection AutoAssignRulesConfig.json file. Data Profiling assigns rules to matching results from the DefaultAutoAssignRulesConfig.json file.
If column and source names in the AutoAssignRulesConfig.json file do not match the automatic rule association criteria, you can edit the connection-specific JSON file to change the source object name and column names.
Example 1. Example
You created a profile with a source object that contains columns named ID, First Name, and Last Name. You might want to assign the Employee_details rule to the columns automatically.
To achieve this goal, you must ensure that you have the DataQualityClaireRule package license in your organization, and then copy the ClouldDataQuality_Bundles from Administrator Service to the ClouldDataQuality_Bundles project. If the column names in the AutoAssignRulesConfig.json file match the source column names in the source object, Data Profiling automatically assigns the Employee_details rule to the columns.
Automatic rule association steps
1Ensure that the organization has the DataQualityClaireRule package license enabled.
2In Data Profiling service, create a project named CloudDataQuality_Bundles.
3Copy the CloudDataQuality_Bundles bundle from Administrator service > Add-On Bundles > Available Bundles to the CloudDataQuality_Bundles project. After you copy the bundle to the project, the project displays all the Data Quality assets that you can use for automatic rule association.
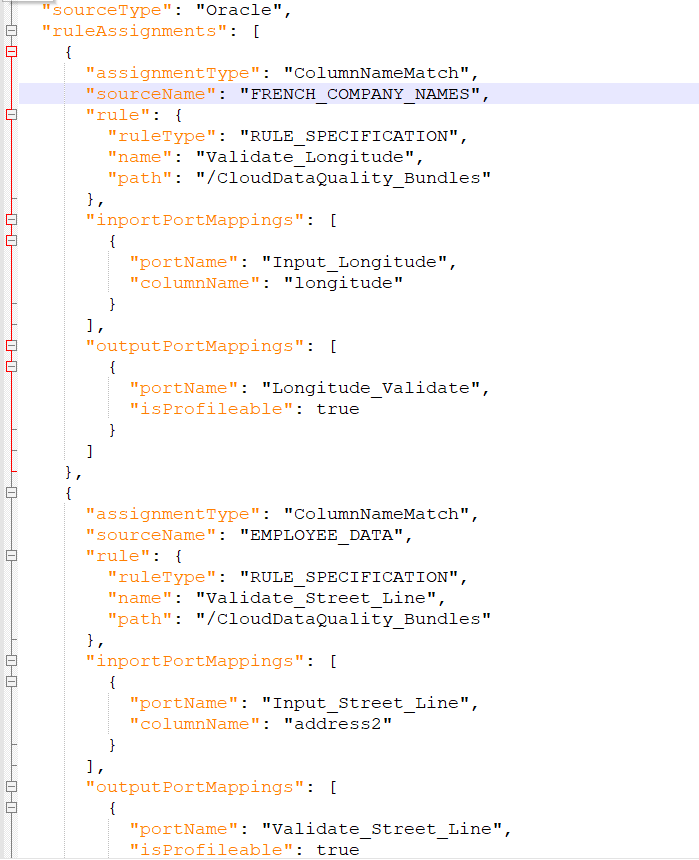
4In the <secureagentlocation>/apps/Data_Integration_Server/data/profiling/AutoRuleAssignmentConfig/ location, configure the <connection_type>AutoAssignRulesConfig.json.file with the data source information based on your requirements as shown in the following sample image:
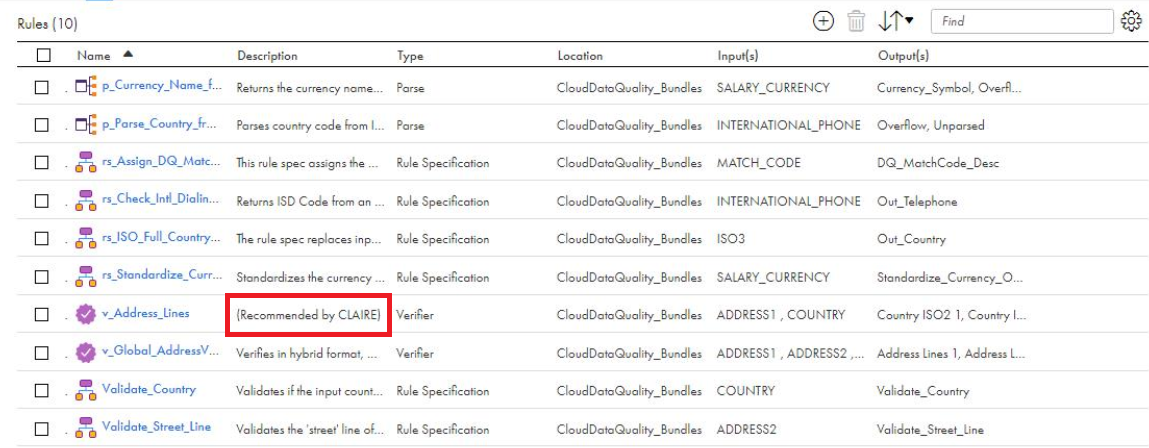
5View the associated rules in Data Profiling.
The following image shows the associated rules with the source objects:
•The Rules tab displays (Recommended by CLAIRE) as a suffix in the rule description.
Customize an AutoAssignRulesConfig.json file
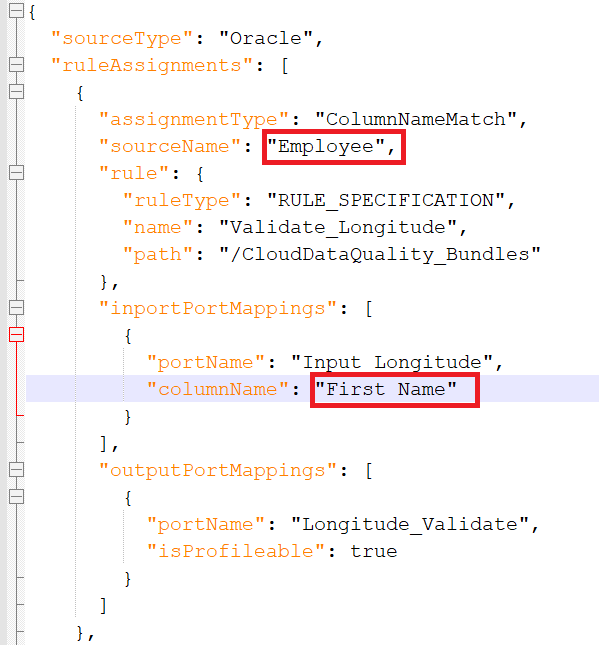
In this scenario, Data Profiling contains a profile with a source object named Employee and column named First Name. The column names and source names that are present in the source object do not match in AutoAssignRulesConfig.json file. You might want to customize the AutoAssignRulesConfig.json file to add rules to columns to match the source names and source objects.
Existing Field Value
Customized Field Value
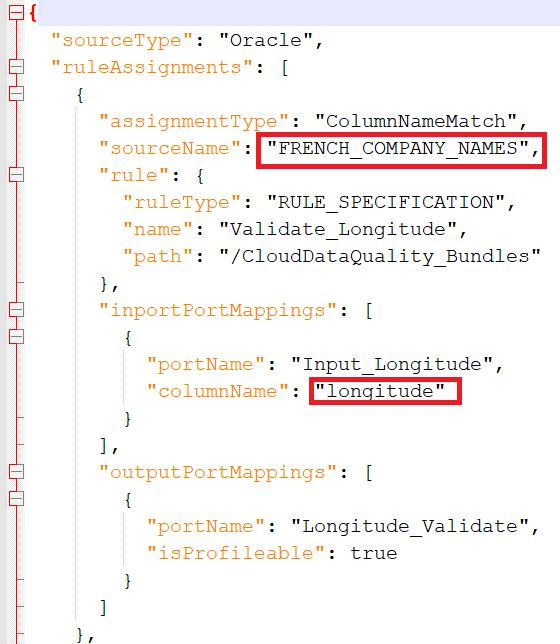
Change the sourceName field value from French_Company_Names
Change to Employee
Change the columnName field value from longitude
Change to First Name
The following image shows a sample AutoAssignRulesConfig.json file with existing source and column names:
The following image shows the changes made to the AutoAssignRulesConfig.json file:
 ).
).