Adding Event Handlers
You can add event handlers to the process as a whole or to a scope. You can add two types of event handlers:
- •onEvent Event Handler
- •an onAlarm Event Handler
For conceptual information, see What is Event Handling?
XML Syntax
<eventHandlers>?
<!-- there must be at least one onEvent
or onAlarm handler -->
<onEvent partnerLink="NCName" portType="QName"?
operation="NCName"
(messageType="QName" | element="QName")?
variable="BPELVariableName"?
messageExchange="NCName"?>*
<correlations>?
<correlation set="NCName" initiate="yes|join|no"/>+
</correlations>
<fromParts>?
<fromPart part="NCName" toVariable="BPELVariableName"/>
</fromParts>
<scope...>...</scope>
</onEvent>
<onAlarm>*
(
<for expressionLanguage="anyURI"?>duration-expr</for>
|
<until expressionLanguage="anyURI"?>deadline-expr</until>
)
<repeatEvery expressionLanguage="anyURI"?>?
duration-expr
</repeatEvery>
<scope...>...</scope>
</onAlarm>
</eventHandlers>
Adding an onEvent Event Handler
The onEvent element indicates that the event specified waits for a message to arrive. This element is very similar to a receive activity, except that a message event cannot create a new process instance. Also, an onEvent must contain a scope activity and optionally uses a variable local to the event handler that contains the message received from a partner.
An incoming message can correspond to a request/response or one-way operation in a WSDL. When the operation is a request/response type, the event handler is expected to use a reply to send back the response.
Required Properties | Optional Properties |
|---|
Participant | Variable |
Operation | Port Type |
Correlations. |
Comment. |
Documentation. |
Setting Visual Properties and Using Your Own Library of Images. |
Execution State |
Message Exchange. |
Extension Attributes and Extension Elements. |
To add an onEvent event handler for the process:
Ensure that you have added a participant for the event handler before you can complete the properties for it.
- 1. Click on the Event Handlers tab of the Process Editor.
- 2. Drag a Message catch event to the Event Handlers canvas.
- 3. From the Properties view, select a participant, operation, and optionally select a Variable Definition and type in a Variable name. This variable is an implicit scope variable that can be used by other activities.
- 4. Drag an activity into the onEvent's scope to respond to the event, such as a reply or exit.
- 5. Fill in the properties for the activity that handles the event.
The following illustration shows an example of an onEvent event handler added for the process. If you collapse the event handler, you can add a background color in the Properties view.
To add an onEvent event handler for a scope:
- 1. Ensure that you have added a WSDL file to Project Explorer containing the participant information needed.
- 2. Display a BPEL file in the Process Editor, and select a scope.
- 3. Drag a Message catch event to the scope.
- 4. Fill in the properties of the onEvent, including the participant, operation and optionally type in a variable. This variable is an implicit scope variable that can be used by other activities.
- 5. Drag an activity into the onEvent's scope to respond to the event, such as a reply or exit.
- 6. Fill in the properties for the activity that handles the event.
The following illustration shows an example of an onEvent and an onAlarm event handler added for a scope. The activity responding to each event is a reply.
Adding an onAlarm Event Handler
The onAlarm element defines a timeout event, using either the duration (for) or deadline (until) attribute. The duration attribute specifies the amount of time after which the event is signaled. The clock for the duration starts when the associated scope starts. The alternative deadline attribute sets the specific point in time when the alarm is fired. Optionally a repeat every attribute can be set to fire an alarm repeatedly each time the interval period expires. The repeat every attribute can be used alone or with an deadline or duration attribute.
For example, you might set an alarm to go off in five minutes and then repeat the alarm every 30 seconds.
An alarm time can be set for the process using the data provided within the message that creates a process instance, as shown in the following example.
In the WSDL file, a complex message is defined with a part specifying processDuration.
<wsdl:definitions
targetNamespace="http://www.example.com/wsdl/exmple"
xmlns:xsd="http://www.w3.org/2001/XMLSchema"
...>
<wsdl:message name="orderDetails">
<part name="processDuration"
type="xsd:duration"/>
</wsdl:message>
</wsdl:definitions>
The message type above is used in the onAlarm value in the BPEL process:
<process name="orderCar"
xmlns:def="http://www.example.com/wsdl/example" ...>
...
<eventHandlers>
<onAlarm
<for>$orderDetails.processDuration</for>
</onAlarm>
</eventHandlers>
...
<variable name="orderDetails"
messageType="def:orderDetails"/>
</variable>
...
<receive name="getOrder"
partnerLink="buyer"
operation="order"
variable="orderDetails"
createInstance="yes"/>
...
</process>
In the above example, the onAlarm element specifies a timer event that is fired when the duration specified in the processDuration field in the orderDetails variable is exceeded. The value of the field is provided via the getOrder activity that receives a message containing the order details and causes the creation of a process instance for that order.
Required Properties | Optional Properties |
|---|
Alarm Expression | Repeat Every (can be used with Alarm Type) |
Alarm Type or Repeat Every | Comment. |
| Documentation. |
| Setting Visual Properties and Using Your Own Library of Images. |
| Execution State. |
| Extension Attributes and Extension Elements. |
To add an onAlarm event handler for the process:
- 1. Click on the Event Handlers tab of the Process Editor.
- 2. Drag a Timer catch event to the Event Handler canvas.
- 3. In the Properties view, optionally select the Dialog button at the end of the Repeat Every row. Type in or compose an expression for the interval. Use this attribute alone or in conjunction with a Wait Type.
- 4. Set the Wait Type as one of the following:
- a. Select Deadline Expression to type in or compose an expression representing the deadline (wait until) for the alarm.
- b. Duration Expression to type in or compose an expression representing the duration (wait for) for the alarm.
- c. Duration to select the number of days, hours, minutes, or seconds to wait.
- d. T time in X days to set a deadline that is X days plus T hours. The expression resolves to an expression such as:
xsd:dateTime(current-date()) + xsd:dayTimeDuration("P3DT15H20S")
- 5. Drag an activity into the event handler to respond to the event, such as a reply or exit.
- 6. Fill in the properties for the activity that handles the event.
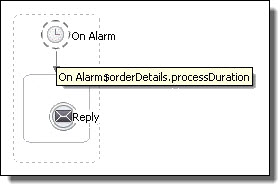
The following illustration shows an example of an onAlarm event handler added for the process.
Tip: If you collapse the event handler, you can add a background color in the Properties view.
To add an onAlarm event handler for a scope:
- 1. Display a BPEL file in the Process Editor, and select a scope.
- 2. Drag a Timer catch event to the scope.
- 3. In the Properties view, fill in properties as described above for the process.
- 4. Drag an activity into the event handler to respond to the event, such as a reply or terminate.
- 5. Fill in the properties for the activity that handles the event.
The following illustration shows an example of an onAlarm and an onEvent event handler added for a scope. The activity responding to each event is a reply.