Creating and Running BPEL Unit Test Suites
You can multi-select B-unit files in the Project Explorer and make a suite of tests.
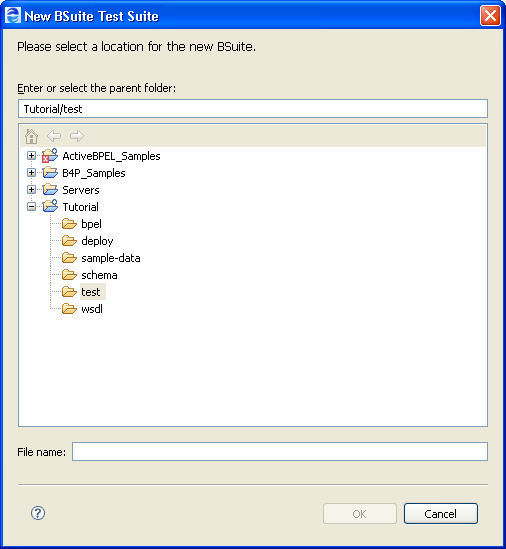
For example, select two or more .bunit files from your test folder within an orchestration project. Right-mouse click and select New > BSuite Test Suite. The BSuite dialog opens, as shown:
Type in a name for the BSuite. The .bsuite extension is automatically added.
All the tests in the suite run.
You can add BSuites to a BSuite, as shown:
Tips on Using Assertions
A key component of the B-unit testing framework is the ability to perform assertions. An assertion describes the expected correctness of the state of a unit of code when it runs. Assertions include:
- •Input data for invoke activities
- •Replies from synchronous messages sent into the engine via the B-unit Send Message command
- •Values for alarm deadlines and durations
Assertions contain expected data and run against data from the process execution. The expected data for the assertion can be a text node, an element, or an imported element. The assertion can run against the entire message data or can use an XPath query to select a portion of the message data.
The B-unit engine validates messages for receives/replies/invokes. As such, it is unnecessary to do assertions on a full message. Instead, you can write assertions that focus on the portion of a message that tests logic within your process. This type of focused assertion makes your unit tests more readable and reduces the amount of work necessary if the message definitions ever change. For example, if you want to assert that the value of rm:ProductGroupId is 100, the following query provides you with the most flexibility:
<abu:assertEquals part="p"
query="//rm:ProductGroupId/text()">100</abu:assertEquals>
In this example, note the use of the descendant axis in the query. This selects the ProductGroupId element anywhere in the message. While this lack of specificity is not always a good idea, keep in mind that the B-unit engine is already validating the structure of a message so if the element were misplaced, this is reported in schema validation.
Here are some good uses of assertions:
- •Asserting the input for an invoke when that input was produced by one or more complex data mappings within the process
- •Assertion proves that a specific path was taken within the process in the case where there is conditional logic in the process in the form of transition conditions or if/else activities
It is probably not worth doing an assertion on something you would get with schema validation or with a large literal assertion when there's only a small part of the message that is worth asserting.
Tips on Using Parameterized XSL for Input and Assert Data
You can build efficiency into your B-unit tests in cases where you want to assert a small difference in the same data across multiple tests. The efficiency comes in the form of parameterized XSL.
Consider the following example.
In an XML data file, there is the following element:
<ns:status>CREATED</ns:status>
Instead of creating different XML files, each with a different status value, you can write an XSL file such as:
<xsl:stylesheet version="1.0"
xmlns:xsl="http://www.w3.org/1999/XSL/Transform"
xmlns:ns="http://schemas.active-endpoints.com/b4p
/wshumantask/2007/10/aeb4p-task-rt.xsd">
<xsl:import href="common.xsl"/>
<xsl:param name="state"/>
<xsl:template match="ns:status/text()" priority="2">
<xsl:value-of select="$state" />
</xsl:template>
</xsl:stylesheet>
In the Source view of your B-unit file, you can then add a parameter, such as:
<abu:part href="../data/getTaskInstanceResponse-minimal.xml"
name="taskInstance"
xsl="../xsl/change-task-instance-state.xsl">
<abu:params>
<abu:param name="state" value="COMPLETED"/>
</abu:params>
For each B-unit test, you use the same imported data and the same XSL file. You need only change the parameter value to get a different result.
Tips on Providing Partner Link Data
Some processes require the configuration of partner link data as part of the test. Partner links can be specified along with wsa:EndpointReference information for their partnerRole or service names for their myRole. This is only necessary if the process makes use of some data within a partner link during some calculation.
To add partner link data to a B-unit test:
- 1. In Outline view, select the Partner Links node, and select a partner link.
- 2. In the Properties view, select the All tab, and select the Simulation category.
- 3. Select the appropriate partner link, My Role, or Partner Role.
- 4. Select the Dialog button at the end of the row to open the Partner Link Data dialog.
- 5. Type in an Endpoint Reference definition.
- 6. Simulate the process and save the simulation as a B-unit test.
The following example shows the B-unit element that is added to your test.
<!-- Controls deployment of partner links to the test engine. -->
<abu:partnerLinks>
<abu:partnerLink xmlns:ns="http://docs.active-
endpoints.com/sample
/bpel/loanprocess/2008/02/loanProcessCompleted.bpel"
name="LoanApproval"
processName="ns:loanProcessCompleted">
<abu:partnerRole endpointReference="static">
<wsa:EndpointReference
xmlns:s="http://docs.active-endpoints.com/
sample/wsdl/riskAssessment/2008/
02/riskAssessment.wsdl"
xmlns:wsa="http://www.w3.org/2005
/08/addressing">
<wsa:Address>urn:x-vos:loancompany:
RiskAssessmentServiceNEW
</wsa:Address>
<wsa:ServiceName
PortName="RiskAssessmentServicePort">
s:RiskAssessmentServiceNEW
</wsa:ServiceName>
</wsa:EndpointReference>
</abu:partnerRole>
</abu:partnerLink>
</abu:partnerLinks>


