Participants and Tasks
To include human workflow activities in a BPEL process, you need a People activity that describes who works on a task. The Participants view is a key starting point for creating the people and tasks to be used in People activities. The human task participants listed in the Participants view correspond to BPEL4People's concept of a Logical People Group, as described in About Logical People Groups. The purpose of selecting a name is to give your Logical People Group a meaningful name. When you create a Process Deployment Descriptor for the process, you must select the actual names from the Identity Chooser.
If desired, you can select the actual group name from your company's LDAP or other identity service for a human task participant. Do this by selecting the button at the end of the Name field in a Logical People Group's Properties view.
Note that you must configure and enable an Identity Service before selecting from the Identity Chooser.
Tip: You can wait until deployment to map one or more groups from your Identity Service to a Logical People Group.
Creating a Human Task Participant
Creating a Human Task Participant
A human task participant represents the role of a person who performs tasks within the process. The participant is a Logical People Group that is used in building a task to be used in a People activity. It consists of a name and optional parameters.
You can add a task as a child of a participant.
To create a new human task participant:
- 1. In Participants view, right-mouse click on Human Task Participants and select "New Human Task Participant."
- 2. The Properties view opens for the new participant, and the default Name of the Logical People Group is "Role1".
In a Logical People Group, people are assigned to a role such as Potential Owners or Business Administrators.
- 3. If desired, rename this group. Alternately, click the button at the end of the Name field to open the Identity Chooser.
Creating a Task for a Participant
After you create a human task participant, you can create a new process-level task for the participant.
Note: To create a new Notification, see About Notifications.
To Create a New Task:
- 1. In Participants view, right-mouse click on a Logical People Group name (such as "Role1"), and select New Human Task.
- 2. The default Task Name is "Task1". If desired, rename this to something more meaningful.
- 3. Do one of the following
- - Click to accept the name and to finish the details later in the Properties view.
- - Continue to the next step to select or create an interface.
- 4. To select an interface that you have already imported into the workspace, use the Interface tree. Select the WSDL operation for this task.
The tree shows several categories: the current BPEL process and the WSDL interfaces currently in use for other participants (if any), Project and Project Reference Services, and Other workspace orchestration projects containing WSDLs (if any). For details on Using Project References, see the Process Developer Online Help.
- 5. To create a new interface, select Generate Interface. See "Creating a New Interface" in the Process Developer Online Help for details.
You will assign the Logical People Group is to the Potential Owners role in the task that is created.
Using or Mapping Users or Groups From the Identity Service
If desired, you can name actual users or groups from your Identity Service to the PDD Logical People Group panel. Note that the WS-HT specification does not allow a mixture of users and groups.
If you selected a user or group name from the Identity Chooser when you created the Logical People Group, you can use that name in the PDD.
If your Logical People Group has a generic name, such as "Role1", you can map this name to an actual user or group in your Identity Service.
Before you can select actual groups, you must ensure that your Identity Service is correctly enabled, as described in Setting up an Identity Service.
To add individual users, select the Users radio button, and then select Add. In the Add User dialog box, type in the name of one user, named exactly the same as in the Identity Service. For example, if you are testing, you may have defined a user in the tomcat-users.xml file as:
<user name="testUser1" password="b4p" roles="abTaskClient, Finance,Marketing,Accounting,NERegionReps" />
In this example, you can type in testUser1 as a User in the PDD Editor.
To add Groups, select the Groups radio button, and then select Add to add a new group name. You can also select from an Identity Chooser, as described in Using the Identity Chooser During Deployment.
Creating a Task for a Participant
Create the interface for a new BPEL for People task.
After you create a human task participant, you can create a new process-level task for the participant.
Note: To create a new Notification, see About Notifications.
To Create a New Task:
- 1. In Participants view, right-mouse click on a Logical People Group name (such as "Role1"), and select New Human Task.
- 2. Rename the default task name.
- 3. Do one of the following
- - Click to accept the name and to finish the details later in the Properties view.
- - Continue to the next step to select or create an interface.
- 4. To select an interface that you have already imported into the workspace, use the Interface tree. Select the WSDL operation for this task.
The tree shows several categories: the current BPEL process and the WSDL interfaces currently in use for other participants (if any), Project and Project Reference Services, and Other workspace orchestration projects containing WSDLs (if any). For details on Using Project References, see the Process Developer Online Help.
- 5. To create a new interface, select Generate Interface. See "Creating a New Interface" in the Process Developer Online Help for details.
You will assign the Logical People Group is to the Potential Owners role in the task that is created.
Using BPEL4People Extension Elements and Activities
BPEL4People is an extension to the BPEL language and is incorporated into the Process Developer through extension elements and activities, namely:
- • Human Interactions Extension Element
This element is added to the Outline View and contains the child elements available for building a People activity, including Logical People Groups, Tasks, and Notifications.
- •People Activity
Human Interactions Extension Element
Human Interactions is an element in the BPEL4People namespace that is an extension to BPEL. This element contains the child elements you can use to build a People activity, namely Logical People Groups, tasks and notifications.
You can add a Human Interactions element to the process or to a scope. As you define Logical People Groups, tasks and notifications at the process or scope level, they become available to the People activities at that level. Using a Human Interaction is a flexible and optional choice. The benefit is that the people assignments, tasks, and notifications within it are available to all People activities in a process.
The Human Interactions element is automatically added to the process when you use the Participants view to create people and tasks.
To manually add a human interactions element to the process:
- 1. From the Outline View, right mouse click on the process name.
- 2. Select Add > Human Interactions.
- 3. The Outline View displays the BPEL4People elements you can use to build one or more People activities.
Tips:
- •Use the Logical People Groups, tasks, and notifications to define generic elements that you can use in one or more People activities. You can override some of the general settings in each People activity.
- •Add a Human Interactions element to a scope to create local definitions.
- •It is optional to define a human interactions element. You can define a task or notification inline within a People activity, for use only within that activity.
About Logical People Groups (1)
Add Logical People Group parameters.
A Logical People Group is a named list that represents users or groups defined in an Identity Service, such as your company's LDAP directory. The Identity Service must be configured and enabled in the Process Console. Instead of naming the actual users or groups who can manage processes and tasks, you can refer indirectly to them from a Logical People Group.
The Logical People Group, such as customer service representatives, can have a parameter, such as regions, that can be associated with an expression, such as region one. Parameters can be used in an assign activity or with a people query at deployment time (for a JDBC or LDAP Identity service). At run-time, the parameters get resolved.
You can use Logical People Groups in defining task and notification assignments.
For example, you can define a Reviewers Logical People Group as a global construct and then use that Logical People Group within one or more tasks requiring reviewers. The users or groups are actually selected at deployment.
Logical People Groups are global elements enclosed in a Human Interactions extension element. The XML syntax for a Logical People Group element is:
<htd:logicalPeopleGroups>?
<htd:logicalPeopleGroup name="NCName" reference="QName"?>+
<htd:parameter name="NCName" type="QName" />*
</htd:logicalPeopleGroup>
</htd:logicalPeopleGroups>
The parameter element is used to pass data needed for a dynamic assignment of a Logical People Group in an assign activity or for a role assignment within a task. A parameter can also be resolved with a people query evaluation at deployment for JDBC and LDAP Identity services, but not file-based services, such as tomcat-users.xml. You can define several parameters of which some, none, or all of them can be evaluated and used in assignments or in the PDD. In addition, the parameters can be overridden in the Process Deployment Descriptor file.
Logical People Groups can be defined either at the process level or on enclosed scopes.
Creating a Logical People From the Outline View
Add Logical People Group parameters.
You can add a Logical People Group from the Outline View, and it will automatically be added as a Human Task Participant in the Participants View. For a key starting point to create Logical People Groups, see Creating a Human Task Participant.
Creating a Logical People Group From the Outline View:
- 1. From the Outline View, right mouse click on the process name.
- 2. Select Add > Human Interactions.
- 3. Expand the Human Interactions element to see Logical People Groups.
- 4. Right mouse click on Logical People Groups and select Add > Logical People Group.
- 5. In the Properties view, fill in the definition as follows:
- a. Type in a unique name, for example, "Regional Reps."
- b. Add parameters as desired. A parameter can be used in an assign activity or a people query for LDAP or JDBC Identity services in the Process Deployment Descriptor file. Its value can further be expressed by an argument within the role assignment in a task definition. For example, potential owners from the "Northeast Region."
Tip: You can create Logical People Groups at the scope level for use within the enclosing scope.
Logical People Group Parameters and Arguments
Add Logical People Group parameters.
A Logical People Group defined within the Human Interaction element can include parameters. They can be evaluated for specific people queries into an Identity service.
In addition, for each Logical People Group used in a task role assignment, you can add an argument expression for the parameter for that role assignment. When you associate the parameter with a search attribute in your LDAP or JDBC Identity service, the argument is resolved.
When you define a parameter, you can use it as follows:
- •In an assign activity, create an expression for a parameter when copying one Logical People Group to another. For example, you can write an XPath or XQuery expression that reflects the following logic: "The Logical People Group for the next task is the previous task owner's manager."
- •In a people query in the Process Deployment Descriptor, associate the parameter with a search attribute in your JDBC or LDAP Identity service. For example, associate the parameter country_code with an Identity search attribute called country_code.
- •In a role assignment within a task, create an expression for the parameter for a more specific people query in a JDBC or LDAP Identity service (not a file-based Identity service). As the parameter is resolved at runtime, the role assignment expression is also evaluated.
Example: Parameters in a Logical People Group Definition
<htd:logicalPeopleGroup name="regionalClerks">
<htd:documentation xml:lang="en-US">
The group of clerks responsible for the region specified.
</htd:documentation>
<htd:parameter name="region" type="xsd:string" />
</htd:logicalPeopleGroup>
Example: Arguments in Logical People Group Definition for a Potential Owner of a Task
<htd:potentialOwners>
<htd:from logicalPeopleGroup="regionalClerks">
<htd:argument name="region">
htd:getInput("part1")/region
</htd:argument>
</htd:from>
</htd:potentialOwners>
Using a Logical People Group in an Assign Activity
For dynamic assignment of a Logical People Group, you can create Copy Operations in an Assign activity. A Logical People Group can be copied as follows:
Copy from a Logical People Group to:
- •Another Logical People Group
- - Variable or variable property
- - Copy to a Logical People Group from:
- •Literal
- - Expression
- - Variable or variable property
XML Syntax
<wsht:from logicalPeopleGroup="NCName">
<wsht:argument name="NCName" expressionLanguage="anyURI"?>*
value
</wsht:argument>
</wsht:from>
<wsht: to logicalPeopleGroup="NCName"/>
Example: From a Logical People Group Including a Parameter to a Process Variable
<bpel:assign name="getVoters">
<bpel:copy>
<wsht:from logicalPeopleGroup="voters">
<wsht:argument name="region">
$electionRequest/region
</wsht: argument>
</bpel:from>
<bpel:to variable="voters" />
</bpel:copy>
</bpel:assign>
Example: From a Literal to a Logical People Group
<bpel:assign>
<bpel:copy>
<bpel:from>
<bpel:literal>
<myns:entity xsi:type="htd:tOrganizationalEntity">
<htd:users>
<htd:user>Elaine Smith</htd:user>
<htd:user>Julie Delgado</htd:user>
</htd:users>
</myns:entity>
</bpel:literal>
</bpel:from>
<wsht:to logicalPeopleGroup="Directors" />
</bpel:copy>
</bpel:assign>
Example: From an XQuery Expression to a Logical People Group
<ns3:copy>
<ns3:from expressionLanguage="urn:active-endpoints:expression-language:xquery1.0">
<ht:organizationalEntity xmlns:ht='http://www.example.org/WS-HT'>
<ht:users>
<ht:user>{$loanOfficers/loanManager}</ht:user>
</ht:users>
</ht:organizationalEntity></ns3:from>
<ns3:to b4p:logicalPeopleGroup="loanreps"/>
</ns3:copy>
Selecting Users or Groups for Logical People Groups During Deployment
Selecting Users or Groups for Logical People Groups During Deployment
During deployment, you can select list of users or groups or create a query to select users or groups for each Logical People Group defined in the process. The users or groups are those defined in your organization’s Identity Service, such as a Tomcat Users file (for testing) or an LDAP or JDBC directory.
The user or group assignments you make are based on the hd:organizationalEntity data type, defined in the WS-HT specification.
Actual assignment of people to roles occurs when a process is instantiated. This runtime behavior allows members of a role to be determined on a just-in-time basis and is beneficial when group membership changes frequently.
Using Logical People Groups for Role Assignments
Select the value of the Role assignment: literal, expression, or Logical People Group.
A Logical People Group is a construct that represents the users or groups who perform a role related to a task or notification. By defining one or more Logical People Groups, instead of naming actual users or groups, you can re-use a Logical People Group in a variety of ways.
For details on creating a Logical People Group, see About Logical People Groups.
To assign a Logical People Group to a task or notification-related role:
- 1. From the Outline view, select a Human Interactions element or People activity containing a task or notification.
- 2. Select a task or notification to put the Properties View in focus.
- 3. On the Assignment tab, select a role. For example, select Potential Owners. For definition of roles, see Role Assignments for a Task or Notification.
- 4. In the Value column, click (...).
- 5. In the Role dialog, select Logical People Group as the Type.
- 6. Select a name from the Group list.
- 7. If the Logical People Group is defined with parameters, you can do the following:
- a. In the Arguments panel, select a parameter.
- b. Click (...) in the Expression column.
- c. In the Argument Expression Builder, create an expression for the parameter. For example, if the parameter is regions, create an expression that will resolve to region one. For related examples, see Using Expressions for Role Assignments.
Note: You can only use parameters and arguments in an assign activity or in a people query in the Process Deployment Descriptor file. The people query is restricted to JDBC or LDAP Identity services.
For details and examples, see Logical People Group Parameters and Arguments.
Using Literal Values for Role Assignments
Select the value of the Role assignment: literal, expression, or Logical People Group.
Use the Literal option to directly specify users or groups for task and notification-related people assignments. Using Literal, you generate an XML document with placeholder values that you can fill in for individual users or groups.
You cannot have a mixed list of users and groups, according to the WS-HT Human Task specification.
To Add a Literal Value for a Task or Notification Role:
- 1. From the Outline View, select a task or notification.
- 2. In the Assignment tab of the Properties view, select a role, such as a task role of potential owners.
- 3. In the Value column, click (...).
- 4. In the Role dialog, select Literal from the Source list.
- 5. Select Generate.
- 6. Notice that Process Developer generates the ht:organizationalEntity element. This element is required when defining people assignments.
- 7. In the text box, modify the values to add users or groups.
The following literal contents are generated:
<ht:organizationalEntity xmlns:ht='http://www.example.org/WS-HT'>
<ht:users>
<ht:user>Some User</ht:user>
</ht:users>
</ht:organizationalEntity>
Modify this XML sample as follows:
- •Delete or fill in valid values for each Some User in <ht:users>. The user name must match a User Id in your organization's directory, such as MyFirstName.MyName. Add additional <user> elements as desired.
- •Replace <users> with <groups>. Add elements and valid values for <ht:group>.
- •According to the WS-HT specification, you cannot mix users and groups
The following is an example of a valid XML data sample:
<htd:potentialOwners>
<htd:from>
<htd:literal>
<htd:organizationalEntity>
<ht:users>
<ht:user>Ann.Weston</ht:user>
<ht:user>Anu.Martin</ht:user>
<htd:user>Deborah.Smile</ht:user>
</ht:users>
</ht:organizationalEntity>
</ht:literal>
</ht:from>
</ht:potentialOwners>
Using Expressions for Role Assignments
Select the value of the Role assignment: literal, expression, or Logical People Group.
Use the Expression option to write a conditional expression for selecting task or notification-related roles. The expression can be based on the input data of a People activity. For example, if you are invoking a service to retrieve identities, you can pass them into the potential owners or administrators identities.
The expression can include a process variable or it can be composed using WS-HT custom XPath functions, described in Custom Functions.
To Add an Expression for a Task or Notification Role:
- 1. From the Outline View, select task or notification.
- 2. In the Assignment tab of the Properties view, select a role, such as potential owners.
- 3. In the Value column, click (...).
- 4. Select Expression as the Source, and then select Expression Builder.
- 5. In the Expression Builder, select a Human Task (WS-HT) custom function or other variable in creating an expression.
- 6. Select the users or groups for the role.
XML Syntax
<htd:from expressionLanguage="anyURI"?>
expression
</htd:from>
Example: Expression for a Task’s Role Assignment
<htd:potentialOwners>
<htd:from>$voters/users/user[i]</htd:from>
</htd:potentialOwners>
The potential owners definition is contained within a For Each activity.
Example: Using a WS-HT Custom Function:
<htd:potentialOwners>
<htd:from>
htd:getInput("part1")/approvers
</htd:from>
</htd:potentialOwners>
<htd:businessAdministrators>
<htd:from>
htd:except(htd:getInput("part1")/admins,
htd:getInput("part1")/globaladmins[0])
</htd:from>
</htd:businessAdministrators>
The WS-HT custom function getInput returns a list of potential owners defined as the child element approvers in part1 of the task's input message. The business administrators group includes globaladmins and excludes admins.
Example: A Notification's Role Assignment
<htd:peopleAssignments>
<htd:recipients>
<htd:from>
htd:getPotentialOwners("ApproveClaim")
</htd:from>
</htd:recipients>
</htd:peopleAssignments>
Example: XQuery
<htd:potentialOwners>
<htd:from>
<htd:literal>
<ht:organizationalEntity
xmlns:ht='http://www.example.org/WS-HT'>
<ht:groups>
<ht:group>{data($creditInformation/loan:loanTypeGroup)}
</ht:group>
</ht:groups>
</ht:organizationalEntity>
</ht:literal>
</ht:from>
</ht:potentialOwners>
About Tasks
To include human participation as part of process execution, you can add a People activity and define a task for it.
A task is a Human Task (WS-HT) construct that relies on a WSDL interface, people assignments, and other details. By itself a task is not executable. It is designed to be used by a People activity. A special type of task is a notification. For details, see About Notifications.
The BPEL4People specification defines several ways that People activities can incorporate tasks, as shown in the following illustration.
Process Developer handles each of the task implementations as follows:
- • Inline Task #1. Define a task within a People activity for use only within that activity
For implementation details, see Creating an Inline or Local Notification Action for a Task Deadline.
- • Inline Task #2 (Local Task). Define a task within the Human Interactions element on the Outline view to make it available to all People activities in a process. The People activity can use the task as is or create overrides for some properties.
For implementation details, see Adding a Task or Notification to the Outline View for Process or Scope Use.
- •Stand Alone Task #3. (This is a future implementation.) Import into the process a human interaction XML document that contains a task definition and refer to the document within a People activity.
- •Stand Alone Task #4. (This is a future implementation.) Refer to a remote task.
A task definition includes the following parts:
- •Task Name, Interface, and Priority
- •Role Assignments for a Task or Notification
- •Adding Task or Notification Presentation Properties
- •About Task Deadlines and Escalations
- •Using Expressions for Outcome and Search By
- •Adding Rendering Details for a Task or Notification
See also Required and Optional Properties for a Task and Using the All Tab of a Task.
Adding a Task or Notification to the Outline View for Process or Scope Use
To make a task or notification available for all People activities within a process or scope, you can create definitions within the Human Interactions element on the Outline view.
- 1. In the Outline view, right-mouse click on the process name or a scope activity.
- 2. Select Add Human Interaction.
- 3. Expand "Human Interactions" and right-mouse click on Tasks (or Notifications).
- 4. Select Add > Human Task.The Human Task wizard opens, where you can select a WSDL interface or select OK to complete the WSDL details later.
- 5. In the Properties view for the task, fill in the details.
A task definition includes the following parts:
- •Task Name, Interface, and Priority
- •Role Assignments for a Task or Notification
- •Adding Task or Notification Presentation Properties
- •About Task Deadlines and Escalations
- •Using Expressions for Outcome and Search By
- •Adding Rendering Details for a Task or Notification
For required properties, see Required and Optional Properties for a Task.
A notification definition includes parts described in About Notifications.
Required and Optional Properties for a Task
The following table describes required and optional properties required to make a task valid as well as properties you can optionally define:
Required Properties | Optional Properties |
|---|
Interface | Outcome and Search By Expressions |
Priority | Task Deadlines - All |
People assignments | Renderings |
Subject | Description |
Task Name Interface and Priority
In the Properties view of a task, the Task tab displays the following properties:
- •Name. (Required). The name combined with the target namespace of a task element uniquely identifies the task definition. This is not the name displayed to task users; that name is Display Name, as described in Adding Task or Notification Presentation Properties.
- •Priority (Required). You can set a default priority level as a non-negative integer, starting at zero as the highest priority. You can create the priority as an expression. The priority is displayed in to users, and task owners or administrators can change the level. A way to raise the priority when the task is in progress is to set an escalation action, described in About Task Deadlines and Escalations. Note that priorities 0 and 1 are displayed with red and yellow flags, respectively. For an illustration of how a priority appears to users, see Adding Task or Notification Presentation Properties.
- •Interface. (Required). Specifies the WSDL port type and operation used to invoke the task. The WSDL must be available in the Project Explorer. See Adding a Task Interface.
See also About Tasks.
Adding a Task Interface
Enter an interface for a callback when a task is described with a one-way operation.
A task is based on a WSDL port type definition. Essentially, a task represents a "service" that is 'invoked' by an operation that contains input and optionally, an output and fault message. You must import a WSDL into your process and then select the port type and operation as an interface to the task. The operation must be a request-response type.
If your process already contains an import for the WSDL that defines the Port Type and Operation, then select the appropriate values.
Role Assignments for a Task or Notification
Specify the constraints for task delegation.
In the Properties view of a task, select the Assignment tab to define participants for the generic roles associated with a task or recipients for a notification.
For a task, you must select at least one user as a potential owner, business administrator, or task stakeholder. For a notification, at least one recipient is required.
If you assign a single user to a task, the task is in auto-claim mode. When the assigned user logs into Process Central, the task is already in the Claimed state. Normally the task is in the Ready state for a potential owner to claim it.
The generic roles are as follows:
Role Assignment | Description |
|---|
Potential Owners | Individuals or groups of people who receive a task. Each person receives the same task. Any one of them can claim ownership of a task, making it unavailable for all others. |
Excluded Owners | Individuals or groups of people who may not become an actual or potential owner and thus they may not reserve or start the task. |
Task Stakeholders | Individuals or groups of people who can influence the progress of a task, for example, by adding attachments or simply observing the state changes of the task. They are also allowed to perform administrative actions on the task instance and associated notifications, such as resolving missed deadlines. |
Task Initiator | The person who creates the task instance. Depending on how a task is instantiated, a task initiator may or may not be defined. A case where the initiator could be known is when the actual owner or business administrator of Task A initiates Task B. At runtime, a task initiator may skip the task, if it is enabled as "skippable." The task appears in the initiator's task view with a Skip button. For details, see Required and Optional Properties for a Task. |
Business Administrators (Task and notification) | Individuals or groups of people who are responsible for ensuring that the task or notification is completed. As such, Administrators can assign a task to any user or claim a task for themselves in order to work on it. An Administrator can also see a list of all task instances for all potential and actual owners of a task. When you set up task deadlines, you can trigger events, such as notifications, that can be targeted for Administrators. Administrators have the same permissions as task stakeholders. |
Delegation (Task only) | In addition to selecting individuals or groups to receive the task, you can specify constraints concerning delegation of the task to others. By default, there is no constraint. Potential owners, the actual owner or a business administrator can delegate a task to any other user. On the All tab of a task, you can select anybody, nobody or potential owners. You can also specify individual or groups of delegatees by creating a literal, expression, or logical people group. |
Recipients (Notification only) | Individuals or groups of people who receive notifications. |
To define one of the generic roles, see:
- •Using Literal Values for Role Assignments
- •Using Expressions for Role Assignments
- •Using Logical People Groups for Role Assignments
Adding Task or Notification Presentation Properties
Adding Task or Notification Presentation Properties
You can add information and instructions for task owners and administrators to help them work on the task. For a notification, there is no work to do, so typically detailed information is not required.
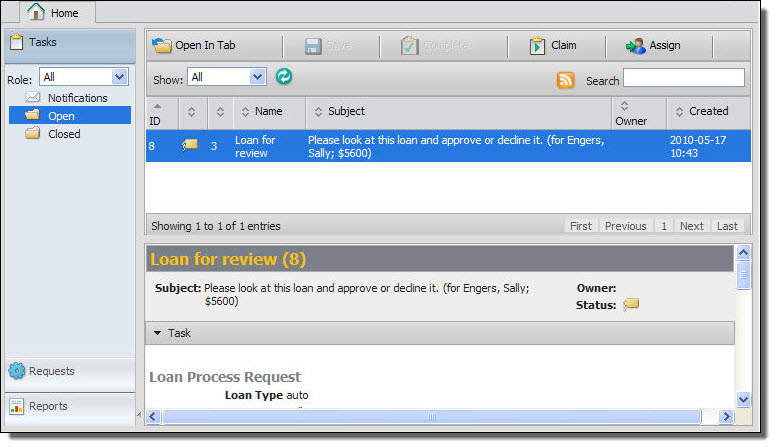
As you are creating the presentation properties, keep in mind how they will appear to users. The following illustration shows an example task for a user, and the list below describes the user interface elements you can create within the Presentation tab of a task or notification.
- •Priority (Default). A task or notification has a priority level, displayed as an integer, starting at zero as the highest priority. (For details on creating a priority, see Task Name, Interface, and Priority.) In the illustration above, the task priority of 3 is shown to the left of the task Name.
- •Display Name (Optional). The property appears as the Name to users. The maximum length is 64 characters.
- •Subject (Required). Short description of the task or notification. You can write this as described in Configuring Presentation Parameters for a Task or Notification Subject or Description. The maximum length of the resulting string is 254 characters.
- •Detailed Description (Optional). Long description of the task or notification as seen in the Additional Information section. You can write this as described in Configuring Presentation Parameters for a Task or Notification Subject or Description and Adding a Content Type for a Task or Notification Description.
- •Renderings (Optional). For details, see About Task Presentation in Process Central.
Configuring Presentation Parameters for a Task or Notification Subject or Description
Provide presentation details for the task or notification.
The task Subject property defines the basic information for users to know what the task is all about. The subject line is similar to an email subject line, and is displayed similarly.
The task Description property can be lengthy and is displayed in the Additional Information section of a task.
You can specify the subject and description by using presentation parameters, which are expression-based variables that can be included in text. For example, a subject might be composed as:
Approve the insurance claim for {$lastname}, {$firstname}.
In this example the parameters, enclosed by curly braces, are configured by referring to child elements in an input message.
Presentation parameters can be based on input data unique to a task instance, making each subject line or description unique.
See the example in topics that follow.
In addition, you can add multi-lingual (localization) support for a Subject. For details, see Adding MultiLingual Support for Task Subject, Description, and Display Name.
You can also use Presentation Parameters to create custom task properties. For details, see Creating Custom Task Properties.
To Configure Presentation Parameters:
- 1. Put the Presentation tab of a task in focus in the Properties view.
- 2. Select the Dialog button at the end of either the Subject or Description field.
- 3. In the Presentation Parameters dialog, select Add. The placeholders param and string are added to a row.
- 4. Type over param with a meaningful Parameter name, such as the name of an input message part you will use in the parameter expression. For example, type in lastname.
- 5. Select the parameter Type from a drop-down list. The type is a simple XSD type. The type string is selected by default.
- 6. Click (...) in the Expression column.
- 7. Create an expression in the Expression Builder.
Tip: Use one of the BPEL4People custom functions to return data from a task input message. See the example below.
The following illustration shows an example of presentation parameters within the Subject.
Adding MultiLingual Support for Task Subject Description and Display Name
On a task’s Presentation tab, you can externalize the text in a Subject’s expression, a Description’s expression, and the Display Name. For an overview of how to create an expression, see Configuring Presentation Parameters for a Task or Notification Subject or Description.
Externalizing the Text Strings for a Subject, Description, and Display Name:
- 1. Open the Properties view of a task and select the Presentation tab.
- 2. At the end of the Subject expression that you have added, append the required syntax for multilingual support, as follows:
| [keyname, {$var}]
where:
- - "|" (vertical bar) is the separator
- - "[ ]" (brackets) contain all externalization values
- - keyname is an identifier for the Subject expression
- - {$var} represents a variable used in the Subject expression
These are shown in the following figure:
Here are some examples. Note that the default expression is to the left of the vertical bar and the externalization values are to the right:
- - This is my subject | [taskSubject]
- - My subject is {$parameter} | [taskSubject, {$parameter}]
- - My subject is {$param1} and {$param2} | [taskSubject , {$param1}, {$param2} ]
- 3. Add the bundle key name and value to each message properties file that you create for multilingual support. For example, in the English file:
- - taskSubject=This is my subject
- - taskSubject=My subject is {0}
- - taskSubject=My subject is {0} and {1}
For details on creating message property files, see "Adding MultiLingual Support to Process Central" in the Process Developer Online Help.
- 4. Repeat steps 2 and 3 for the task’s Description. The Description appears in the Task Details section in Process Central.
- 5. Repeat steps 2 and 3 for a task Display Name. Note that only a key name is allowed.
- 6. Be sure that your Process Central configuration file (.avcconfig file) contains an i18n location reference for your default properties file. For details, see "Adding MultiLingual Support for an .avcconfig File" in the Process Developer Online Help.
Adding a Content Type for a Task or Notification Description
Add a content type for a description.
You can specify one or more content types, such as plain text, HTML, or XHTML, for the text in a task description. You can then compose the description differently, as desired, for each content type. The default content type is plain text.
Adding a Content Type:
- 1. Put the Presentation tab of a task in focus in the Properties view.
- 2. In the Description panel, select the Add (+) button next to Type.
- 3. In the Content Type dialog, type in a new content-type value. For example, add "text/html".
Note: Process Developer supports plain text, HTML, and XHTML. However, you can add any content type you wish that you may be supporting in your own client task application.
Using the All Tab of a Task
In a task's Properties view, the All tab displays the complete list of properties, including some that do not appear on the Task, Presentation, and Assignment tabs.
You can define or modify properties on the All tab or on the other tabs as desired.
For details on properties that appear only on the All tab, see the following topics:
- •Using Expressions for Outcome and Search By
- •Adding Rendering Details for a Task or Notification
- •Role Assignments for a Task or Notification
Using Expressions for Outcome and Search By
Create an expression for task outcome.
You can use the following two expressions:
- • Outcome
This optional element identifies the field of an XSD simple type variable in the output message that reflects the business result of a task. Using Outcome enables you to create a query to produce an xs:string which represents the outcome of the task. This query is run against the specified part of the output data.
This element is not displayed in an Process Developer task client, but can be useful as part of the HT API.
- • Search By
This optional element lets you create an expression which produces an xs:string that can be used to quickly locate a task within the a task client application. The expression evaluates using the input data for the task. For example, a loan application request contains several data parts, including an application ID customer name, and other loan details. The Search By expression may extract the application ID from the input data. In a task client, a user can type in an application ID in the Search By field to quickly retrieve a particular task.
The Search By expression created in Designer might be:
htd:getInput('loanPart')/@applicationId
where application Id evaluates to a five-digit number associated with the loan application request. In the Process Developer task client, a user would enter a five-digit number in the Search By field, such as "12345", to locate a particular task.
About Task Deadlines and Escalations
Select a deadline event (escalation) to view its definition.
You can specify one or more deadlines by which a task must be started and also one or more deadlines by which a task must be completed. If a start date or completion date is missed, you can trigger one or more escalation actions. For example, set a "start the task" deadline for three hours after a task is created, and if the deadline is missed, send a notification to the task's owner. If the second deadline is missed, alert the business administrator.
In addition to the simple example of notifying a task owner when a task is late, there are many expressions and conditions you can apply to a task deadline.
Note the following about setting deadlines:
- •Start deadlines describe when a potential owner must start working on a task. The deadlines are enabled as soon as the task is created and are disabled after a potential owner starts the task.
- •Completion deadlines describe when an owner must complete a task. The deadlines are enabled as soon as the task is created and are disabled after an owner completes the task.
If a task is reassigned, which changes the task state to unclaimed, the original deadlines are still in effect. For details, see About Task LifeCycle.
See the following topics for details on setting deadline alarms and escalation actions.
- •Adding Start and Completion Deadlines and Alarms
- •Selecting an Escalation Action to Occur When a Task Deadline is Triggered
- •Defining a Condition for an Escalation Action
- •Using Task Data or Mapped Data for a Notification
- •Creating an Inline or Local Notification Action for a Task Deadline
- •Using a Reassignment Action for a Task Deadline
- •Invoking a Process When a Task Deadline Occurs
Adding Start and Completion Deadlines and Alarms
You can set deadlines for when a task must start and when a task must complete.
If desired, you can set deadlines for when a task must start and when a task must complete. For example, if a task must start within three hours of being created, you can set a start deadline and add an escalation action to notify the potential owners that no one has started the task. The notification is sent to all potential owners.
You can add multiple start and completion deadlines for a task. For details on the definition of start and completion, see About Task Deadlines and Escalations.
Creating a Start (or Completion) Deadline for a Task:
- 1. In the Outline view, select a people activity that has a task (not a notification).
- 2. Select the people activity's task.
- 3. In the task Properties view, select the Deadlines tab, and select Add.
- 4. In the Deadline Specification dialog, select the deadline type: Start or Completion. A start deadline indicates when a task must be started by. A completion deadline indicates when a task must be completed by.
- 5. Select an Alarm Type: Deadline or Duration. You can fill in the expression later.
- 6. Select one of the escalation types to occur when the deadline occurs:
- - inline notification
- - local notification
- - reassignment
- - process invoke
- - send email
- 7. In the table, click (...) in the Expression column to create a deadline or duration value that conforms to the type selected.
- 8. To complete the details for the escalation, see Selecting an Escalation Action to Occur When a Task Deadline is Triggered.
- 9. Add more start and completion deadlines as desired.
Tips:
- •The start time begins when the task is created; that is, when the BPEL process executes the People activity.
- •An example of a duration of six hours is PT6H. For more examples on how to express deadlines or durations, refer to the Process Developer Online Help.
- •If desired, add a condition to the expression.
- •On the Deadlines tab of a task, select a deadline and then select Go To to view the properties of the deadline.
Selecting an Escalation Action to Occur When a Task Deadline is Triggered
You can set deadlines for when a task must start and when a task must complete.
If desired, you can define start and completion deadlines for a task, and when a deadline is reached, trigger an escalation action. For details on how to set a task deadline, see Adding Start and Completion Deadlines and Alarms.
An escalation action is an event that ranges from a simple notification to a process invocation.
The following table describes the escalation actions available to occur when you set a task deadline.
Escalation Action | Description |
|---|
Inline Notification | Adds a new notification available only to the current task |
Local Notification | Adds a notification that was defined in the process or enclosing scope |
Reassign Task | Removes the task from the current users and groups’ task view and reassigns it to specified users or groups |
Invoke a process | Executes a BPEL process that may, for example, send an email instead of a notification |
Send email | Sends an email to a list of recipients; this requires that the Email and Identity services are enabled and configured in Process Server |
In addition, you can trigger an escalation action under certain conditions and with certain data. For details, see:
- •Defining a Condition for an Escalation Action
- •Using Task Data or Mapped Data for a Notification
Defining a Condition for an Escalation Action
As you define deadlines for the start and completion of a task, you can add a condition for triggering an escalation action. For example, you can check to see what the current priority of the task is, and if it is a high priority, trigger the escalation action. Escalation actions include notifications, reassignments, and process invocations, as described in Selecting an Escalation Action to Occur When a Task Deadline is Triggered.
If you add a condition to an escalation action, the escalation does not occur unless the condition evaluates to true.
Adding a Condition for an Escalation:
- 1. Open the Properties view of an escalation, such as an inline notification under a Start Deadline of a task.
- 2. Select the Dialog (...) Button at the end of the Condition text box.
- 3. In the Condition Builder, select the functions and variables for your condition. For example:
htd:getInput("ClaimApprovalRequest")/amount < 10000
In this example, the amount part of the ClaimApprovalRequest variable must be less than $10,000 in order for the condition to evaluate to true.
As you write conditions, you can take advantage of the Human Task functions, in particular the getInput function shown in the example. This function returns data from a running task instance.
Using Task Data or Mapped Data for a Notification
Notification data. Use task data or specify how to map data to another variable part.
Like a task, a notification has input data based on a WSDL interface. The interface for a notification serving as a task deadline's escalation action may be the same or different from the interface for the task.
The Properties view of an inline or local notification has a Data section:
- •Use Task Data. If the notification's input data is the same as the enclosing task's, then this option is available for selection. The input message of the task is passed to the notification.
- •Map Data. If the notification's data is a different type, then you can assign appropriate data to the notification to create a multi-part WSDL message from the data. The part attribute refers to a part of the WSDL message. You must map each part for every part in the WSDL message definition to avoid uninitialized parts in the target WSDL message.
To Map Data:
- 1. In the Properties view of a notification used as an escalation, select the Map Data radio button.
- 2. Select the Dialog button in the Expression row for the first message part.
- 3. Create an expression for the data mapping, as shown in the following illustration:
Example
This example comes from the WS-HT specification:
<htd:toParts>
<htd:toPart name="firstname">
htd:getInput("ClaimApprovalRequest","ApproveClaim")
/firstname
</htd:toPart>
<htd:toPart name="lastname">
htd:getInput("ClaimApprovalRequest","ApproveClaim")
/lastname
</htd:toPart>
<htd:toPart name="taskId">
htd:getTaskID("ApproveClaim")
</htd:toPart>
</htd:toParts>
Creating an Inline or Local Notification Action for a Task Deadline
A common escalation action associated with a task deadline is a notification. When a deadline is reached, a notification can alert a task owner about a late task. For a discussion of escalations, see About Task Deadlines and Escalations.
Two of the escalation actions you can select are inline notification and local notification.
- •An inline notification is a new notification, defined exclusively, in this case, as an escalation action. For details on defining a notification, see About Notifications.
- •A local notification is defined at the process or scope level, within a Human Interaction element. You can customize the notification for a particular escalation by providing overrides for the existing people assignments and the existing priority.
Creating an Inline Notification:
- 1. In the Outline view, right mouse click on Task > Start (or Completion) Deadline > Inline Notification.
- 2. In the Properties view, fill in all the required details for the notification, including interface, assignments, priority, and presentation Subject.
Creating a Local Notification:
- 1. In the Outline view, right mouse click on Task > Start (or Completion) Deadline > Local Notification.
- 2. In the Local Notification Properties view, select a Notification from the picklist.
- 3. If desired, add a new priority.
- 4. If desired, add new assignments on the Assignments tab.
For details on setting a condition and using task data, see Defining a Condition for an Escalation Action and Using Task Data or Mapped Data for a Notification.
Using a Reassignment Action for a Task Deadline
Reassignments are used to replace the potential owners of a task when an escalation is triggered. For a discussion of escalations, see About Task Deadlines and Escalations.
To Create a Reassignment:
- 1. In the Outline view, right mouse click on Task > Start (or Completion) Deadline > Reassignment.
- 2. In the Properties view, select potential owners for the task.
For details on adding a condition, see Defining a Condition for an Escalation Action.
Invoking a Process When a Task Deadline Occurs
The Invoke Process action is an extension escalation provided by Informatica. This action is based on Informatica-provided WSDL, "Custom B4P Notification", as described in Creating Custom Escalation Actions.
You can deploy a BPEL process to your server and then specify the service name as an escalation action. You might want to invoke a process to send an email to a user, rather than send a notification to a task client application.
To Create an Invoke Process Action:
- 1. Ensure that you have deployed your BPEL process that serves as a custom escalation action. This process must be based on the special template, Custom B4P Notification.
- 2. In the Outline view, right mouse click on Task > Start (or Completion) Deadline>Process Invoke.
- 3. In the Properties view, add the Service name of a BPEL file deployed to the same server where your current process will run. You can copy the service name from the Process Console's Service Definitions page.
Note: You must use the special BPEL template, Custom B4P Notification, designed for a custom notification, as described in Creating Custom Escalation Actions.
- 4. If desired, create a Data expression for task or other data you wish to pass to the called service. For example, create an expression to determine the task priority or list of potential owners.
For details on adding a condition, see Defining a Condition for an Escalation Action.
Sending Email When a Task Deadline Occurs
The Send Email action is an extension escalation provided by Informatica. When a deadline is reached, an email can alert a task owner or administrator about a late task. For a discussion of escalations, see About Task Deadlines and Escalations.
Sending email requires that you set up the Email Service in Process Server. The Email service provides a default sender's email address, which you can configure. For details, see the Process Server Online Help.
To Create a Send Email Action:s
- 1. In the Outline view, right mouse click on Task > Start (or Completion) Deadline > Send Email.
- 2. In the Email tab, add an expression for one or more recipients. The assignment you make to recipients must evaluate to the hd:organizationalEntity data type, defined in the WS-HT specification. Typing the name of a Logical People Group or a user name is not a valid value. To create a valid expression, use a Human Task custom function from the Expression Builder, such as:
htd:getPotentialOwners("reviewTask")
- 3. Add an expression for the Subject and for the Body of the email. To write these expressions, see the example below. Also, see Email Service in the Process Developer Online Help for some tips on creating the Subject and Body using expressions.
- 4. Optionally, add a condition, as described in Defining a Condition for an Escalation Action.
Here are examples of valid email values:
- •Recipients: htd:getLogicalPeopleGroup('loanreps')
- •Subject: 'New task in Central'
- •Body: concat('Please review new loan for ', htd:getInput('Document')/loan:lastName, 'which has just arrived in Process Central.')
About Notifications (1)
A notification is a WS-HT construct that relies on a WSDL interface, people assignments, and other details that are incorporated into a People activity.
In BPMN, a notification is implemented within a Send Task or Message Send Event.
By itself a notification is not executable. It is designed to be used as an escalation action within a task or as the main construct of a People activity.
Unlike a task, a notification does not have an outcome. It relies on a one-way operation in a WSDL, serving to inform users of an event such as missed deadline or product ship date. Notifications usually are displayed in users’ task client application along with tasks. They could also be used in other forms, like email or text message, if you choose to create your own client applications.
The BPEL4People specification defines several ways that a People activity can incorporate a notification, as follows:
- •An inline notification declared within the People activity. The notification can be used only by that People activity. For details, see Creating an Inline Task or Notification.
- •A local notification declared within either the scope containing the People activity or the process scope. In this case, the notification can be reused as an implementation of multiple People activities enclosed within the scope containing the notification declaration. For details, see Adding a Task or Notification to the Outline View for Process or Scope Use.
- •An escalation action for a task deadline. For details, see About Task Deadlines and Escalations
- •(For future release.) A standalone notification identified using a QName. In this case the notification can be reused across multiple BPEL4People processes within the same environment.
A notification definition contains the following parts:
- •Notification Name, Priority, and Interface
- •Role Assignments for a Task or Notification
- •Adding Task or Notification Presentation Properties
- •Adding Rendering Details for a Task or Notification
Required and Optional Properties for a Notification
The following table describes properties required to make a notification valid as well as properties you can optionally define:
Required Properties | Optional Properties |
|---|
Interface | Description |
Priority | Renderings |
People Assignments | |
Subject | |
Notification Name Priority and Interface
Enter the port type and operation from the WSDL you want to use for the notification interface.
In the Properties view of a notification, the Notification tab displays the following properties:
- •Name. (Required). The name combined with the target namespace of a notification element is used to uniquely identify the notification definition. Note that this is not the name displayed in users’ task area in Process Central. That name is Display Name, as described in Adding Task or Notification Presentation Properties.
- •Priority (Optional). You can set a default priority level as a non-negative integer, starting at zero as the highest priority. You can create the priority as an expression. The priority is displayed in users’ Task Details view. Note that priority zero (0) is displayed with red flag. For an illustration of how a priority appears in a user’s Task Details view, see Adding Task or Notification Presentation Properties.
- •Interface. (Required). Specifies the WSDL port type and one-way operation that is the interface to the notification. The WSDL must be available in the Project Explorer.
If your process already contains an import for the WSDL that defines the Port Type and Operation then select the appropriate values.
Using the All Tab of a Notification
In a notification's Properties view, the All tab displays all available properties, including some that do not appear on the Notification, Presentation, and Assignment tabs.
You can define properties on the All tab or on the other tabs as desired.
For details on properties that appear only on the All tab, see Adding Rendering Details for a Task or Notification.