Adding Human Interaction
After an acknowledgment is sent to the loan requester, add the People activity to the process.
Step 1. Add the LoanApproval Human Task Participant and Task Owners and Administrators
To create the human interaction for approving a loan, use WS-BPEL For People and WS-Human Task features.
A group called loanreps can claim and work on the tasks, while a group called loanmgrs would be administrators--they can escalate and reassign tasks. In BPEL, these are called a Logical People Group. They are added in the Participants view under Human Task Participants.
Logical People Group definitions must be defined for both loanreps and loanmgrs, and then they aree associated with the proper role for the task.
- 1. In the Participants view, right click Human Task Participants, and select New Human Task Participant. You will need to add a new participant role named Role1 to the Participants view.
- 2. Select Role1. Edit the value for Name from Role1 to loanreps. Later, when defining a deployment descriptor for the process, you will associate this Logical People Group name with an actual set of users that the configured Identity Service will resolve at runtime.
- 3. Repeat Steps 1 through 2 to add a second Logical People Group, this time naming it loanmgrs.
Step 2. Create the loan approval Human Task
Now that you've declared the Logical People Groups, you can define its tasks. Start with WSDL defining the interactions. You can reuse the LoanApproval WSDL that was removed from the process earlier, but this time it will provide definitions for interaction with a person instead of a service.
- 1. In the Participants view, right click the loanreps Logical People Group, and select New Human Task.... The Human Task dialog opens, showing available port types. Remember that in WS-BPEL For People, people activities are just another type of service interaction, and they are declared in WSDL.
- 2. Expand the loanProcessHuman - Imported Services then the LoanApproval to display the approve operation, select it and press OK.
A new task will appear in the Participants view, under loanreps, called Task1.
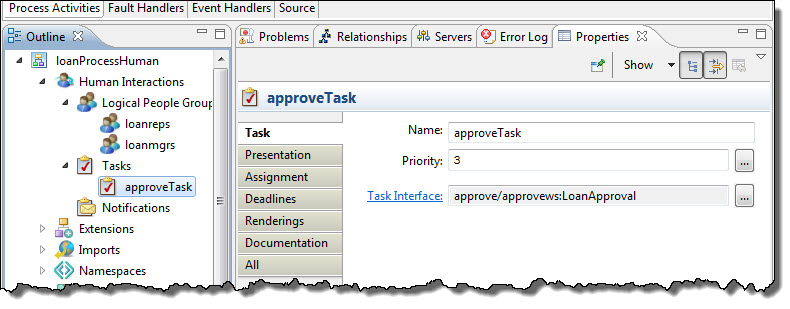
- 3. Select Task1 so that is displayed in the Properties view. Edit the value of the Name property to approveTask.
- 4. Set the Priority to 3. Your task properties should look similar to the following:
- 5. Select the Presentation side tab in the Properties view and set the following properties:
- - Display Name: Loan for review
- - Subject: Please look at this loan and approve or decline it. (for {$loansummary})
- - Type: default
- 6. Still at the Presentation tab, define the loansummary substitution variable that was just entered in the Subject area:
- a. Press the ellipsis button at the right of the panel.
- b. In the Presentation Parameters dialog that appears, press Add to add a new parameter. A new parameter called param1 whose type is string will appear.
- c. Click on the Parameter name to make it editable, and enter loansummary.
- d. Leave the Type as string.
- e. Click on the expression to make it editable, and enter the following value:
concat(htd:getInput('Document')/loan:lastName , ", ",
htd:getInput('Document')/loan:firstName , "; $",
htd:getInput('Document')/loan:amountRequested )
Your dialog should look similar to this:
Step 3. Complete Binding the Task Owners and Administrators to the Task
The Potential Owners Role was automatically set to loanreps when you created the task. You now need to assign other users to some of the other task roles. Do this by assigning the loanmgrs Logical People Group to the Business Administrators role, and by assigning the Loan Process literal to the Task Initiator role.
- 1. Select the Assignment tab and set the value for Business Administrator to loanmgrs as follows:
- a. Click in the Value column for Role Name Business Administrator. An ellipsis button appears. Click it to display the Role dialog.
- b. In the Role dialog, select Logical People Group in the Type picklist.
- c. In the Group picklist, select loanmgrs, and press OK.
- 2. Still at the Assignment tab, set a value for Task initiator as follows:
- a. Click in the Value column for Role Name Task Initiator. An ellipsis button appears. Click it to display the Role dialog.
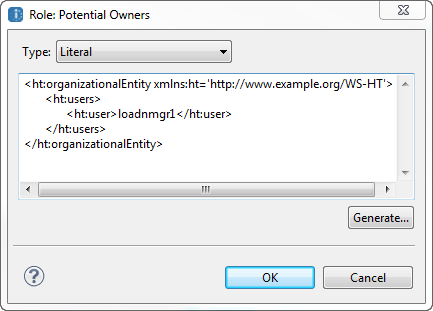
- b. In the Role dialog, select Literal in the Type picklist.
- c. Select Generate to generate XML for a user.
- d. Edit the value of the ht:user element to say Loan Process.
- e. Your dialog should look like this:
Step 4. Setting Task Deadlines
You can specify one or more deadlines by which a task must be started and also one or more deadlines by which a task must be completed. If a start or completion date is missed, you can trigger one or more escalation actions. For example, if you set a start the task deadline for two hours after a task is created and the deadline is missed, you can send a notification to the task owner. Here are the deadlines you will set:
- •A start deadline that is triggered if the task is not claimed and started by a loanrep within 2 hours.
- •A completion deadline that is triggered if the task s not completed by a loanrep within 130 minutes.
Step 4a. Setting the Start Deadline
- 1. From either Participants or Outline view, select the approveTask node and select the Deadlines side tab in the Properties view.
- 2. Click the Add button and set the properties for Deadline Type to Start, the Alarm Type to Duration and the Escalation Type to Inline Notification.
- 3. Press OK.
- 4. Click in the blank value under the Expression column and press the ellipses button (...) and set the duration expression to the following: 'PT120M'. Include the single quotes in what you type.
- 5. Repeat steps 1-4 and create a completion deadline with a Duration Alarm Type for 10 minutes later ('PT130M').
- 6. The two task deadlines appear in the Properties view:
- 7. In the Outline view, select the Start Deadline and select the Escalations side tab in the Properties view.
- 8. Select the Inline Notification labeled InlineNofication1 and press the Go To button.
- 9. In the Properties view, select the Notification tab and change the name to TwoHourReminder.
- 10. In the Outline view, expand the TwoHourReminder node and select the child node labeled N1. This is the where you define the escalation action that is triggered if the deadline is reached.
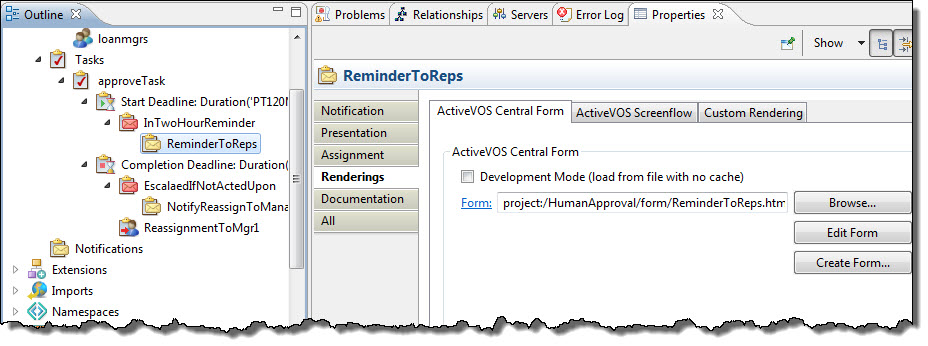
- 11. In the Properties view, select the Notification tab and set the following properties:
- - Name: ReminderToReps
- - Priority: 2
- 12. Press the ellipsis button to the right of the Notification Interface field.
- 13. In the Notification Interface dialog that appears, navigate to the LoanApprovalPeople port type, and select the remind operation.
The remind operation is a one-way operation that notifies loanreps that a loan application has waited two hours for review. The Notification tab should look similar to the following:
- 14. In the Properties view, select the Presentation tab and set the following properties:
- - Display Name: Unclaimed Task reminder
- - Subject: There is a loan task waiting to be claimed. ({$lastname}, {$firstname}; ${$amount} priority {$priority})
- - Description Type: default
- - Description Content: A loan review has been unclaimed for 2 hours. Please go to your inbox and claim if appropriate.
- 15. In the Properties view, select the Presentation tab, press the ellipsis to the right of the Subject field, and set the following presentation parameters:
Parameter | Type | Expression |
firstname | string | htd:getInput('Document', 'approveTask')/loan:firstName |
lastname | string | htd:getInput('Document', 'approveTask')/loan:lastName |
amount | string | htd:getInput('Document', 'approveTask')/loan:amountRequested |
priority | string | htd:getTaskPriority() |
Your completed dialog should look similar to this:
- 16. Press OK.
- 17. In the Properties view, select the Assignment tab, click in the Value field, and set the Recipients to loanreps and Business Administrator to loanmgrs.
Step 4b. Setting the Completion Deadline
- 1. In the Outline view select the Completion Deadline and press the Escalation tab in the Properties view.
- 2. Select the Inline Notification labeled InlineNofication1 and press the Go To button.
- 3. In the Properties view, select the Notification tab and change the name to EscalateIfNotActedUpon.
- 4. In the Outline view, expand the EscalateIfNotActedUpon node and select the child node labeled N1.
- 5. In the Properties view select the Notification tab and set the following properties:
- - Name: NotifyReassignToManager
- - Priority: 1
- - Notification Interface: remind/loanhuman:LoanApprovalPeople
- 6. In the Properties view select the Presentation tab and set the following properties:
- - Display Name: Escalated To Manager
- - Subject: This loan is being reassigned to loanmgr1 for review
- - Description Type: default
- - Description Content: Needs to be completed within 10 minutes!
- 7. In the Properties view select the Assignment tab and set the Recipients to loanreps and Business Administrator to loanmgrs, as you did in a previous step for Reminder to Reps.
- 8. In the Outline view select the Completion Deadline and press the Escalation side tab in the Properties view.
- 9. Press the Add button and specify Reassignment for the Escalation Type:
- 10. Select the Reassignment labeledReassignment1 and press the Go To button.
- 11. In the Properties view select the Reassignment side tab and change the name to ReassignToMgr1.
- 12. In the Properties view select the Assignmentside tab and set the properties by pressing the ellipses (...) button in the Value column:
- - Select Literal for the Type.
- - Press the Generate... button
- - Change the value in <ht:user> from Some User to loanmgr1
- - Press OK.
- - Your Properties should look like the following:
Step 5. Setting Task Renderings
Process Developer can create an HTML Form (or an XSL file or a custom rendering) that will render the task information in the Process Central Task forms. You can edit this form to customize how task information is presented to the user in the Process Central web application.
- 1. In the Outline view select the approveTask.
- 2. In the Properties view select the Renderings tab.
- 3. The Create Form button presents a dialog were you can specify the project folder and name for the form.
- 4. You will create the form in the form folder and use the default name of approveTask.html.
After you select OK, the Form editor opens.
- 5. You can see a preview of the form in the top half of the editor. Close the form.
- 6. Create Process Central forms for the task notifications by expanding the approveTask in the Outline view and trhen creating new Process Central Forms for the two notifications: ReminderToReps and NotifyReassignToManager (highlighted in the following figure).
That's it. The task is now complete with escalations, notifications, and rendering information. All that remains is to create a People Activity based on the task, and to place it in the process.
Step 6. Creating the People Activity
Now that you've defined the human task, the last step is to create a people activity in the process that uses the task. Although you've already defined most of the details of the human interaction through setting properties associated with the task, the people activity has a few properties of its own as well, and you need to set them as well.
- 1. In the Participants view, select the approveTask. Drag it from the Participants view to a position after the Under Review activity:
- 2. Select the people activity, and the associated Properties view. Edit the properties for the activity as follows:
- a. On the People Activity tab, change the name to ReviewLoan. Select a color, such as orange.
- b. On the Assignment tab, no changes are required. Note that the role assignment information that was entered during task definition has been propagated to the people activity automatically. It can be overridden here if desired.
- c. The Schedule tab allows you to control when the activity is executed, and how long it is allowed to take. These parameters are separate from the escalation deadlines that are part of the task definition, and all are taken into account at runtime. Set an Expiration expression for a task duration of 'PT180M', the maximum allowed duration for the people activity.
- d. On the Input tab:
- ▪ In the Assignment picklist, select Single Variable.
- ▪ In the Variable picklist, select creditInformation.
- e. On the Output tab:
You have now completed the definition of both a human task for loan application review, and a people activity using that task. You've added the people activity to the process at the appropriate location. In the final part of the process, you will notify the Customer Service Department of the loan approval decision, so that they can inform the customer.