Identity Service
An identity service provides a way for a BPEL process to look up users and groups in an enterprise directory service or database. The Process Server identity service is based on one of the following:
By providing the communication details for look-up access to your identity service, you can do the following:
- •Run BPEL processes that implement identity-based activities. When a process runs, the person or group specified in the process is looked up in your identity service. Identity-based activities use a system-supplied WSDL, as described in the Process Developer documentation.
- •For the BPEL for People functionality, specify users or groups to receive tasks into their Process Server or other task client
Note: When a user is removed from an ICS group and an executing process is associated with the group, there may be a short interval that the user can still invoke the process. This is because this information is cached and is refreshed every five minutes. This interval can be longer if ICS is not executing.
Creating a Trusted Keystore File
To ensure that the Process Server can trust the SSL certificate presented by the LDAP server, the LDAP server's certificate, or its CA's certificate such as VeriSign, must be installed in a Java key store file which is designated as the store keeping a list of trusted certificates. This trust key store file must be accessible by the Process Server engine.
Example
Assuming your LDAP server is Apache DS running SSL using a self-signed certificate, you would use the following steps to create a trusted keystore file.
- 1. Export the Apache DS SSL certificate as a DER-formatted file using the Java/Sun keytool. For example:
c:> keytool -export -keystore apacheds.ks -alias apacheDsAlias
-file aeldap.cer
where apacheds.ks is the key store database in which the Apache DS SSL certificate is stored, apacheDsAlias is the alias within that key store, and aeldap.cer is the name of the file where the certificate is exported to.
- 2. When you run the command in Step 1, you will be prompted for the keystore password. Add the password for the apacheds.ks file.
- 3. Create a new keystore file, such as aeTrustedCA.ks, on the same machine as the Process Server engine. This key store will contain trusted certificates. Also in the same command, import the certificate. For example:
c:> keytool -import -file aeldap.cer -alias apacheDsAlias
-keystore aeTrustedCA.ks -storepass secret
where aeldap.cer is the file that was exported from the Apache DS server aeTrustedCA.ks is the name of the new key store file on machine that is running the Process Server engine, and secret is the password for the apacheds.ks file.
- 4. When you run the command in Step 3, you will be asked whether to trust this certificate. Type in yes to add the certificate.
- 5. From the Identity Service Page of the Process Console, enter the full path to the aeTrustedCA.ks file for the Trusted Keystore Path.
JDBC Identity Service
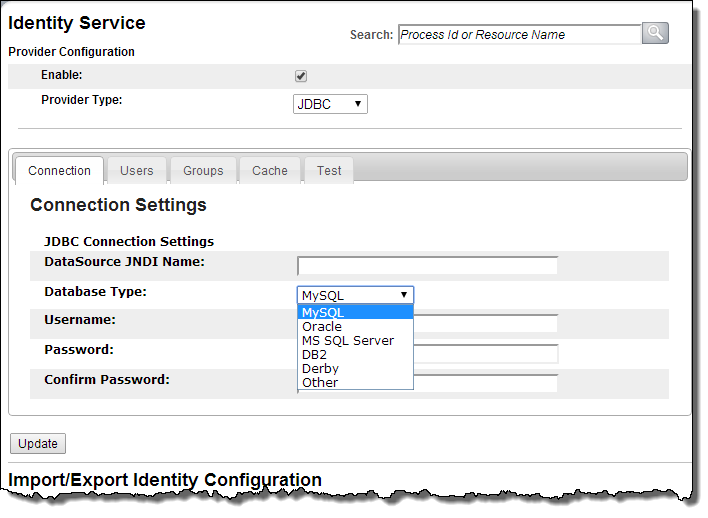
If you select a Provider Type of JDBC, the Connection tab is as follows:
In your identity service, be sure to map the Process Central security role, abTaskClient, to each user that will login to Process Central.
View and update identity service settings as shown in the table below.
Before enabling a JDBC datasource for the identity service ensure the prerequisites are met:
- •A database is configured for use with JDBC identity service
- •A connection pool resource is configured in your application server
- •The database driver exists in the common/lib (or similar) directory
Note: Tomcat users must manually configure the JNDI DataSource in the Process Server context file.
If desired you can import and export your JDBC configuration.
Enter the provider-specific connection settings used to establish connectivity to your identity store.
Provider Configuration |
|---|
Enable | Add a checkmark to use the identity service. Initially the service is disabled since it is not configured and ready for use. Configure the remaining settings, and then enable the service. |
Provider Type | Select JDBC from the drop-down list: |
DataSource JNDI Name | The resource must be assigned a JNDI name for location at run-time. For example, java:comp/env/jdbc/IdentityTest |
Database Type | Choose database type from picklist. Choose Other to use generic settings |
Username | (Optional). An application server may require credentials for a JNDI context; that is, credentials for doing a lookup on the JNDI tree. Your application server may require credentials for looking up a connection pool for access to the identity service. In this case, you must provide the user name and password. For a local data source, you can leave this field blank. Note that the user name for the JNDI context is not the same as the user name for the data source itself. The data source username must be set on the connection pool resource. |
Password | (Optional) Password associated with Username |
LDAP Identity Service
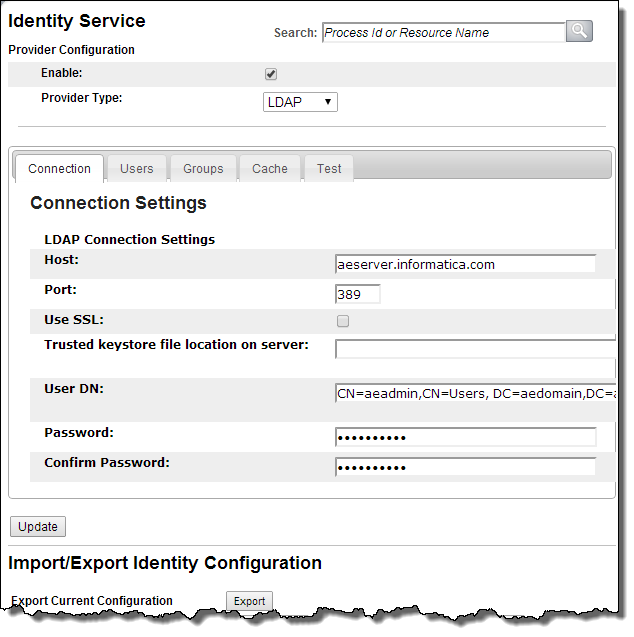
If you are using an identity service that makes use of LDAP, select it from the Provider Type picklist. Here is what you will see:
Note: In your identity service, be sure to map the Process Central security role, abTaskClient, to each user that will login to Process Central.
View and update identity service settings as shown in the following table. If desired, you can import and export your LDAP configuration.
Enter the provider-specific connection settings used to establish connectivity to your identity store.
Provider Configuration |
|---|
Enable | Add a checkmark to use the identity service. Initially the service is disabled since it is not configured and ready for use. Configure the remaining settings, enable the service, and select Update. |
Provider Type | Select LDAP from the drop-down list: |
Host | Enter the LDAP server’s DNS name such as ldap1.my-domain-name.com or IP address such as 192.168.1.1. |
Port | Enter the port to use for communications between the Process Server and the LDAP server. The default value is 389. |
Use SSL | (Optional) Enable this checkbox to provide encrypted transport communication between Process Server and the LDAP service. If you enable this, you must enter a trusted keystore file location in the next field. |
Trusted keystore file location on the server | (Optional) Enter the full path to the aeTrustedCA.ks file for the Trusted Keystore Path. This file must be accessible by all instances of the server when deployed in a clustered environment. This path is required if SSL is enabled. This is discussed following this table. |
User DN | Enter the user distinguished name. Most directory servers do not allow anonymous access, therefore the username and password is required. The username should be the distinguished name of the user. For Microsoft Active Directory, an example of a user distinguished name is: CN=Administrator, CN=Users, DC=domainname, DC=com (or local) For an open LDAP service, an example of the DN is: uid=admin, ou=system |
Password | Enter the administrator password for access to the directory service, and confirm it. |
Creating a Trusted Keystore File
To ensure that the Process Server can trust the SSL certificate presented by the LDAP server, the LDAP server's certificate, or its CA's certificate such as VeriSign, must be installed in a Java key store file which is designated as the store keeping a list of trusted certificates. This trust key store file must be accessible by the Process Server engine.
Example
Assuming your LDAP server is Apache DS running SSL using a self-signed certificate, here's how you could create a trusted keystore file.
- 1. Export the Apache DS SSL certificate as a DER-formatted file using the Java/Sun keytool. For example:
c:> keytool -export -keystore apacheds.ks -alias apacheDsAlias
-file aeldap.cer
where apacheds.ks is the key store database in which the Apache DS SSL certificate is stored, apacheDsAlias is the alias within that key store, and aeldap.cer is the name of the file where the certificate is exported to.
- 2. When you run the command in Step 1, you will be prompted for the keystore password. Add the password for the apacheds.ks file.
- 3. Create a new keystore file, such as aeTrustedCA.ks, on the same machine as the Process Server engine. This key store will contain trusted certificates. Also in the same command, import the certificate. For example:
c:> keytool -import -file aeldap.cer -alias apacheDsAlias
-keystore aeTrustedCA.ks -storepass secret
where aeldap.cer is the file that was exported from the Apache DS server aeTrustedCA.ks is the name of the new key store file on machine that is running the Process Server engine, and secret is the password for the apacheds.ks file.
- 4. When you run the command in Step 3, you will be asked whether to trust this certificate. Type yes to add the certificate.
- 5. From the Identity Service Page of the Process Console, enter the full path to the aeTrustedCA.ks file for the Trusted Keystore Path, as described rarlier in this topic.
XML or LDIF Identity Service
If you are using an identity service that makes use of XML or LDIF, select one of these from the Provider Type picklist. Here is what you will see:
In your identity service, be sure to map the Process Central security role, abTaskClient, to each user that will login to Process Central.
View and update identity service settings as shown in the following table.
Note that file-based identity service does not require any additional information beyond the connection settings.
Enter the provider-specific connection settings used to establish connectivity to your identity store.
Provider Configuration |
|---|
Enable | Add a checkmark to use the identity service. Initially the service is disabled since it is not configured and ready for use. Configure the remaining settings, enable the service, and select Update. |
Provider Type | Select from the drop-down list: - - LDIF. (LDAP Data Interchange Format). A file-based service representing (LDAP) directory content.
- - XML File. A file-based service, such as the entries found in tomcat-users.xml file.
Be sure to see the notes that follow this table. |
File location on server | This field is displayed only if the Provider Type is LDIF or XML File. Do one of the following: - - For an LDIF provider, provide a path to your .LDIF file. (See the notes that follow this table.)
- - For a provider based on XML user entries, provide a path to your file. (See the notes that follow this table.)
|
Notes for File-Based Service:
- •If you are running in a clustered environment, ensure that the file is shared or is on the same path in all servers.
- •The file you select must be on the Process Server
- •You can add an email entry to your XML file. For example, <user name="user1" password="user1pw" roles="admin,oabTaskClient" email=”user1@example.com”/>
- •The LDIF or XML file is read each time the Process Server starts. You can update the file at any time. If the server is running, select Update to refresh the file contents.
User and Group Attribute Mapping
When looking up a user or group in an LDAP or JDBC-based Identity service, Process Server search procedure includes several basic identity attributes. For users and groups, these are:
- •Users
- - person
- - memberOf (recommended, if Identity service supports it)
- - userName (required)
- - email
- - firstName
- - lastName
- •Groups
- - groupName (required)
- - member (required for LDAP)
This generic model applies to any Identity service, and you can use it as is, or delete the optional attributes from the model.
The memberOf Users attribute is recommended for making searches for group members more efficient, especially where a user is a member of more than one group. Be sure to map a user as memberOf all relevant groups and add the user as a member in relevant Groups.
If desired, you can add many other search attributes to the basic model, and then use these attributes in LDAP or JDBC people queries from within a BPEL process People activity. When you add a search attribute from your Identity service, you must map it to a new attribute that gets added to the Process Server search model.
For example, if your Identity service includes a loginCount attribute, you can add that to the Users or Groups attribute mapping page. The attributes can be loaded into the Process Developer Process Deployment Descriptor Editor, where a developer has access to them for creating Logical People Group queries. For details on using identity attributes in Process Developer, see Logical People Group Queries in Process Developer Help.
To Add an Attribute Mapping:
- 1. On the Users or Groups tab of the Identity Service, select Add Attribute.
- 2. In the Provider Attribute/Column Name column, type in the name of an existing attribute that is in your identity store.
- 3. In the Model Attribute column, type in the same name or alias for the attribute.
- 4. Select the data type from the list. The list contains all types defined by the search model, based on the Higgins Open Source Identity Framework. (The Process Server uses Higgins to enable the adding of identity attributes to the search model.) Note that the list also contains two custom types, GroupReference and PersonReference. Use one of these types if you want to reference a group or user by name, rather than by the full distinguished name or primary key defined in the data store.
To Delete an Attribute Mapping:
- 1. Select the checkbox next to the Model Attribute field.
- 2. Select Update. The attribute is removed.
Testing LDAP and JDBC Configurations
You can test user and group configurations for an Identity service in the following ways:
- •Select a user for testing
- •Write a test query
Note: The Test tab is the same for JDBC and LDAP.
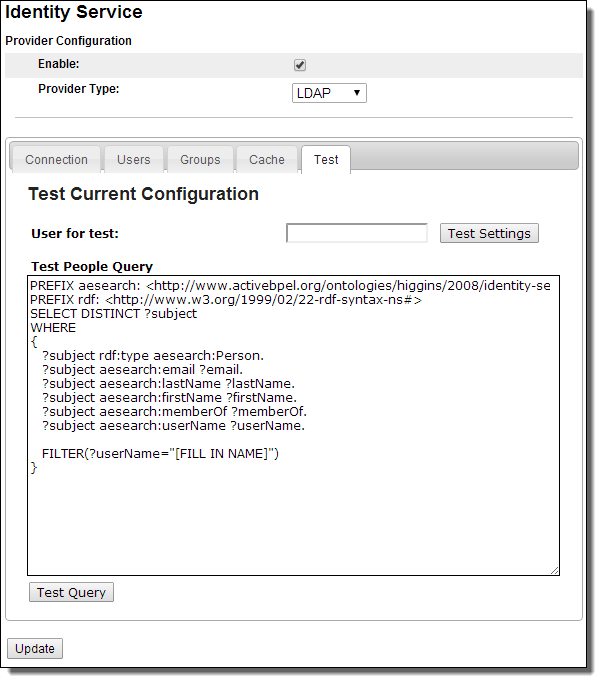
After selecting this tab, the following is displayed:
Selecting a user for testing
In the Test tab, enter a user name listed in your Identity service, and select Test Settings. This test ensures that the Identity service is set up correctly. If the test fails, the error messages try to suggest how to correct the configuration settings.
Writing a test query
The Process Server Identity search model allows identity queries to be made using the SPARQL Protocol and RDF Query Language. SPARQL is a standard language, well-suited to query identity resources. The Process Server use of SPARQL includes preconfiguring most of the required parts of the query. You need only to add a FILTER keyword to test the user and group attributes you added on the Users and Groups tabs of the Identity Service configuration page.
By writing the FILTER clause of a SPARQL expression, you can test the results of required and optional attributes. The default FILTER clause in the Test Query box is: FILTER($userName="[FILL IN NAME]"). Replace the text between the quotes with a user name and select Test Query.
For details on writing SPARQL queries, see http://www.w3.org/TR/rdf-sparql-query/
Sample SPARQL Queries
- •FILTER (($memberOf = "NE_Reps") || ($memberOf="NW_Reps"))
Select users that are members of either the "NE Reps" or "NW Reps" group
- •FILTER ( (($memberOf = "NE_Reps") || ($memberOf="NW_Reps")) && BOUND(?email) )
Select users that are members of either the "NE Reps" or "NW Reps" group and have an email address
- •FILTER($vacation != "On Vacation")
Select users who are not on vacation.
Note that the Test Query box accepts only literals for testing.
See also User and Group Attribute Mapping.
If your JDBC Identity service is on Apache Tomcat, see Manual Configuration for a JDBC Identity Service on Tomcat.
Importing and Exporting an Identity Configuration
The Import/Export Identity Configuration section is at the bottom of all Identity Service pages.
On the Connection Settings tab of the Identity Service, select Export to generate an XML document displayed in your browser. You can use the browser’s Save As feature to save the document to file. You can then import these settings to another Process Server.
Note: On Google Chrome, you'll see a blank page. Right-mouse click and select view page source to view the XML document.
Import a configuration file by browsing to the file and selecting Import.
Identity Service Cache Settings
To enhance server performance, Process Server caches query results from the identity service for running processes. By default, the cache is enabled.
Note: The same information is displayed for all identity services.
If you do not expect many changes to the identity service as you run processes, you should enable caching. If the members of your identity service change frequently, you can increase the Cache Expiration and Cache Size values or disable the cache.
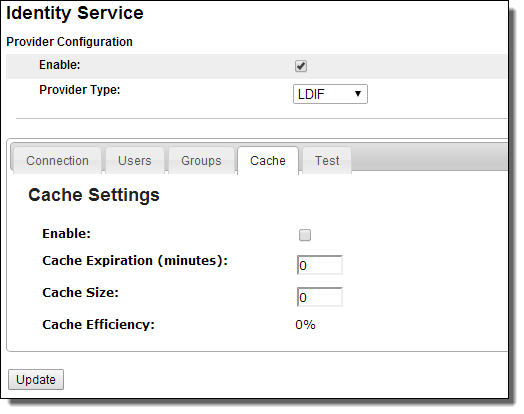
After selecting the Cache tab, the following is displayed:
- 1. Select Enable to use cache settings.
- 2. Set the Cache Expiration to at least one minute. The maximum is unlimited and the default is 30 minutes.
- 3. Set the Cache Size to a unit of in-memory queries to the identity service. The default is 100.
- 4. Press Update.
After enabling or disabling the cache settings and selecting Update, Process Server immediately makes the change.
This page also displays the cache efficiency. This is the percentage of reads from in-memory cache compared to total reads. Total reads includes going out to the identity service get the data. A large percentage value indicates that the in-memory cache is being used.
Manual Configuration for a JDBC Identity Service on Tomcat
To use a JDBC Identity Service on Tomcat, you must perform a manual step in addition to configuring the service in the Process Console. You must configure the JNDI data source by adding a declaration for your resource to the Process Server context.
Add an element like the following example to two files: $CATALINA_HOME/conf/Catalina/localhost/activevos.xml file and active-bpel.xml.
Nest the declaration inside the Context element.
Example:
<Resource name="jdbc/TestDB"
auth="Container"
type="javax.sql.DataSource"
maxActive="100"
maxIdle="30"
maxWait="10000"
username="javauser"
password="javapw"
driverClassName="com.mysql.jdbc.Driver"
url="jdbc:mysql://localhost:3306/javatest?autoReconnect=true"/>


