Using Process Developer to Create HTML Forms
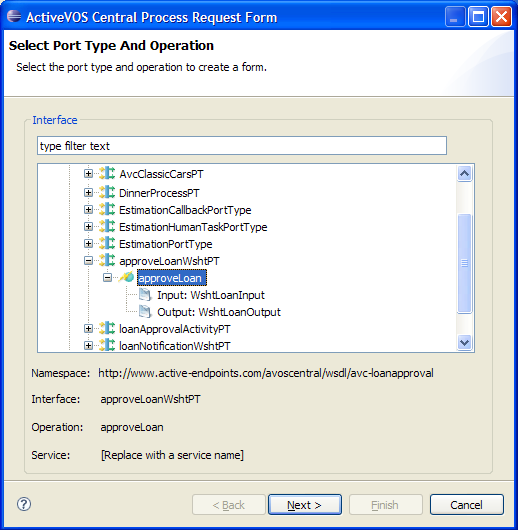
You can create HTML forms and basic supporting JavaScript using ActiveVOS Designer. The Process Request Form action available under File > New > Other > Orchestration brings up a wizard style dialog. From this dialog, you can choose your request WSDL, port-type, operation and the destination where the generated HTML file is saved.
Select the WSDL port-type and operation.
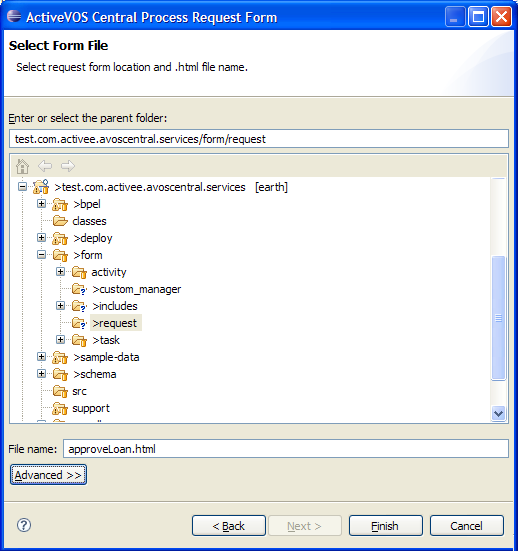
Select the location where the HTML file will be saved.
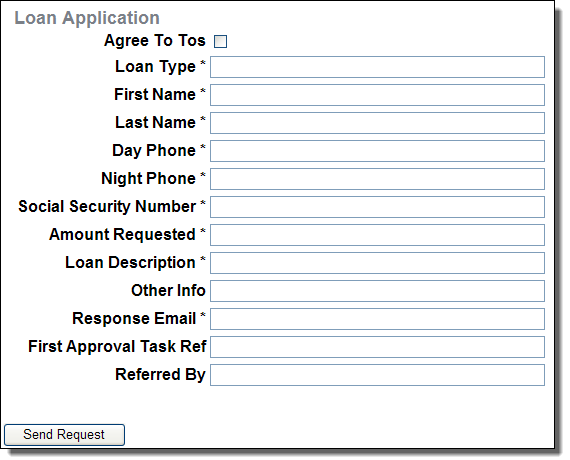
The generated html forms looks similar to (in the case of Loan Approval process):
The basic structure of a generated request form HTML looks like the following:
<html>
<head>
<!-- header content -->
</head>
<body>
<!--
Main DIV that contains all markup
related to this request form UI
-->
<div id="processRequestForm$ID">
<!-- DIV that contains UI related request form and data entry -->
<div id="processRequestForm$ID">
<div>Display Name UI</div>
<!-- container for the form UI controls -->
<div>
<form id="loanApplicationInputForm$ID">
<!-- actual form content, for example: -->
First Name: <input id="firstName$ID" name="firstName" value="" size="50" /> <br/>
Last Name: <input id="lastName$ID" name="lastName" value="" size="50" /> <br/>
</form>
<!-- Send button -->
<input type="button" id="sendRequest$ID" value="Send Request" />
</div>
</div>
<!--
DIV that contains html to show
the results after submitting a form (invoking a process).
Note this DIV is initially hidden, and only shown when
response data needs to be displayed.
-->
<div id="responseContainer$ID" style="display: none;">
</div>
</div>
<!-- Script -->
<script type="text/javascript">
// <![CDATA[
// JavaScript to implement JSON process invoke
// ]]>
</script>
</body>
</html>
The HTML above is a skeleton used that illustrates various elements used in Process Developer generated forms. The actual form may be a little more detailed and is targeted for use with jQuery and jQueryUI. Note that all elements used in the form have an id attribute. This attribute is used as the primary selector when Process Server needs to access various elements within the HTML document. Also note that the id attribute values that are generated end with the $ID suffix (for example processRequestForm$ID in <div id="processRequestForm$ID">).
All elements in an HTML document must have unique values for the id attribute. In cases where you need to display the same form more than once (a requirement of Process Central), the elements cannot be duplicated with the same values for the id attribute. When the forms are used with Process Central, the forms server automatically replaces the $ID suffix with a unique value so that a form can be cloned and used in the same HTML document. For example, at runtime Process Central may have two loan request form instances <div id="processRequestForm_01"> and <div id="processRequestForm_02"> (note where $ID has been replaced with _01 and _02 in this example).
Since this document pertains to using single instance of forms (outside of Process Central), you can use the generated html as is after performing a search-and-replace of $ID suffix with any string that does not have a $. For example, if all occurrences of $ID is replaced with an empty value, you essentially remove the $ID suffix; for example, <div id="processRequestForm$ID"> becomes <div id="processRequestForm">.
Using jQuery form input data can be used with the id selectors. For example, getting the current value of the firstName input field is $("#firstName$ID").val(). The field value can be prepopulated with data using $("#firstName$ID").val("John"). The complete script that drives the form can be found at the end of the form in the <script> section. The basic mechanics of the script looks similar to following skeleton code :
// The jQuery 'ready' event is fired once the page (form) is loaded and ready for processing.
$(document).ready(function() {
// bind button click event handler code when the Send button is pressed.
$("#sendRequest$ID").click( function() {
sendForm(); // see fn below.
});
});
// send form
function sendForm() {
// first grab data entered by user.
var firstNameStr = $("#firstName$ID").val();
// ..
// .. get other UI data such as loanType, lastName, phone etc.
// ..
// build JSON request
var loanRequestJSON = {"loanProcessRequest":
{"xmlns":"http:\/\/schemas.active-endpoints.com\/sample\/LoanRequest\/2008\/02\/loanRequest.xsd",
"loanType":{"$t": loanTypeStr},
"firstName":{"$t": firstNameStr},
"lastName":{"$t": lastNameStr},
"dayPhone":{"$t": dayPhoneStr},
"nightPhone":{"$t": nightPhoneStr,
"socialSecurityNumber":{"$t": ssnStr},
"amountRequested":{"$t": loanAmount},
"loanDescription":{"$t": loanDesc},
"responseEmail":{"$t": email}
}
};
// JSON endpoint URL (for example,
// http://localhost:8080/active-bpel/services/JSON/humantaskProcessDemoService)
var loanServiceUrl =
AE_AJAX_SERVICE_UTIL.getActiveVOSServiceUrl("JSON/humantaskProcessDemoService");
// send JSON request
AE_AJAX_SERVICE_UTIL.postJSON(
loanServiceUrl,
loanRequestJSON,
function(aJsonResponse) {
// success result handler:
// show <status/> element text in the response div.
var statusText = AE_JSON_NODE_UTIL.getText(aJsonResponse.status);
// (above is same as aJsonResponse.status.$t)
// append the status text string to the <div id="responseContainer$ID" /> div
$("#responseContainer$ID").html("<p>Status=" + statusText + "</p>");
// show the div (since it was initially hidden)
$("#responseContainer$ID").show();
},
function(aJsonFault) {
alert("Fault!");
},
function(aStatusCode, aStatusMessage) {
alert("Transport error: " + aStatusCode + " " + aStatusMessage);
}
);
}
This code demonstrates the approach taken to handle form submissions. The actual code in the generated form is a little more detailed, but still follows this methodology. In the generated code, the script related to a form is enclosed in a function:
// Function that encapsulates the form script.
var AeRequestForm$ID = function() {
// variable defining the name of service
var mServiceName = "humantaskProcessDemoService";
//
// internal functions: pseudo code shown below for brevity
//
// This function is called when the form is loaded.
function documentReady() {
// initialize and populate UI here.
// code to bind the SendButton click event to invoke _submitRequest() function
// also invoke _setupValidation();
}
// function is called (by documentReady() )
function _setupValidation() {
// optional code to setup & initialize your form data validation
}
// Function returns the JSON data structure for this operation
function getInputRequest() {
// code that creates JSON object. For example:
// var json = { "loanProcessRequest": {...} };
// return json;
}
// function called when the Send Request button is pressed.
function _submitRequest() {
// 1. validate the form by calling avcform_validate().
// 2. var jsonReq = getInputRequest();
// 3. get form UI data and populate jsonReq object
// 4. serviceUrl = AE_AJAX_SERVICE_UTIL.getActiveVOSServiceUrl("JSON/" + mServiceName);
// 5. invoke json request via:
// AE_REQUESTS_UTIL.postJSON(serviceUrl, jsonReq, _showResponseCallback, ....);
//
}
// validate the form
function avcform_validate() {
// check form date and validate (e.g. verify required fields have data etc.)
// return true if user submitted data is valid
}
// Called by postJSON(..) code in _submitRequest() function.
function _showResponseCallback(aJsonResponse) {
// called to display response from a json invoke
}
// Called by postJSON(..) code in _submitRequest() function.
function _showFaultCallback(aJsonFault) {
// handle fault
}
// Called by postJSON(..) code in _submitRequest() function.
function _communicationErrorCallback(aStatusCode, aError) {
// error handler code
}
}
// The jQuery 'ready' event is fired once the page (form) is loaded
// and ready for processing.
$(document).ready(function() {
// Create Request Form JavaScript object
var requestForm = new AeRequestForm$ID();
// initialize form
requestForm.documentReady();
});