Creating Guides and Processes
You can create guides or processes while working in Process Designer or while working in the Salesforce Guide Designer, if you have licensed the Salesforce Managed Package.
- 1. From Informatica Cloud, select Design > Services & Processes to start Process Designer. From Salesforce, select Guide Designer.
- 2. From the Design Home page:
- •Double-click the guide name or click Open in the toolbar to edit an existing guide or process.
- •Click New and select Guide or Process to create a new object.
You can complete the guide or process properties described in the following sections.
Note that:
- •Each guide or process has a Start step to identify its starting point.
- •For each subsequent step, you can specify properties using the Property Sheet accessible on the right side of the canvas. Open the Step Type Palette on the left side of the canvas to drag specific step types into the guide or process.
- •Each guide or process also contains an End step.
Navigating the Tree
Most trees contain more steps than can fit on your screen. They are almost always too wide and often too high. To help you focus on the steps you are creating and editing, the guide designer focuses on the step you're currently working on, only showing a few steps before and after it. It also mostly limits what it is displaying to the branch containing this step and perhaps a few steps in nearby branches.
Using Your Keyboard
You can use the following keys and shortcuts:
Key | Description |
|---|
Up Arrow | Moves to a step immediately above the current step |
Down Arrow | Moves to a step immediately below the current step |
Left Arrow | Move to the step immediately to the left of the current step |
Right Arrow | Moves to the step immediately to the right of the current step |
Insert | Inserts a new step in front of the selected step |
Delete | Deletes the selected step or steps and its subtree |
Ctrl+X | Cuts (removes) the current step or step and its subtree |
Ctrl+C | Copies the current step or step and its subtree |
Ctrl+V | Pastes the step or subtree previously cut or copied |
Ctrl+Z | Undoes the previous action |
Ctrl+Y | Restores the action that was undone by the Undo command |
Using Your Mouse
Changing Which Steps are Displayed
The space where you view the process might be too small to see all of process's steps. You can get to other part of the process by clicking your left mouse in white space within the window, then dragging the window's contents.
Opening a Step
To open the Step Information dialog, place your cursor over a step and double click. The editor then displays the Step Information dialog. When you are done working on a step, you can select one of the following buttons at the bottom of the dialog:
- •OK: Applies the changes and closes the step editor.
- •Cancel: Cancels the changes and closes the step editor.
- •Apply: Applies the changes but does not close the step editor. You can select another step to work on without closing the editor.
Other Ways to Use Your Mouse
Your mouse also lets you perform the following actions:
- Zooming
- Use the wheel on your mouse to zoom in and out, making what you see either larger or smaller.
- Inserting
- Double-click on the arrow between steps to insert an empty step between the two.
- Rearranging Branches
- When the editor adds branches to the right of a step--for example, after you've inserted a Decision step--you can rearrange the branches by selecting a branch and move it up or down.
- Moving a Step to a New Place in the Guide
- Click on a step, then drag it to it's new location.
- Moving a Step and the Steps that Follow
- To move a step and the steps that follow to a new place in the guide, click and hold the arrow preceding the steps to be moved and drag the arrow into its new position.
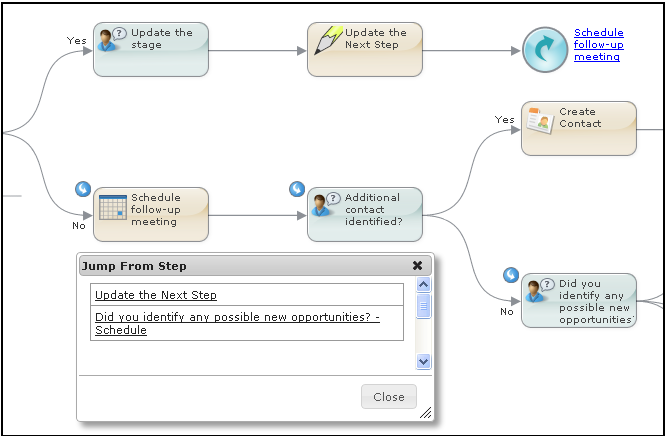
Jump Steps
While most steps have lines leading away from them, a Jump Step does not. After the jump is defined, you will see a link to the right of the step.
Here's an example:
If you click on the link in the upper-right corner, the designer selects the step being jumped to. In this figure, this is step in the lower-left corner.
Three of the steps in this figure have small arrows similar to a Jump Step in their upper left corner. This lets you know that another step is jumping to it. If you click on a small arrow, the editor displays a dialog that names the steps jumping to this step. If you click on one of these "jump from" steps, the editor focuses on that step.
Embedded Steps
Embedded steps, let you go directly to the embedded guide. Similarly, the guide that was embedded can place you in its embedding guide. In the following figure, the embedding guide has a "+" button within it. If you press that button, the embedded guide is displayed.
In the embedded guide, notice the inward pointing arrow at the start step. If you click this button, it displays a dialog containing the guides that embed this guide. Clicking on the link within that dialog takes you to that guide.