Model Repository Service Management
Use the Administrator tool to manage the Model Repository Service and the Model repository content. For example, you can use the Administrator tool to manage repository content, search, and repository logs.
Content Management for the Model Repository Service
When you create the Model Repository Service, you can create the repository content. Alternatively, you can create the Model Repository Service using existing repository content. The repository name is the same as the name of the Model Repository Service.
You can also delete the repository content. You may choose to delete repository content to delete a corrupted repository or to increase disk or database space.
Creating and Deleting Repository Content
1. On the Manage tab, select the Services and Nodes view.
2. In the Domain Navigator, select the Model Repository Service.
3. To create the repository content, on the Manage tab Actions menu, click Repository Contents > Create.
4. Or, to delete repository content, on the Manage tab Actions menu, click Repository Contents > Delete.
If you delete and create new repository content for a Model Repository Service that is configured for monitoring, then you must restart the domain after you create new content. If you do not restart the domain, then the Model Repository Service does not resume statistics collection.
Model Repository Backup and Restoration
Regularly back up repositories to prevent data loss due to hardware or software problems. When you back up a repository, the Model Repository Service saves the repository to a file, including the repository objects and the search index. If you need to recover the repository, you can restore the content of the repository from this file.
When you back up a repository, the Model Repository Service writes the file to the service backup directory. The service backup directory is a subdirectory of the node backup directory with the name of the Model Repository Service. For example, a Model Repository Service named MRS writes repository backup files to the following location:
<node_backup_directory>\MRS
You specify the node backup directory when you set up the node. View the general properties of the node to determine the path of the backup directory. The Model Repository Service uses the extension .mrep for all Model repository backup files.
To ensure that the Model Repository Service creates a consistent backup file, the backup operation blocks all other repository operations until the backup completes. You might want to schedule repository backups when users are not logged in.
To restore the backup file of a Model Repository Service to a different Model Repository Service, you must copy the backup file and place it in backup directory of the Model Repository Service to which you want to restore the backup. For example, you want to restore the backup file of a Model Repository Service named MRS1 to a Model Repository Service named MRS2. You must copy the backup file of MRS1 from <node_backup_directory>\MRS1 and place the file in <node_backup_directory>\MRS2.
Note: When you back up and then delete the contents of a Model repository, you must restart the Model Repository Service before you restore the contents from the backup. If you try to restore the Model repository contents and have not recycled the service, you may get an error related to search indices.
Backing Up the Repository Content
You can back up the content of a Model repository to restore the repository content to another repository or to retain a copy of the repository.
1. On the Manage tab, select the Services and Nodes view.
2. In the Domain Navigator, select the Model Repository Service.
3. On the Manage tab Actions menu, click Repository Contents > Back Up.
The Back Up Repository Contents dialog box appears.
4. Enter the following information:
Option | Description |
|---|
Username | User name of any user in the domain. |
Password | Password of the domain user. |
SecurityDomain | Domain to which the domain user belongs. Default is Native. |
Output File Name | Name of the output file. |
Description | Description of the contents of the output file. |
5. Click Overwrite to overwrite a file with the same name.
6. Click OK.
The Model Repository Service writes the backup file to the service backup directory.
Restoring the Repository Content
You can restore repository content to a Model repository from a repository backup file.
Verify that the repository is empty. If the repository contains content, the restore option is disabled.
1. On the Manage tab, select the Services and Nodes view.
2. In the Navigator, select the Model Repository Service.
3. On the Manage tab Actions menu, click Repository Contents > Restore.
The Restore Repository Contents dialog box appears.
4. Select a backup file to restore.
5. Enter the following information:
Option | Description |
|---|
Username | User name of any user in the domain. |
Password | Password of the domain user. |
Security Domain | Domain to which the domain user belongs. Default is Native. |
6. Click OK.
If the Model Repository service is configured for monitoring, then you must recycle the Model Repository Service. If you do not recycle the Model Repository Service, then the service does not resume statistics collection.
Viewing Repository Backup Files
You can view the repository backup files written to the Model Repository Service backup directory.
1. On the Manage tab, select the Services and Nodes view.
2. In the Navigator, select the Model Repository Service.
3. On the Manage tab Actions menu, click Repository Contents > View Backup Files.
The View Repository Backup Files dialog box appears and shows the backup files for the Model Repository Service.
Security Management for the Model Repository Service
You manage users, groups, privileges, and roles on the Security tab of the Administrator tool.
You manage permissions for repository objects in Informatica Developer and Informatica Analyst. Permissions control access to projects in the repository. Even if a user has the privilege to perform certain actions, the user may also require permission to perform the action on a particular object.
To secure data in the repository, you can create a project and assign permissions to it. When you create a project, you are the owner of the project by default. The owner has all permissions, which you cannot change. The owner can assign permissions to users or groups in the repository.
Search Management for the Model Repository Service
The Model Repository Service uses a search engine to create search index files.
When users perform a search, the Model Repository Service searches for metadata objects in the index files instead of the Model repository.
To correctly index the metadata, the Model Repository Service uses a search analyzer appropriate for the language of the metadata that you are indexing. The Model Repository Service includes the following packaged search analyzers:
- •com.informatica.repository.service.provider.search.analysis.MMStandardAnalyzer. Default search analyzer for English.
- •org.apache.lucene.analysis.cjk.CJKAnalyzer. Search analyzer for Chinese, Japanese, and Korean.
You can change the default search analyzer. You can use a packaged search analyzer or you can create and use a custom search analyzer.
The Model Repository Service stores the index files in the search index root directory that you define for the service process. The Model Repository Service updates the search index files each time a user saves, modifies, or deletes a Model repository object. You must manually update the search index if you change the search analyzer, if you create a Model Repository Service to use existing repository content, if you upgrade the Model Repository Service, or if the search index files become corrupted.
Creating a Custom Search Analyzer
If you do not want to use one of the packaged search analyzers, you can create a custom search analyzer.
1. Extend the following Apache Lucene Java class:
org.apache.lucene.analysis.Analyzer
2. If you use a factory class when you extend the Analyzer class, the factory class implementation must have a public method with the following signature:
public org.apache.lucene.analysis.Analyzer createAnalyzer(Properties settings)
The Model Repository Service uses the factory to connect to the search analyzer.
3. Place the custom search analyzer and required .jar files in the following directory:
<Informatica_Installation_Directory>/services/ModelRepositoryService
Changing the Search Analyzer
You can change the default search analyzer that the Model Repository Service uses. You can use a packaged search analyzer or you can create and use a custom search analyzer.
1. In the Administrator tool, select the Services and Nodes view on the Manage tab.
2. In the Navigator, select the Model Repository Service.
3. To use one of the packaged search analyzers, specify the fully qualified java class name of the search analyzer in the Model Repository Service search properties.
4. To use a custom search analyzer, specify the fully qualified java class name of either the search analyzer or the search analyzer factory in the Model Repository Service search properties.
5. Recycle the Model Repository Service to apply the changes.
6. Click Actions > Search Index > Re-Index on the Manage tab Actions menu to re-index the search index.
Manually Updating Search Index Files
You manually update the search index if you change the search analyzer, if you create a Model Repository Service to use existing repository content, if you upgrade the Model Repository Service, or if the search index files become corrupted. For example, search index files can become corrupted due to insufficient disk space in the search index root directory.
The amount of time needed to re-index depends on the number of objects in the Model repository. During the re-indexing process, design-time objects in the Model repository are read-only.
Users in the Developer tool and Analyst tool can view design-time objects but cannot edit or create design-time objects.
If you re-index after changing the search analyzer, users can perform searches on the existing index while the re-indexing process runs. When the re-indexing process completes, any subsequent user search request uses the new index.
To correct corrupted search index files, you must delete, create, and then re-index the search index. When you delete and create a search index, users cannot perform a search until the re-indexing process finishes.
You might want to manually update the search index files during a time when most users are not logged in.
1. In the Administrator tool, click the Manage tab > Services and Nodes view.
2. In the Domain Navigator, select the Model Repository Service.
3. To re-index after changing the search analyzer, creating the Model Repository Service to use existing repository content, or upgrading the Model Repository Service, click Actions > Search Index > Re-Index on the Manage tab Actions menu.
4. To correct corrupted search index files, complete the following steps on the Manage tab Actions menu:
- a. Click Actions > Search Index > Delete to delete the corrupted search index.
- b. Click Actions > Search Index > Create to create a search index.
- c. Click Actions > Search Index > Re-Index to re-index the search index.
Repository Log Management for the Model Repository Service
The Model Repository Service generates repository logs. The repository logs contain repository messages of different severity levels, such as fatal, error, warning, info, trace, and debug. You can configure the level of detail that appears in the repository log files. You can also configure where the Model Repository Service stores the log files.
Configuring Repository Logging
1. In the Administrator tool, click the Manage tab.
2. Click the Services and Nodes view.
3. In the Domain Navigator, select the Model Repository Service.
4. In the contents panel, select the Processes view.
5. Select the node.
The service process details appear in the Service Process Properties section.
6. Click Edit in the Repository section.
The Edit Processes page appears.
7. Enter the directory path in the Repository Logging Directory field.
8. Specify the level of logging in the Repository Logging Severity Level field.
9. Click OK.
Audit Log Management for the Model Repository Service
The Model Repository Service can generate audit logs in the Log Viewer.
The audit log provides information about the following types of operations performed on the Model repository:
- •Logging in and out of the Model repository.
- •Creating a project.
- •Creating a folder.
By default, audit logging is disabled.
Enabling and Disabling Audit Logging
1. In the Administrator tool, click the Manage tab.
2. Click the Services and Nodes view.
3. In the Domain Navigator, select the Model Repository Service.
4. In the contents panel, select the Processes view.
5. Select the node.
The service process details appear in the Service Process Properties section.
6. Click Edit in the Audit section.
The Edit Processes page appears.
7. Enter one of the following values in the Audit Enabled field:
- - True. Enables audit logging.
- - False. Disables audit logging. Default is false.
8. Click OK.
Cache Management for the Model Repository Service
To improve Model Repository Service performance, you can configure the Model Repository Service to use cache memory. When you configure the Model Repository Service to use cache memory, the Model Repository Service stores objects that it reads from the Model repository in memory. The Model Repository Service can read the repository objects from memory instead of the Model repository. Reading objects from memory reduces the load on the database server and improves response time.
Model Repository Cache Processing
When the cache process starts, the Model Repository Service stores each object it reads in memory. When the Model Repository Service gets a request for an object from a client application, the Model Repository Service compares the object in memory with the object in the repository. If the latest version of the object is not in memory, the Model repository updates the cache and then returns the object to the client application that requested the object. When the amount of memory allocated to cache is full, the Model Repository Service deletes the cache for least recently used objects to allocate space for another object.
The Model Repository Service cache process runs as a separate process. The Java Virtual Manager (JVM) that runs the Model Repository Service is not affected by the JVM options you configure for the Model Repository Service cache.
Configuring Cache
- 1. In the Administrator tool, click the Manage tab.
- 2. Click the Services and Nodes view.
- 3. In the Domain Navigator, select the Model Repository Service.
- 4. Click Edit in the Cache Properties section.
- 5. Select Enable Cache.
- 6. Specify the amount of memory allocated to cache in the Cache JVM Options field.
- 7. Restart the Model Repository Service.
- 8. Verify that the cache process is running.
The Model Repository Service logs display the following message when the cache process is running:
MRSI_35204 "Caching process has started on host [host name] at port [port number] with JVM options [JVM options]."
Version Control for the Model Repository Service
You can integrate a Model repository with a version control system. Version control system integration protects Model repository objects from overwriting on a team where multiple developers work on the same projects.
To enable version control, configure versioning properties, and then synchronize the Model repository with the version control system.
You can integrate the Model repository with the Perforce or Subversion version control systems. You must use a version control system that has not been integrated with a Model repository. Only one Model repository can use a version control system instance.
You can configure versioning properties when you create or update a Model repository service.
The versioning properties include a version control system user ID and password. The connection uses this single account to access the version control system for all actions related to versioned object management.
After you configure version control, ask Model repository users to close all editable objects, and then you restart the Model repository.
When the Model repository restarts, it checks whether the version control system is in use by another Model repository. If the version control system connects to a different Model repository, the Model Repository Service cannot restart. You must configure versioning properties to connect to a version control system that has not been integrated with a Model repository.
When you synchronize Model repository contents to the version control system, the Model repository populates a directory in the version control system depot with Model repository objects. After the Model repository copies its contents to the version control system directory, you cannot disable version control system integration.
When the Model repository is integrated with a version control system, you can perform the following tasks:
- •Check in revised objects.
- •Undo the checkout of objects.
- •Reassign the checked-out state of objects to another user.
How to Configure and Synchronize a Model Repository with a Version Control System
To enable version control, you configure versioning properties, and then synchronize the Model repository with the version control system.
After you configure versioning and synchronize the Model repository with the version control system, the version control system begins to save version history. If you change the version control system type, host, URL, or directory properties, you can choose to retain or discard version history.
Perform one of the following tasks:
- •To retain version history, manually copy the contents of the version control system directory to the new version control system location, change versioning properties, and then recycle the Model Repository Service.
- •To discard version history, change versioning properties, recycle the Model Repository Service, and then re-synchronize the Model repository with the new version control system type or location.
Note: When you change Model repository properties, you must recycle the Model Repository Service for your changes to take effect. Ask users to save changes and close Model repository objects that they have open for editing. While synchronization is in progress, the Model repository is unavailable.
The following image shows the process of configuring, synchronizing, and re-synchronizing the Model repository with a version control system:
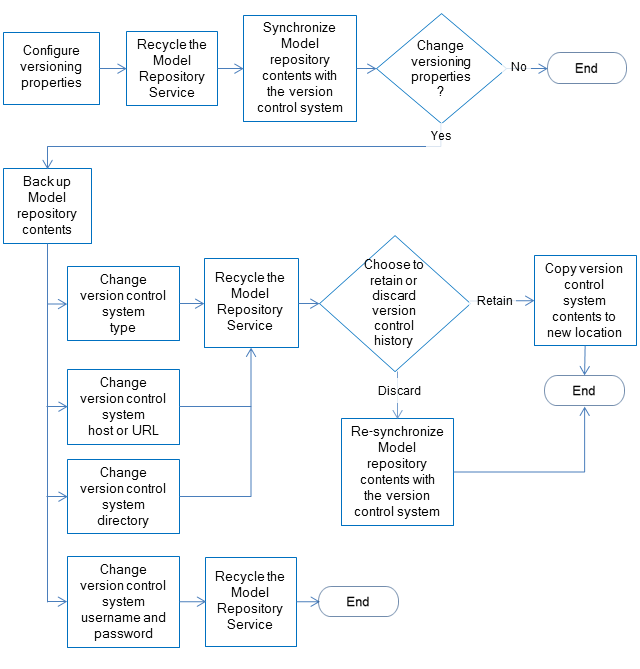
- 1. Configure versioning properties and restart the Model repository service.
- 2. Synchronize the Model repository contents with the version control system.
- 3. Optionally, change the version control system type.
- a. Back up the Model repository contents.
- b. Change the version control system type and restart the Model Repository Service.
- c. Choose whether to retain or discard the version history:
- ▪ To retain version history, copy the contents of the existing version control system directory to the new version control system, and configure the Model repository for the new location.
- ▪ To discard version history, re-synchronize the Model repository to the new version control system.
- 4. Optionally, change the version control system host or URL.
If you use Perforce as the version control system, you can change the Perforce host or port number. If you use Subversion, you can change the URL.
- a. Back up the Model repository contents.
- b. Change the version control system location and restart the Model Repository Service.
- c. Choose whether to retain or discard the version history:
- ▪ To retain version history, copy the contents of the existing version control system directory to the new version control system location, and configure the Model repository for the new location.
- ▪ To discard version history, re-synchronize the Model repository to the new version control system host or URL.
- 5. Optionally, change the version control system directory location.
- a. Back up the Model repository contents.
- b. Change the version control system directory and restart the Model Repository Service.
- c. Choose whether to retain or discard the version history:
- ▪ To retain version history, copy the contents of the existing version control system directory to the new directory, and configure the Model repository for the new location.
- ▪ To discard version history, re-synchronize the Model repository to the new version control system directory.
- 6. Optionally, change the version control system username or password.
- a. Back up the Model repository contents.
- b. Change the version control system type.
- c. Restart the Model Repository Service.
You can perform these tasks from the command line or from the Administrator tool.
Synchronizing the Model Repository with a Version Control System
Before you synchronize the Model repository with the version control system, you configure versioning properties, and then recycle the Model Repository Service for property changes to take effect. Then synchronize the contents of the Model repository with the version control system.
Note: While synchronization is in progress, the Model repository is unavailable. Ask users to save changes and close Model repository objects before synchronization begins.
1. Instruct Model repository users to save changes to and close repository objects.
2. On the Manage tab, select the Services and Nodes view.
3. Select the Model repository to synchronize with the version control system.
4. Click Actions > Synchronize With Version Control System.
5. Click OK.
The Model Repository Service copies the contents of the repository to the version control system directory. During synchronization, the Model repository is unavailable.
When synchronization is complete, versioning is active for Model repository objects. All Model repository objects are checked in to the version control system. Users can check out, check in, view version history, and retrieve historical versions of objects.
After the Model repository is synchronized with the version control system, you cannot disable version control system integration.
Troubleshooting Team-based Development
Consider the following troubleshooting tips when you use features related to team-based development:
- The Perforce version control system fails to check in some objects, with an error about excessively long object path names.
Due to Windows OS limitations on the number of characters in a file path, Model repository objects with long path and file names fail when you try to check them in. The Perforce error message reads "Submit aborted" and says the file path exceeds the internal length limit.
To work around this problem, limit the length of directory names in the path to the Perforce depot, and limit the length of project, folder, and object names in the Model repository. Shorter names in all instances help limit the total number of characters in the object path name.