Expression Rules
Expression rules use expression functions and columns to define rule logic. Create expression rules and add them to a column profile in the Analyst tool.
Use expression rules to change or validate values for columns in a column profile. You can create one or more expression rules to use in a profile. Expression functions are SQL-like functions used to transform source data. You can create expression rule logic with the following types of functions:
- •Character
- •Conversion
- •Data Cleansing
- •Date
- •Encoding
- •Financial
- •Numeric
- •Scientific
- •Special
- •Test
You can use the following methods to create an expression rule:
- •Profile wizard. When you create or edit a column profile, you can create and apply expression rules in the profile wizard. You can promote the rule to a reusable rule and use it in multiple profiles.
- •Rule specification. You can configure a rule specification in the Analyst tool and use the rule specification in the column profile. When you configure a rule specification, you translate the requirements of a business rule into one or more rule statements. The rule statements represent the logic that determines whether a data set conforms to the business rule. Generate a mapplet from the rule specification and use the mapplet in the column profiles that you create in the Developer tool.
You can use the expression editor to add expression functions, configure columns as input to the functions, validate the expression, and configure the return type, precision, and scale. After you create and validate an expression rule, you can edit the precision value of the output rule column. By default, the precision value of the output rule column is set to 10. The precision value is truncated when the output rule column exceeds the set precision value.
The output of an expression rule is a virtual column that uses the name of the rule as the column name. The Analyst tool runs a column profile on the virtual column. For example, you use an expression rule to validate a ZIP code. The rule returns 1 if the ZIP code is valid and 0 if the ZIP code is not valid. Informatica Analyst runs a column profile on the 1 and 0 output values of the rule.
Creating an Expression Rule
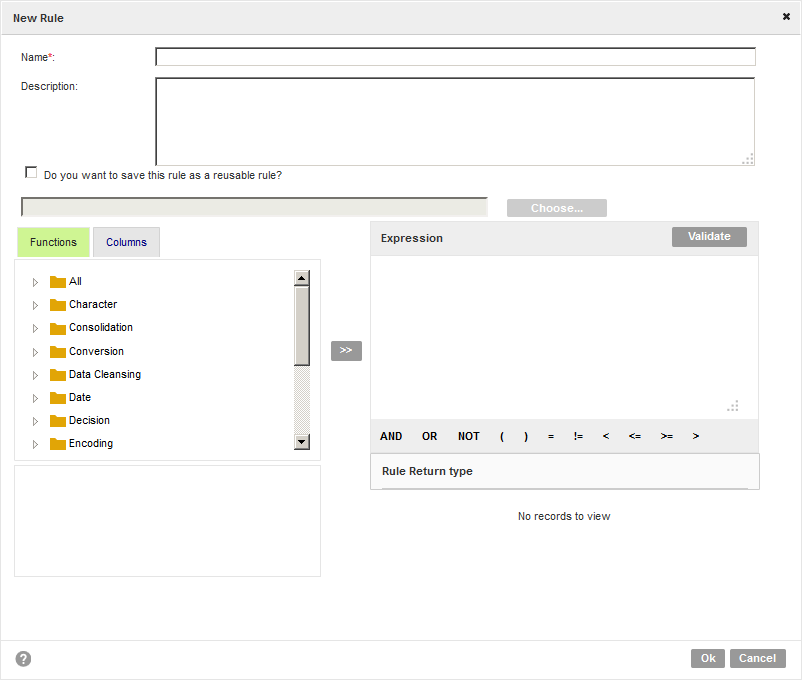
Use the Profile wizard to create an expression rule and add it to a profile. Create an expression rule to validate values for columns in a profile.
1. Open a profile.
2. In the summary view, click Actions > Edit Profile to open the Profile wizard.
3. Click Specify Rules and Filters.
4. In the Rules pane, click Actions > Add a Rule.
The
New Rule dialog box appears.

5. In the New Rule dialog box, enter a name and an optional description for the rule. You can create a rule in the Functions panel or Columns panel.
6. To verify the rule, click Validate.
7. Optionally, choose to promote the rule as a reusable rule and configure the project and folder location. If you promote a rule to a reusable rule, you or other users can use the rule in another profile as a predefined rule.
8. Click OK.
The Specify Rules and Filters screen appears with the rule in the Rules pane.
Creating an Expression Rule Using Rule Specification
You can use the rule specification to create an expression rule in Informatica Analyst. You can add the rule to column profiles to validate data.
1. In the header area, click New > Rule Specification.
The New Rule Specification wizard appears.
2. In the New Rule Specification wizard, enter a name and an optional description for the rule.
3. In the Location field, click Browse to select the project or folder where you want to save the rule.
4. Click Continue.
The rule specification appears in the Design workspace.
5. To enter the properties for the rule, select the top-level octagonal shape in the rule, and click Properties.
6. To configure a primary rule set, click the next-level rectangle shape in the rule.
7. To enter the inputs for the rule set, click Properties > Inputs.
The Inputs Management dialog box appears.
8. In the Inputs Management dialog box, click Add Input, and enter a name, data type, maximum length, and a description for the input. Optionally, you can enter multiple inputs.
9. Click OK.
The inputs appear in Properties section.
10. To define a rule logic, click Rule Logic, and enter an operator, condition, and choose an action in the Action list.
11. Optionally, enter multiple rule sets as necessary.
12. To validate the rule, click the Validate ( ) icon.
 13. To save and use the rule specification in column profiles, click Save and Finish.
14. To save and continue working on the rule, click Save and Continue.
15. To use the rule specification in the Developer tool, click the Generate rule ( ) icon to generate a mapplet.
 The Analyst tool creates a mapplet in the Model repository. Validate the mapplet as rule and then use the mapplet in the column profiles that you create in the Developer tool.


 ) icon.
 ) icon to generate a mapplet.