Create a Custom Workflow
If you want an object to follow one or more specific workflows, create a custom workflow for the object. A stakeholder with edit permissions can create a custom workflow.
1. Click the object for which you want to create a custom workflow.
2. Click Edit.
The object opens in the edit mode.
3. Click the Workflow tab.
4. Choose to add a new workflow.
5. Enter a name for the workflow.
The name must contain a minimum of six characters.
6. Provide a description for the workflow.
Axon creates a canvas with many swimlanes based on the roles that are defined for the facet.
7. In Workflow Diagram section, create a workflow diagram on the canvas. Create swimlanes to assign tasks to the facet stakeholders or Requestor. Use the Toolbar to add objects and connect them. Use the Properties panel to specify additional properties for the objects.
8. Click Save.
Workflow Designer
Axon implements a visual editor to create and run a workflow from a browser.
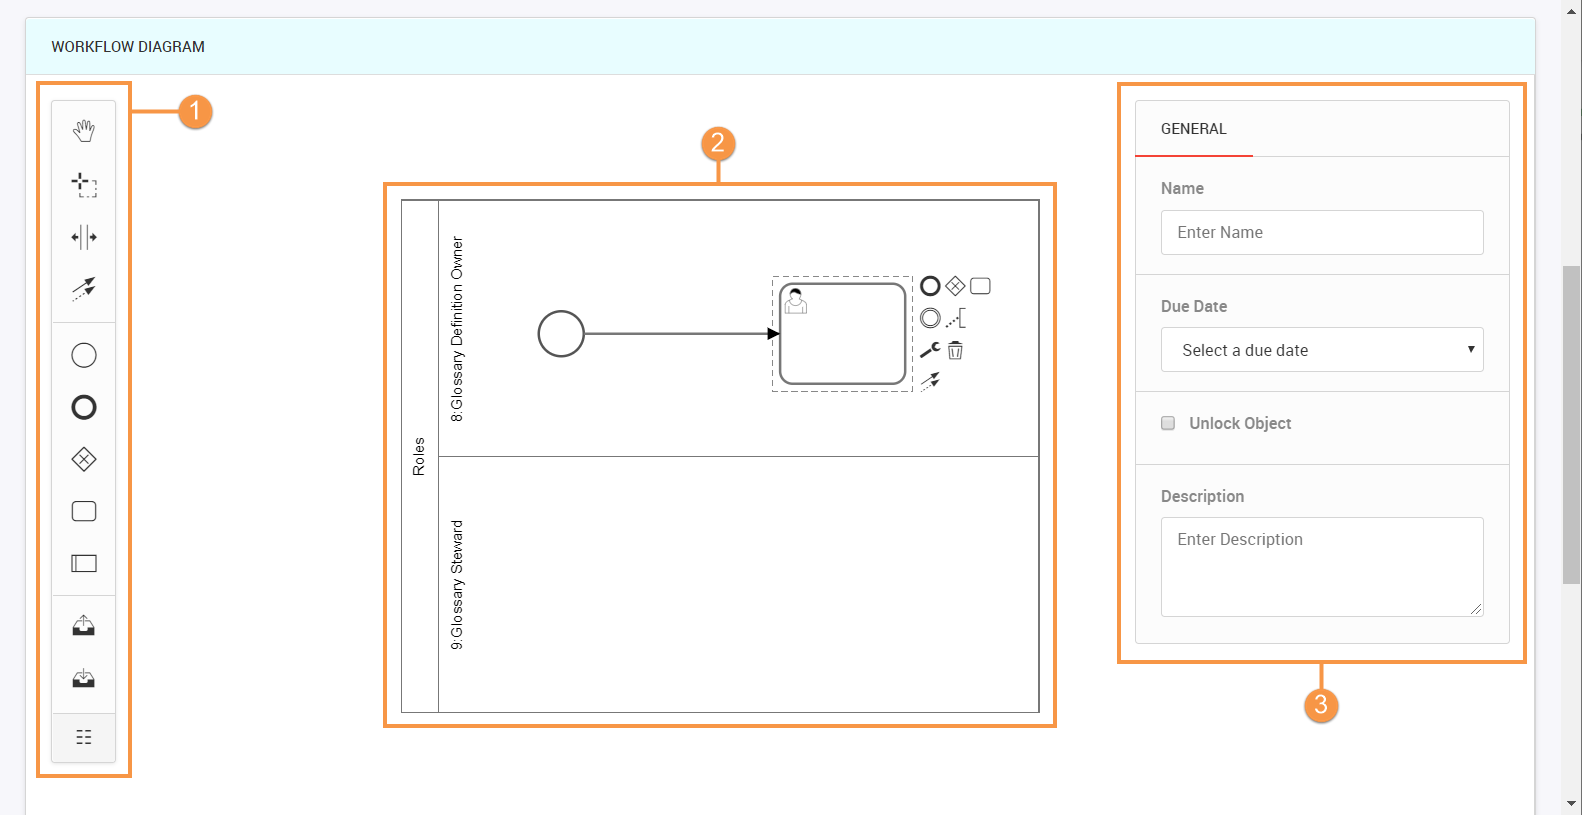
When you provide a name and description for a new workflow, Axon creates a canvas to create a workflow diagram. The Workflow Diagram section has three components: a toolbar on the left, a canvas in the center, and a properties panel on the right.
The following image shows the different sections of a workflow diagram:
- 1. Toolbar
- 2. Canvas
- 3. Properties
Toolbar
Use the toolbar to create a workflow diagram. The toolbar has three sections. The top section contains tools to select the items, resize the canvas, and connect the items. The middle section lists the building blocks of the workflow. You can select the items and drag to the canvas to create the workflow. The bottom section contains tools to show or hide the toolbar.
The following table describes the different tools that you can use to create a workflow diagram:
Tool Name | Description |
|---|
Hand | Use the hand tool to select an item. |
Lasso | Use the lasso tool to select a block on the swimlane. |
Create/Remove Space | Use the create or remove tool to increase or decrease the canvas size. |
Global Connect | Use the global connect tool to connect the items in a workflow. |
Create StartEvent | Use the Create StartEvent tool to start a workflow event. You can decide the role that can start the event. |
Create EndEvent | Use the Create EndEvent tool to end a workflow event. You can decide the role that can end the event. |
Create ExclusiveGateway | Use the Create ExclusiveGateway tool to create decision boxes that can have two results. For example, a validate request can have two values: accept and reject. A gateway and the preceding user task must be close to one another in the same swimlane because they both are a logical unit and must be performed by the same user. |
Create UserTask | Use the Create UserTask tool to create tasks that a user can perform. You can enter a name, due date, and description for a user task. You can create user tasks such as validate request, capture impact assessment, confirm feasibility, and approve request. |
Create Pool/Participant | Use the Create Pool or Participant tool to add a swimlane for a user role. |
Upload BPMN | Use the Upload BPMN tool to upload a workflow diagram to the canvas. |
Download BPMN | Use the Download BPMN tool to download a workflow diagram from the canvas. |
Hide/Show | Use the Hide or Show tool to hide or show the toolbar. |
Canvas
The canvas provides a visual representation of the workflow. When you create a custom or default workflow, Axon automatically creates an empty canvas with swimlanes for each role that is defined for a facet. For example, if a Glossary facet has four roles, Axon creates four swimlanes, one for each role.
Select a swimlane and drag a corner to resize the canvas vertically and horizontally. Select items from the toolbar, drag them to the canvas, and connect them. When you place an item on the canvas, you can click the item to view the toolbar options that are relevant to the object.
BPMN workflows use swimlanes to capture who is responsible for a set of tasks. The tasks that you specify in a swimlane becomes the responsibility of the role associated with the swimlane. If one or more roles do not contain any task in the workflow, you can leave the swimlanes empty or delete the swimlanes. If you want to create the swimlane again, you can use the tool bar to create a swimlane and you must specify the role name and the correct role ID.
Properties
In the Properties panel, you can specify additional properties for the items or tasks on the canvas. The properties that appear depend on the tool that you add to the workflow. All properties do not appear for all tools.
The following table describes the properties that you can configure:
Tool Name | Description |
|---|
Name | Name of the workflow step. If you click a role in the workflow canvas, select the object stakeholder or requestor that participates in the workflow step. |
Due Date | Date by which the workflow step must be completed. |
Description | Description of the workflow step. |
Axon Status | Status of the object during the workflow step as it appears in the Axon Status field. |
Lifecycle | Lifecycle of the object during the workflow step as it appears in the Lifecycle field. |
Unlock Object | Select the check box to unlock the object at a specific step in the workflow. If you do not select the check box, the object remains locked. |
Commit Changes | Select the check box to save the object with the changes and apply the values that you specified in the Axon Status and Lifecycle fields. This check box is typically selected when the workflow has reached the last step and a stakeholder has approved the changes to the object. Clear the check box to not save the object. This check box is typically cleared when the workflow has reached the last step and a stakeholder has rejected the changes to the object. |
If you have a gateway in a workflow, you must specify the labels for the lines that start from the gateway. The labels need to be short and unique. The labels serves decision routing actions when you run the workflow.
Workflow Diagram Example
The example shows a new Default Workflow being created. Apart from the different start point, the functionality to build the workflow is identical. The facet used in this example is Product. After you select the Product facet, you can see that one default workflow already exists. You can either select this one to edit, or create another.
1. From the Axon toolbar, click Admin Panel under the user name.
The Admin Dashboard appears with the Axon version details, status of Axon services, and Axon message queues.
2. On the left navigation pane, click DG Operating Model > Default Workflows.
3. Select the Product facet for which you want to configure a workflow.
4. Choose to add a new workflow.
5. Enter a name for the workflow.
The name must contain a minimum of six characters.
6. Provide a description for the workflow.
Axon creates a canvas with many swimlanes based on the roles that are defined for the facet. Remember that the swimlanes appear with a lane for each type of stakeholder role configured for the facet, that is for the Product Steward, Product Owner role.
7. Click into one of the lanes, so that a dotted line appears, and use the bin icon on the menu to delete this lane. You can add it back in later if required.
8. From the toolbar, choose the Start Event, and place it in the Steward’s swimlane. This means that the objects stewards receive the first request to action when a ticket is raised against this request.
9. Typically the first thing that anyone does is to validate that the request should have been routed to this workflow. If OK, then do something. If Not OK, inform the requestor and close the ticket.
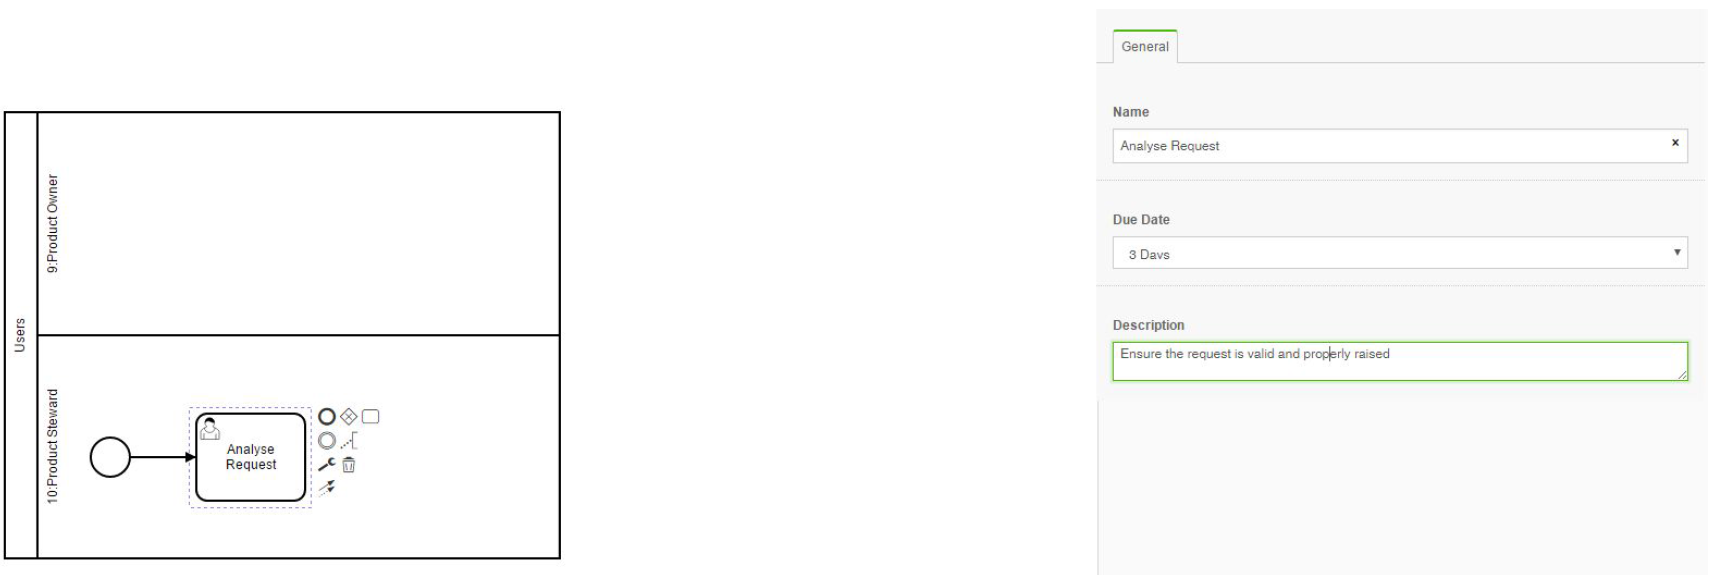
10. The first step is to raise a User Action, and populate the Properties on the right.
- a. Click into the Start action.
- b. From the options cloud that appears, choose the User Action and drop it in the Steward's swimlane.
A line automatically appears between the two concepts.
The following image shows the start step and the first user task of the workflow:
The User Action can be populated by completing the Properties section, as above.
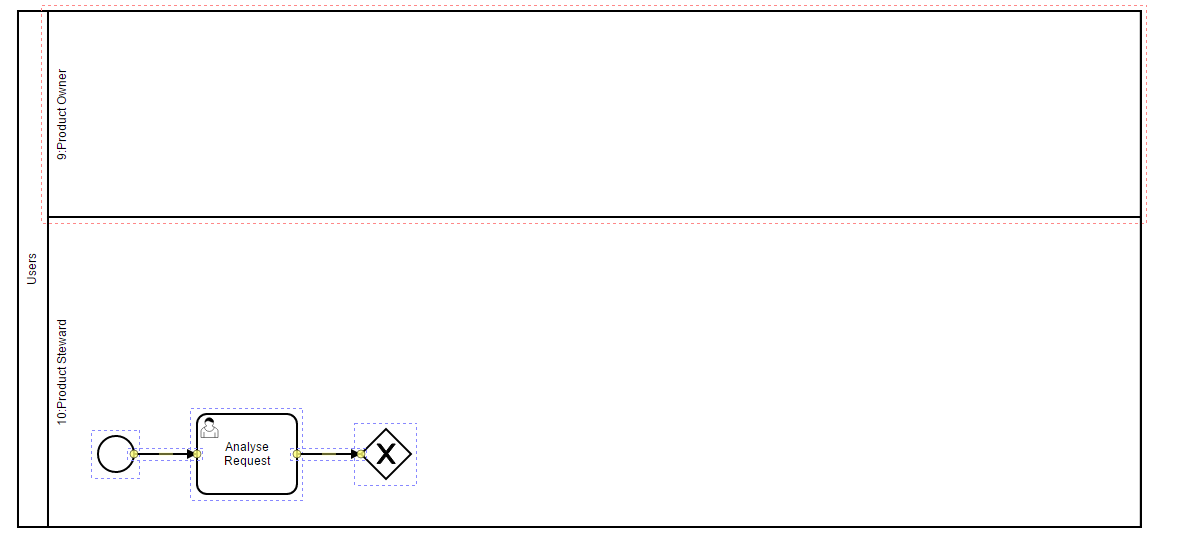
11. Next, you need a Gateway to show that there are two options - accept as valid request or reject.
- a. Click in the User Action and the same option cloud appears as before. This time select the diamond shaped concept, ensuring that it is placed in the Steward's swimlane.
- b. In the next picture the user has increased the horizontal width of all swimlanes, increased the height of the Steward's swimlane, and finally used the lasso tool on the Toolbar to grab and move the concepts you have created so far to the bottom of the swimlane.
The following image shows the increased length of the swimlane:
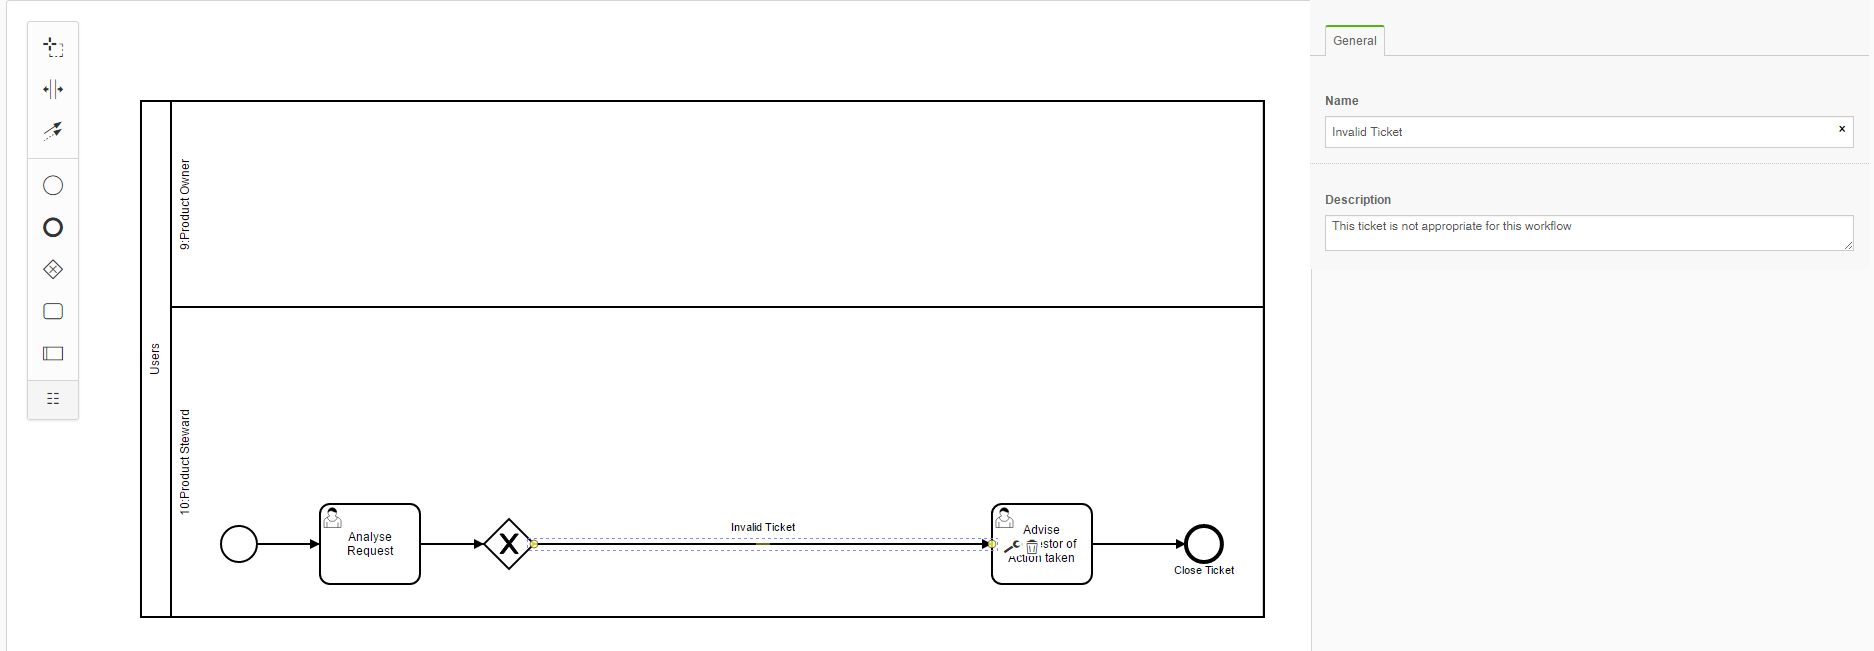
12. Now, you can add the two possible paths. First, an invalid request needs a User Action to Inform the user and then a Close Action.
- a. Always remember to click the predecessor object, create the User Action, and close the workflow. Remember to populate the Properties for each object.
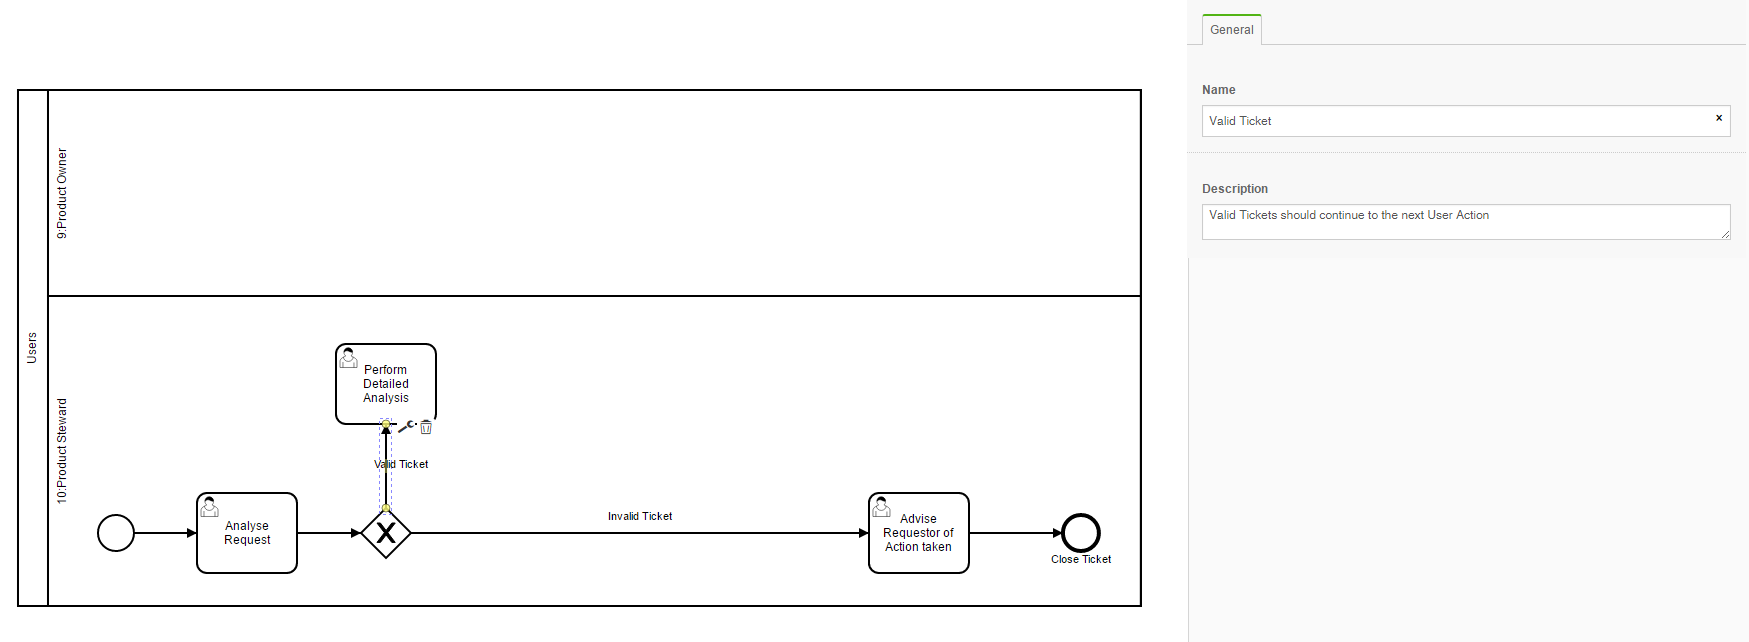
- b. Lines leaving a gateway MUST have a name added to them, because these will appear in the any active workflow as labels on the Accept/Reject buttons. Keep them short and clear.
The following image shows the workflow diagram with the user task:
13. If you want to leave the Gateway on the alternative (valid request) path, then you need to create the next User Task.
This step is to ‘Perform Detailed Analysis’, and has been created in the picture below. As you can see, this is also performed by the Product Steward.
The following image shows the workflow diagram with the user task:
14. After some additional tasks by the Steward shown as an additional User Task (Collate Report) in the same swimlane, it is time to send to the Product Owner user for review and approval.
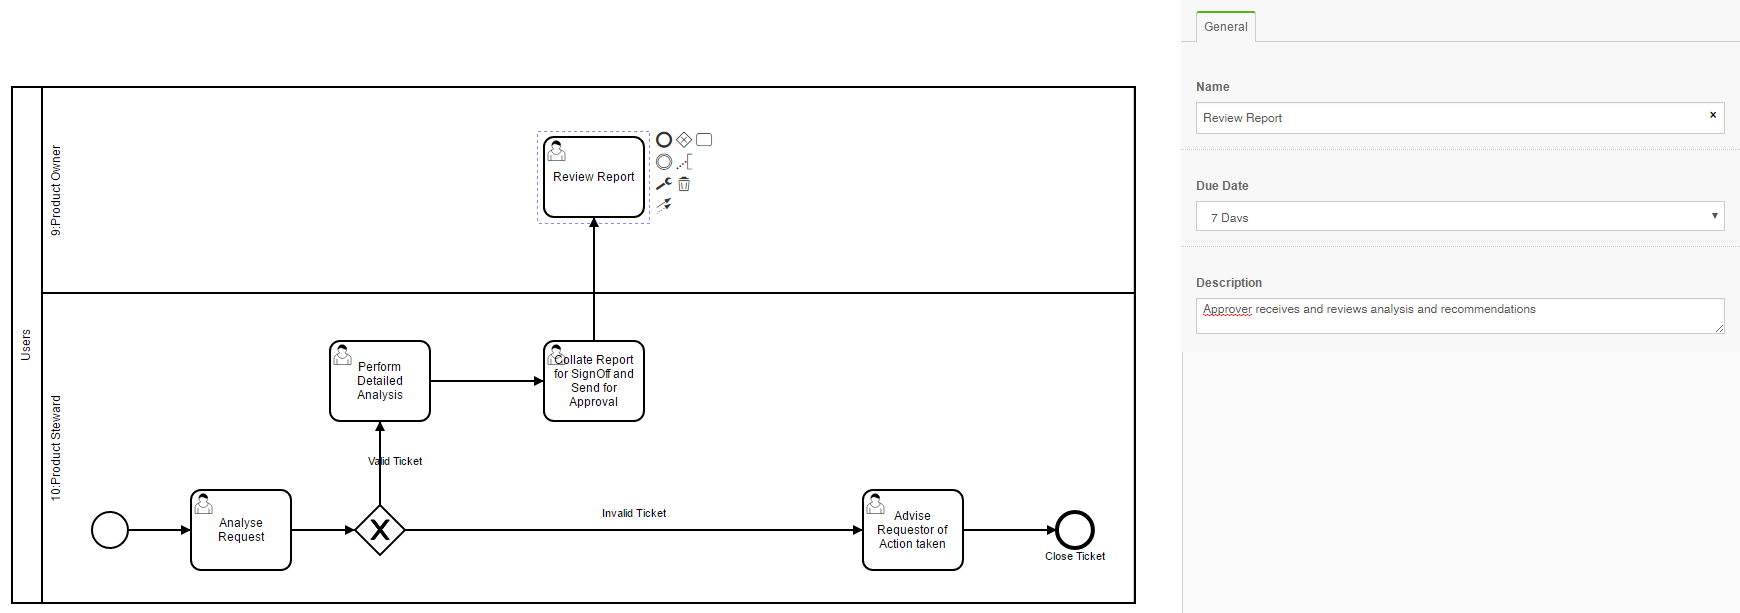
This time, from the option cloud on the ‘Collate Report’ User Action, simply drag the User Action into the Owner’s swimlane, and fill in the Properties.
The following image shows the properties that you can fill in for the user task:
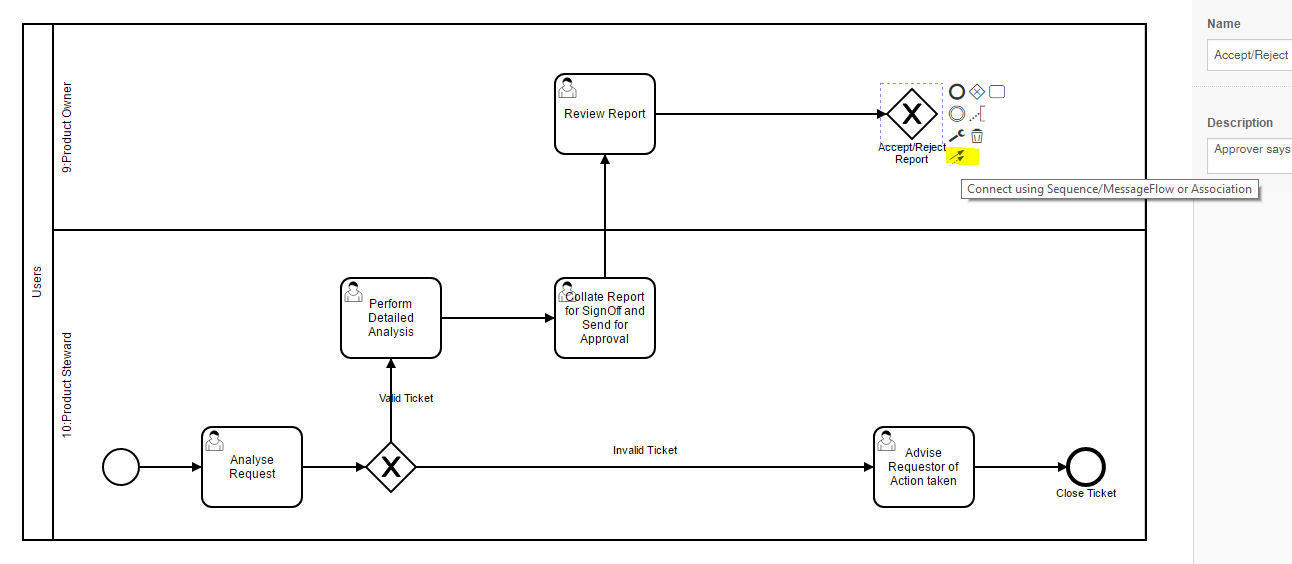
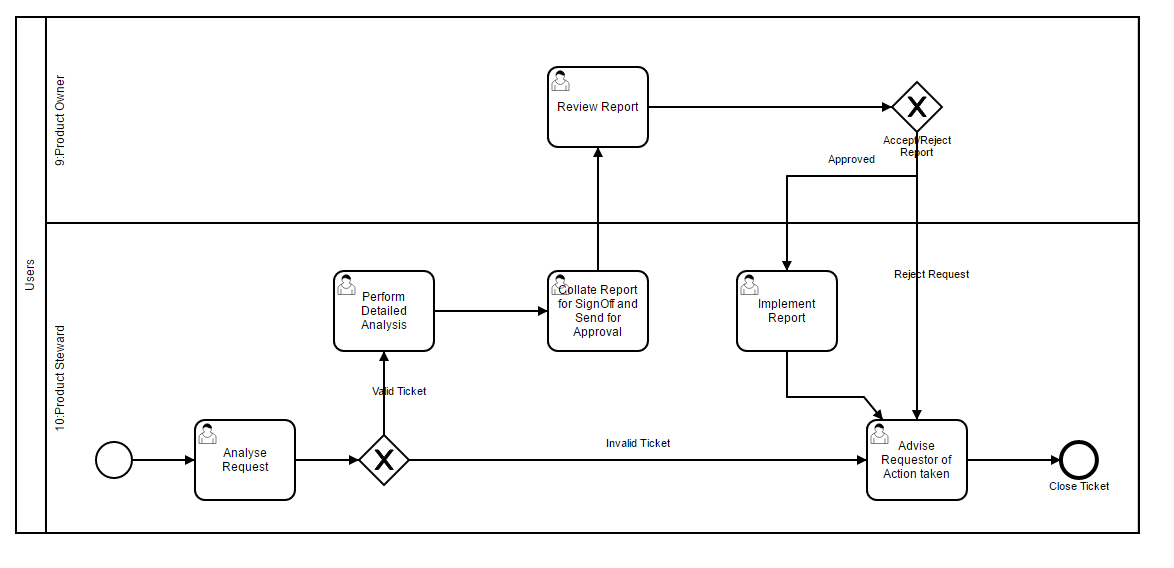
15. As the possible actions are to either accept or reject the findings in the report, you need a Gateway to show these two alternatives. If the Owner rejects the report, then you should connect this new Gateway to the User Action already created to ‘Advise Requestor of Action taken’, and then you close the workflow.
The following image shows the alternatives for the gateway:
16. As this Gateway and the User Action both already appear on the page, you need to do something slightly different to connect them.
- a. Click on the Gateway, and select the lines icon, from the option cloud.
- b. Once clicked simply move your mouse toward the ‘Advise Requestor…’ User Action, and a line will be drawn between them.
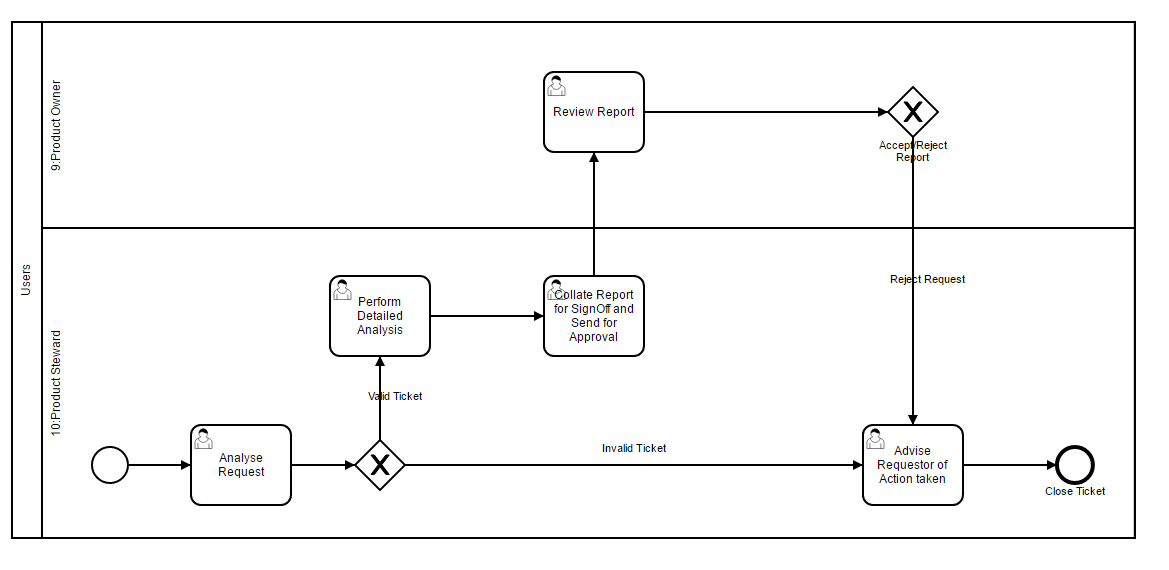
- c. Remember to go back to this new line and name it. Click in the line between the two concepts and fill in the Properties. The line’s name will later appear in the workflow step when the Owner has to accept/reject the step.
The following image shows the workflow with the Reject path complete:
17. If the reviewed report is accepted, add something in to show what happens. The Steward is expected to implement the report, so create a User Action in the Steward’s swimlane.
The following image shows the action added to the steward role:
18. Save and close the workflow.
you now have a completed workflow. All paths ultimately lead to the Close event. All lines leading FROM a Gateway have a name, which creates the approve/reject buttons in a live workflow.
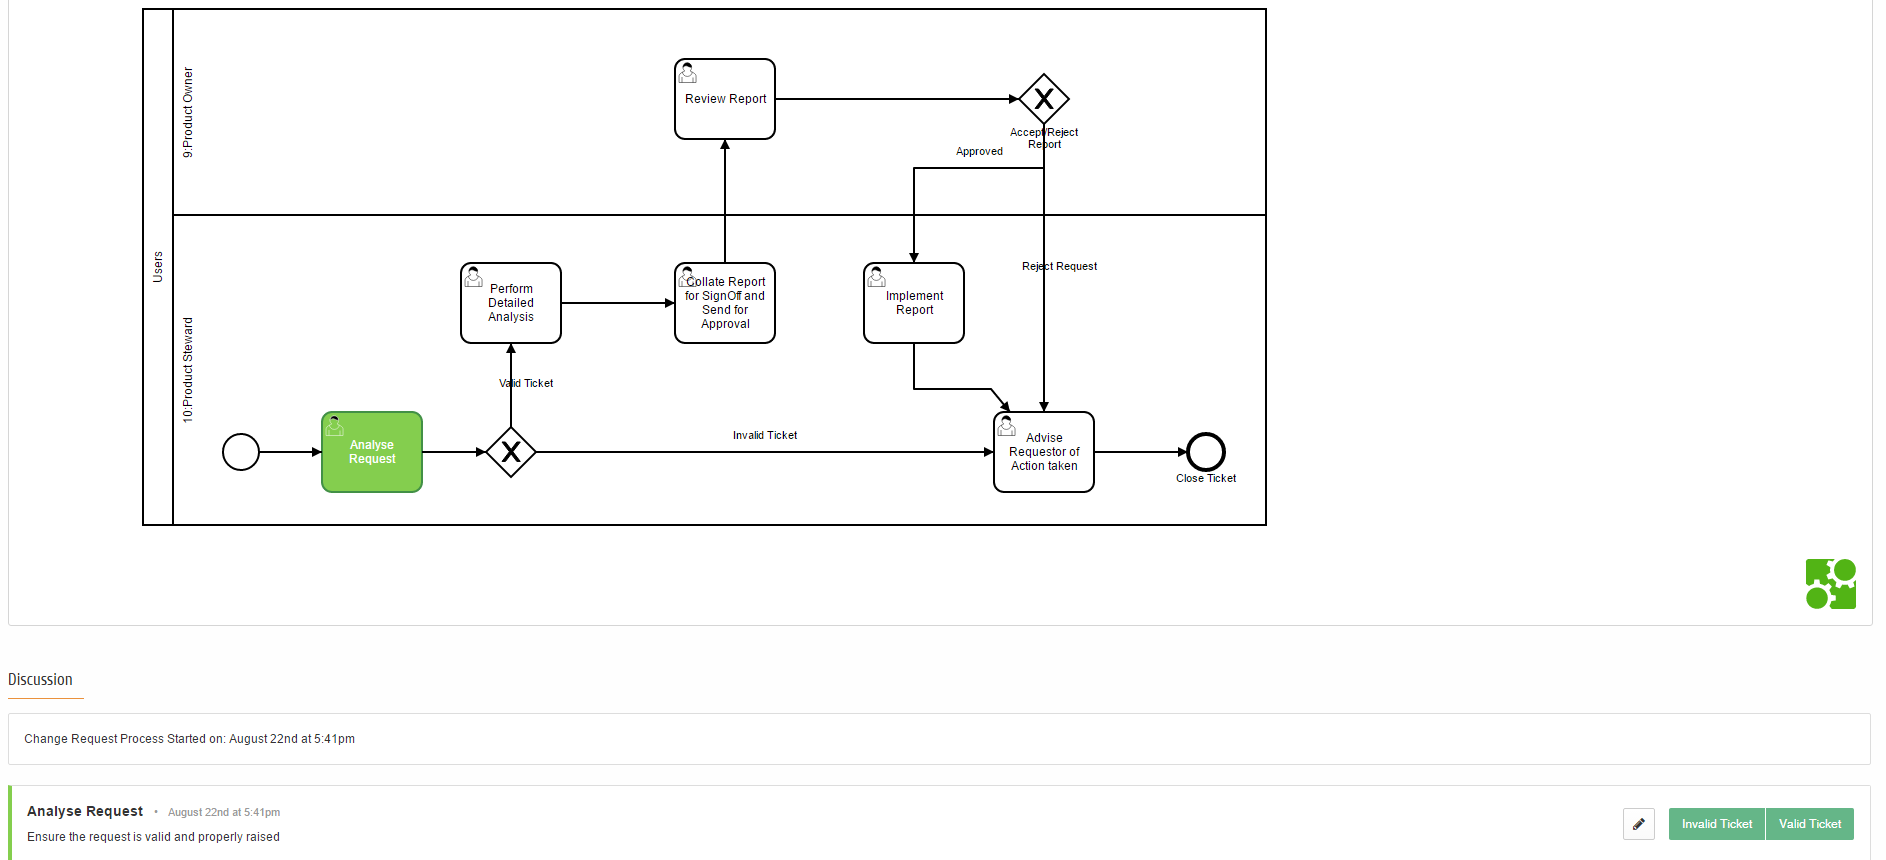
19. When a Change Request is raised against the workflow, you can see the CR on the canvas.
You can see that:
- a. The Active Step, i.e. the step awaiting action is Green. If orange it is alerting users that the Due By Date is less than a day away.
- b. The description that was created for this workflow step (in the Properties section) appears as guidance on the action expected by the Steward in the Discussion section below the canvas..
- c. There are two green buttons in the Discussion, which allow the Steward to accept/reject the step. They have the same names as the lines that leave the Gateway immediately after the active User Action.
The following image shows the workflow diagram for the change request:
