Configuring Dynamic Ports Using Input Rules
Define input rules to specify which ports to generate and propagate through a dynamic port in the pipeline.
Use the Input Rules dialog box to define input rules for a dynamic port, rename the generated ports to indicate where ports occur in a mapping, change the order of the generated ports, and view the results for the rules. You can add multiple rules to include and exclude ports. The Data Integration Service applies rules in the order that they appear in the list.
1. Open the Input Rules dialog box.
2. Define one or more input rules for each dynamic port in the transformation. For each input rule, perform the following steps:
- a. Choose the operator and the selection criteria for the input rule.
- b. If you choose the Name selection criteria, specify the criteria details by name or by parameter.
- c. If you choose the Type selection criteria, select the data type of the ports from the list.
- d. If you choose the Pattern selection criteria, select the pattern type, and specify the pattern string as value or as paramter.
Optionally, define the input rule for the last dynamic port in the transformation to include all remaining ports from the upstream transformation.
3. Rename the generated ports.
4. Optionally, reorder the generated ports.
5. Verify the results of the input rules and the input rule settings.
Step 1. Open the Input Rules Dialog box
Open the Input Rules dialog box to define or edit input rules.
 Open the Input Rules dialog box in the following ways:
- - Right-click the dynamic port in a transformation, and select Edit Input Rules.
- - On the Ports tab of the transformation, click Input Rules for the dynamic port.
The Input Rules dialog box appears with a default Include All input rule.
Step 2. Define Input Rules
Define input rules to include or exclude ports that a dynamic port receives from the upstream transformation.
1. In the Include or Exclude Ports area, choose Input Rules.
2. To edit the default input rule, perform the following steps:
- a. Choose the operator and selection criteria for the input rule.
- b. Configure the selection criteria details.
3. Optionally, add more input rules in the order that you want the Developer tool to run the rules.
- a. Click New to add a new row for the input rule.
- b. For each input rule, choose the operator and the selection criteria, and specify the criteria details.
4. To include only the remaining ports from the upstream transformation, perform the following steps:
- a. Create another dynamic port or choose the last dynamic in the transformation.
- b. Choose Include all remaining ports.
This rule includes ports from the upstream transformation that are not part of other dynamic ports.
Step 2a. Choose the Operator and Selection Criteria
Choose an operator to include or exclude ports and a selection criteria to filter ports based on port names or data types.
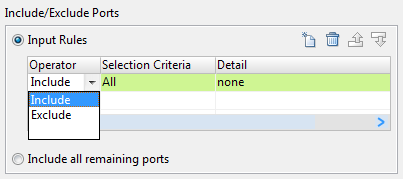
1. From the Operator column, choose the Include or Exclude operator.
The operator determines whether the rule must include or exclude ports.
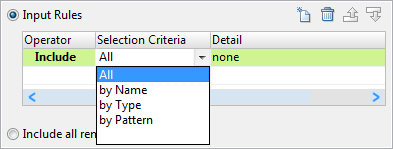
2. From the Selection Criteria column, choose one of the following options:
- - All. Includes all ports. Do not choose this option with the Exclude operator.
- - Name. Includes or excludes ports based on port names.
- - Type. Includes or excludes ports based on data type of the port.
- - Pattern. Includes or excludes ports based on patterns of port names.
3. From the Details column, click the Details arrow to provide the selection criteria details.
The Input Rule Detail dialog box for the selection criteria appears.
Step 2b. Configure the Name Selection Criteria Details
If you choose the name selection criteria for the input rule, select the port names from a list of values. Or, use a parameter of type port or port list to specify port names that you can change at run time.
1. In the Input Rule Detail: By Name dialog box, select one of the following from the Specify by list:
- - Value. Enter port names, or select port names from a list.
- - Parameter. Create a new parameter or choose an existing parameter of Port List type.
2. Specify port names values in one of the following ways:
- - Enter the port names in the Names box and click Add.
- - Click Choose, select the port names in the Ports dialog box, and click OK.
3. To create a new parameter for the port name, perform the following steps:
- a. Click New.
- b. In the Parameters dialog box, enter a parameter name.
- c. Optionally, enter a parameter description.
- d. Enter a default value for the port name parameter. You can also click Choose to select port names from the list of ports.
- e. Click OK.
4. To choose an existing parameter for the port name, perform the following steps:
- a. Click Browse.
- b. In the Assign Parameter dialog box, choose a parameter.
- c. Optionally, create new parameters or edit parameters from this dialog box.
- d. Click OK.
Step 2c. Configure the Type Selection Criteria Details
If you choose the type selection criteria for the input rule, select the types from a list of data types.
1. In the Input Rule Detail: By Type dialog box, select the data types from the list.
2. Click OK.
Step 2d. Configure the Pattern Selection Criteria Details
If you choose the pattern selection criteria for the input rule, choose a pattern type for the port name. Enter a value for the pattern or use a parameter of type String to specify the value that you can change at run time.
1. In the Input Rule Detail: By Pattern dialog box, select one of the following from the Pattern Type list:
- - Prefix. To include or exclude port names that start with the prefix string.
For example, if you enter the prefix value E, the input rule filters the port names that start with E or e such as EmpNo, empName, and EmpTitle.
- - Suffix. To include or exclude port names that end with the suffix string.
For example, if you enter the suffix value E, the input rule filters the port names that end with E or e such as empname and EMPTITLE.
- - Regular expression. To include or exclude port names that follow a certain pattern.
For example, if you enter the value E.*No, the input rule filters port names that start with E and end with No such as ENo, EmpNo, and EmployeeNo.
2. Select one of the following from the Specify by list:
- - Value. Enter the string value for the pattern.
- - Parameter. Create a new parameter or choose an existing parameter of string type.
3. Specify pattern values in the String box and click OK.
4. To create a new parameter for the pattern, perform the following steps:
- a. Click New.
- b. In the Parameters dialog box, enter a parameter name.
- c. Optionally, enter a parameter description.
- d. Enter a default value for the pattern and enter the precision value.
- e. Click OK.
5. To choose an existing parameter for the port name, perform the following steps:
- a. Click Browse.
- b. In the Assign Parameter dialog box, choose a parameter.
- c. Optionally, create new parameters or edit parameters from this dialog box.
- d. Click OK.
Step 3. Rename the Generated Ports
Rename generated ports to make sure that the port names are unique within a transformation.
1. In the Settings area, choose Rename Ports.
2. Choose whether to add a prefix or a suffix to rename the generated ports.
3. Add the text to prefix or suffix the generated ports.
The renamed ports appear in the Port Preview area.
Step 4. Reorder the Generated Ports
Reorder generated ports to effectively view and analyze results.
 In the Settings area, choose Reorder generated ports according to the input rule order.
The reordered ports appear in the Port Preview area. The generated ports appear according to the order of the input rules instead of the order in which it appears in the upstream transformation.
Step 5. Verify the Dynamic Port Configuration
View the generated ports based on the rules and settings that you defined for the dynamic port.
 In the Port Preview area of the Input Rules dialog box, verify the results of the input rule settings for the dynamic port.

