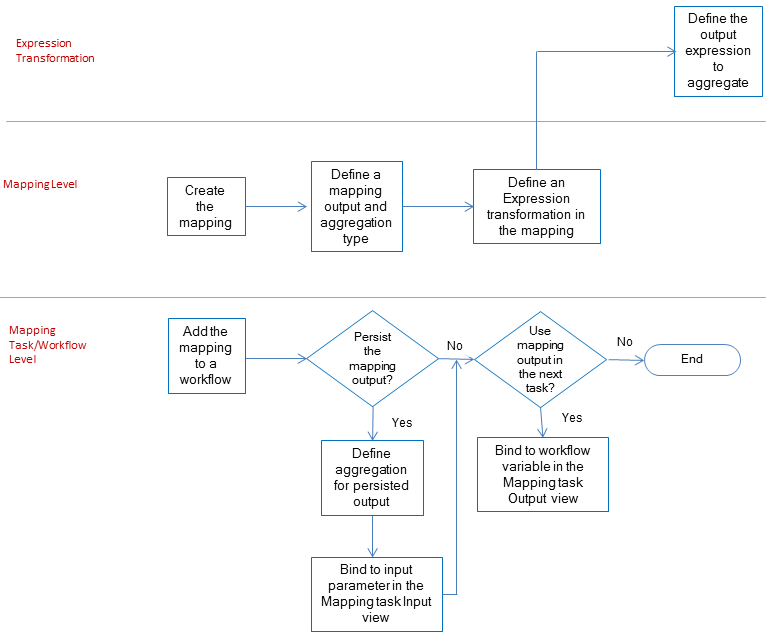
How to Configure Mapping Outputs
When you configure mapping outputs, define the mapping outputs at the mapping level, configure the expressions to aggregate at the transformation level, and persist the results at the Mapping task level.
The following image shows the process to configure mapping outputs:
To configure mapping outputs, perform the following steps:
- 1. Create the mapping.
- 2. In the Outputs view of the mapping, define the mapping output name and type of aggregation.
- 3. Add an Expression transformation to the mapping and configure the mapping output expression in the Expression Mapping Outputs view.
- 4. To create a Mapping task, add the mapping to a workflow .
- 5. Persist the mapping output in the Mapping task Persistence view and configure the aggregation function type for the persisted value.
- 6. Assign the persisted mapping output to an input parameter in the Mapping task.
- 7. If you want to use the mapping output in another workflow task, assign the mapping output to a workflow variable .
Creating a Mapping
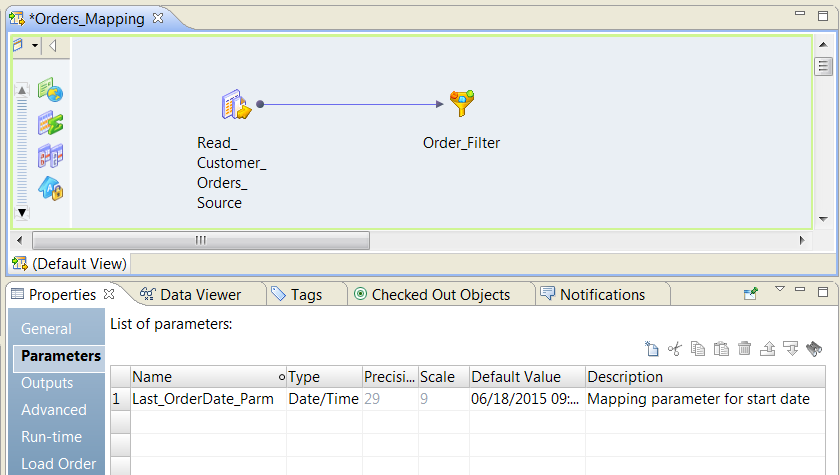
Create a mapping that contains a reusable Filter transformation. The Filter transformation filters rows that have order dates less than a specific date. The filter expression includes a parameter called Last_Order_Date_Parm.
1. Create a mapping to process order data from a Customer_Order file.
2. In the mapping Properties view, click the Parameters tab.
3. Add a date/time mapping parameter called Last_Order_Date_Parm.
Enter a default date for the starting parameter.
The following image shows the mapping parameter:
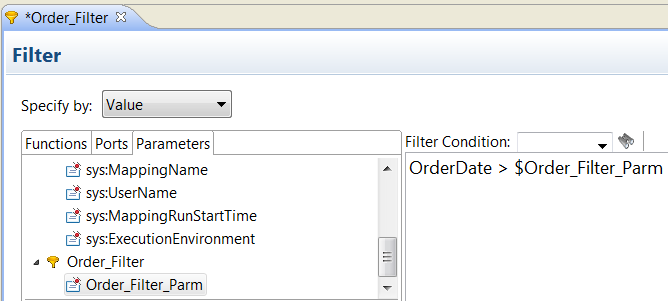
4. Create a reusable Filter transformation to filter Customer_Order rows.
5. Define a parameter in the Filter transformation called Order_Filter.
Enter a default date for the starting parameter.
6. Add a filter expression to find order dates that are greater that the parameter:
7. Add the Filter transformation to the mapping.
8. Click the Filter transformation to display the transformation Properties view.
9. Click the Parameters tab.
10. To bind the Order_Filter_Parm transformation parameter to the Last_Order_Date mapping parameter, click the Instance Value column for the Order_Filter_Parm.
11. Select Last_Order_Date.
The following image shows where the mapping parameter is bound to the transformation parameter:
Defining Mapping Outputs
Create a mapping and define the mapping outputs in the mapping Properties. Each mapping output definition describes what type of aggregation to perform and the data type of the results.
1. After you create a mapping, click the editor to access the mapping Properties.
2. Click the Outputs view.
3. Click New to create a mapping output.
The Developer tool creates a mapping output with default field values.
The following image shows the mapping output default values in the Outputs view:
4. Change the name that identifies the mapping output.
5. Select a numeric or date mapping output type. Enter the precision and scale.
6. Choose the aggregation type for the mapping output.
You can summarize the output expression or you can find the minimum or maximum expression value that the mapping processed. Default is SUM.
7. Click File > Save to save the mapping output.
You must save the mapping output before you can create a mapping output expression in the Expression transformation.
The following image shows a mapping output that contains the sum of a decimal field and a mapping output that contains a maximum date value:
Configuring the Mapping Output Expression
In the Expression transformation, configure the expression to aggregate for each row that the mapping processes.
1. Add an Expression transformation to the mapping.
Consider the mapping logic before you decide where to place the transformation. The mapping output contains an aggregation of the rows that the Expression transformation receives.
2. In the Expression transformation, click the Mapping Outputs view.
3. Click New to add a mapping output expression.
The Developer tool creates a mapping output with a output name that matches one of the mapping outputs you created at the mapping level. If you have more than one mapping output in the mapping Properties, select the appropriate mapping output name to use.
The following image shows the Mapping Outputs view in the Expression transformation:
4. Click the Expression column to enter an expression in the Expression Editor.
The expression can contain just a port name or it can contain functions, ports, and parameters.
The following image shows an expression to calculate the Total_OrderAmt in the Expression Editor:
5. Click Validate to verify that the expression is valid.
6. Click OK to save the expression.
The expression appears in the Expression column for the mapping output.
7. Click File > Save to save the Expression transformation.
Persisting Mapping Outputs
After you add the mapping to a workflow, you can persist mapping outputs from the Mapping task. You can use persisted mapping outputs as input to the Mapping task the next time it runs.
1. Add the mapping to a workflow to create a Mapping task.
2. Click the Mapping task icon in the workflow to view the Mapping task Properties.
3. Click the Persistence view.
A list of the user-defined mapping outputs appears in the Persistence view.
4. Enable Persist to save the mapping output after the Mapping task runs.
5. Optionally, change the aggregation type and enter the description.
The following image shows the Persistence view for a Mapping task:
The Last_Order_Date mapping output is persisted. The aggregate function is MAX, so the Data Integration Service saves maximum order date value in the repository.
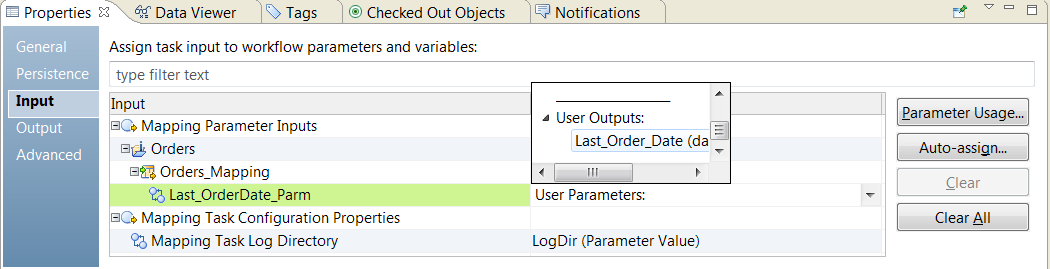
Assigning Persisted Outputs to Mapping Task Input
You can bind persisted mapping outputs from a Mapping task to the input parameters of the same Mapping task for the next time the workflow runs.
Assign the persisted latest order date value from the Mapping task as the input parameter to the same Mapping task. Configure a Filter transformation that uses a Last_OrderDate_Parm parameter to select which orders to process. The filter expression to select input rows is Order_Date > Last_OrderDate_Parm.
1. Click the Mapping task icon in the workflow to view the Mapping task Properties view.
A list of the Mapping task input parameters and a list of the parameterized Mapping task configuration properties appears. The mapping must have a mapping parameter to assign the mapping output to.
2. Locate the mapping input parameter that you want to bind the mapping output to. Double-click the Value column to view the selection arrow.
3. Click the selection arrow to view a list of the parameters and variables that you can assign to the input parameter.
4. Scroll to the User Outputs section of the list and choose the persisted mapping output to use.
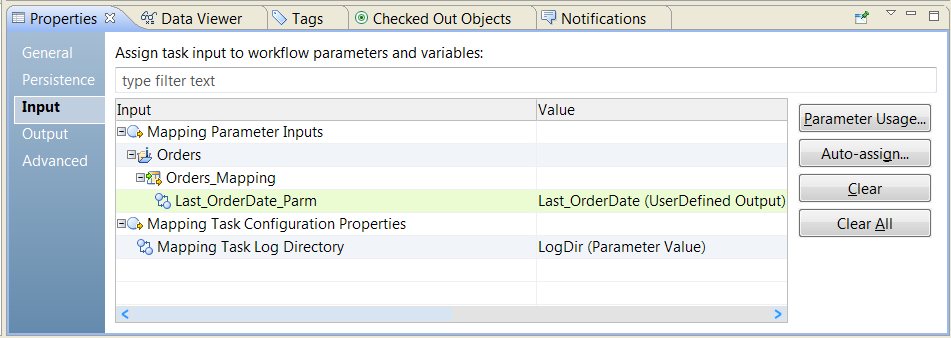
The following image shows Last_OrderDate_Parm mapping parameter on the Mapping task Input view:
5. Select the mapping output to assign to the parameter.
The mapping output name appears in the value column for the input parameter.
6. Click File > Save to save the Mapping task.
The Last_OrderDate_Parm is bound to the persisted order date value from the repository.
Binding Mapping Outputs to Workflow Variables
You can bind mapping outputs to workflow variables and pass the values to other tasks in the workflow.
To pass the mapping output value to another task, bind the mapping output to a workflow variable in the Mapping task Output view. You can bind mapping outputs from the current Mapping task or you can bind the persisted mapping outputs from the previous Mapping task run.
1. Add the mapping with the mapping outputs to a workflow.
2. Click the Mapping task icon in the workflow to view the Mapping task Properties.
3. In the Mapping task Properties, click the Output view.
The Mapping task Output view shows the data that you can pass from the task into workflow variables.
4. Find the mapping output that you want to bind to a variable.
5. Double-click the Variable column to access the selection arrow and view a list of workflow variables.
The following image shows where to bind the Total_Order_Amt mapping output to the wf_Variable_Total_OrderAmt workflow variable in the Mapping task Output view:
6. To create a workflow variable, click the New Variable option from the list of workflow variables in the Value column.
Enter the variable name, type, and default value.