How to Configure Parameters
Define parameters in a transformation, a mapping, a mapplet, or a workflow.
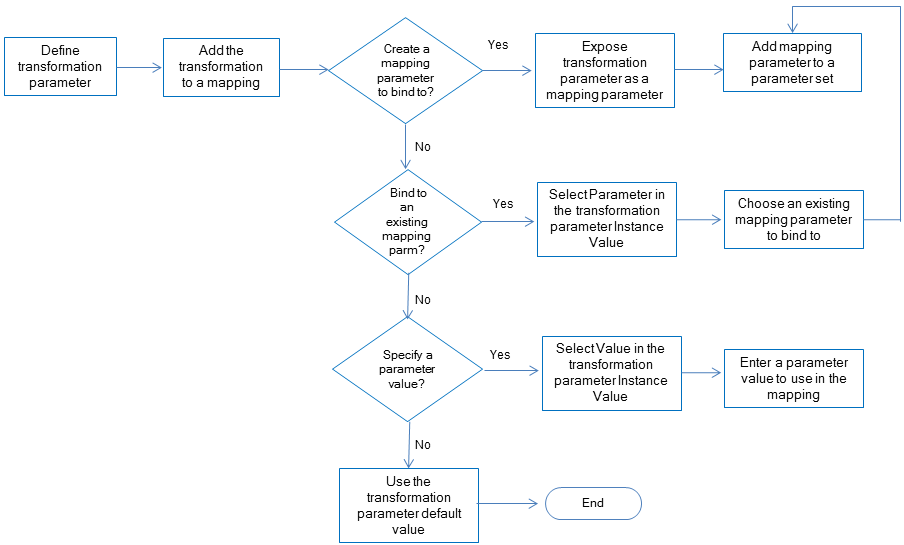
The following image shows the process to use parameters in a reusable transformation in a mapping:
1. In a reusable transformation, create a parameter for a property in the transformation or for a variable in the Expression Editor.
2. Add the transformation to a mapping or to a mapplet.
3. In the transformation Parameters tab, choose how to set the parameter value in the mapping or the mapplet.
- - Expose the transformation parameter as a mapping parameter. Creates a duplicate of the transformation parameter at the mapping level.
- - Bind the transformation parameter to a mapping parameter. Browse for a mapping parameter or manually create a mapping parameter to bind to the transformation parameter.
- - Enter a specific parameter value. Enter a default value to use in the mapping run.
- - Use the default value of the transformation parameter. Use the original parameter value in the mapping.
After you bind a mapping parameter to the transformation parameter, you can createa parameter set or a parameter file to override the mapping parameter value at run time. Run the mapping from the Developer tool or the command line. Specify the parameter set or parameter file to use for the mapping run.
Creating a Parameter for a Transformation Property
When you assign a parameter to field or to a transformation property, you can browse for a parameter to use or you can create a parameter specifically for the field.
1. Navigate to the field or property that you want to update.
2. Click the selection arrow in the Value column.
If you can parameterize the property, the Assign Parameter option appears.
The following image shows the Assign Parameter option for the Cache Directory:
3. Click Assign Parameter.
The Assign Parameter dialog box appears. The dialog box shows the system parameters and the user-defined parameters that you created in the transformation.
The following image shows the Assign Parameter dialog box:
4. To create a parameter, click New.
5. Enter the parameter name, the type, the precision, and the default value.
The following image shows the parameter called MyCacheParameter in the Parameters dialog box:
6. Click OK.
The parameter name appears in the transformation property.
The following image shows MyCacheParameter in the Aggregator transformation cache directory:
You can add, change, and delete parameters in the transformation Parameters tab.
Creating a Parameter in an Expression
You can reference the parameter in an Expression after you define the parameter. The following example shows how to assign a parameter to a component in a filter expression.
1. In the Filter transformation, click the Filter tab.
The Expression Editor appears. You can select functions, ports, and parameters to create the expression.
2. Select Specify By Value to define the expression instead of using an expression parameter.
3. On the Filter tab, click the Ports tab.
4. Select the Amount port. On the Functions tab, select the greater than (>) function.
The following image shows the expression that contains the Amount port and the > operator:
5. Click the Parameters tab in the Expression Editor.
The Expression Editor lists the system parameters and the user-defined parameters.
6. Click Manage Parameters to add a parameter.
The Parameters dialog box appears.
7. Click New.
A dialog box appears with default parameter values.
8. Enter the parameter name, parameter type, precision, and default value.
The following image shows the Parameters dialog box:
9. In the Expression Editor, click OK
The parameter that you created appears in the parameter list.
10. Select the Min_Order_Amount parameter to add it to the expression.
The Min_Order_Amount parameter appears in the expression.
The parameter appears in the expression with a dollar sign ($) identifier. The Min_Order_Amount default value is 50. If you add the transformation to a mapping without overriding the Min_Order_Parameter, the Filter transformation returns rows where the Amount is greater than 50.
Expose Transformation Parameters as Mapping Parameters
After you add a reusable transformation to a mapping, you can expose the transformation parameter as a mapping parameter. When you expose a reusable transformation parameter as a mapping parameter, you create a mapping parameter from the transformation parameter. The mapping parameter has the same name and type as the transformation parameter. The mapping parameter uses the instance value of the reusable transformation parameter.
You can click Expose as Mapping Parameter one time for a transformation parameter. If you click Expose as Mapping Parameter and the transformation parameter is already bound to a mapping parameter, the Developer tool does not change the mapping parameter. The Developer tool does not create another mapping parameter, and it does not update the mapping parameter default value. After you create a mapping parameter, multiple objects might use the mapping parameter. If you need to change the mapping parameter default value, change the value in the mapping or change it at run time.
1. Open the mapping. Select the mapping in the Outline view.
The Parameters tab appears in the Properties view.
The following image shows the Parameters tab for a Filter transformation:
2. To create a mapping parameter for the parameter, select the parameter and click Expose as Mapping Parameter.
The Developer tool creates a mapping parameter with the same name and it binds it to the transformation parameter.
3. To update a mapping parameter, select the parameter from the Outline view.
You can change the default mapping parameter value. You can also add mapping parameters on the mapping Parameters tab.
Setting the Parameter Instance Value
You can set the parameter instance value from the Instance Value column on the transformation Parameters tab. Set the instance value in this column if you do not want to create a duplicate mapping parameter.
You can set a transformation parameter to a default value or you can bind an existing mapping parameter to the transformation parameter.
1. After you add a transformation to a mapping, click the Parameters tab on the Properties view of the transformation.
2. To bind a mapping parameter to a transformation parameter, perform the following steps:
- a. Click the Instance Value column for the transformation parameter.
The Specify By dialog box appears.
- b. Click Specify By Parameter.
- c. On the Assign Parameterdialog box, browse for and select a mapping parameter or a system-defined parameter to bind to the transformation parameter.
- d. Click OK.
The mapping parameter name appears as the parameter value in the Specify By dialog box.
- e. Click OK in the Specify By dialog box.
The mapping parameter name appears in the Instance Value column.
3. To set a default value for the transformation parameter instance, use the following steps:
- a. Click the Instance Value column for the transformation parameter.
The Specify By dialog box appears.
- b. To enter a default value, click Specify By Value and enter a default value for the instance.
- c. To use the transformation parameter default value, click Use Default.
Creating a Parameter Set
Create a parameter set that you can use to change the runtime context for mappings and workflows.
When you create the parameter set, choose a mapping or workflow to contain the parameters. After you choose a mapping or workflow, you can manually enter parameters in the parameter set or you can select parameters.
1. In the Object Explorer view, right-click a project and click New > Parameter Set.
2. Enter a name for the parameter set and click Finish.
3. Drag the Properties panel down and view the grid to add the parameters to the parameter set.
4. Click New > Mapping/Workflow.
5. In the Add Parameters dialog box click Browse to find the mapping or workflow that contains the parameters you need to include in the set.
A list of mappings and workflows appears.
6. Select a mapping or a workflow and click OK.
A list of parameters from the mapping or workflow appears.
7. Select the parameters to include in the parameter set and then click OK.
The mapping or the workflow name and the path appears in the parameter set. Each parameter that you selected appears beneath the object.
8. To add a parameter that is not yet in a workflow or mapping, right-click a mapping or object name and select Parameter insert.
The Developer tool creates a parameter beneath the workflow or mapping. Change the parameter name, the value, and the type.
Note: You must add the parameter to the mapping or workflow before you use the parameter set.


 in parenthesis.")


