How to Create, Deploy, and Update an Application
Create and edit mappings and other objects and deploy them in an application to make them accessible to end users.
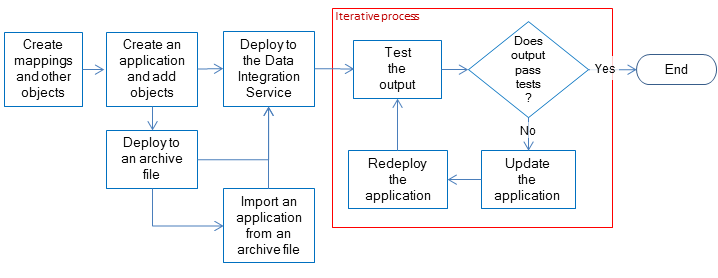
The following image shows the process of developing and deploying an application:

- 1. Create mappings, workflows, transformations, and other objects to access and transform data.
- 2. Create an application and add objects to it.
- 3. Choose to deploy the application to a Data Integration Service or to an application archive file:
- - Deploy the application to a Data Integration Service to allow the Data Integration Service to run objects.
- - Deploy the application to an application archive file to allow an administrator to archive the file, deploy the application from the archive file, or import the application from the application archive file to a Model repository.
- 4. If objects need further development to meet requirements, you can edit objects and update the application, and then redeploy the application to the Data Integration Service.
An administrator can deploy an application and perform other administrative tasks from the command line or from the Administrator tool. For information about these tasks, see the Informatica Application Service Guide.
Creating an Application
When you create an application, you select the objects to include in the application. Create an application when you want to deploy one or more objects so end users can access the data through third-party tools.
1. Select a project or folder in the Object Explorer view.
2. Click File > New > Application.
The New Application dialog box appears.
3. Enter a name for the application.
The application name is part of the session log file name when you deploy the application. Depending on the application, the session log file name might include the application name, feature name, connection ID, and the date and time.
The session log file name is included with the log directory path in the log file path. On Windows operating systems, the log file path has a limit of 259 characters. Consider the length limitation when you name the application.
4. Click Browse to select the application location.
You must create the application in a project or a folder.
5. Click the Add button to add objects to the application.
The Add Objects dialog box appears.
6. Select one or more objects and click OK.
The Developer tool lists the objects you select in the New Application dialog box.
7. Select the Parameter Sets view to add parameter sets to the application. Click Finish to skip adding parameter sets.
If you choose to add a parameter set, the Add Parameter Sets dialog box appears. If you click Finish, the Developer tool adds the application to the project or folder.
8. To add parameter sets to the application, click the Add button.
The Add Parameter Sets dialog box appears.
9. Select the parameter sets to add to the application and click OK.
10. Click Finish to create the application.
After you create an application, you deploy it to a Data Integration Service immediately, or deploy it to an application archive file to run later.
Deploying an Application to a Data Integration Service
After you create an application, you can deploy it to a Data Integration Service to run application objects.
1. Right-click an application in the Object Explorer view and select Deploy.
The Deploy dialog box appears.
2. Select Deploy to Service.
3. Click Browse to select the domain.
- a. In the Choose Domain dialog box, select a domain and click OK.
- b. Select the Data Integration Services to which you want to deploy the application.
4. Click Finish.
The Developer tool deploys the application to the Data Integration Service. The Data Integration Service runs the application and the objects that it contains.
You can test the output of application objects and validate the output against requirements. If necessary, you can update the application and redeploy it.
Deploying an Object to a Data Integration Service
If you want to deploy an object to a Data Integration Service so you can run it, the Developer tool prompts you to include it in an application. Then you can deploy the application to a Data Integration Service to run application objects.
Create an application, based on business and functional requirements, when you want to deploy one or more objects. You can also create an application when you want to update a deployed application.
1. Choose to deploy an executable object or a flat file data source.
- - To deploy a mapping, workflow, or other executable object, right-click the object and select Deploy.
- - To deploy a flat file data source, right-click the object and choose Deploy as a web service or Deploy as a SQL Data service.
The Developer tool prompts you to create an application.
2. Enter an application name.
3. To add objects to the application, click the Add button and select objects.
4. To deploy the application with parameter sets, click Next.
- a. Click the Add button to select the parameter sets to include in the application.
- b. Select each parameter set to include from the list. You can select all the parameter sets.
5. Click Next.
6. Select a Data Integration Service to deploy the application to.
7. If the Developer tool contains the connection information for multiple domains, click Browse to select the domain, and complete the following steps:
- a. In the Choose Domain dialog box, select a domain and click OK.
The Developer tool lists the Data Integration Services associated with the domain in the Available Services section of the Deploy dialog box.
- b. Select the Data Integration Services to which you want to deploy the application.
- c. Click Next.
8. To deploy the object to a web service, complete the following steps:
- a. Configure properties for the web service.
- b. To add operations to the web service, click Next.
By default, the Developer tool creates an operation for each object that you deploy as a web service.
- c. Select each operation, operation input, and operation output to display and configure the properties.
- d. Click Finish.
9. To deploy the object to an SQL data service, complete the following steps:
- a. Enter a name for the SQL data service.
- b. Accept the default location, or click Browse to select a Model repository and a project folder location for the SQL data service.
- c. Click Next.
The Add Virtual Tables to SQL Data Service dialog box appears.
- d. Click the Add button.
- e. Enter a name for the virtual table.
- f. Click the Open button in the Data Object column.
The Select a Data Object dialog box appears.
- g. Select a physical data object and click OK.
- h. Enter the virtual schema name in the Virtual Schema column.
- i. Select Read in the Data Access column to link the virtual table with the data object. Select None if you do not want to link the virtual table with the data object.
10. Click Finish.
The Developer tool deploys the application to the Data Integration Service. The Data Integration Service runs the application and the objects that it contains.
You can test the output of application objects and validate the output against requirements. If necessary, you can update the application and redeploy it.
Deploying an Object to an Archive File
You can export an object to an application archive file. You can store the file, or make it available to an administrator to deploy to a Data Integration Service.
If you want to export an object to a file, you must create a valid application and add the object to it. Then you can export the application to an application archive file.
Note: The application must be valid before it can be exported to an application archive file. To export an application that is not valid, right-click an object and select Export, and then choose an export format.
1. Choose to export an executable object or a flat file data source.
- - To export a mapping, workflow, or other executable object, right-click the object and select Deploy.
- - To export a flat file data source, right-click the object and choose Deploy as a web service or Deploy as a SQL Data service.
The Developer tool prompts you to create an application.
2. Enter an application name.
3. To choose a location for the application, accept the default location, or click Browse and select another location.
4. To add objects to the application, click the Add button and select objects.
5. To deploy the application with parameter sets, complete the following steps:
- a. Click the Add button to select the parameter sets to include in the application.
- b. Select each parameter set to include from the list. You can select all the parameter sets.
6. Click Next.
7. Select Export as an application archive file.
8. Click Browse to select the directory to save the file to.
The Choose a Directory dialog box appears.
9. Select the directory and click OK.
10. To configure details for an SQL data service, complete the following steps.
- a. To choose a location for an SQL data service, accept the default location, or click Browse and select another location.
- b. To add virtual tables to the SQL data service, click Next.
- c. Click the Add button to configure additional virtual tables for the SQL data service.
11. To configure details for a web service, complete the following steps.
- a. Enter a name for the web service.
- b. Accept the default Model repository location, or click Browse and select another location.
- c. Enter a namespace.
- d. Enter a prefix.
- e. To add operations to the web service, click Next.
- f. Click the Add button to create a new operation.
- g. Configure input and output for each operation.
12. Click Finish.
The Developer Tool validates the application and then exports it to an application archive file.
Note: If the application is not valid, the deployment process fails.
You can store the application archive file in another system. For example, you can archive it in a version control system. An administrator can deploy the application in the file to a Data Integration Service from the infacmd dis DeployApplication command. You can also import the application in the file to a Model repository.
Deploying an Application to an Archive File
Deploy an application to an application archive file if you do not want to deploy it directly to a Data Integration Service. You can store the file, make it available to an administrator for import to another system, or deploy the application from the file to a Data Integration Service.
1. Right-click an application in the Object Explorer and select Deploy.
2. Select Deploy to File System.
3. Click the Browse button to select the directory where you want to save the file.
The Choose a Directory dialog box appears.
4. Select the directory and click OK.
5. Click Finish.
The Developer tool validates the application and then exports it to an application archive file.
You can store the application archive file in another system. For example, you can archive it in a version control system. An administrator can deploy the application in the file to a Data Integration Service using infacmd dis DeployApplication.
Importing Application Archives
You can import an application that was deployed to an application archive file. You import the application and dependent objects into the Model repository. You might want to do this if the archive file has been archived from a different Model repository or retrieved from a version control system.
1. Click File > Import.
The Import wizard appears.
2. Select Informatica > Application Archive.
3. Click Next.
4. Click Browse to select the application archive file.
The Developer tool lists the application archive file contents.
5. Select the Model repository into which you want to import the application.
6. Click Finish.
The Developer tool imports the application into the repository.
Updating an Application
If you update any object in an application, you must update the application and redeploy it to make the changes accessible to end users. When you update the application, you can also add or delete objects and edit properties.
Before you update and redeploy an application, stop the application on the Data Integration Service.
1. To edit an application object, open the object from the Object Explorer.
2. Right-click the application in the Object Explorer and select Open.
The Application Editor opens.
3. Click the Add button to add objects to the application.
The Add Objects dialog box appears.
4. Select one or more objects and click OK.
5. Select one or more objects to delete and click the Delete button.
6. Save the application.
After you update the application, redeploy it to the Data Integration Service.
Redeploying an Application to a Data Integration Service
After you update the objects that an application contains, redeploy the application to a Data Integration Service.
1. Right-click an application in the Object Explorer view and click Deploy.
The Deploy dialog box appears.
2. Select Deploy to Service.
3. If no default Data Integration Service is set, click Browse to select the domain.
The Choose Domain dialog box appears.
4. Select a domain and click OK, and then select a Data Integration Service.
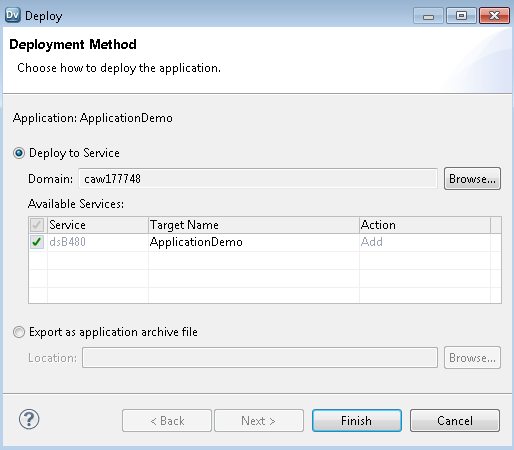
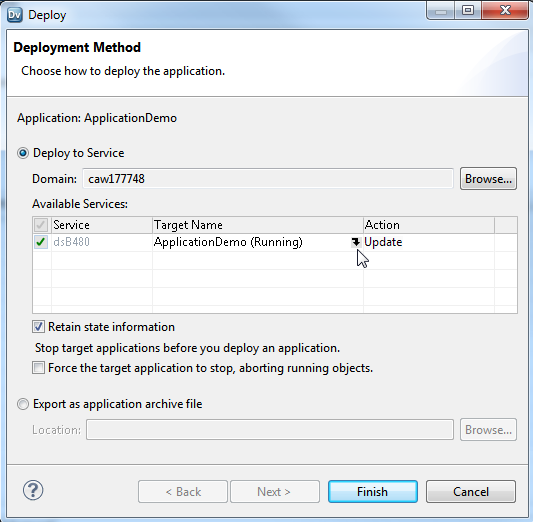
The Target Name column displays the application with the same name by default. For example, the following image shows the deployment of the application ApplicationDemo:
5. Click the Target Name column to choose a different target application on the Data Integration Service.
6. To retain the state of run-time objects that are part of the application, select Retain state information.
7. To replace deployed objects, select Force target application to stop, aborting running objects.
8. Click Finish.
After you redeploy the application, you can validate it against requirements.


