Object Import
You can import a project or objects within a project from an export file. You can import the objects and any dependent objects into a project or folder.
You can import a project or individual objects. Import a project when you want to reuse all objects in the project. Import individual objects when you want to reuse objects across projects.
When you import an object, the Developer tool lists all the dependent objects. You must add each dependent object to the target before you can import the object.
When you import objects, an object in the export file might have the same name as an object in the target project or folder. You can choose how you want to resolve naming conflicts.
You can also import objects with the infacmd oie ImportObjects command.
You cannot import objects from an export file that you created in a previous version.
Importing Projects
You can import a project from an XML file into the target repository. You can also import the contents of the project into a project in the target repository.
1. Click File > Import.
2. Select Informatica > Import Object Metadata File (Basic).
3. Click Next.
4. Click Browse and select the export file that you want to import.
5. Click Next.
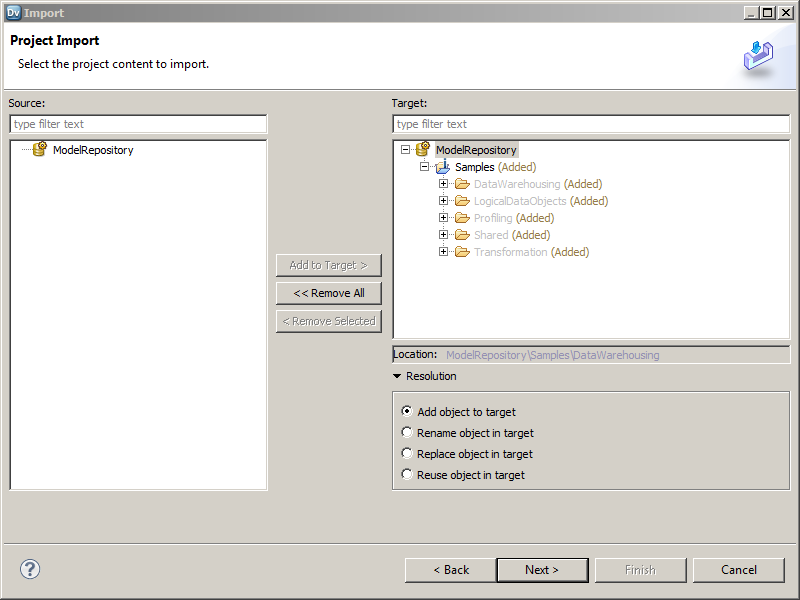
6. Select the project or select "<project name> Project Content" in the Source pane.
- - If you select the project in the Source pane, select the Model Repository Service in the Target pane where you want to import the project.
- - If you select the project content in the Source pane, select the project to which you want to import the project contents in the Target pane.
7. Click Add to Target to add the project to the target.
Tip: You can also drag the project from the Source pane into the repository in the Target pane. Or, you can drag the project content in the Source pane into a project in the Target pane.
8. Click Resolution to specify how to handle duplicate objects.
You can rename the imported object, replace the existing object with the imported object, or reuse the existing object. The Developer tool renames all the duplicate objects by default.
9. Click Next.
The Developer tool lists any reference table data that you are importing. Specify the additional reference table settings.
10. Click Next.
The Developer tool summarizes the objects to be imported. Click Link Source and Target Objects to link the objects in the Source and Target display panes when you select one of the objects. For example, if you select this option and then select an object in the Source pane, the Developer tool selects the same object in the Target pane.
11. Map the connections from the import file to the target domain connections in the Additional Import Settings pane. You can also select whether to overwrite existing tags on the objects.
12. Click Finish.
If you chose to rename the duplicate project, the Model Repository Service appends a number to the object name. You can rename the project after you import it.
Importing Objects
You can import objects from an XML file or application archive file. You import the objects and any dependent objects into a project.
1. Click File > Import.
2. Select Informatica > Import Object Metadata File (Advanced).
3. Click Next.
4. Click Browse to select the export file that you want to import.
5. Click Next.
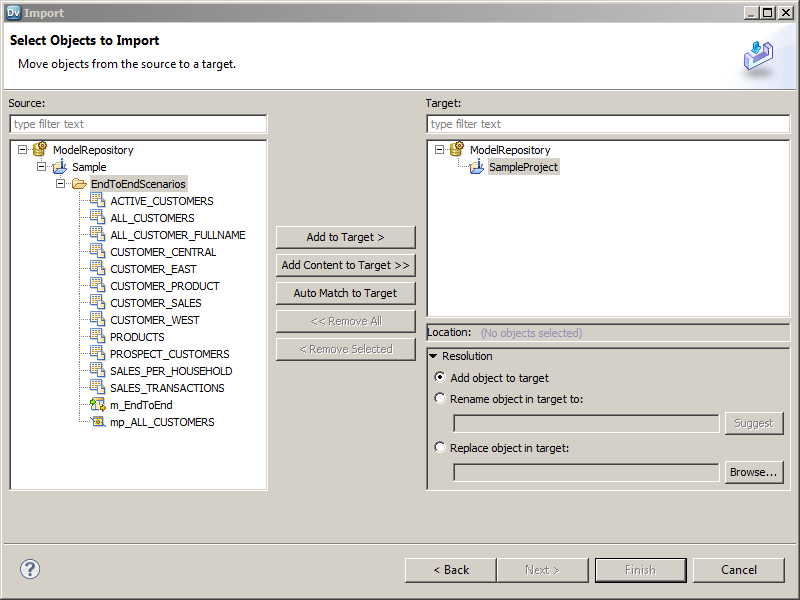
6. Select the object in the Source pane that you want to import.
7. Select the project in the Target pane to which you want to import the object.
8. Click Add to Target to add the object to the target.
If you click Auto Match to Target, the Developer tool tries to match the descendants of the current source selection individually by name, type, and parent hierarchy in the target selection and adds the objects that match.
If you want to import all the objects under a folder or a project, select the target folder or project and click Add Content to Target.
Tip: You can also drag the object from the Source pane into the required project in the Target pane. Press the control key while you drag to maintain the object hierarchy in source and target.
9. Click to specify how to handle duplicate objects.
You can rename the imported object, replace the existing object with the imported object, or reuse the existing object. The Developer tool renames all the duplicate objects by default.
10. Click Next.
The Developer tool lists any dependent objects in the import file.
11. Add dependent objects to a target folder or project.
12. Click Next.
The Developer tool lists any reference table data that you are importing. Specify the additional reference table settings.
13. Click Next.
The Developer tool summarizes the objects to be imported. Click Link Source and Target Objects to link the objects in the Source and Target display panes when you select one of the objects. For example, if you select this option and then select an object in the Source pane, the Developer tool selects the same object in the Target pane.
14. Map the connections from the import file to the target domain connections in the Additional Import Settings pane. You can also select whether to overwrite existing tags on the objects.
15. Click Finish.
If you choose to rename the duplicate project, the Import wizard names the imported project as "<Original Name>_<number of the copy>." You can rename the project after you import it.
Importing Objects from a Previous Informatica Release
You can upgrade objects exported from a previous Informatica release to the current metadata format, and then import the upgraded objects into the current Informatica release. You must upgrade the exported objects to the current metadata format before you import the objects into the current release.
You might import objects from a previous Informatica release into the current Informatica release in an enterprise with multiple Informatica releases installed. For example, you might export objects from a previous Informatica release development domain, and then import the objects into a current Informatica release test domain.
You export objects from an Informatica 10.1 or 10.1.1 Model repository to an .xml file that contains the object metadata. You use the mrs UpgradeExportedObjects command to upgrade the exported objects to the current metadata format. You must specify the path and file name of the .xml file that contains the exported objects when you run the command.
Do not modify the .xml file before you run the mrs UpgradeExportedObjects command. If you modify the file before you run the command, the objects in the file might not upgrade successfully.
The mrs UpgradeExportedObjects command upgrades the objects, and then generates an .xml file containing the upgraded objects. You must specify the file name and path for the .xml file. You can import the .xml file into a current Informatica release repository.
The mrs UpgradeExportedObjects command requires access to an Informatica 10.2 Model Repository Service. You must supply the service name of an Informatica 10.2 Model Repository Service running within the domain when you run the command.
For more information about the mrs UpgradeExportedObjects command, see the Informatica Command Reference.

