Team-based Development with Versioned Objects
Team-based development is the integration of the Model repository with a third-party version control system. The version control system saves multiple versions of objects and assigns each version a version number.
You manage object versions through the Developer tool. You can perform actions such as checking objects out and in, viewing and retrieving historical versions of objects, and undoing a checkout.
The Model repository protects objects from being overwritten by other members of the development team. If you open an object that another user has checked out, you receive a notification that identifies the user who checked it out. You can open a checked out object in read-only mode, or you can save it with a different name.
When the connection to the version control system is active, the Model repository has the latest version of each object.
The Model repository maintains the state of checked-out objects if it loses the connection to the version control system. While the connection with the version control system is down, you can continue to open, edit, save, and close objects. The Model repository tracks and maintains object states.
When the connection is restored, you can resume version control system-related actions, such as checking in or undoing the checkout of objects. If you opened and edited an object during the time when the connection was down, the Model repository checks out the object to you.
Note: SQL data service objects are not included in version control.
Versioned Object Management
When the Model repository is integrated with a version control system, you can manage versions of objects. For example, you can check out and check in objects, undo checkouts, and view objects that you have checked out.
You can perform the following actions:
- Check out an object.
- When you check out an object, it maintains a checked-out state until you check it in or undo the checkout. You can view objects that you have checked out in the Checked Out Objects view. To check out an object, you can begin to edit it, or you can right-click the object in the Object Explorer and select Check Out.
- Undo a checkout of an object.
- When you undo a checkout, you check in the object without changes and without incrementing the version number or version history. All changes that you made to the object after you checked it out are lost. To undo a checkout, you can use the Checked Out Objects view or the object right-click menu. For example, you might want to undo a checkout to delete changes to an object.
Note: If a user moved an object while it was checked out and you undo the checkout, the object remains in its current location, and its version history restarts. Undoing the checkout does not restore it to its pre-checkout location.
- Check in an object.
- When you check in an object, the version control system updates the version history and increments the version number. You can add check-in comments up to a 4 KB limit. To check in an object, you can use the Checked Out Objects view or the object right-click menu.
Note: The Perforce and SVN version control systems limit file path lengths due to a Windows restriction that restricts path lengths to 260 bytes. If you attempt to check in a file with a path that exceeds the limitation, Perforce returns an error. A 260 byte path length results in varying path lengths depending on the character set of your system.
- Delete an object.
A versioned object must be checked out before you can delete it. If it is not checked out when you perform the delete action, the Model repository checks the object out to you and marks it for delete. To complete the delete action, you must check in the object.
When you delete a versioned object, the version control system deletes all versions.
To delete an object, you can use the Checked Out Objects view or the object right-click menu.
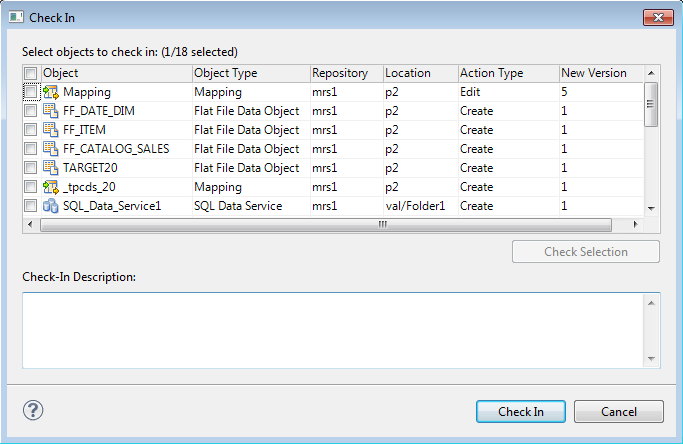
Check In Dialog Box
The Check In dialog box displays all objects you have checked out.
Use the Check In dialog box to check in objects. You can also use it to delete objects that you marked for delete.
The following image shows the Check In dialog box:
The Action Type column shows the action that the Model Repository Service performs on each item when you check it in. The Model Repository Service performs one of the following action types:
Action Type | Description |
|---|
Create | The object is new and has never been checked in. When you select it and click Check In, the Model Repository Service checks it in to the version control system and assigns it a version number of 1. |
Delete | The object is marked for delete. When you select it and click Check In, the Model Repository Service deletes the object. |
Edit | The object is marked for edit. When you select it and click Check In, the Model Repository Service replaces the version in the version control system with the new version. |
Move | After you checked out the object, you moved it from one Model repository project or folder to another. When you select it and click Check In, the Model Repository Service checks it in to the version control system in the new location. |
The Location column shows the current location of the object. If you moved the object, the Action Type is Move.
Tip: You can see previous locations of a moved object in the Version History view.
The New Version column shows the version number of the object after you complete the checkin.
You can check in one or more objects in the Check In dialog box. Select objects to check in by performing one of the following actions:
- •Use the check box to select one or more objects.
- •Select one or more rows and click Check Selection to enable the check box for each object that you selected.
Optionally, you can add a description in the Check-In Description text pane. Then you can click Check In to check in all the selected objects.
Deleting a Versioned Object
When you want to delete a versioned object, you mark it for deletion, and then check it in.
1. Right-click an object in the Object Explorer or the Checked Out Objects view, and select Delete.
The Action attribute changes from Edit to Delete.
2. Select the object and select Check In.
The Model repository deletes the object.
Historical Versions of Objects
The version control system saves a copy of an object every time you check it in.
The version control system saves a version of the object and assigns a version number to it. The highest number designates the latest version.
Use the Version History view to view the version history of objects, open historical versions in read-only view, and restore historical versions of objects. You might want to restore a historical version of an object to restore previous functionality.
When you restore a historical version of an object, that version becomes the latest version. The Model repository replaces the current version of the object with the historical version and checks the object out to you. If the object is open in an editor, the Developer tool refreshes the object to the restored version.
Restoring a Historical Version of an Object
You can view or get a historical version of an object from the version control system.
1. Right-click an object in the Object Explorer and select View Version History.
The Revision History view opens.
2. To view a historical version, right-click one of the versions listed in the Revision History view and select View Version.
The Developer tool opens a read-only version of the object. The Developer tool lists the version number in the title bar of the editor window.
3. To restore a historical version, right-click one of the versions listed in the Revision History view and select Restore Version.
The object opens in the editor. You can edit the object, or check it in without editing it.
4. Check in the object.
The restored version of the object becomes the latest version in the Model repository and the version control system.
Checked Out Objects View
The Checked Out Objects view lists all the objects that you have checked out.
You can perform the following actions in the Checked Out Objects view:
- •Undo a checkout of an object
- •Check in an object
To perform one of these actions, right-click the object and select the action.
To delete an object that is marked for delete in the Action Type column, right-click the object and select Check In.
Version History View
The Version History view displays the version history of selected objects. You can read check-in comments and view user information about object check-ins.
The view displays the following information:
- •Version. Integer showing the order in which versions were saved. The version control system assigns the highest number to the most recent checked-in version.
- •Name. Name of the object.
- •Location. Path to the object in the Model repository.
- •Action type. The action that the user took when checking in the object. You can add, edit, or delete and object when you check it in.
- •User. User ID of the team member who checked in the object.
- •Version date. Date and time that a user checked in the object.
- •Version description. Check-in comments for the selected version.
To view version history, right-click an object in the Object Explorer and select View Version History.
Troubleshooting Team-based Development
Consider the following troubleshooting tips when you use features related to team-based development:
- The Perforce version control system fails to check in some objects, with an error about excessively long object path names.
Due to Windows OS limitations on the number of characters in a file path, Model repository objects with long path and file names fail when you try to check them in. The Perforce error message reads "Submit aborted" and says the file path exceeds the internal length limit.
To work around this problem, limit the length of project, folder, and object names in the Model repository. Shorter names in all instances help limit the total number of characters in the object path name.