Create a Write Transformation
When you create a Write transformation, you choose one of the following methods based on the resource you create the transformation from:
- Create the transformation from a data object in the Model repository.
- Use this method if you want to base the Write transformation metadata on a data object.
- To create a Write transformation in the mapping editor, use the New Write Transformation wizard, or drag a data object from the Object Explorer view and select Write as the transformation type.
- Create the transformation from the flow of mapping objects.
- Use this method to base the ports in the Write transformation on the flow of metadata from upstream mapping transformations.
- Create the transformation using a parameter.
- Use this method if you want the Write transformation to inherit ports from the object that the parameter represents.
- Create the transformation using another transformation in the mapping.
- Use this method if you want the Write transformation to have the same ports as the source transformation.
Creating a Write Transformation from a Data Object
You can create and configure a Write transformation in the mapping editor.
You might want to use this method if you want to configure specific properties for the transformation. For example, you can create the transformation, and then configure it to get column metadata from the data source at run time.
1. Right-click in the mapping editor and select Add Transformation.
The Add Transformation dialog box opens.
2. Select Write and click OK.
The New Write Transformation wizard opens.
3. Select Physical Data Object or Logical Data Object, and then click Browse.
The Select Data Object dialog box opens.
4. Select a data source, and then click OK.
5. To define Write transformation columns by the associated data object, select Associated data object.
The Write transformation ports are the same as the columns of the associated data object.
6. To dynamically update target object columns at run time with changes from the target file, select At run-time, get data object columns from data source.
The Data Integration Service refreshes the column metadata for the Write transformation when the mapping runs.
7. Click Finish.
Creating a Write Transformation from Mapping Flow
You can create and configure a Write transformation in the mapping editor.
You might want to use this method if you want to configure specific properties for the transformation. For example, you can create the transformation, and then configure it to define columns based on mapping flow and to get column metadata from the data source at run time.
1. Right-click in the mapping editor and select Add Transformation.
The Add Transformation dialog box opens.
2. Select Write and click OK.
The New Write Transformation wizard opens.
3. Select Physical Data Object or Logical Data Object, and then click Browse.
The Select Data Object dialog box opens.
4. Select a data source, click OK.
5. Select Mapping flow, and then click Finish.
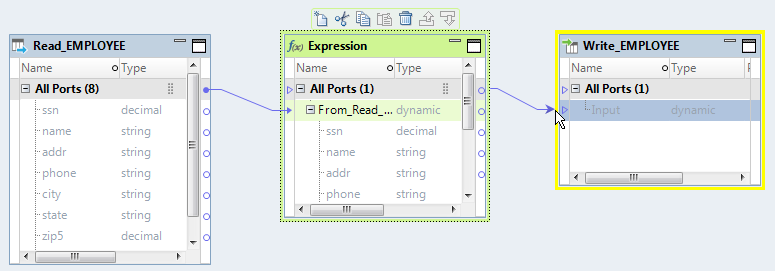
6. Drag ports from the All Ports port of the upstream to the Input port of the Write transformation.
The following image shows how to connect upstream ports to the Input port of the Write transformation:
The Write transformation receives column definitions from upstream mapping objects.
7. To dynamically update target object columns at run time with changes from the target file, select At run-time, get data object columns from data source.
The Data Integration Service refreshes the column metadata for the Write transformation when the mapping runs.
Creating a Write Transformation from a Parameter
A parameter is a constant value that you can change between mapping runs.
In a dynamic mapping, you can use parameters to change sources and targets. You can also use parameters for input rules, selection rules, run-time links, and transformation properties. When you change the value of the parameter, the Data Integration Service creates or recreates the target according to the value specified in the parameter.
1. Right-click in the editor and select Add Transformation.
2. Select Write from the list of transformations, and then click OK.
Tip: Type the first letter of the transformation to filter the list.
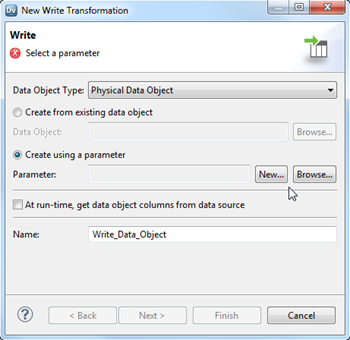
The New Write Transformation dialog box opens.
3. Select Create using a parameter.
4. Browse to select the parameter, or click New to create a new parameter, and then browse to select a data object to create the parameter from.
5. Optionally, select the option At run time, get data object columns from data source to refresh the transformation columns at run time.
6. Optionally, click Next to choose how to define transformation columns.
7. Click Finish.
Creating a Write Transformation from an Existing Transformation
You can create a Write transformation with the same ports in a transformation that exists in the mapping.
You can create a target for complex files, flat files, or relational resources. If one of the ports in the existing transformation contains a complex port, you must create a complex file target and link ports by name or link ports at run time based on the link policy. The Developer tool can create an Avro or a Parquet complex file target.
1. Open a mapping in the editor.
2. Right-click a transformation in the mapping editor and select Create Target.
The Create Target window opens.
3. Choose a complex file, flat file, or relational data object type.
4. Choose a link type.
You can choose from the following link types:
- Link ports by name
- Ports in the Write transformation correspond to those in the source and have the same names.
- Link dynamic port based on the mapping flow
- The Write transformation contains dynamic ports based on upstream objects in the mapping flow.
- Link ports at run time based on link policy
- Ports are created in the target at run time based on the link policy that you configure on the Run Time Linking tab of the Write transformation.
For more information about dynamic ports and run-time link configuration, see the Informatica Developer Mapping Guide.
5. Name the new data object.
6. Optionally, click Browse to select a location for the data object.
7. If you chose to create a complex file target, select the complex file format as Avro or Parquet in the Resource Format drop-down box.
8. Click Finish.
The Developer tool performs the following tasks:
- •Adds a Write transformation to the mapping.
The following image shows a Write transformation created from a Read transformation:
- •Links ports.
- •Creates a physical data object.
You can configure the physical data object properties. For example, you must specify an HDFS connection for the complex file data object.


