Workday Source Operations
Create a Source transformation in the Mapping Designer to read data from Workday.
When you select a Workday connection for a Source transformation in a mapping to read data from Workday, you can select an operation based on the imported WSDL.
For a complete list of supported versions, see the following link to the Workday Web Services (WWS) Version Directory:
https://community.workday.com/custom/developer/API/versions/index.html. You can click the version you want to view for the services and the corresponding operations that you can perform with Workday.
After you specify the configured connection, specify All Operations on the Source tab of the Source transformation. The Secure Agent displays all the supported operations for the specified version and module. You can select the operation that you want to perform. When you select Read Operations, a subset of the available read operations for the WSDL appears.
Select the operation you require, configure the request message in XML from the sample template provided, and configure the advanced properties for the operation. If you want to write to a relational target, define a relational structure for the worker data by mapping the incoming fields that is in hierarchical format to the output fields in relational format. When you run the mapping, the Secure Agent retrieves data for the specified operation from Workday.
Configuring a Request Using Request Message Editor
When you create a Source transformation, configure an XML request message for the operation that you want to perform in Workday.
Use the Request Message Editor to create a request message. The request message is in XML format. You can use the default request message for the operation and then customize the request message to specify the data that you want to enter into the data flow.
To customize your request, copy the request message from the sample template to the Request Message Editor pane where you can edit the XML message and add the attributes for the request.
For example, you want to perform an operation Get_Workers using Workday Connector to retrieve data for a worker that was updated through a specified period. Specify the attributes Updated_From and Updated_Through values in the request message to fetch worker transactions that occurred between May 12, 2016 and May 13, 2016.
The following XML sample shows the request input elements that you want in the response:
<bsvc:Get_Workers_Request xmlns:bsvc="urn:com.workday/bsvc" bsvc:version="v25.0">
<bsvc:Request_Criteria>
<bsvc:Transaction_Log_Criteria_Data>
<bsvc:Transaction_Date_Range_Data>
<bsvc:Updated_From>2016-05-12T00:00:00-07:00</bsvc:Updated_From>
<bsvc:Updated_Through>2016-05-13T00:00:00-07:00</bsvc:Updated_Through>
</bsvc:Transaction_Date_Range_Data>
</bsvc:Transaction_Log_Criteria_Data>
</bsvc:Request_Criteria>
<bsvc:Response_Filter>
<bsvc:Count>1</bsvc:Count>
</bsvc:Response_Filter>
<bsvc:Response_Group>
<bsvc:Include_Personal_Information>1</bsvc:Include_Personal_Information>
<bsvc:Include_Transaction_Log_Data>1</bsvc:Include_Transaction_Log_Data>
</bsvc:Response_Group>
</bsvc:Get_Workers_Request>
Note: Use only the following date time format: yyyy-mm-ddThh:mm:ss.
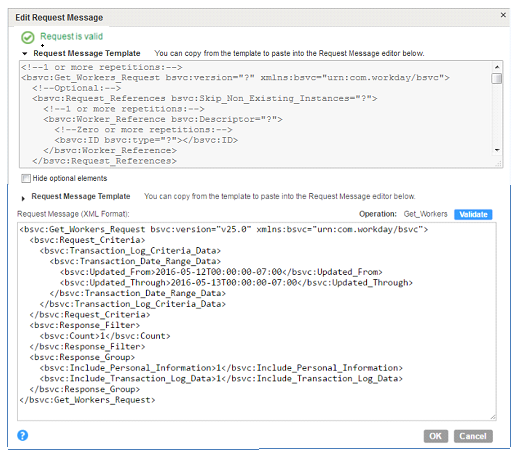
The following image shows the validated request message in a Get_Workers operation in the Mapping Designer:
For information about the type, value, cardinality, and description of each of the parameters that you can use in the request XML message for the Get_Workers operation, go to version 25 of the WSDL in the Workday Web Services (WWS) Directory, and then select the Get_Workers operation listed under the Human_Resources service. See the following link for the Get_Workers operation listed for v25.0 in the WWS directory:
https://community.workday.com/custom/developer/API/Human_Resources/v25.0/Get_Workers.htmlThe request message format in Workday Connector follows the service request definition in Workday. You can view the Get_Workers_Request and Get_Workers_Response to understand the request and response elements that you can use.
Ensure that you use well-formed XML formatting in the request message. You can verify if the XML request is valid to ensure that the XML matches the structure expected by the operation.
Parameterizing Input Values in a Request Message
You can use in-out parameters to represent input values in a request XML.
Configure the in-out parameters in the Mapping Designer. From the Mapping Design page, you open the parameters panel and configure an in-out parameter.
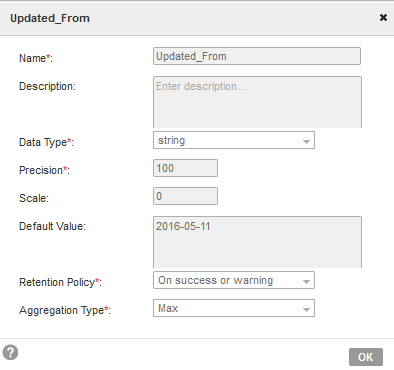
The following image shows a configured Updated_From in-out parameter value:
After you configure a parameter, use the parameter name in the following format, $$Name, in a request message. The XML uses the fields from the parameterized object.
For example, you want to use parameterized Updated_From and Updated_To values in an XML request for a Get_Operation.
The following sample request shows the parameterized values that you can specify in an XML request:
<bsvc:Get_Workers_Request xmlns:bsvc="urn:com.workday/bsvc" bsvc:version="v25.0">
<bsvc:Request_Criteria>
<bsvc:Transaction_Log_Criteria_Data>
<bsvc:Transaction_Date_Range_Data>
<bsvc:Updated_From>$$Updated_From</bsvc:Updated_From>
<bsvc:Updated_Through>$$Updated_Through</bsvc:Updated_Through>
</bsvc:Transaction_Date_Range_Data>
</bsvc:Transaction_Log_Criteria_Data>
</bsvc:Request_Criteria>
<bsvc:Response_Filter>
<bsvc:Count>1</bsvc:Count>
</bsvc:Response_Filter>
<bsvc:Response_Group>
<bsvc:Include_Personal_Information>1</bsvc:Include_Personal_Information>
<bsvc:Include_Transaction_Log_Data>1</bsvc:Include_Transaction_Log_Data>
</bsvc:Response_Group>
</bsvc:Get_Workers_Request>
Configuring In-Out Parameters in a Mapping
You can use an in-out parameter that holds a variable value that can change each time a task runs to manage incremental data loading.
Add the in-out parameterized values in complex expressions in a mapping when you want to update the parameters when each task runs. The in-out parameter acts like a placeholder for a value that stores a task stage. Informatica Cloud evaluates the parameter at run time based on the specified configuration.
For example, you can use the following parameterized values in an Expression transformation:
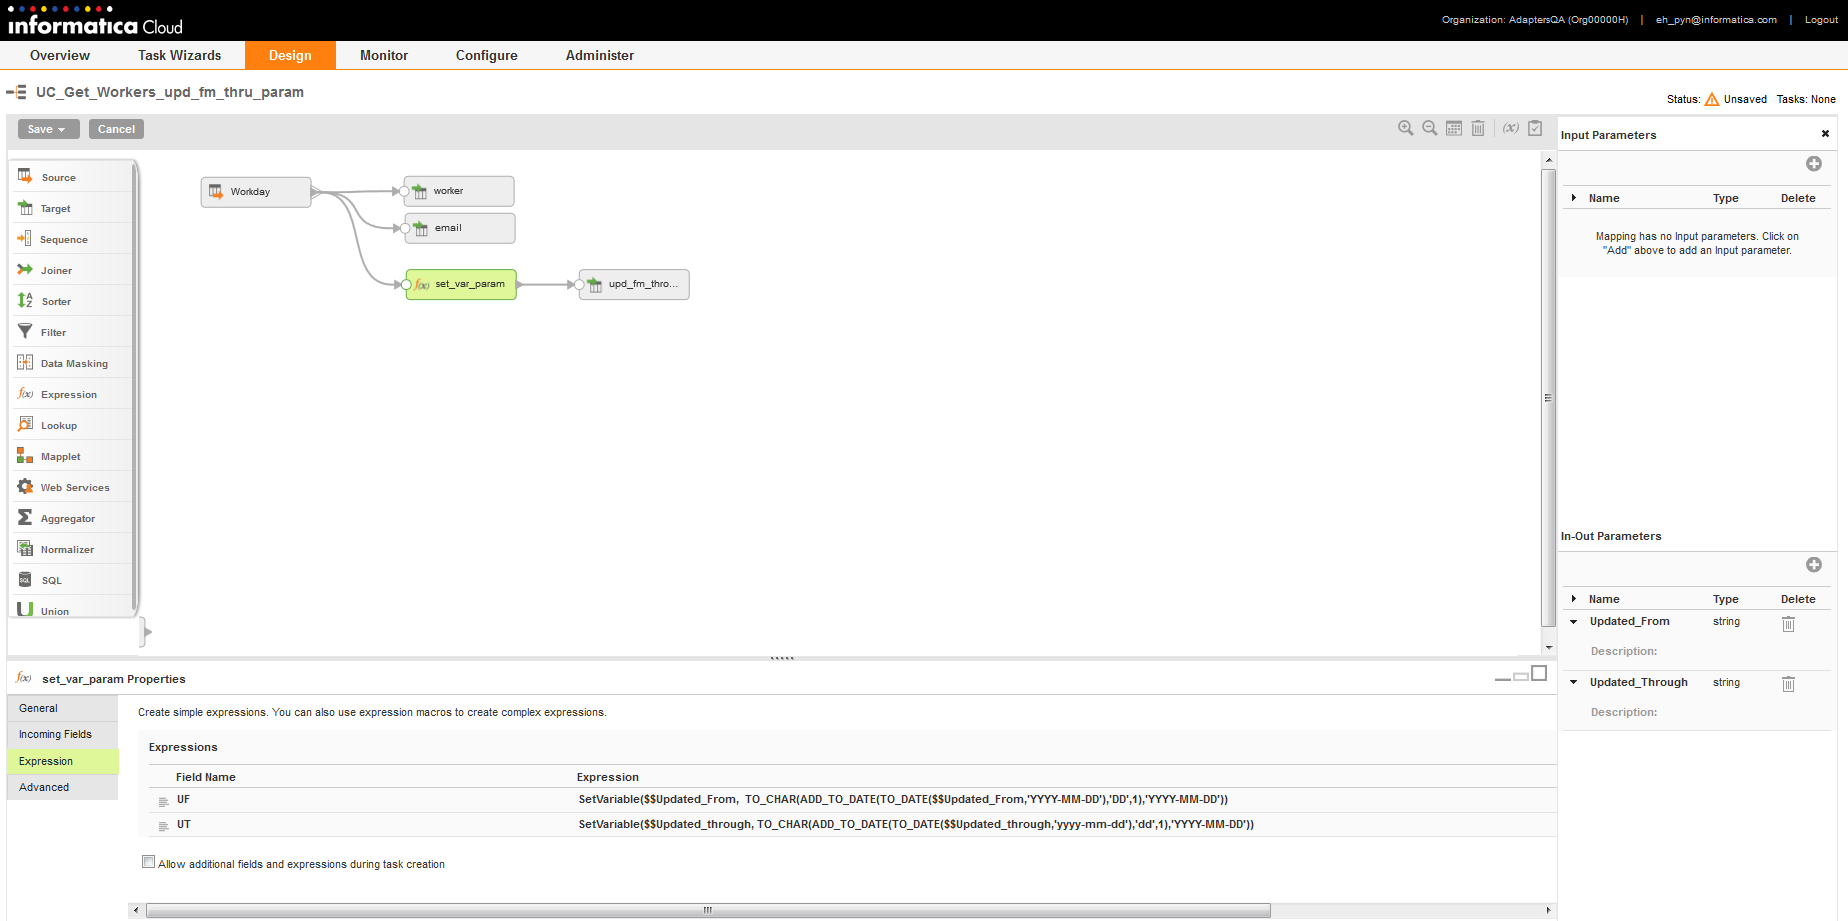
SetVariable($$Updated_From, TO_CHAR(ADD_TO_DATE(TO_DATE($$Updated_From,'YYYY-MM-DD'),'DD',1),'YYYY-MM-DD'))
In the example, SetVariable function sets the parameter value each time the session runs. The default value set for the $$Updated_From parameter is 2016-05-11. You want to update the value by one every time the task runs.
The following image shows the parameterized values uses in an Expression transformation in the Mapping Designer:
When you deploy the mapping in a Mapping Configuration Task, you can configure the mapping to run according to a schedule. When the task runs, the Secure Agent updates the in-out parameters based on the specified parameters in the expression.
The following image shows a configured parameter used in a Mapping Configuration task:
In the example, the task reads rows dated through the default value 2016-05-11 the first time it runs. The task sets $$Updated_From to 2016-05-12 when the session is complete. The next time the session runs, the task considers the updated value and reads rows with the date 2016-04-12.
Field Mapping in a Source Transformation
The response message format follows the service response definition in Workday. You can map response fields from a hierarchical to a relational structure of output groups and fields.
After you configure an operation for a source and specify the request message, create the relational format from the hierarchical data to include groups and fields that you want in the output.
To do this, select the elements in the response structure that you want to include as output fields. The Secure Agent converts the XML response in the hierarchical structure to relational groups at run time.
The output groups along with the primary and foreign keys are automatically generated. You can hover the mouse over an output field to view the XPath expression, which indicates which field the output field is mapped to in the response structure of the hierarchy tree.
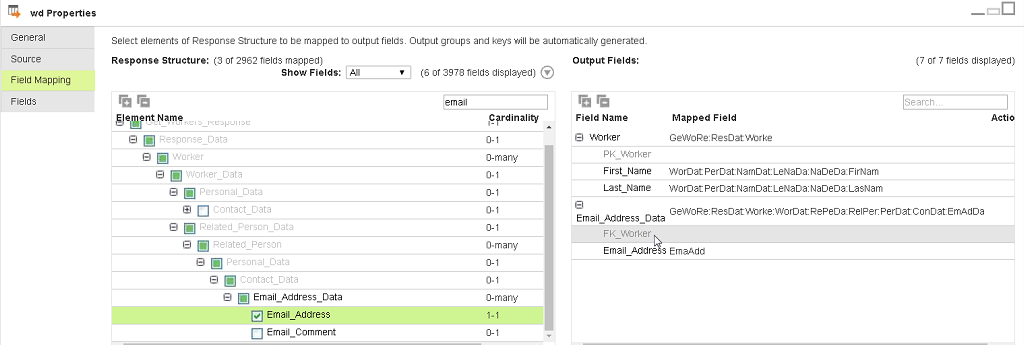
The following image shows an example hierarchical response structure generated from the request XML for the Get_Workers operation in the Human Resources Workday module and the corresponding relational output fields for the response:
For example, in the Response Structure pane, you select First_Name and Last_Name, and then you select Email_Address, which is located under a different parent in the hierarchy. In the Output Fields area, the structure is relational with system-generated primary and foreign keys.
You can map fields from only one output group to a particular branch of the response structure hierarchy. For example, if Birth_Date is a sibling of nodes that are mapped to the Personal_Data group, you must map Birth_Date to the Personal_Data group.
You can edit the data type, precision, and scale for the groups and fields after mapping the fields.
Creating Packed Fields in a Field Mapping
You can reduce the number of output groups for a complex request message by marking fields that you want to pack when you configure the field mapping.
You can pack multiple instances of a single element or a hierarchy of elements into one field. A packed icon displays next to elements marked to be packed, indicating that you can pack the entire element into one output field when you check that element.
Fields can come from the source that are already marked for packing. You can unpack fields by clicking the pack icon. You cannot select fields that are descendants of packed fields.
The following image shows the packed Phone_Data element:
When you run the mapping, the agent packs the element and its descendants into a single XML string.
The following sample table shows the Worker output in the target file after you run the task:
PK_Worker | Phone_Data | First_Name | Last_Name |
|---|
1 | <infa_packed><wd:Phone_Data wd:Formatted_Phone="+1 (650) 882-6532">
<wd:Country_ISO_Code>USA</wd:Country_ISO_Code>
<wd:International_Phone_Code>1</wd:International_Phone_Code>
<wd:Area_Code>650</wd:Area_Code>
<wd:Phone_Number>882-6532</wd:Phone_Number>
<wd:Phone_Device_Type_Reference wd:Descriptor="Mobile">
<wd:ID wd:type="WID">d691375437c848aea9d5b0874353bfd7</wd:ID>
<wd:ID wd:type="Phone_Device_Type_ID">1063.1</wd:ID>
</wd:Phone_Device_Type_Reference>
<wd:Usage_Data wd:Public="0">
<wd:Type_Data wd:Primary="1">
<wd:Type_Reference wd:Descriptor="Home">
<wd:ID wd:type="WID">836cf00ef5974ac08b786079866c946f</wd:ID>
<wd:ID wd:type="Communication_Usage_Type_ID">HOME</wd:ID>
</wd:Type_Reference>
</wd:Type_Data>
</wd:Usage_Data>
</wd:Phone_Data>
</infa_packed>
| Ernest | Egg |
You can view the packed Phone_Data in the target file.


