Incoming Fields
An incoming field is a field that enters a transformation from an upstream transformation.
By default, a transformation inherits all incoming fields from an upstream transformation. However, you might want to change the default. For example, you might not need all of the fields from an upstream transformation, or you might need to rename fields from an upstream transformation.
A field rule defines how data enters a transformation from an upstream transformation. You can create field rules to specify which incoming fields to include or exclude and to rename incoming fields as required.
A field name conflict occurs when fields come from multiple transformations and have the same name. To resolve a field name conflict caused by fields from an upstream transformation, you can create a field name conflict resolution to rename incoming fields in bulk.
The following list shows the order of events that take place as fields enter and move through a transformation:
- 1. Field name conflict resolution rules run, if any are present.
- 2. Field rules run as fields from upstream transformations enter a transformation.
- 3. Depending on the transformation type, new fields might be added to a transformation. For example, in a Lookup transformation, fields can enter the transformation from a lookup object.
Field Name Conflicts
The Mapping Designer generates a field name conflict error when you validate a mapping that has fields with matching names from different transformations. When a field name conflict occurs, you need to ensure that each field has a unique name.
To resolve a field name conflict, you can create a field rule to rename fields. If you create a field rule to resolve a field name conflict, you create the field rule in the upstream transformation.
Alternatively, field name conflict error messages contain a link that you can use to create a field name conflict rule to resolve the field name conflict. A field name conflict rule renames all of the fields from the upstream transformation, not just the fields that cause a conflict.
Field name conflict rules take effect before field rules take effect. Field name conflict rules are only applicable to incoming fields from upstream transformations. Field name conflicts that occur after incoming fields first enter a transformation cannot be corrected by field name conflict rules. For example, you cannot use field name conflict rules to correct field name conflicts that occur due to field rules or activities such as lookup fields. Instead, modify the field rules or transformations that cause the conflict.
Creating a Field Name Conflict Resolution
You can resolve a field name conflict by renaming all of the fields coming from an upstream transformation in bulk using the Resolve Field Name Conflict dialog box, which you access from a field name conflict error message.
1. Click the link in the error message to access the Resolve Field Name Conflict dialog box.
2. Select the upstream transformation that contains the fields you want to rename in bulk.
3. In the Bulk Rename Options column, specify whether you want to rename by adding a prefix or by adding a suffix.
4. Enter the text to add to the field names, then click OK.
Field Rules
Configure a field rule based on incoming fields from an upstream transformation. Then configure the field selection criteria and naming convention for the fields.
When you configure a field rule, you perform the following steps:
- 1. Choose the incoming fields that you want to include or exclude. To improve processing time and keep a clean set of data, you can include only the incoming fields that you need.
- 2. Configure the field selection criteria to determine which incoming fields apply to the rule. If you use the Named Fields selection criteria, you can use a parameter for the incoming fields.
- 3. Optionally, choose to rename the fields. To distinguish fields that come from different sources or to avoid field name conflicts, you can rename incoming fields. If you use the pattern option, you can create a parameter to rename fields in bulk.
- 4. Verify the order of execution. If you configure multiple rules, you can change the order in which the Mapping Configuration task applies them.
Note: You cannot configure field rules on Source transformations or Mapplet transformations that contain sources.
Step 1. Choose Incoming Fields
When you configure a field rule, you indicate whether the rule includes or excludes the incoming fields that you specify.
The include/exclude operator works in conjunction with field selection criteria to determine which incoming fields a field rule affects.
For example, you want a transformation to exclude all binary fields. You select the exclude operator to indicate that the incoming fields that meet the field selection criteria do not pass into the current transformation. Then you specify the binary data type for the field selection criteria.
Step 2. Configure Field Selection Criteria
When you configure a field rule, you specify the field selection criteria to determine which incoming fields apply to the field rule.
You can choose one of the following field selection criteria:
- All Fields
- Includes all of the incoming fields. You can rename the incoming fields in bulk when you use this option in combination with the Includes operator.
- Named Fields
- Includes or excludes the incoming fields that you specify. Use the Named Fields selection criteria to specify individual incoming fields to rename or to include or exclude from the incoming transformation. When you enter the field selection criteria details, you can review all of the incoming fields and select the fields to include or exclude. You can add a field that exists in the source if it does not display in the list. You can also create a parameter to represent a field to include or exclude.
- Fields by Data Type
- Includes or excludes incoming fields with the data types that you specify. When you enter the field selection criteria details, you can select the data types that you want to include or exclude.
- Fields by Text or Pattern
- Includes or excludes incoming fields by prefix, suffix, or pattern. You can use this option to select fields that you renamed earlier in the data flow. When you enter the field selection criteria details, you can select a prefix, suffix, or pattern, and define the rule to use. When you select the prefix option or suffix option, you enter the text to use as the prefix or suffix. When you select the pattern option, you can enter a regular expression or you can use a parameter for the pattern.
The following image shows the selection of the Fields by Data Types field selection criteria:
The following image shows the selection of the date/time data type for the field selection criteria details:
Step 3. Rename Fields
Rename fields to avoid field name conflicts or to clarify field origins in complex mappings. You can rename fields as part of a field rule in a transformation. After you specify the field selection criteria for a field rule, you specify how to rename the selected fields.
You can rename fields individually or in bulk. When you rename fields individually, you select the fields you want to rename from a list of incoming fields. Then you specify the name for each of the selected fields.
When you rename in bulk, you can rename all fields by adding a prefix, suffix, or pattern. When you rename fields with a prefix or suffix, you enter the text string to use as a prefix or suffix. For example, you can specify to rename all fields as FF_<field name>.
When you rename fields by pattern, you enter a regular expression to represent the pattern or use a parameter to define the pattern in the task. You can create a simple expression to add a prefix or suffix to all field names or you can create an expression to replace a particular pattern with particular text.
To replace a pattern with text use a regular expression in the following syntax, where a forward slash separates the pattern to match and the text the pattern will be replaced with:
<pattern to match>/<replacement text>
The following table provides a few examples of using regular expressions when you rename fields in bulk:
Goal | Expression |
|---|
Replace all occurrences of Inc with LLC. | Inc/LLC |
Replace occurrences of Inc that occur at the end of a field name with LLC. | Inc$/LLC |
Replace occurrences of Loc that occur at the beginning of a field name with Branch. | ^Loc/Branch |
Remove all occurrences of A/C. | A\/C(.*)/$1 Note: When a character in a field name is a regular expression metacharacter, escape the character with a backslash to show that it is a literal. In this example, the forward slash is a metacharacter. |
Add a prefix of _FF and a suffix of _in to all fields. | FF_$0_in |
The following image shows the Include All Fields dialog box with the Pattern bulk renaming option selected and a pattern specified to use:
Carefully construct field renaming rules to ensure that the rules do not introduce issues such as field name conflicts. If a field renaming rule causes field name conflicts, you can edit the rule.
Tip: If the upstream transformation is a source where you cannot rename in bulk, you can add an Expression transformation to rename the fields.
Step 4. Verify Order of Rule Execution
If you create multiple field rules, confirm that the rules run in a logical order.
To review the order in which the rules run, you can view the rules in the Field Rules area. The mapping configuration task runs the rules in the order in which the rules appear. If the order of the field rules is incorrect, you can rearrange the order.
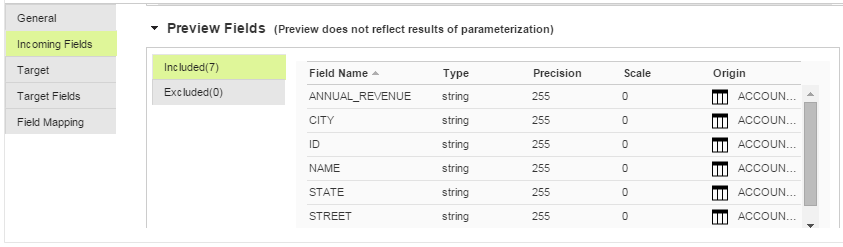
You also can preview the incoming fields for the transformation based on the rules that you have created in the Preview Fields area. For example, if you create a field rule that excludes binary fields, the Preview Fields area lists the binary fields as excluded from the transformation.
If the Source transformation in the mapping uses a connection parameter or a data object parameter, the Preview Fields area does not display the transformation incoming fields.
The following image shows the Preview Fields area:
Field Rule Configuration Example
You need to create a mapping to gather revenue data from multiple sales locations.
You learn that multiple fields from the upstream transformation have the same names as fields in a source transformation. To avoid field name conflicts, you decide to change the field names for all incoming fields. You decide to rename the fields so that the source is distinguishable throughout the mapping.
To increase performance, you want to ensure that the data set only includes required data. You determine that information regarding transaction dates is not required, so you decide that the date fields are not necessary for the mapping.
To change the names of all of the incoming fields, you create a field rule to rename all fields with the SalesForce_ prefix.
To exclude date fields, you create a rule to exclude fields with a date/time data type.
You review the order in which the rules appear. You realize that you want the rule to rename the fields to run after the rule to exclude the date/time fields. You move the rule to remove date/time fields so that it appears before the renaming rule.
Creating a Field Rule
Configure field rules on the Incoming Fields tab of the Properties panel in the Mapping Designer.
1. On the Incoming Fields tab, in the Field Rules area, insert a row for the rule based on the order in which the rules must run. In the Action column for a rule that you want to run before or after the new rule, select either Insert above or Insert below.
2. To specify whether the rule includes or excludes fields, from the Operator column, choose either Includes or Excludes.
3. In the Field Selection Criteria column, choose one of the following methods:
- - To rename all of the incoming fields in bulk, select All Fields.
- - To apply the rule to the fields that you specify, select Named Fields.
- - To apply the rule based on the data type of each field, select Fields by Data Type.
- - To apply the rule to all fields that contain a specific prefix, suffix, or pattern, select Fields by Text or Pattern.
4. To provide the field selection details, in the Detail column, click the Configure or Rename link. The Rename link appears if the field selection criteria is All Fields.
5. On the Select Fields tab, specify the fields to apply to the rule, based on the chosen field selection criteria. Alternatively, click Parameters to add a parameter so fields can be selected in the mapping configuration task.
6. To rename fields, click the Rename Selected tab and choose to rename fields individually or in bulk.
If you want to rename all fields, you must rename in bulk. If you want to rename fields in bulk by pattern, you can create a parameter to specify the pattern in the mapping configuration task.
7. To ensure that the field rules run in a logical order, in the Field Rules area, review the order in which the rules display. In the Preview Fields area, review the results of the rules. Move field rules to the appropriate location if required.
8. To delete a rule, in the Action column, select Delete.