Secure Agent Groups
Use a Secure Agent group as the runtime environment when you need to access on-premises data. You can also use a Secure Agent group when you want to access data in a cloud computing services environment without using the Hosted Agent. When you select a Secure Agent group as the runtime environment for a connection or task, a Secure Agent within the group runs the tasks.
Create Secure Agent groups to separate tasks by workgroup or environment. For example, users in the sales department run 10 times as many tasks as users in the finance department, but the finance tasks are more time critical. To prevent the sales tasks from impacting the finance tasks, create separate Secure Agent groups for each department. Then assign the sales tasks to one runtime environment and the finance tasks to the other runtime environment.
You might also create separate Secure Agent groups for test and production environments. When you configure a connection, you can associate it with the test or production database by choosing the appropriate Secure Agent group as the runtime environment.
When you create a Secure Agent group, all users in the organization can select the Secure Agent group as the runtime environment.
You can add and remove Secure Agents from a group. Based on your license, you can also perform the following actions:
- •If you have the Secure Agent Cluster license, you can add multiple agents to a Secure Agent group.
- •If you have the Organization Hierarchy license, you can share a Secure Agent group with your sub-organizations.
If you need to access output files on the Secure Agent machine, you can view the Activity Log to determine where the task ran.
Secure Agent Groups with Multiple Agents
When you create a Secure Agent, it is added to its own group by default. If you have the Secure Agent Cluster license, you can add multiple agents to one Secure Agent group. All agents within a group must be of the same type.
Add multiple agents to a group to achieve the following goals:
- Balance the workload across machines.
Add multiple agents to a group to balance the distribution of tasks across machines. When the runtime environment is a Secure Agent group with multiple agents, the group dispatches tasks to the available agents in a round-robin fashion.
- Improve scalability for connections and tasks.
- When you create a connection or task, you select the runtime environment to use. If the runtime environment is a Secure Agent group with multiple agents, the tasks can run if any Secure Agent in the group is up and running. You do not need to change connection or task properties when you add or remove an agent or if an agent in the group stops running.
When you add multiple agents to a group, ensure that all of the Secure Agents are of the same type. For example, your organization installs four Secure Agents on physical machines within your network and two Secure Agents on virtual machines that run in Amazon Web Services. You can create a Secure Agent group that contains some or all of the local agents and a different group that contains the agents that run in Amazon Web Services. Do not create a group that contains both a local agent and an agent that runs on Amazon web services.
Shared Secure Agent Groups
If you are the administrator of a parent organization, you can share a Secure Agent group with the sub-organizations. When you share a Secure Agent group, all sub-organizations can run tasks on the Secure Agents within the group.
Share a Secure Agent group to optimize the use of available Secure Agent resources. For example, your organization contains separate sub-organizations for departments in different time zones. Each sub-organization runs data integration tasks at different times of the day. If you create one Secure Agent group for each sub-organization, some Secure Agent groups might be used heavily at certain times of the day while others remain idle. To distribute the tasks more evenly, add the Secure Agents to a Secure Agent group, and share the Secure Agent group with the sub-organizations.
To share a Secure Agent group, you must have the Organization Hierarchy license.
When you share a Secure Agent group, the group appears on the Runtime Environments page in all sub-organizations. The sub-organization administrators cannot view the Secure Agents within the group. They cannot perform management tasks on the group such as adding or deleting Secure Agents, renaming, deleting, or unsharing the group, or changing the group permissions.
When a user in the sub-organization creates a connection or task, the user can select the shared Secure Agent group as the runtime environment.
Rules and Guidelines for Shared Secure Agent Groups
Consider the following rules and guidelines when you create shared Secure Agent groups:
- •If a shared Secure Agent group contains multiple Secure Agents and the group is used as the runtime environment for a flat file connection, the directory used in the connection must be accessible by all Secure Agents in the group.
If the directory is not accessible by all Secure Agents, tasks that use the connection fail if they are assigned to a Secure Agent that cannot access the directory.
- •When you assign a connector license to an organization that uses shared Secure Agent groups, assign the license to the parent organization.
If you assign a connector license to a sub-organization but not the parent organization, use the connection in a mapping, and then select a shared Secure Agent group as the runtime environment, the mapping fails. The mapping fails because the agents in the Secure Agent group are part of the parent organization, and the parent organization cannot use the connection.
Secure Agent Group Management
After you create a Secure Agent group, you can manage the Secure Agent group on the Runtime Environments page.
To manage a Secure Agent group, you can perform the following tasks:
- Create a Secure Agent group.
- To create a Secure Agent group, click New Secure Agent Group on the Runtime Environments page. Provide a name for the group. After the Secure Agent Group appears on the Runtime Environments page, you can add Secure Agents to the group.
- Add Secure Agents to a group.
- When you add a Secure Agent to a group, you can choose from any agent in the Unassigned Agents group.
If you assign more than one Secure Agent to a Secure Agent group, all the Secure Agents must be functionally the same. Verify the following functionality:
- - The installation directory and directory paths are the same on each Secure Agent machine.
- - Each Secure Agent is configured to connect to the same external systems and has access to files such as libraries, initialization files, and JAR files.
- - Verify that files used in a task are available in a shared location.
- Remove Secure Agents from a group.
- When you remove a Secure Agent from a group, Informatica Cloud assigns it to a group named "Unassigned Agents."
You cannot remove an agent from a Secure Agent group if it is the only agent in the group and the Secure Agent group is used in a connection or task.
- Delete a Secure Agent group.
- You can delete a Secure Agent group if it does not contain any Secure Agents. From the Actions menu associated with the group, choose Delete Secure Agent Group.
- Share or unshare a Secure Agent group.
- If you are the administrator of a parent organization, you can share a Secure Agent group so that the sub-organizations can use it. You can unshare a group if it is not used in a connection or task. From the Actions menu associated with the group, choose Share Secure Agent Group or Unshare Secure Agent Group.
- Change permissions for a Secure Agent group.
- You can define permissions for a Secure Agent group for each user group in your organization. From the Actions menu associated with the group, choose Change Permissions. You can set the following permissions:
- - Read. View details about the Secure Agent group and use the Secure Agent group in a task.
- - Update. Edit the Secure Agent group.
- - Delete. Delete the Secure Agent group.
- - Change Permission. Change permissions for the Secure Agent group.
Adding a Secure Agent to a Group
You can add unassigned Secure Agents to a Secure Agent group.
Before you add a Secure Agent to a Secure Agent group, verify that it appears in the group "Unassigned Agents" on the Runtime Environments page.
1. Click Configure > Runtime Environments to access the Runtime Environments page.
2. Under Actions for the Secure Agent group that you want to configure, select Add or Remove Secure Agents.
The Add or Remove Secure Agents dialog box appears.
3. Select the Secure Agents that you want to assign to the Secure Agent group.
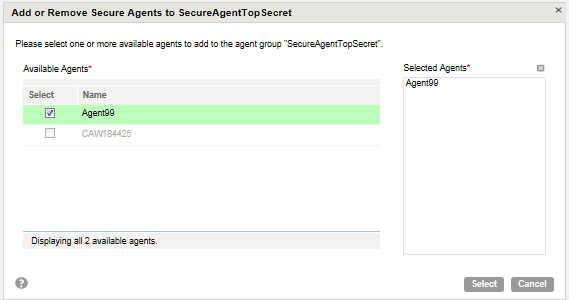
Verify that the checkbox is enabled and that the Secure Agent appears in the list of agents in the right pane, as shown in the following image:
If there is one Secure Agent in a Secure Agent group and the Secure Agent group is the runtime environment for any connection or task, you cannot unassign the Secure Agent. Configure the connection or task to use a different runtime environment before you remove the Secure Agent. Or, if you have the Secure Agent Cluster license, add a different Secure Agent to the Secure Agent group.
4. Click Select.
Removing a Secure Agent from a Group
You can remove an agent from a Secure Agent group if it is not the only agent in the group and the Secure Agent group is not used in a connection or task. When you remove a Secure Agent from a group, Informatica Cloud assigns it to a group named "Unassigned Agents."
1. Click Configure > Runtime Environments to access the Runtime Environments page.
2. Under Actions for the Secure Agent group that you want to configure, select Add or Remove Secure Agents.
The Add or Remove Secure Agents dialog box appears.
3. Select the Secure Agents that you want to remove from the Secure Agent group.
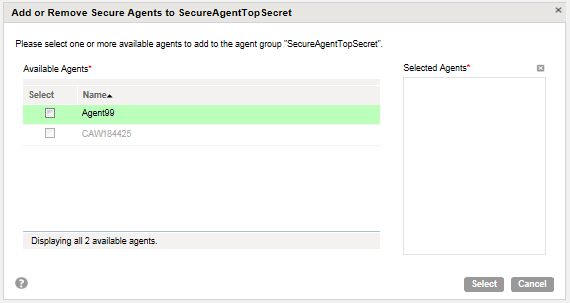
Verify that the checkbox is not enabled and that the Secure Agent does not appear in the list of agents in the right pane, as shown in the following image:
4. Click Select.
The Secure Agent appears in the "Unassigned Agents" group on the Runtime Environments page.
Sharing a Secure Agent Group
Share a Secure Agent group from the Runtime Environments page of the parent organization.
1. Log in to the parent organization.
2. Click Configure > Runtime Environments.
The Runtime Environments page appears.
3. Under Actions for the Secure Agent group that you want to share, select Share Secure Agent Group.
The term "(shared)" appears next to the group name to indicate that the group is shared.
Unsharing a Secure Agent Group
Unshare a Secure Agent group from the Runtime Environments page of the parent organization.
Before you unshare a Secure Agent group, verify that the group is not the runtime environment for any connection or task. You cannot unshare a Secure Agent group if the group is the runtime environment for a connection or task.
1. Log in to the parent organization.
2. Click Configure > Runtime Environments.
The Runtime Environments page appears.
3. Under Actions for the Secure Agent group that you want to share, select Unshare Secure Agent Group.
The term "(shared)" no longer appears next to the group name, and the group is no longer shared.

