Secure Agents
The Informatica Cloud Secure Agent is a lightweight program that runs all tasks and enables secure communication across the firewall between your organization and Informatica Cloud.
When the Secure Agent runs a task, it connects to the Informatica Cloud hosting facility to access task information. The Secure Agent connects directly and securely to sources and targets, transfers data between them, orchestrates task flows, runs processes, and performs any additional task requirement.
You can configure a Secure Agent for high availability and modularity. Each Secure Agent can run multiple services that you can configure independently from other services. For example, the Data Integration Server runs as a service to run all data integration jobs. The Process Server runs as an independent service to run application integration and process orchestration. Each service has a unique set of configuration properties, such as Tomcat and Tomcat JRE settings.
If the Secure Agent loses connectivity to Informatica Cloud, it tries to reestablish connectivity to continue the task. If it cannot reestablish connectivity, the task fails.
The Secure Agent uses pluggable microservices for data processing which provide the following benefits:
- •The Secure Agent does not restart when you add a connector or package.
- •The Secure Agent does not restart during Informatica Cloud upgrades.
- •No service is impacted when another service restarts. For example, a long standing process continues to run even if the Data Integration Server service is restarted.
You can run one Secure Agent on a machine. After you install a Secure Agent, all Informatica Cloud users in the organization share the Secure Agent. You can configure the Secure Agent properties and move it to another Secure Agent group. To improve scalability, you can also add multiple Secure Agents to a Secure Agent group.
Secure Agent Management
Use the View Secure Agent page to manage Secure Agents. You can view and configure Secure Agent properties, view and refresh the status, and view the audit information. You can also view information about the agent host.
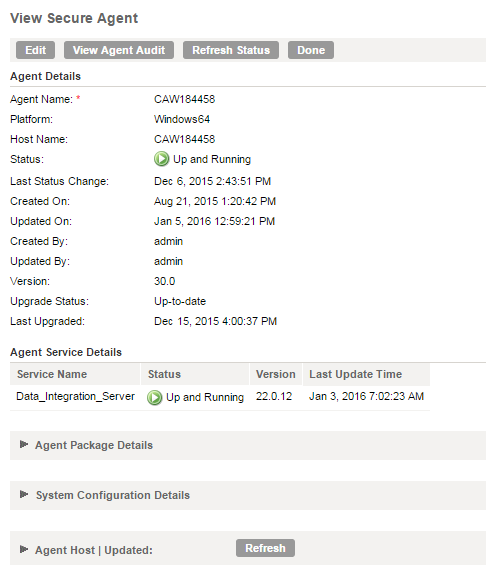
To access the View Secure Agent page, click a Secure Agent on the Runtime Environments page. The following image shows the View Secure Agent page:
You can perform the following actions:
- View the Secure Agent details.
View details such as the host name, the current status, the last date and time that the agent was updated, and the agent version.
The Secure Agent can have any of the following statuses:
Status | Description |
|---|
Up and Running | The Secure Agent and all of the services that the Secure Agent runs are also available. |
Stopped | The Secure Agent is not available. |
Upgrading | The Secure Agent is upgrading to a new version. |
Warning | The Secure Agent is available, but one or more of the services are not available. |
Restart Required | Applicable to the Process Server only. The Secure Agent is available but with outdated configuration. You see the Restart Required state in the following cases: - - You changed a Process Sever property.
- - A Cloud Application Integration connector upgraded.
|
Note: If a Process Server instance is in the Restart Required state, and you do not see another Process Server instance in the Up and Running state, you must restart the Secure Agent. If you do not restart the Secure Agent, you cannot run any Cloud Application Integration artifact on the Secure Agent.
In the following image, you see a Process Server instance in the Stopped state and another in the Restart Required state:
- View the agent service details for services that run on the Secure Agent.
View details such as the name, status, version, and last update time of services that the Secure Agent runs.
A service can have any of the following statuses:
Status | Description |
|---|
Starting Up | The service is starting up. |
Up and Running | The service is running. |
Warning | The service is running but it cannot accept work. |
Standby | The service is running but it is not compatible with Informatica Cloud. |
Error | The process failed. |
Restarting Due to Error | The service is starting due to a failure. |
Shutting Down | The service is shutting down. |
Stopped | The service is not available. |
The version number changes each time you modify the service. Informatica Cloud retains the directory for the old version of the service for seven days. For example, if you update the NetworkTimeoutPeriod for version 27.0.2 of the Data Integration Server, Informatica Cloud increments the version number to 27.0.3 and creates the <Secure Agent installation directory>/apps/Data_Integration_Server/27.0.3 directory. It deletes the <Secure Agent installation directory>/apps/Data_Integration_Server/27.0.2 directory after seven days.
- View the Secure Agent package details.
- View details such as the name and version of the Secure Agent packages.
- View the Secure Agent properties.
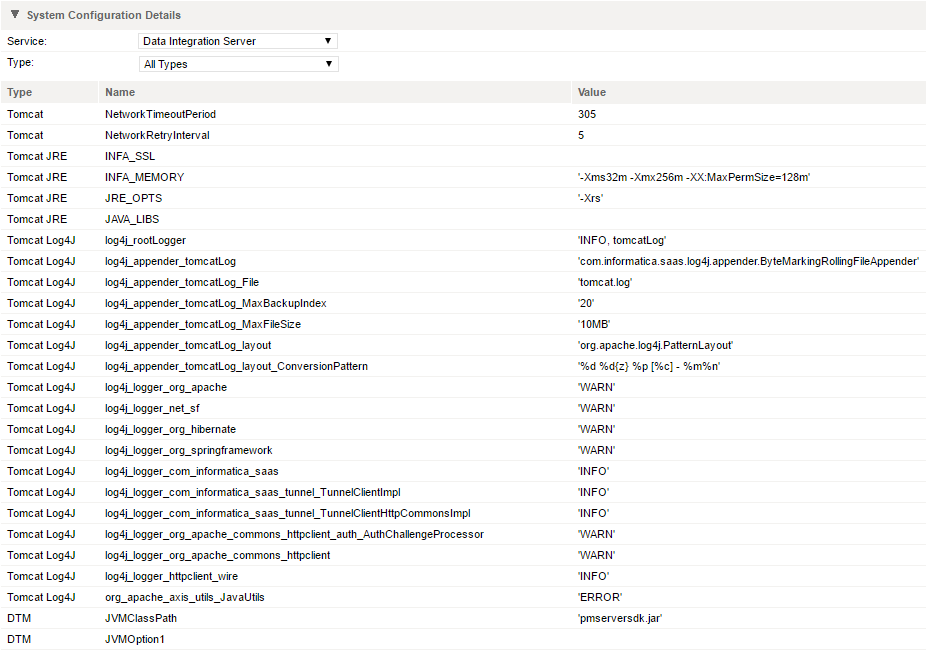
- Expand the System Configuration Details section to view the Secure Agent configuration properties. You can filter the properties by service and type.
- Edit the Secure Agent properties.
- Click Edit to configure Secure Agent properties.
- View the Secure Agent audit information.
Click View Agent Audit to view audit information such as start and stop times, server connections, and upgrade messages.
To refine the audit information, use the following filters:
Filter | Description |
|---|
Component name | Select the services for which you want to view the audit information. To view the system audit information, select System. |
Type | Filter the information by message type such as Fatal, Error, or Debug. |
To and From dates | Display messages for a specific date range. If you do not select a To date, Informatica Cloud uses the current date. |
- Refresh the Secure Agent status.
Click Refresh Status to refresh the status of the Secure Agent.
To view the status on Linux, you can also navigate to the following directory:
<Secure Agent installation directory>/apps/agentcore
Then run one of the following commands:
consoleAgentManager.sh getstatus
consoleAgentManager.sh updatestatus
- View the Secure Agent host properties.
- Expand the Agent Host section to see information about the machine that hosts the Secure Agent such as the machine name and available disk space. Click the Refresh button to refresh the information in the Agent Host section. The last date and time that the information was updated appears in the Agent Host section heading.
Secure Agent Properties
To change or optimize Secure Agent behavior, edit the values of the Secure Agent configuration properties. You can change the Secure Agent name, update service configuration properties, and add custom properties for the Secure Agent.
The Secure Agent can run multiple services. You can configure properties for one service independently from other services.
You can update configuration properties for the following services:
- •Data Integration Server
- •Process Server
For information about the Process Server properties, see the Informatica Cloud Real Time documentation.
Data Integration Server Properties
To change or optimize behavior of the Data Integration Server, configure the Data Integration Server properties. For example, if a network interruption occurs, you want the Secure Agent to try to reestablish communication with Informatica Cloud after two minutes. Set the Tomcat NetworkTimeoutPeriod to 120 seconds.
Configure Data Integration Server properties in the System Configuration Details area of the Edit Secure Agent page.
The following image shows some of the Data Integration Server properties:
You can configure the following Data Integration Server properties:
Type | Name | Description |
|---|
Tomcat | NetworkTimeoutPeriod | Amount of time, in seconds, that the Secure Agent tries to reestablish communication with Informatica Cloud. Default is 300. |
Tomcat | NetworkRetryInterval | Frequency, in seconds, in which the Secure Agent tries to contact Informatica Cloud within the specified timeout period. Default is 5. |
Tomcat JRE | JRE_OPTS | JRE VM options for the Apache Tomcat process. |
Tomcat JRE | INFA_MEMORY | JRE VM options that are set for virtual machine memory for the Apache Tomcat process. |
DTM | AgentConnectionTimeout | Number of seconds that the Secure Agent communication requests to wait before it times out. Default is 5. |
Note: Do not change the values of other Data Integration Server properties unless Informatica Global Customer Supports instructs you to do so. |
Custom Properties
You can create and configure custom Secure Agent properties in the Custom Configuration Details area at the bottom of the Edit Secure Agent page.
The following image shows the Custom Configuration Details area:
Custom properties are specific to connectors. For more details, see the respective Informatica Cloud Connector user guides.
Configuring Secure Agent Properties
Configure Secure Agent properties from the Edit Secure Agent page. You can change the name of the Secure Agent, change or reset configuration properties, and add or remove custom properties.
1. Click Configure > Runtime Environments.
2. Click the name of the Secure Agent.
Note: You might have to expand the Secure Agent group to see the list of Secure Agents within the group.
3. On the View Secure Agents page, click Edit.
4. To change the Secure Agent name, in the Agent Details area, enter a new name in the Agent Name field.
5. To edit a configuration property, complete the following steps:
- a. In the System Configuration Details area, select a service.
- b. Select the configuration type.
- c. Click the Edit Agent Configuration icon next to the property that you want to edit, and enter the new property value.
- d. To reset the property to the system default, click the Reset Agent Configuration to system default icon.
6. To add a custom property, complete the following steps:
- a. In the Custom Configuration Details area, select a service.
- b. Select a configuration type.
- c. To determine the logging level, choose INFO or DEBUG as the sub-type.
- d. Enter the property name and value.
- e. Click the Add icon.
7. To remove a custom property, click the Remove icon next to the custom property.
8. To reset all configuration properties to the default settings, click Reset All.
9. Click OK to save your changes.
Secure Agent Resiliency
Tasks can continue to run during temporary network issues while the Secure Agent tries to reestablish a connection. Two Data Integration Service properties determine how the Secure Agent tries to reestablish a connection.
You can set the following Data Integration Service properties on the Edit Secure Agent page:
- •NetworkTimeoutPeriod. Determines the length of time that the Secure Agent tries to reestablish communication with Informatica Cloud. If communication is not established at the end of the time period, any tasks that were in progress stop running. The default value is 300 seconds.
- •NetworkRetryInterval. Determines the frequency with which the Secure Agent tries to contact Informatica Cloud within the specified timeout period. The default value is five seconds.
For example, with the default settings, if the network is down, the Secure Agent tries to reestablish communication with Informatica Cloud for 300 seconds. During the 300-second period, the Secure Agent tries to contact Informatica Cloud every five seconds. If the Secure Agent reestablishes communication within the 300-second period, tasks that are in progress are not affected. If the Secure Agent is unable to reestablish communication within the 300-second period, the Secure Agent stops all of the tasks that are in progress.


