Amazon QuickSight Targets in Mappings
To insert data to Amazon QuickSight, configure an Amazon QuickSight object as the target in a mapping.
Specify the name and description of the Amazon QuickSight target. Configure the target and advanced properties for the target object.
The following table describes the target properties that you can configure in a Target transformation:
Property | Description |
|---|
Connection | Name of the target connection. |
Target Type | Target type. Select Single Object. |
Object | Name of the target object. You can select an existing object or create an object at runtime. |
Create Target | Creates a target. Enter a name and path for the target object and select the source fields that you want to use. By default, all source fields are used. The target name can contain alphanumeric characters. You can use only a period (.), an underscore (_), an at the rate sign (@), a dollar sign ($), and a percentage sign (%) special characters in the file name. When you specify the name and path for the target object, the object is created in the specified path under the bucket name and folder name specified in the connection properties. For example: If you specify Finance/Reports in the Folder name in the connection properties and East/Sample/Report1 in the Create Target property, the target with name Report1 will be created under Finance/Reports/East/Sample. Note: Do not use a single slash (/) in the beginning of the path. Do not use double slash (//) or double dots (..) in the path. |
Operation | Select the target operation. The Amazon S3 target is a delimited file and you can run the task with only the insert operation. When you run the task, the Secure Agent replaces all data in the file. |
You can use parameters defined in a parameter file in the target name for a Mapping Configuration task. For a mapping, use input and output parameters to parameterize the target file name.
Specifying the folder path in create target is applicable only to a mapping.
The following table describes the advanced target properties:
Property | Description |
|---|
Encryption Type | Not applicable. |
Success File Directory | Not applicable. |
Error File Directory | Not applicable. |
Forward Rejected Rows | Determines whether the transformation passes rejected rows to the next transformation or drops rejected rows. By default, the Mapping Configuration application forwards rejected rows to the next transformation. |
Manifest File Prefix | You can add a prefix to the manifest file name to correlate manifest files. For example, you can specify <prefix><YYYY-MM-DD-HH-MM-SS>- manifest.json You can also generate the manifest file under a folder to correlate manifest files. For example, <foldername>/<prefix><YYYY-MM-DD-HH-MM-SS>- manifest.json By default, if you do not specify a prefix, the manifest file is generated in the following format: <targetname><YYYY-MM-DD-HH-MM- SS>-manifest.json |
Amazon QuickSight Target File Parameterization
When you parameterize the file name and target folder location for Amazon QuickSight target objects, you can pass the file name and folder location at run time. If the folder does not exist, the agent creates the folder structure dynamically. You can also append time stamp information to the file name to show when the file is created.
When you specify the file name for the target file, you include special characters based on Apache STRFTIME function formats that the Mapping Configuration task uses to include time stamp information in the file name.
The following table describes some common STRFTIME function formats that you might use:
Special Character | Description |
|---|
%d | Day as a two-decimal number, with a range of 01-31. |
%m | Month as a two-decimal number, with a range of 01-12. |
%y | Year as a two-decimal number without the century, with range of 00-99. |
%Y | Year including the century, for example 2015. |
%T | Time in 24-hour notation, equivalent to %H:%:M:%S. |
%H | Hour in 24-hour clock notation, with a range of 00-24. |
%l | Hour in 12-hour clock notation, with a range of 01-12. |
%M | Minute as a decimal, with a range of 00-59. |
%S | Second as a decimal, with a range of 00-60. |
%p | Either AM or PM. |
You can use the STRFTIME function formats in a mapping. To use the STRFTIME function formats in a Mapping Configuration task, enable the Handle Special Characters option in underlying mapping and do not parameterize the target file name.
Specifying a Target
You can use an existing target or create a target to hold the results of a mapping. If you choose to create the target, the agent creates the target when you run the task.
To specify the target properties, follow these steps:
1. Select the Target transformation in the mapping.
2. On the Incoming Fields tab, configure field rules to specify the fields to include in the target.
3. To specify the target, click the Target tab.
4. Select the target connection.
5. For the target type, choose Single Object or Parameter.
6. Specify the target object or parameter. You must specify a .csv target file name.
- - To create a target file at run time, enter the name for the target file including the extension, for example, Accounts.csv.
- - If you want the file name to include a time stamp, click Handle Special Characters and add special characters to the file name. For example, add the special characters shown here to include all the time stamp information: Accounts_%d%m%y%T.csv.
Note: If you enable Handle Special Characters, the input and output parameters in Create Target are ignored.
7. Click Formatting Options if you want to configure the formatting options for the file, and click OK.
8. Click Select and choose a target object. You can select an existing target object or create a new target object at run time and specify the object name. 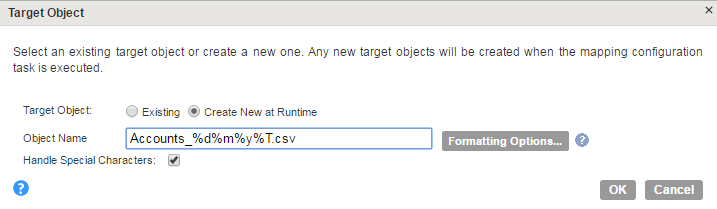
9. Specify Advanced properties for the target, if needed.