1. Click Task Wizards > Data Synchronization.
The Data Synchronization Tasks page appears.
2. Click New to create a Data Synchronization task.
3. In the Definition page, configure the following fields:
Field | Description |
|---|---|
Task Name | Name of the Data Synchronization task. For example: File_Process_SFTP_GET. |
Description | Description of the Data Synchronization task. Maximum length is 255 characters. |
Task Operation | Select Insert. |
4. Click Next.
The Source page appears.
5. In the Source page, configure the following fields:
Field | Description |
|---|---|
Connection | Select the connection you created. For example: File_Process_SFTP_GET. |
Source Type | Select Single. |
Source Object | Select SFTP_GET. |
6. Click Next.
The Target page appears.
7. In the Target page, configure the following fields:
Field | Description |
|---|---|
Connection | Select a flat file connection. |
Target Object | Click Create Target. |
8. Click Next.
The Data Filters page appears.
9. In the Data Filters page, create a filter, specify the SFTP_User_ID, SFTP_Hostname, FileName, and SFTP_SSH2_KeyFile as shown in the following image:
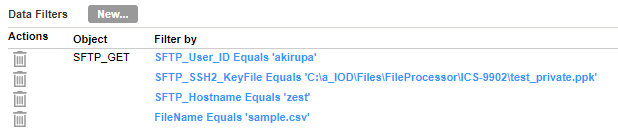
You must enter the complete private key file path as the data filter in the SFTP_SSH2_KeyFile field. In this example, the private key file path is C:\a_IOD\Files\FileProcessor\ICS-9902\test_private.ppk.
Note: If you use a pass phrase during the key generation, you must enter it as the data filter in the SFTP_PassPhrase field. Before you enter the pass phrase as a data filter in a Data Synchronization task, specify the pass phrase value as one of the passkey fields in the SFTP connection properties.
10. Click Next.
The Field Mapping page appears.
11. In the Field Mapping page, click Automatch.
12. Click Validate Mapping.
13. Save and run the Data Synchronization task.