1. To create a Data Synchronization task, click Task Wizards > Data Synchronization, and then click New.
2. In the Data Synchronization Task page, configure the following fields:
Field | Description |
|---|---|
Task Name | Name of the Data Synchronization task. For example: Flat_File_Process_124_move_local |
Description | Description of the Data Synchronization task. Maximum length is 255 characters. |
Task Operation | Select Insert. |
3. Click Next.
4. In the Source page, configure the following fields:
Field | Description |
|---|---|
Connection | Select the connection you created. For example: File_Process_move_local |
Source Type | Select Single. |
Source Object | Select FileMove. |
5. Click Next.
6. In the Target page, configure the following fields:
Field | Description |
|---|---|
Connection | Select the flat file connection. |
Target Object | Click Create Target. |
7. Click Next.
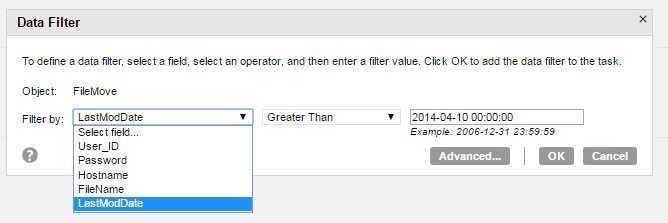
8. In the Data Filters page, create a new filter and filter by the required field as shown in the following image:
9. Click Next.
10. In the Field Mapping page, click Automatch.
11. Click Validate Mapping
12. Save and run the Data Synchronization task.