Mapping Tutorial
The following tutorial describes how to create a simple mapping, save and validate the mapping, and create a Mapping Configuration task.
For this tutorial, you have a file that contains U.S. customer account information. You want to create a file that contains customer account information for a specific state.
In the mapping, you define the following components:
- •Source transformation. Represents the source file that contains account information.
- •Filter transformation. Transformation that filters out all account information except for a specific state.
- •Target transformation. Represents the target file that contains account information for a specific state.
When you create the Filter transformation, you create a parameter to hold the state value so that you can use the mapping to create multiple tasks. You can specify a different state value for each task.
After you define the mapping, you create a Mapping Configuration task that is based on the mapping. When you run the Mapping Configuration task, you specify the state in the filter parameter. The Mapping Configuration task then writes the data to the target based on the specified state.
The mapping tutorial includes the following steps:
- 1. Create a mapping.
- 2. Configure a source. Specify the name of the source object and the connection to use.
- 3. Create a Filter transformation. Create a parameter in the Filter transformation to hold the state value.
- 4. Configure a target. Specify the name of the target object and the connection to use.
- 5. Validate the mapping to be sure there are no errors. The mapping must be valid before you can run a task based on the mapping.
- 6. Create a task based on the mapping. The task includes a parameter for the state value, which you specify when you run the task.
Preparing for the Mapping Tutorial
Before you start the mapping tutorial, you need to download a sample file and set up a connection.
1. Download the sample Account source file from the Informatica Cloud Community and save the file in a directory local to the Secure Agent. You can download the file from the following link:
2. Create a flat file connection for the directory that contains the saved sample Account source file.
Step 1. Create a Mapping
In the following procedure, you create a mapping in the Mapping Designer to specify the source, filter, and target.
1. To create a mapping, click Design > Mappings.
The following image shows the Design menu with Mappings selected:
2. Click New Mapping.
The following image shows selection of the New Mapping button on the Mappings page:
3. In the New Mapping dialog box, enter Account_by_State for the mapping name and click OK.
You can use underscores in mapping and transformation names, but do not use other special characters.
Step 2. Configure a Source
In the following procedure, you create a source transformation to specify the source object.
When you design a mapping, the first object you add to the mapping canvas is a source object. The source object represents the source of the data that you want to use in the mapping. You add the source object at the beginning of mapping design because the source properties can affect the downstream data. For example, you might filter data at the source, which affects the data that enters downstream transformations.
Configure the sample Account flat file as the source object.
1. To add a source object to the mapping, on the Transformation palette, click Source.
The following image shows the Source transformation in the Transformation palette:
2. In the Properties panel, on the General tab, enter FF_Account for the Source transformation name.
3. Specify which connection to use based on the source object. In this case, the source object is a flat file so the connection needs to be a flat file connection. On the Source tab, configure the following properties:
Source Detail | Description |
|---|
Connection | Connection to the sample source file. Select the flat file connection that you set up before you started the tutorial. |
Source Type | Source object or a parameter, which is a placeholder for the source object that you specify when you run a task based on the mapping. Select Single Object. |
Object | Source object for the mapping. Enter the full path to the source object and the source file name, for example, C:\Informatica\Tutorial\ACCOUNT.csv. If you want to view the data in the source file, you can click Preview Data. |
The following image shows the FF_Account details in the Properties panel:
To view the source fields and field metadata, click the Fields tab.
4. To save the mapping and continue, on the toolbar, click Save > Save and Continue.
Step 3. Create a Filter Transformation
In the following procedure, you create a Filter transformation to filter accounts based on the state in which each account is located. You also create a parameter to hold state values.
You want this mapping to run tasks that filter accounts based on specific states. To accomplish this, you add a Filter transformation to the data flow to capture state information. You then define a parameter in the filter condition to hold the state value. When you use a parameter, you can reuse the same mapping to create multiple tasks. You can specify a different state value for each task.
The sample Account source file includes a State field. When you use the State field in the filter condition, you can write data to the target based on the state. For example, when you use State = MD as the condition, you include accounts based in Maryland in the data flow. When you use a parameter for the value of the filter condition, you can define the state that you want to use when you run the task.
Field rules define the fields that enter the transformation and how they are named. By default, all available fields are included in the transformation. You might want to exclude unnecessary fields when you have large source files. Or you might want to change the names of certain incoming fields, for example, when you have multiple sources in a mapping. Field rules are configured on the Incoming Fields tab. For this tutorial, do not configure field rules.
1. To add a Filter transformation, on the Transformation palette, drag a Filter transformation to the mapping canvas.
You might need to scroll through the Transformation palette to find the Filter transformation.
2. To link the Filter transformation to the data flow, click the right edge of the FF_Account source object and then drag the cursor to the Filter transformation.
The following image shows how the cursor moves the arrow from one transformation to the other transformation, which links the transformations together:
When you link transformations, the downstream transformation inherits fields from the previous transformation.
3. To configure the Filter transformation, select the Filter transformation on the mapping canvas.
4. To name the Filter transformation, in the Properties panel, click General and enter Filter_by_State for the Filter transformation name.
5. To create a simple filter with a parameter for the value, click Filter. For the Filter Condition, select Simple.
6. Click Add New Filter Condition.
The following image shows the Add New Filter Condition icon:
When you click the icon, a new row is created where you specify values for the new filter condition.
7. For Field Name, select State.
8. For Operator, select Equals.
9. For Value, select New Parameter.
10. In the New Parameter dialog box, configure the following options and click OK:
Filter Condition Detail | Description |
|---|
Name | Name of the filter condition. Enter FilterConditionValue for the name. |
Display Label | Label that shows in the Mapping Configuration Task wizard where you enter the condition value. Enter Filter Value for State for the label. |
Description | Description that appears in the Mapping Configuration Task wizard. Enter this text for the description: Enter the two-character state name for the data you want to use. |
Type | Data type of the field used for the filter condition. The State field is a String data type, which is already specified in the dialog box. |
Default Value | Default value for the filter condition. The Mapping Configuration task uses this value unless you specify a different value. You want to run the task for accounts in Maryland by default, so enter MD. |
The following image shows the New Parameter dialog box, where you configure the FilterConditionValue parameter:
11. To save your changes, click Save > Save and Continue.
Step 4. Configure a Target
In the following procedure, you configure the target object so that each time you run the task, a new target file is generated.
1. To add a Target transformation, on the Transformation palette, drag a Target transformation to the mapping canvas.
2. To link the Target transformation to the data flow, click the right edge of the Filter_by_State Filter transformation and then drag the cursor to the NewTarget transformation.
3. To name the Target transformation, in the Properties panel, click General and enter Accounts_by_State for the Target transformation name.
4. Click the Target tab and configure the following properties:
Target Detail | Description |
|---|
Connection | Connection to the target file. You want the target object to be a flat file and you want the target object to reside in the same location as the source file. You can use the same connection that you used for the source because the source is a flat file as well. |
Target Type | Target object or parameter. You do not want to parameterize the target, so select Single Object. |
Object | Target object for the mapping. You want to create a target object, so click Select and then select Create New at Runtime. Enter the name of the file: AccountsByState.csv and then click OK. The Mapping Configuration task creates the target object the first time you run the task. In subsequent runs, the Mapping Configuration task replaces the data in the target object. |
Operation | Specifies whether to insert, upsert, or update data when a target file already exists. Because you want to create a target file, you do not set this property. |
The following image shows the Target Object dialog box, which appears when you click the Select button:
5. Click Save > Save and Continue.
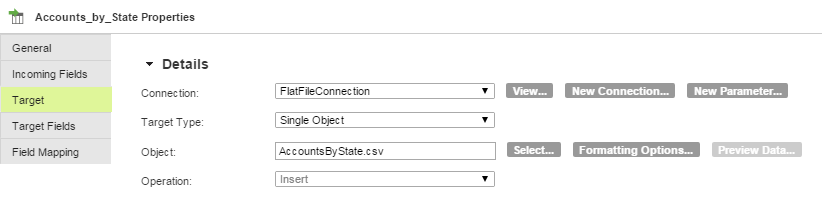
The following image shows the Accounts_by_State Target transformation details in the Properties panel:
Step 5. Validate the Mapping
In the following procedure, you save and validate the mapping. You can save a mapping that is invalid if you want to finish your work later. However, you cannot run a task that uses an invalid mapping.
An example of a validation error is a source transformation or target transformation that does not have a specified connection. Another example is a mapping that does not have a source transformation and a target transformation.
1. To validate the mapping, click Save > Save and Continue.
When you save the mapping, the Mapping Designer validates the mapping. The mapping is valid when the Status in the status area shows Valid.
The following image indicates that the mapping is valid:
2. If the status is not valid, perform the following steps:
- a. In the toolbar, click the Validation icon.
- b. In the Validation panel, click Validate.
The Validation panel lists the transformations in the mapping and the mapping status.
- c. If errors appear, click the highlighted transformation and then correct the errors.
- d. After you correct the errors, click Validate to verify that the mapping is valid.
Step 6. Create a Task
In the following procedure, you create a task that uses the mapping that you just designed to create a target file that includes accounts from Texas.
Now that you have a valid mapping, you can use the Mapping Configuration Task wizard to create tasks based on the mapping. Because you used a parameter in the mapping, you can reuse the mapping to create multiple tasks with different values for the parameter. After a task runs, you have a target file that contains account information for the state that you specify in the parameter.
1. To create a task based on the mapping, click Save > Save and New Mapping Configuration Task.
The Mapping Configuration Task wizard launches.
2. On the Definition page, enter Mapping Tutorial for the name of the task.
3. Select the runtime environment to use to run this task.
The following image shows the Definition page in the Mapping Configuration Task wizard:
4. Click Next.
5. To configure the Filter Value for State parameter to capture all of the accounts from Texas, delete the default value, MD, and enter TX on the Input Parameters page.
6. To save and close the task, click Save > Save and Close.
The following image shows that the Mapping Tutorial task now appears in the Mapping Configuration Task list: