1Click New > Components > Fixed Width File Format and then click Create.
To edit a fixed-width file format, on the Explore page, navigate to the fixed-width file format. In the row that contains the fixed-width file format, click Actions and select Edit.
2Enter the following fixed-width file format details:
Property | Description |
|---|---|
Configuration Name | Name of the fixed-width file format. |
Location | Location of the fixed-width file format. Browse to the folder where you want to store the fixed-width file format or use the default location. If the Explore page is currently active and a project or folder is selected, the default location for the asset is the selected project or folder. Otherwise, the default location is the location of the most recently saved asset. |
Description | Description of the fixed-width file format. |
3Specify the following connection details for the sample fiat file:
Property | Description |
|---|---|
Sample Flat File Connection | Connection to the sample file that you use to specify the fixed-width format. |
Sample Object | Sample file that you use to specify the format options. |
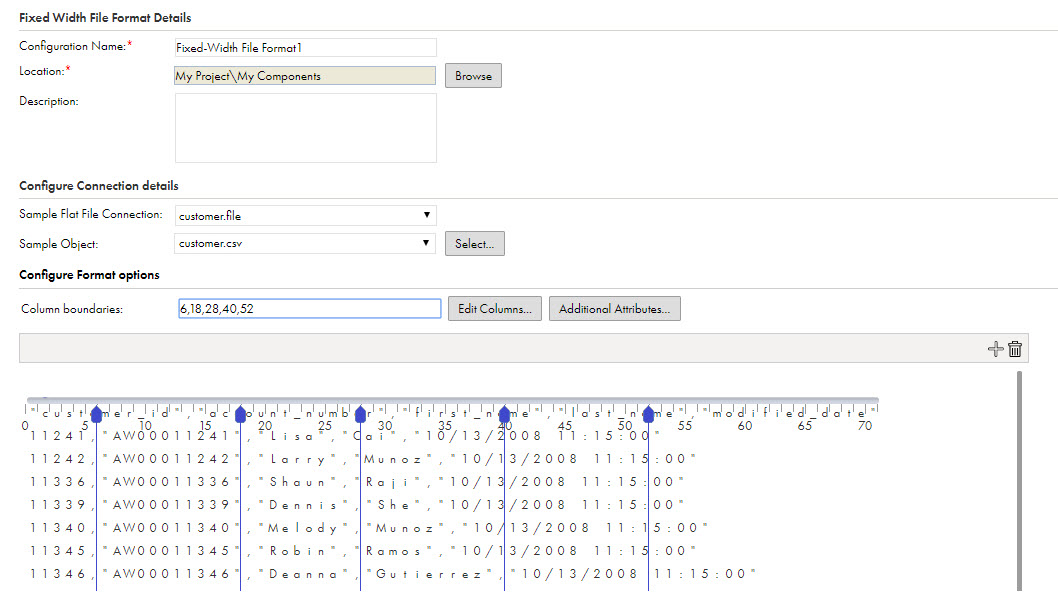
4Configure the column boundaries to fit the data in your sample file. You can enter the boundaries in the Column boundaries field or you can position the boundaries using the ruler.
- - To configure column boundaries in the Column boundaries field, enter the number of bytes to determine the width of the first column. Then enter boundaries for the subsequent columns. Separate each value with a comma. Press Enter after you enter a boundary to see the placement of the boundary on the ruler.
- - To configure column boundaries using the ruler, use the mouse to drag the boundary to the appropriate location on the ruler for the first column. Each mark on the ruler represents a byte. To add new boundaries, click the ruler or click Add. Use the mouse to drag boundaries to the appropriate position on the ruler as necessary.
The following image shows a fixed-width file format with boundaries configured for six columns:

5To add or change column names and edit datatypes, click Edit Columns and then enter the column name and select the datatype for each column.
6To specify advanced properties, click Additional Attributes and specify the following properties:
Property | Description |
|---|---|
Line sequential | Ends each row with a newline character. Must be enabled when you use a fixed-width file format for a flat file source or target object. Line sequential is enabled by default. |
Number of rows to skip | Number of initial rows to skip. For example, you might want to skip blank rows or header rows. |
Number of bytes to skip after column ending | Number of bytes between the last column of one row and the first column of the next. |
Null character type | Whether the null character is text or ASCII. |
Null character | Character to represent a null value. |
Repeat null character | Reads repeat null characters in a single field as a single null value. |
Strip trailing blanks | Removes trailing blanks from string values. |
Default Date Format | Date format to use for the column when a date format is not specified in the flat file connection. To specify the default date format, enter the following information:
For example, if you want the format to be fixed width with a width of 12 bytes and date format of DD/MM/YYYY, enter the following text: F 12 DD/MM/YYYY |
To save the advanced properties, click OK.
7To save the fixed-width file format, click Save.