Informatica Administrator for Enterprise Data Catalog > Schedules > Create and Edit Schedules
  

Create and Edit Schedules

Before you schedule a job, create a schedule that defines when the job runs. Jobs can run one time or at an interval. You can schedule jobs when you create the schedule or you can add jobs to the schedule later.
You can select a time zone when you configure the date and time to run the schedule. By default, when you enter a start time for a schedule, the time zone is the time zone of your client machine. If the Data Integration Service runs on a machine in a different time zone from the client, you need to ensure that the job runs at a specific time for that time zone. You can choose the time zone when you define the schedule.
You can schedule deployed mappings and workflows including mappings and workflows for profiles and scorecards. Optionally, you can configure a parameter file or parameter set for the job. Configure a parameter file or set when you want to run the deployed mapping or workflow with different settings. If the Scheduler Service runs on multiple nodes, you must store the parameter file in a directory that all of the nodes can access. Configure the directory in the Storage Properties for the Scheduler Service.
Optionally, you can configure the Run As User property for the job. You might configure the property if you need to schedule an object that you do not have permission on. When you configure the Run As User property, you run the job as a user in the domain who has permission on the object.
After you create a schedule, you can edit the schedule. When you edit a schedule, you can change the recurrence options, schedule jobs, or change the job parameters.

Creating a Schedule

Create a schedule to run deployed mappings, deployed workflows, profiles, or scorecards at a specified time.
    1. In the Administrator tool, click the Manage tab.
    2. Click the Schedules view.
    3. Click Actions > Create Schedule.
    The Properties dialog box appears.
    4. Enter a name and an optional description for the schedule.
    5. In the Recurrence section, choose Run Once to run the schedule one time, or choose Recurring Schedule to run the schedule on an interval.
    6. If you are creating a recurring schedule, specify whether to run the job on a Daily, Weekly, or Monthly interval.
    The following table describes the recurrence options that you can configure:
    Option
    Description
    Daily - Run every
    Run the job every n days
    Daily - Run after every
    Run the job every n minutes or hours
    Weekly
    Run the job on a day or days of the week
    Monthly - Run every n day
    Run the job on a day of the month
    Monthly - Run every
    Run the job on a day even n week of the month
    Monthly - Run every last day of the month
    Run the job on the last day of the month
    7. In the Start section, configure a start date and time for the schedule.
    8. Select the time zone for the schedule from the list.
    The default time zone is the time zone of the client machine.
    9. If you are creating a recurring schedule, you can optionally configure an end date and time.
    You can end the recurrence on a specific date or after n runs.
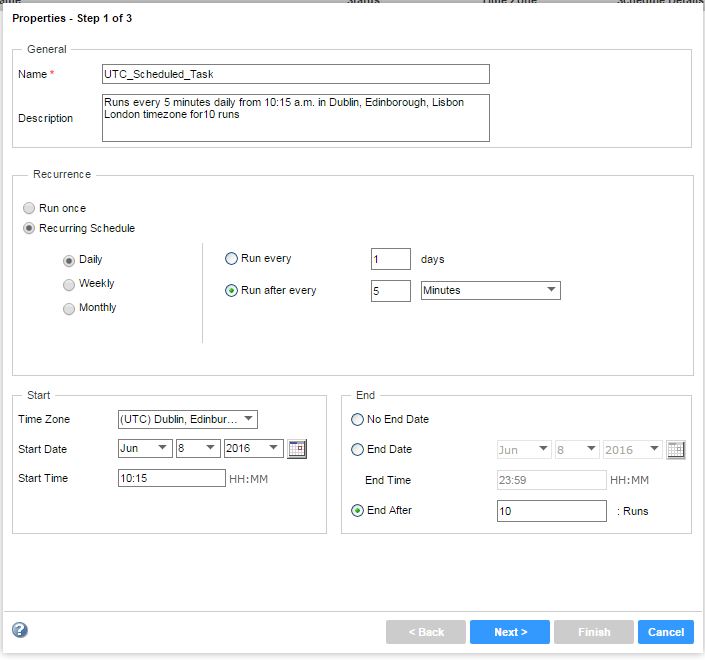
    The following image shows the Scheduler Wizard:
    10. Click Next.
    The Applications dialog box appears.
    11. Expand a Data Integration Service and select jobs to run on the schedule.
    12. Optionally, upload a parameter file to define parameters for the mapping or workflow.
    1. a. Select a mapping or a workflow.
    2. The Application Properties section appears.
    3. b. Click Upload.
    4. The Upload Parameter File dialog box appears.
    5. c. Click Choose Files.
    6. d. Browse for a file, and then click Open.
    7. e. Click OK.
    13. Optionally, select a parameter set.
    14. Optionally, configure the Run As User property to run the job as a different user.
    1. a. Click Change.
    2. The Run As dialog box appears.
    3. b. Expand the user list.
    4. c. Select a user.
    5. d. Enter the password for the user.
    6. e. Click OK.
    15. Click Next.
    The Review window appears and lists the schedule properties.
    16. Click Finish to create the schedule.
    The schedule appears in the list of schedules in the Navigator.

Editing a Schedule

You can edit a schedule in the Administrator tool. You can edit a schedule to change recurrence options, schedule jobs, or run jobs with different parameters.
    1. In the Administrator tool, click the Manage tab.
    2. Click the Schedules view.
    The Domain Navigator lists the schedules in the domain.
    3. In the Domain Navigator, select a schedule.
    The contents panel shows the schedule properties.
    4. To edit the schedule, click Actions > Edit Schedule.