Informatica BPM Installation
Informatica BPM Installation
Installation of the Informatica BPM service
For the installation of the Informatica BPM service it is recommended to follow the official installation guide at https://docs.informatica.com/process-automation/informatica-activevos/current-version.html.
In the Prerequisites chapter https://docs.informatica.com/process-automation/informatica-activevos/current-version/4-----server-installation--configuration--and-deployment/apache-tomcat/general-information/prerequisites.html you can find the information about database servers supported for ActiveVOS and additional information about database drivers which are supported. The drivers themselves are not included in the installation package of ActiveVOS and should be get from database vendor.
In the past there were some issues occurred during installation of ActiveVOS if the database schemas have been already created before installation.
So please remember to uncheck “Install database schema” if empty DB is already created and to check the “Install database schema” option if database schema should be created during installation of ActiveVOS.
Webserver and Java
A good start is to use the integration with Apache Tomcat as container where Informatica BPM service will be deployed to.
We recommend to use a container version equal or newer to Apache Tomcat 8.5.51.
Make sure to use Java 8 as runtime for the Informatica BPM service by setting the necessary environment variables for example.
Adjusting the webserver to support non SSL port
The Informatica BPM web endpoint does enforce SSL by default. To disable that behavior it is possible to set a JVM property:
-Dae.web.filter.https.force=falseIntegrated Security
It's possible to configure the "Informatica BPM" Server to use integrated Security for MS SQL Server connection. In this case the configuration files do not contain sensitive security data like database user and password of the database user.
The configuration can be made during the installation and initial configuration of "Informatica BPM" Server and as a post-configuration for already existing installations.
Configuration during installation
In this case it's better to use the silent installation and configuration mode
Create a Windows service user which will be used to execute BPM Server. (e.g. INFA\bpm-service)
Create the same user as MSSQL Server user and configure this user to use Windows Authentication (INFA\bpm-service)
Create manually a new ActiveVOS database and configure the owner of this database to newly created user (INFA\bpm-service).
Install the Webserver (in our case it's Apache Tomcat) and copy the SQL Server driver class and the additional dll (sqljdbc42.jar and sqljdbc_auth.dll) in the lib folder of Tomcat
Adapt the service.bat to use tomcat lib folder additional to a java.lib.path like this: --JvmOptions "...; ...;-Djava.library.path=%CATALINA_HOME%\lib"
Extract the installation and configuration tool for "Informatica BPM".
Go to the <installation_tool>\server-enterprise\tomcat_config\bin folder and adapt the install.properties for server configuration. See example for properties relevant to integrated security. The content of username and password is mandatory but not relevant for the connection. So you can use any signs.Propertiesjdbc.database.driver.class=com.microsoft.sqlserver.jdbc.SQLServerDriverjdbc.database.driver.jar=<tomcat_path>\\lib\\sqljdbc42.jarjdbc.database.url=jdbc\:sqlserver\://<sqlserver_host>;databaseName\=Active_VOS;integratedSecurity=true;jdbc.database.name=Active_VOSjdbc.database.password=xxxxjdbc.database.username=xxxxGo to the <installation_tool>\server-enterprise\tomcat_config\bin folder and adapt the config_deploy.bat to use tomcat lib folder additional to a java.lib.path like this:
Configuration"<jdk_path>\bin\java"-Xms128m -Xmx512m -Djava.library.path="<tomcat_path>\lib"-jar config.jar %1Open the command window and execute the config_deploy.bat in silent mode.
Install the Tomcat service using service.bat install
Configure the "Log on" for this service to use the BPM service account (INFA\bpm-service)
Start the service and call the ActiveVOS Console.
Re-configuration of already installed server
Following steps can be made to re-configure the existing BPM Server installation to use the integrated security for database connection:
Stop and uninstall the Tomcat service for BPM Server. Use service.bat uninstall [ tomcat service name ]
Create a Windows service user which will be used to execute BPM Server. (e.g. INFA\bpm-service)
Create the same user as MSSQL Server user and configure this user to use Windows Authentication (INFA\bpm-service)
Configure the owner of the existing ActiveVOS database to newly created user (INFA\bpm-service).
Go to the webserver (Tomcat) installation ({install_dir}/apache-tomcat/conf/Catalina) and to the BPM server ({install_dir}/server-enterprise/tomcat_config/conf) and adapt activevos.xml and active-bpel.xml in both places to use integrated security (s. example). The content of username and password is mandatory but not relevant for the connection. So you can use any signs like in example.
Configuration<Context displayName="ActiveBPEL Enterprise Tomcat Database context"path="/active-bpel"><Resource name="jdbc/ActiveVOS"auth="Container"type="javax.sql.DataSource"maxActive="100"maxIdle="10"maxWait="1000"username="xxxx"password="xxxx"driverClassName="com.microsoft.sqlserver.jdbc.SQLServerDriver"url="jdbc:sqlserver://server.informatica.com;databaseName=Active_VOS;integratedSecurity=true;"/></Context>Copy the driver class and the additional dll (sqljdbc42.jar and sqljdbc_auth.dll) in the lib folder of Tomcat
Adapt the service.bat to use tomcat lib folder additional to a java.lib.path like this: --JvmOptions "...; ...;-Djava.library.path=%CATALINA_HOME%\lib"
Install the Tomcat service using service.bat install
Configure the "Log on" for this service to use the BPM service account (INFA\bpm-service)
Start the service and call the ActiveVOS Console.
Installation of the required default workflows
After installing the Informatica BPM service the required default workflows have to be deployed to the BPM instance.
The workflows are provided as deployable Business Process Archives: P360_JMS_Core.bpr and P360_BPM_Management.bpr in the Accelerator package <P360 version>_InformaticaBPM of the P360 release.
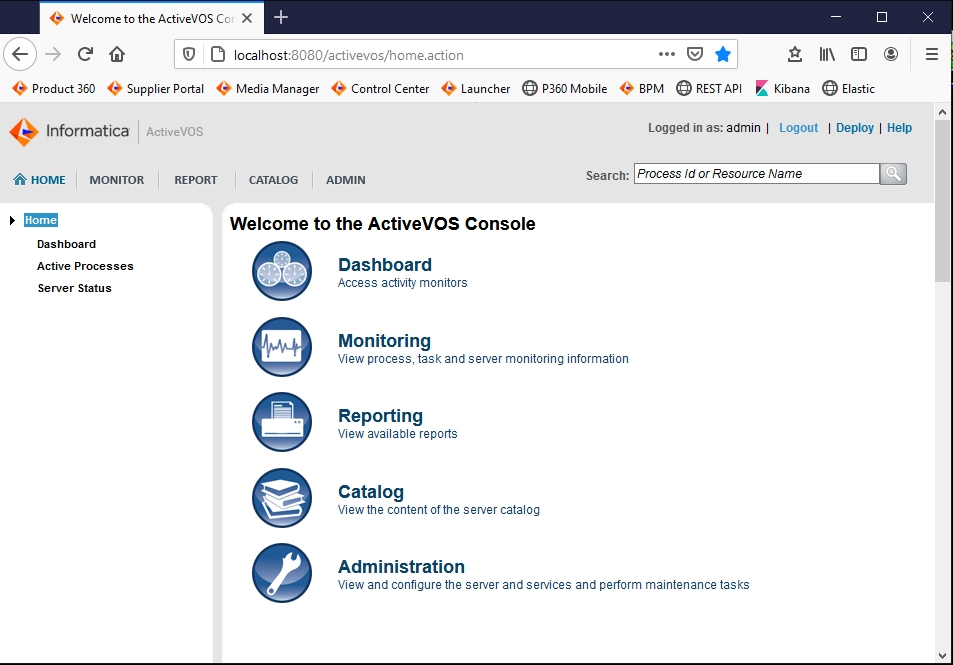
To deploy the workflows make sure the Informatica BPM service is up and running: Open your web browser and open the management console located at http://your-bpm-server:8080/activevos. You should see the start page of the management console.
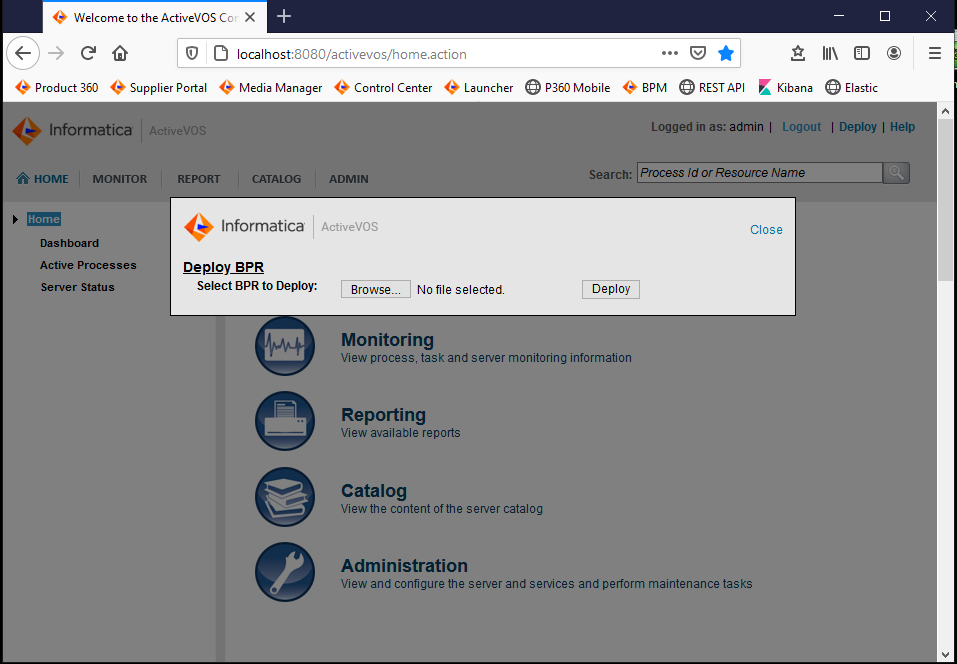
To deploy the workflows open the deploy dialog by clicking on the "Deploy" button in the upper right corner and upload the Business Process Archives.
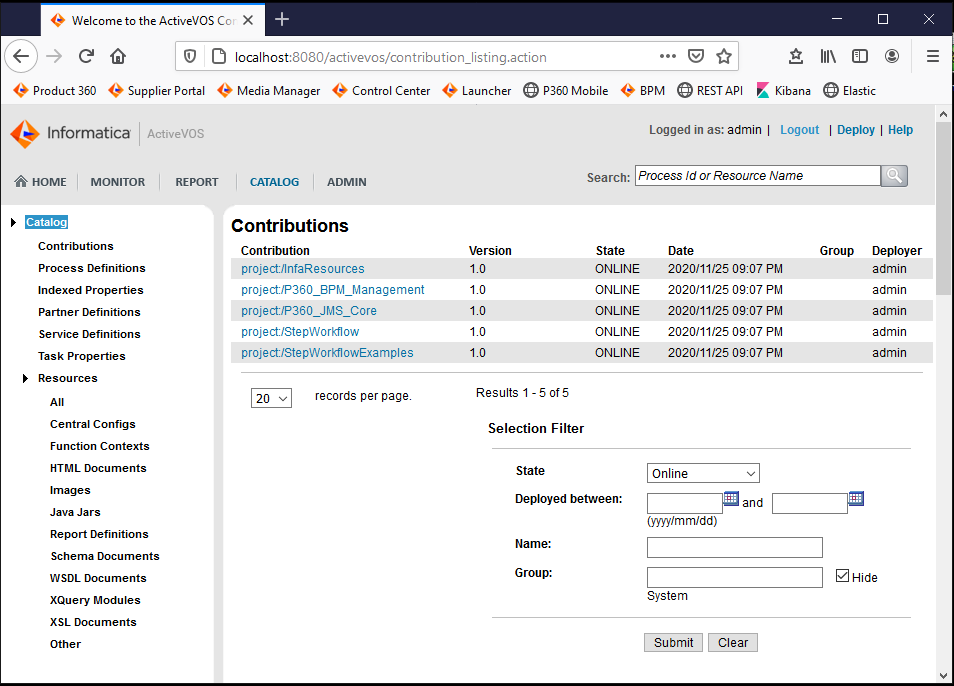
After the upload and deployment has been processed successfully you can check the availability of the P360 default workflows by navigating to Catalog/Contributions where you should now see the deployed projects containing the P360 default workflows in the list.
Configure Dispatch Services
The dispatch services have to be configured in the console of BPM:
Open a web browser and navigate to http://your-bpm-server:8080/activevos and login using your user credentials
On the landing page navigate to "Monitor/Process Monitoring/Dispatch Service"
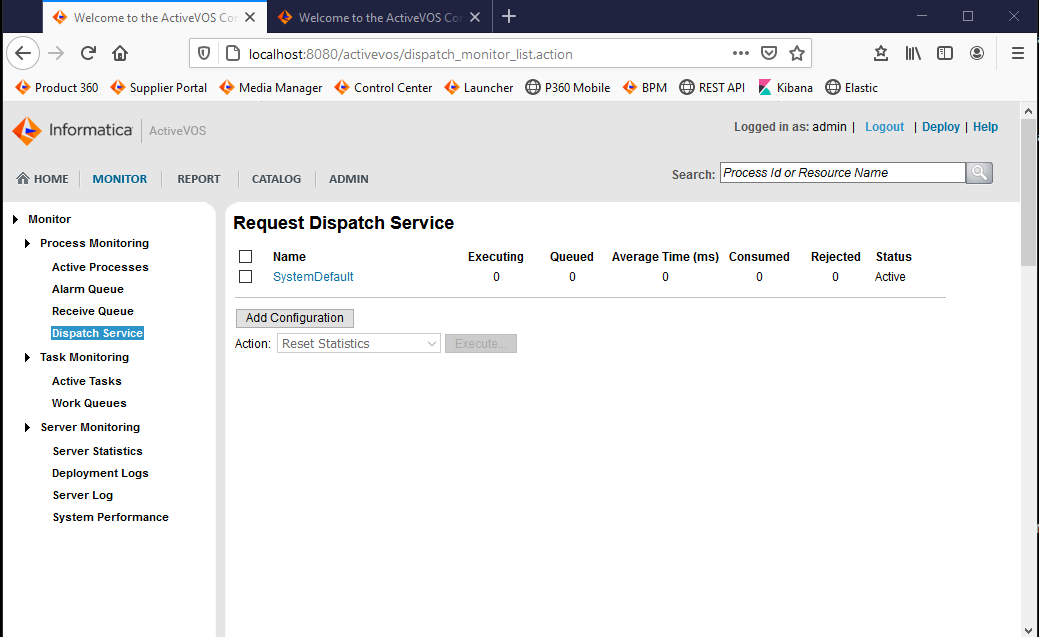
Click on SystemDefault and update the values
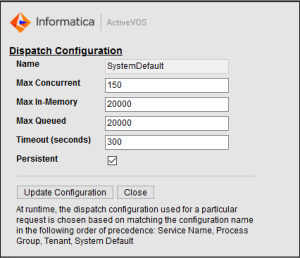
Dispatch Configuration
Name
SystemDefault
Max Concurrent
150
Max in Memory
20000
Max Queued
20000
Timeout (seconds)
300
Persistent
true
Click on Update Configuration
Click on Add Configuration and set the values
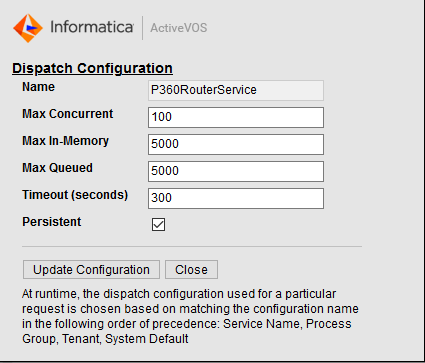
Dispatch Configuration
Name
P360RouterService
Max Concurrent
100
Max in Memory
5000
Max Queued
5000
Timeout (seconds)
300
Persistent
true
Click on Update Configuration
Preparing Informatica BPM service for JMS based communication
The communication between Informatica Product 360 and Informatica BPM service can be switched to an asynchronous message based communication. To enable this capability of Informatica BPM service some post installation steps have to be performed.
Download additional library
ActiveMQ client library
To make Informatica BPM service ready for working with messaging an additional library has to be installed.
Download https://repo1.maven.org/maven2/org/apache/activemq/activemq-all/5.15.9/activemq-all-5.15.9.jar
Put the downloaded file activemq-all-5.15.9.jar into the lib folder of the Tomcat container
Ensure the JDK version is >=1.8 as the active mq lib requires that
Make sure to restart the Informatica BPM service so that the changes take effect.
Setup messaging service within Informatica BPM
To be able to use the asynchronous message based communication between Informatica Product 360 and Informatica BPM service some basic configuration within Informatica BPM has to be set up. This configuration will be done using the Informatica BPM management console.
Open a web browser and navigate to http://your-bpm-server:8080/activevos and login using your user credentials
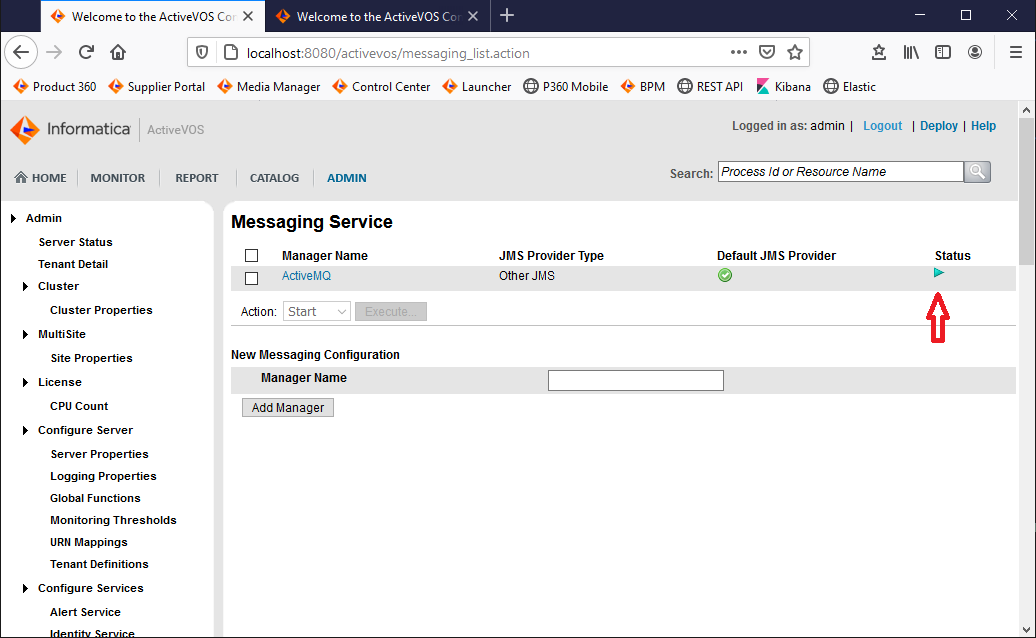
On the landing page navigate to "Administration/Configure Services/Messaging Service"
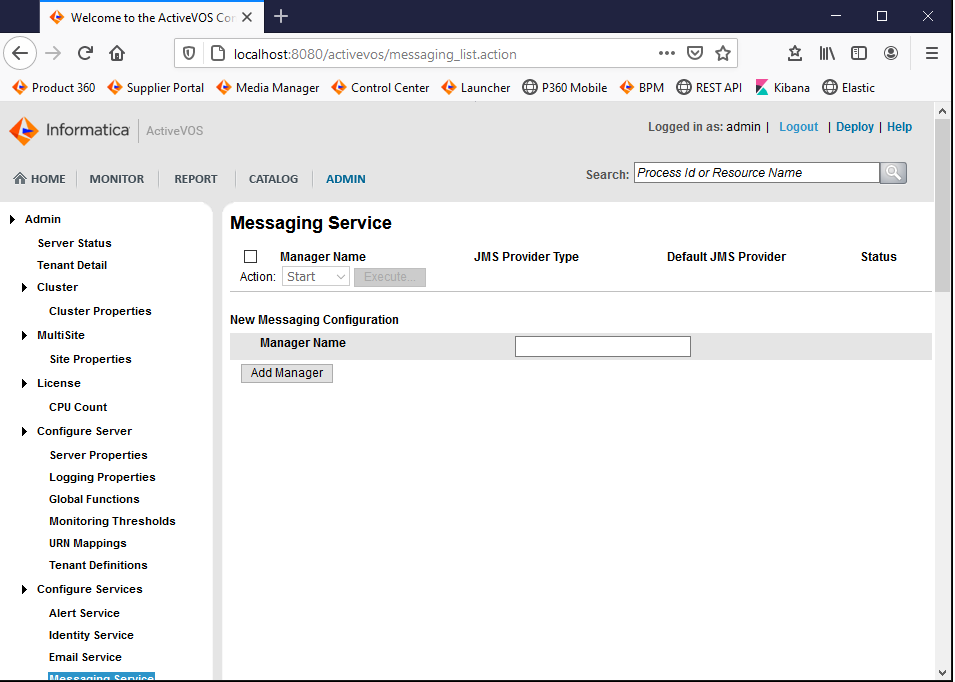
Create a new "Manager" entering "ActiveMQ" as name and clicking on the "Add Manager" button
A new entry with name "ActiveMQ" will appear in the list of manager, to configure the manager in detail click on the manager entry
Detail configuration of the message manager
To finish the configuration of the manager you have to add the following values as minimum configuration
JMS Messaging Configuration
|
Property name |
Property value |
|
Default JMS Provider |
enabled |
|
JMS Provider Type |
Other JMS |
|
Connection Factory Name |
ConnectionFactory |
|
Connection User |
The username to connect to the ActiveMQ message broker |
|
Connection Password |
The password to connect to the ActiveMQ message broker |
|
Send Empty Credentials |
disabled |
|
Maximum Total Connections |
-1 |
|
Maximum Free Connections |
15 |
|
Delivery Mode |
Persistent |
|
Time To Live (ms) |
0 |
|
Priority (int) |
0 |
|
Reconnect Interval (ms) |
Initial Context Properties
|
Property name |
Property value |
|
java.naming.provider.url |
tcp://your-activemq-server:61616?jms.redeliveryPolicy.maximumRedeliveries=-1 1 |
|
java.naming.factory.initial |
org.apache.activemq.jndi.ActiveMQInitialContextFactory |
|
queue.JNDI_P360_BPM |
P360_BPM |
|
queue.JNDI_P360_SERVICE_API |
P360_SERVICE_API |
|
queue.JNDI_P360_BATCH_API |
P360_BATCHAPI |
|
queue.JNDI_P360_BPM_RESPONSE |
P360_BPM_RESPONSE |
1 if using ssl connection make sure to import the corresponding certificates into jour JREs trust store.
Queues & Listeners
Add a new entry in section Queues & Listeners, not mentioned properties need to stay with their default value
|
Property name |
Property value |
|
Name |
P360_BPM_LISTENER |
|
JNDI Location |
JNDI_P360_BPM |
|
Listener Class |
com.activee.rt.mom.jms.transport.AeJmsBpelListener |
|
Listener Count |
15 |
|
Default Service |
P360RouterService |
Add a new entry in section Queues & Listeners, not mentioned properties need to stay with their default value
|
Property name |
Property value |
|
Name |
P360_BPM_RESPONSE_LISTENER |
|
JNDI Location |
JNDI_P360_BPM_RESPONSE |
|
Listener Class |
com.activee.rt.mom.jms.transport.AeJmsBpelListener |
|
Listener Count |
15 |
|
Default Service |
P360RouterService |
Verifying the configuration
After the manager configuration has been validated and saved you can go back to the Messaging Service overview page. Your manager should now appear in the list with status running.