Entities
An entity defines a structure for copying related data to the subset database.
An entity consists of a driving table and related tables. A driving table is the starting point for defining relationships between tables in the entity. Test Data Manager defines the tables that relate to the driving table based on physical and logical constraints. You can add tables that have cyclic or circular relationships within the table or between tables. You must add a staging connection before you can add these tables to an entity.
When you create an entity, you select a table as the driving table. Test Data Manager retrieves all related tables to the driving table based on the constraints in the driving table. Test Data Manager adds the related tables to the entity by default.
Define filter parameters for columns of tables in the entity. The filter parameters define the criteria for the subset of the data. To define the subset criteria, you can enter a specific value or a variable that is present in the parameter file.
Entity Example
An employee has an ID number of 10 and you want information about EmpID 10 from multiple tables. A table called Employee contains an EmpID column. The Employee_History and Employee_Order tables have constraints that relate them to the Employee table that contain the EmpID column.
Create an entity and define Employee as the driving table. Test Data Manager adds the Employee_History and Employee_Order tables to the entity. Define a criteria in which the EmpID value must be equal to 10.
Create a plan, generate the workflow, and start the workflow. The target database contains all the data for EmpID 10. The Employee table has one row with EmpID 10, the Employee_History table has multiple rows of history for EmpID 10, and Employee_Order has all the orders for EmpID 10.
Entities View
Create, edit, and delete entities in the Define | Data Subset view of a project.
When you create an entity, you can configure it with the following views:
- Entity Map
- The Entity Map view is a graphical representation of the tables in the entity and the relationships between the tables. You can disable and enable relationships, and edit filter criteria for each table in the Entity Map view. To select multiple rows in the Relationships view, you can click the required links in the graphical representation of the entity.
- Tables
- The Tables view contains a list of the tables in the entity. You can edit filter criteria for each table in the Tables view.
- Relationships
- The Relationships view shows a list of relationships in the entity. For each constraint, the view shows the parent table and the child table in the relationship. You can disable and enable relationships between tables in the Relationships view. To select specific links in the Entity Map view, you can select the corresponding rows in the Relationships view.
Entity Map View
The entity map is a graphical representation of the tables in an entity and the relationships between the tables.
When you create an entity, you define a driving table for the entity. The driving table is a starting point for determining the structure of the entity. Test Data Manager determines the rest of the tables in the entity based on the constraints that include the driving table.
If you drag the entity map panel to the left, a Table Properties panel appears that includes information about a selected table or constraint.
You can select any table in the map to edit the filter criteria. You can click a link to edit the constraint between the tables. You can disable relationships between tables from the map. When you select links in the Entity Map view, the corresponding rows are selected in the Relationships view.
Entity Map Example
You might define the driving table as Employee. Employee has a primary key, EmpID. Employee has three child tables that have the EmpID foreign key. The EmployeeBankDetails child table has an AccountNum constraint that relates EmployeeBankDetails to a BankAccounts table. When you create an entity with Employee as the driving table, Test Data Manager might create an entity map similar to the following map:
The driving table icon contains a star in the entity map.
To add a filter criteria for Employee, click the Employee table in the entity map. Edit the filter criteria from the Table Properties panel.
To edit the constraint between the EmployeeDetails and Employee table, click the link between the tables.
When you click the links between the Employee, EmployeeBankDetails, and BankAccounts table, the corresponding rows are selected in the Relationships view.
Choose Tables to View from the Entity Map
You can change which tables you view in the entity map. You can view all the tables or you can view the tables by their relationships with a selected table. By default the entity map shows enabled relationships.
You can choose the Show excluded tables option with any of the views to show disabled relationships.
Select one of the following views:
- All
- Shows all tables in the entity.
- All parents
- Shows all the parent tables of a selected table.
- All immediate relationships
- Shows the tables that have constraint relationships with a selected table. You can view one level of parent and child tables from the selected table.
- All children
- Shows all the child tables of a selected table.
- All cyclic relationships
- Shows all constraint relationships that create cyclic relationships. The maximum number of cyclic relationships that TDM displays is 1000. You can choose to hide nodes and paths that are not a part of the cycles.
Tables View
The Tables view contains a list of the tables in the entity. You can edit filter criteria for each table from the Tables view.
The Tables view shows the table name, description, and the name of the database that contains the table. The status field indicates whether the entity includes or excludes the table. When you disable a relationship in the entity and the table is not related to any table in the entity map, the table is excluded from the data subset database.
Relationships View
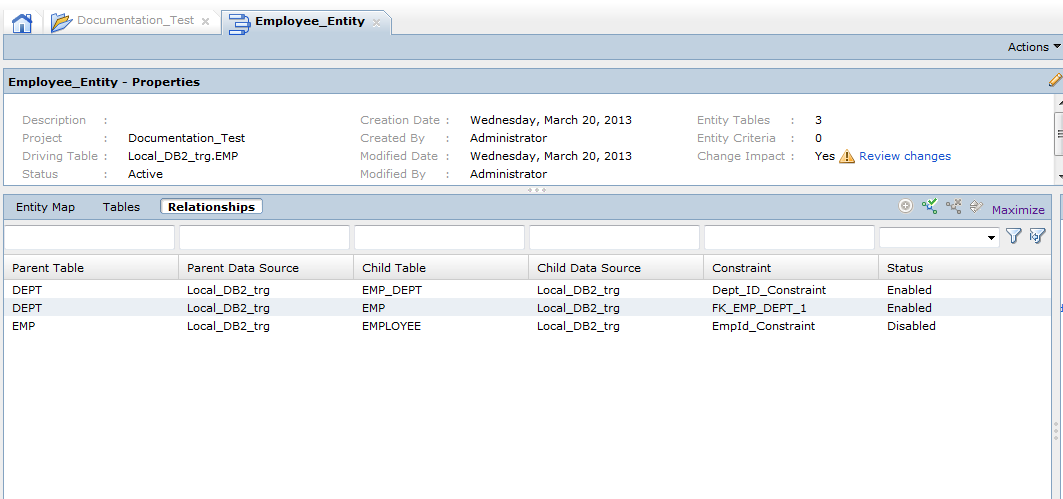
The Relationships view shows a list of the relationships between tables in the entity. You can disable and enable relationships from the Relationships view.
The Relationships view shows the parent table, the child table, and the database names for each table. The view shows the name of the constraint that defines the relationship between the tables. When a table has more than one relationship in an entity, the table appears more than once in the view.
The Status field indicates whether the relationship is enabled or disabled.
When you select a row in the Relationships view, the corresponding link is selected in the Entity Map view.
Disabling and Enabling Relationships in the Relationships View
You can enable or disable a relationship in the Relationships view.
1. In Test Data Manager, open a project.
2. Navigate to the Define | Data Subset view.
3. Select the entity you need to change.
4. Click the Relationships view.
5. Select the relationship to change.
6. Click Enable Relationship or Disable Relationship.
The status changes to disabled or enabled.
Enabling a Relationship in the Entity Map
You can enable a disabled relationship from the entity map.
1. In the Entity Map view, select Show Excluded Tables.
Test Data Manager includes disabled relationships in the entity map. The entity map shows a disabled relationship with broken lines between the objects in the relationship.
2. Click the broken line between the tables in the relationship you want to enable.
3. Click Enable Relationship.
The broken line becomes a solid line when Test Data Manager enables the relationship.
Disabling a Relationship in the Entity Map
You can disable relationships between entity objects.
1. In Test Data Manager, open a project.
2. Navigate to the Define | Data Subset view.
3. Click the entity to open the Entity Map view.
4. Click the link between the parent and child icons in the map to select the link.
Test Data Manager highlights the link.
5. Click Disable Relationship.
The link appears as a dotted line.
6. Click the Relationships view.
The relationship status is disabled.
Review Changes
When you modify a constraint that affects a table in an entity, you must update the entity to reflect the change.
For example, you create an entity that contains a table called EMP. After you create the entity, you add a constraint relationship between EMP and another table. When you add the constraint, the additional table does not appear in the entity unless you update the entity relationships.
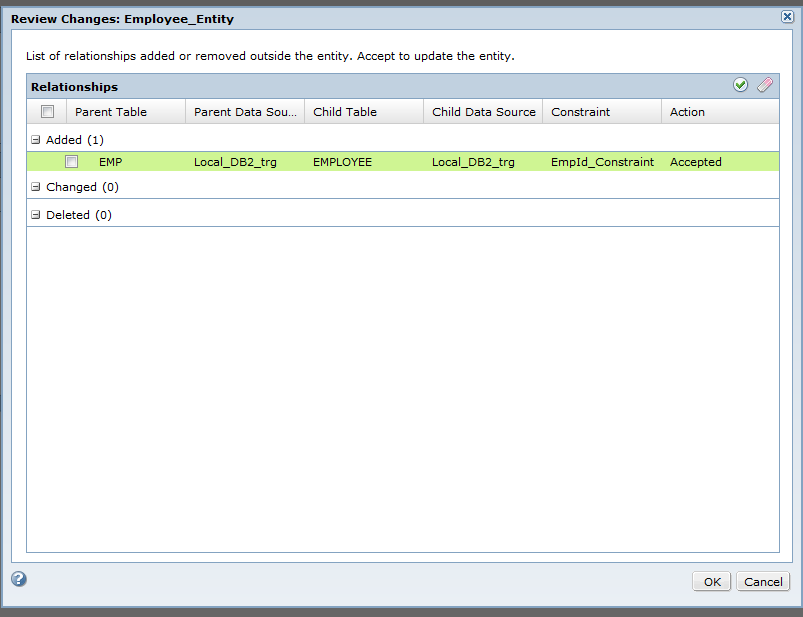
When you view the list of entities in a project, Test Data Manager flags the entity as having a change impact. Open the entity and click Review Changes to see the relationship changes that impacted the entity. You can select a relationship and accept the change to update the entity.
Note: After you review and update the entity, you must indicate that you are finished reviewing the changes. In the Entity view, click Actions > Mark Changes Review as Complete. The Review Changes notification no longer appears for the entity.
The following image shows the Review Changes dialog box:


