Name Substitution Example
You want to mask employee names and you want to preserve the gender and nationality of the names in the masked data.
You create substitution masking rules to mask first names based on gender and nationality. Substitution masking replaces a column of data with similar but unrelated data from a dictionary. You use substitution masking to mask string data with realistic output. You use advanced masking to apply multiple masking techniques to a column.
Complete the following steps to create rules to mask names based on gender and nationality:
- 1. Add a dictionary in Test Data Manager.
- 2. Create a substitution rule that substitutes first names based on gender.
- 3. Create an advanced masking rule to substitute first names based on nationality.
Add a Dictionary in Test Data Manager
Add a dictionary in Test Data Manager to use for substitution masking.
The dictionary must contain country, gender, and first name columns. You can use a flat file or a relational dictionary. Test Data Manager uses the dictionary to substitute data.
The following text is a sample from the flat file dictionary that you use to mask the employee names:
SNO, COUNTRY, GENDER, FIRSTNAME
1, US, M, Adam
2, US, F, Sarah
3, JP, M, Mahito
4, JP, F, Kyoko
Adding a Relational Dictionary
When you add a relational dictionary, you define the connection to the dictionary.
1. In the Administrator | Dictionaries view, click Actions > New Dictionary.
The New Dictionary tab appears.
2. Enter the name of the dictionary, an optional description of the dictionary, and the type of the dictionary.
3. Click Select to define a connection.
The Select Relational Dictionary dialog box appears.
4. Select a datasource connection from the menu, and click Next.
5. Select a datasource, and click Next.
6. Select a table from the list of tables in the datasource, and click Finish.
7. Review the Connection, Schema, and Table properties you selected.
8. Click Save.
A tab with the dictionary properties opens and the dictionary appears in the Administrator | Dictionaries view.
Adding a Flat File Dictionary
When you add a flat file dictionary, you can select a dictionary from the local system.
1. In the Administrator | Dictionaries view, click Actions > New Dictionary.
The New Dictionary tab appears.
2. Enter a name and optional description for the dictionary. Select Flat File as the dictionary type.
3. Click Choose File to browse to the location of the dictionary. Select the dictionary file, and click Open.
4. Optionally, select to overwrite the file if a dictionary exists in the <TDM installation directory>/TDM/infa_shared/LkpFiles directory.
5. Select the file encoding type.
6. Click Save.
A tab with the dictionary properties opens and the dictionary appears in the Administrator | Dictionaries view.
Creating the Substitution Rule
Create a substitution rule that substitutes first name based on gender.
1. In the Policies view, click Actions > New > Masking Rule.
The New Rule window appears.
2. Enter a name and optional description for the rule.
3. Select the string datatype and standard substitution masking type. Select override allowed.
4. Click Next.
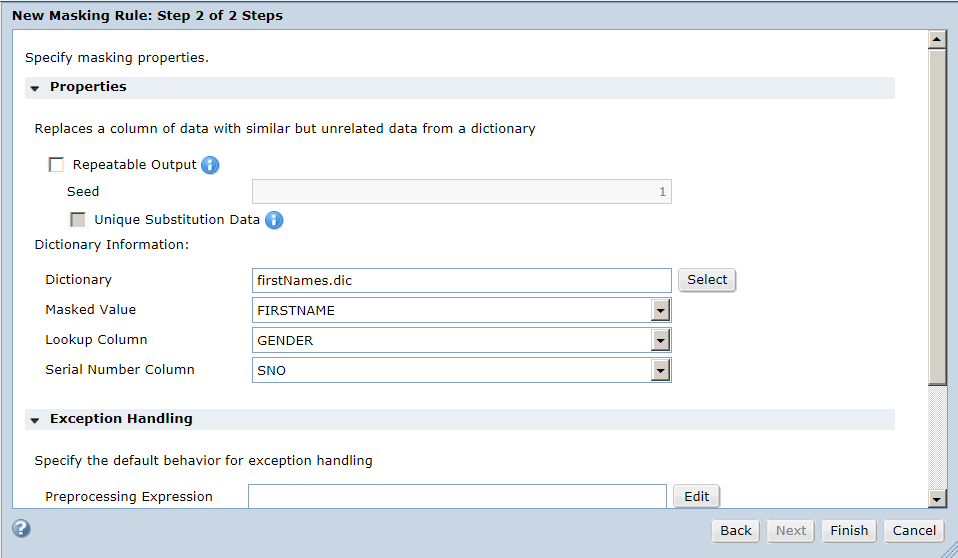
5. Enter the following substitution masking parameters:
- - Dictionary. Select the dictionary to use for the masking rule.
- - Masked Value. Select FIRSTNAME.
- - Lookup column. Select GENDER.
- - Serial number column. Select the serial number column.
The following image shows the substitution masking parameters:
6. Click Finish.
The rule appears in the Policies view.
Creating the Advanced Masking Rule
Create an advanced rule that substitutes first names based on nationality with a lookup condition on gender.
1. In the Policies view, click Actions > New > Masking Rule.
The New Masking Rule window appears.
2. Enter a name and optional description for the rule.
3. Select the advanced masking type.
4. Click Next.
5. Click Create Input Column in the Specify Masking Properties window.
The Add Column window appears.
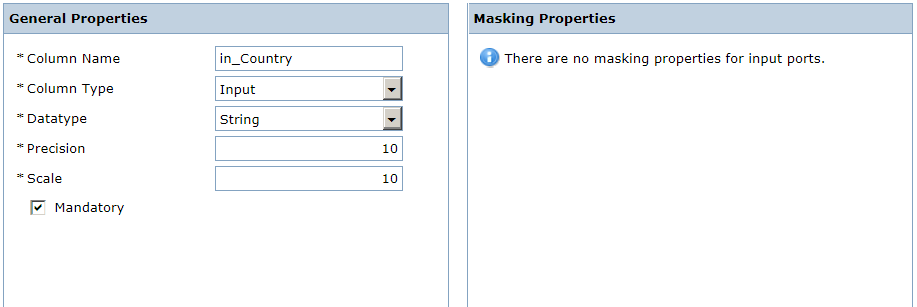
6. Enter the following general properties:
- - Column name. Enter in_Country.
- - Column type. Select input.
- - Datatype. Select string.
- - Precision. Select 10.
- - Scale. Select 10.
- - Mandatory. Select the check box.
The following image shows the in_Country column properties:
7. Click OK.
The in_Country input column appears in the list of input columns.
8. Click Create Input Column.
The Add Column window appears.
9. Enter the following general properties:
- - Column name. Enter in_FirstName.
- - Column type. Select input.
- - Datatype. Select string.
- - Precision. Select 10.
- - Scale. Select 10.
- - Mandatory. Select the check box.
10. Click OK.
The in_FirstName input column appears in the list of input columns.
11. Click Create Input Column.
The Add Column window appears.
12. Enter the following general properties:
- - Column name. Enter in_Gender.
- - Column type. Select input.
- - Datatype. Select string.
- - Precision. Select 10.
- - Scale. Select 10.
- - Mandatory. Select the check box.
13. Click OK.
The in_Gender input column appears in the list of input columns.
14. Click Create Input Column.
The Add Column window appears.
15. Enter the following general properties:
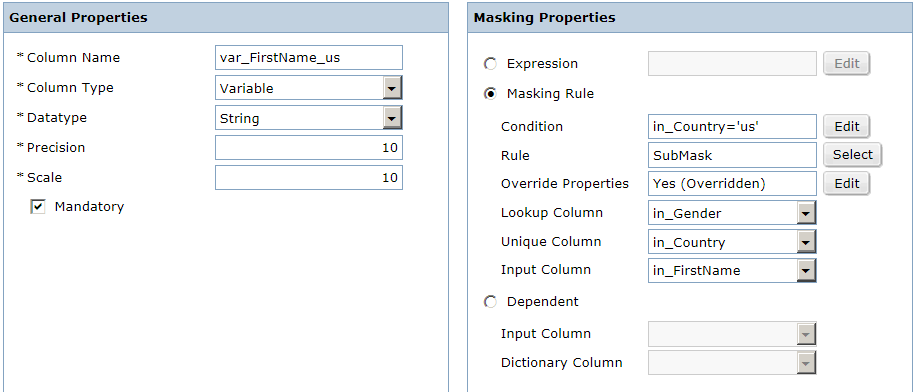
- - Column name. Enter var_FirstName_us.
- - Column type. Select variable.
- - Datatype. Select string.
- - Precision. Select 10.
- - Scale. Select 10.
- - Mandatory. Select the check box.
16. Select the masking rule masking property. Configure the following masking properties:
- - Condition. Enter in_Country='us'.
- - Rule. Select the substitution rule you created in Step 2.
- - Override Properties. Click Edit. Enable Repeatable Output and Unique Substitution Data options, and click Save. The property appears as Yes (Overridden).
- - Lookup column. Select in_Gender.
- - Unique column. Selct in_Country.
- - Input column. Select in_FirstName.
The following image shows the var_FirstName_us column properties:
17. Click OK.
The var_FirstName_us variable column appears in the list of variable columns.
18. Click Create Input Column.
The Add Column window appears.
19. Enter the following general properties:
- - Column name. Enter var_FirstName_jp.
- - Column type. Select variable.
- - Datatype. Select string.
- - Precision. Select 10.
- - Scale. Select 10.
- - Mandatory. Select the check box.
20. Select the masking rule masking property. Configure the following masking properties:
- - Condition. Enter in_Country='jp'.
- - Rule. Select the substitution rule you created in Step 2.
- - Override Properties. Click Edit. Enable Repeatable Output and Unique Substitution Data options, and click Save. The property appears as Yes (Overridden).
- - Lookup column. Select in_Gender.
- - Unique column. Selct in_Country.
- - Input column. Select in_FirstName.
21. Click OK.
The var_FirstName_jp variable column appears in the list of variable columns.
22. Click Create Input Column.
The Add Column window appears.
23. Enter the following general properties:
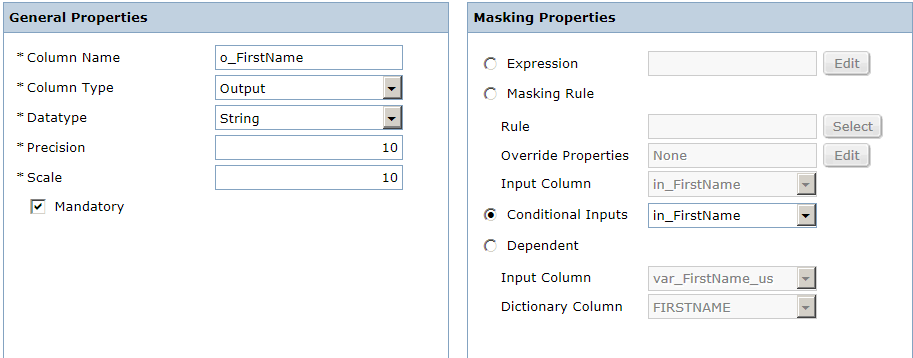
- - Column name. Enter o_FirstName.
- - Column type. Select output.
- - Datatype. Select string.
- - Precision. Select 10.
- - Scale. Select 10.
- - Mandatory. Select the check box.
24. Select the conditional inputs masking property. Configure the following masking property:
- - Conditional input. Select in_FirstName.
The following image shows the o_FirstNames column properties:
25. Click OK.
The o_FirstName variable column appears in the list of output columns.
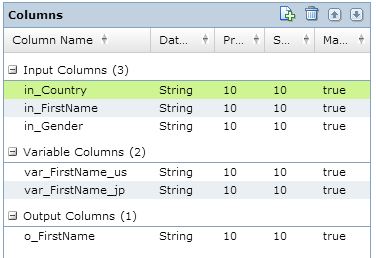
The following image shows the rule columns:
26. Click Next.
Review the rule map that appears.
27. Click Finish.
The rule appears in the Policies view.
