Enhancing the data onboarding experience in Salesforce
Use an unmanaged Salesforce package named Informatica Customer 360 Extension for Salesforce to enhance the data onboarding experience in Salesforce. The Salesforce package includes a configurable Lightning component that seamlessly integrates with Customer 360 SaaS to detect and import similar records from Customer 360 SaaS. The unmanaged Salesforce package also contains predefined permission set, named credential, field sets, custom labels, custom metadata types, and custom metadata records configured for the Salesforce Account object.
Download, install, and set up the unmanaged Salesforce package in your Salesforce environment to use the Lightning component. You can use the Lightning component with the Account object by default. However, you can customize the component for other Salesforce objects by using custom metadata types in the unmanaged Salesforce package.
Installing the unmanaged Salesforce package
Before you begin, perform the following prerequisites:
•Ensure that the Salesforce organization uses the Enterprise or Professional edition.
•Ensure that you've administrator rights to install an unmanaged Salesforce package.
•Ensure that you've enabled the State and Country/Territory picklists for address fields.
1To access the unmanaged Salesforce package, use the following URLs:
The Install Informatica Customer 360 Extension for Salesforce page appears.
3Enter NOV2025RELEASESBC as the installation key, and select one of the following options:
- Install for Admins Only. Only administrator users in the environment can search and import records from Customer 360 SaaS.
- Install for All Users. All users in Salesforce can search and import records from Customer 360 SaaS.
- Install for Specific Profiles. Select specific user profiles and allow users with those profiles to search and import records from Customer 360 SaaS.
4Click Install.
The Approve Third-Party Access dialog box appears with the Intelligent Data Management Cloud website details.
5Grant access to the Intelligent Data Management Cloud website, and click Continue.
6To see detailed components of the package, click View Components.
7After the installation is complete, click Done.
If the installation takes a long time, a message appears stating that you will receive an email when the installation is complete.
The Installed Packages page lists Informatica Customer 360 Extension for Salesforce.
Setting up the unmanaged Salesforce package
After you install the unmanaged Salesforce package, configure the Salesforce environment to use the Lightning component that is included in the package.
To configure the unmanaged Salesforce package, perform the following tasks:
1Assign the predefined permission set to users.
2Configure an external credential principal in the named credential.
3Update remote site settings.
4Verify whether a platform cache partition exists in the Salesforce environment.
5Deploy the custom labels.
6Configure a button on a Salesforce object to launch the Lightning component.
7Test the Lightning component.
Assigning the predefined permission set to users
In Salesforce, a permission set specify what the users can do within an organization. The unmanaged Salesforce package includes a predefined permission set that provides access to the Informatica Customer 360 Extension for Salesforce Lightning component and Intelligent Data Management Cloud. Assign the permission set to the users.
1From Setup, enter Permission Sets in the Quick Find box.
2Click Permission Sets.
The Permission Sets page appears.
3Click Infa Mdm SBC Permissions.
The permission set details appear.
4Click Manage Assignments > Add Assignments.
5Select the users for whom you want to assign the permission set, and click Next.
6Click Assign.
Configuring the named credential
To configure the named credential, you must configure an external credential principal to map the named credential to.
1From Setup, enter Named Credentials in the Quick Find box.
2Click Named Credentials.
The Named Credentials page appears.
3Click Infa MDM Login NC.
The Infa MDM Login NC page appears with the following prepopulated details:
Field Name
Value
Label
Infa MDM Login NC
Name
Infa_MDM_Login_NC
URL
https://dmp-us.informaticacloud.com
External Credential
Infa MDM Login EC
4To update the details, click Edit. Save the changes.
5In the External Credential field, click Infa MDM Login EC.
The Infa MDM Login EC page appears.
6In the Principals section, click the Actions menu for the Infa MDM Creds parameter and then click Edit.
7In the Authentication Parameters section, click Add.
The Parameter 1 section appears.
8Specify the Intelligent Data Management Cloud (IDMC) username as the authentication parameter.
In the Parameter 1 section, enter username in the Name field and an IDMC username in the Value field.
9In the Authentication Parameters section, click Add.
The Parameter 2 section appears.
10Specify the Intelligent Data Management Cloud (IDMC) password as the authentication parameter.
In the Parameter 2 section, enter password in the Name field and the password associated with the IDMC username in the Value field.
11Click Save.
Updating remote site settings
The unmanaged Salesforce package includes a predefined remote site settings. To enable the Lightning component to access Intelligent Data Management Cloud (IDMC), update the remote site URL to your MDM SaaS application base URL.
1From Setup, enter Remote Site Settings in the Quick Find box.
2Click Remote Site Settings.
3To update the Infa_MDM_baseAPI_URL remote site, click Edit.
The Remote Site Edit page appears.
4In the Remote Site URL field, enter the MDM SaaS application base URL.
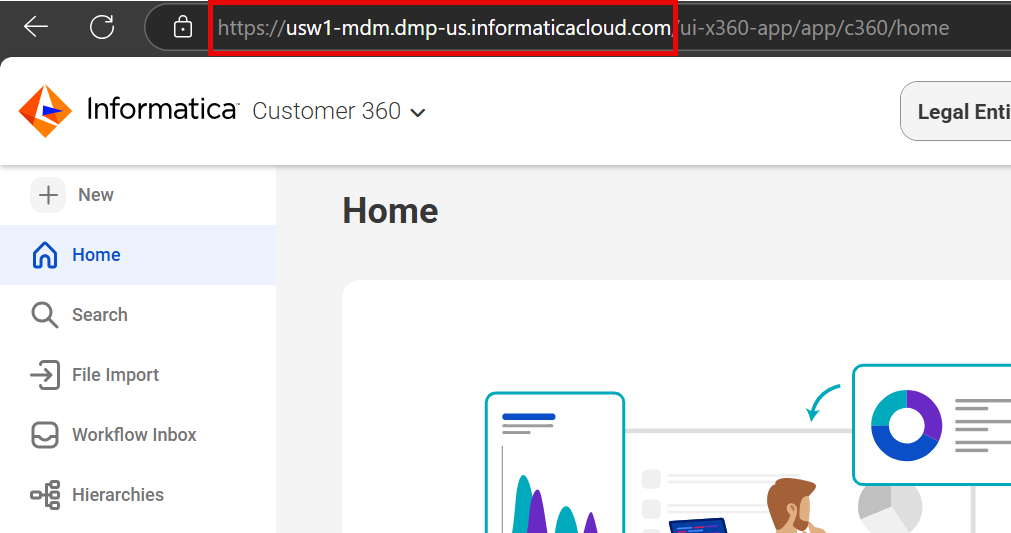
To find the MDM SaaS application base URL, log in to IDMC, and click Customer 360.
The following image shows the base URL of the MDM SaaS application:
5Click Save.
Creating a cache partition
Ensure that the Salesforce organization has a default platform cache partition. If a platform cache partition isn't included, create a platform cache partition. Ensure that you allocate a session cache for Organization with a minimum value of 1.
For more information about creating a platform cache partition, see the Salesforce documentation.
Deploying custom labels in Salesforce
The extension package includes sample custom labels specific to the Account object for the Lightning component in the unmanaged Salesforce package. Use the custom labels to enter the display name of the MDM SaaS field group and section title in a custom metadata record. Custom label values are separated by a semi-colon. Use the semi-colon as the delimiter when updating a custom label or during translation.
To deploy the custom labels in Salesforce, perform the following tasks:
1Open your browser and go to https://workbench.developerforce.com.
2Select the Salesforce environment where the unmanaged package is installed.
3Agree to the terms of service, and click Login with Salesforce.
If you are already logged in to Salesforce, proceed to step 5.
4Enter your user credentials, and click Log In.
5If prompted, click Allow to let Workbench access the Salesforce environment.
The Metadata API Process Status page appears. Verify that the deployment status is marked as succeeded.
Configuring the Lightning component
To launch the Lightning component that searches for similar records in Customer 360 SaaS, you can either override the New button on the Accounts page or create a custom button.
2To override the New button on the Accounts page, perform the following tasks:
aFor the New label, click the down arrow, and select Edit.
The Override Standard Button or Link page for the New label appears.
bFor Lightning Experience Override, select Lightning component, and select c:InfaMdmSbc.
cClick Save.
Similarly, you can override the New button for other Salesforce objects.
Note: To configure the Lightning component for other Salesforce objects by overriding the New button, select the preferred object in step 1.a instead of Account.
3Optionally, to create a custom button on the Accounts page and add it to the List View button layout, perform the following tasks:
aClick New Button or Link.
The Account Custom Button or Link page appears.
bSpecify details for the custom button, such as label, name, and description.
cSelect List Button as the display type.
dIn the formula editor, enter the following relative URL:
This URL launches the Lightning component InfaMdmSbc with the specified parameters for newactionoverride and objectApiName.
eClick Save.
fOn the left pane, click List View Button Layout.
gFor the List View layout, click the down arrow, and select Edit.
The Edit Search Layout page appears with the Account list view.
hIn the Custom Buttons section, select the custom button from Available Buttons, and click Add to move it to Selected Buttons.
iClick Save.
Similarly, you can create custom buttons for other Salesforce objects.
Note: To configure the Lightning component for other Salesforce objects by creating a custom button, select the preferred object in step 2.a instead of Account. In step 2.d, specify objectApiName of the object in the formula editor.
Testing the Lightning component
After you configure the Lightning component, test the component to ensure that the component works as expected.
1From App Launcher, find and open an application that has the Accounts tab configured.
2On the Accounts tab, click New or the custom button that you configured to launch the Lightning component.
The New Account dialog box appears.
3Select a record type, and click Next.
The prompt to select a record type appears only when the Account object has record types configured.
4Specify the details, and click Search.
If Customer 360 SaaS contains similar records, a list of those records appears.
5Select a record to view its details, and perform one of the following tasks:
- If the record exists in Salesforce, click Open to view the record in Salesforce.
- If the record exists in Customer 360 SaaS, click Import to import the record.
6If similar records aren't found, perform one of the following tasks:
- To create a new record in Salesforce, click Create New.
- To search for another record in Customer 360 SaaS, click Back and refine your search criteria.
Customizing the unmanaged Salesforce package
The unmanaged Salesforce package, includes the custom metadata types that define the structure of application metadata for the Lightning component in Salesforce. Each custom metadata type includes custom metadata records that are configured for the Account object. You can edit the existing custom metadata records or create new custom metadata records to customize the package for other Salesforce objects.
The unmanaged Salesforce package includes the following custom metadata types:
Informatica MDM SaaS Configuration
Defines object-level settings that map a Salesforce object to its corresponding MDM SaaS business entity. Each record in this metadata type contains the configuration for a Salesforce object and its integration with an MDM SaaS business entity.
Informatica MDM SaaS Field Setting
Defines field-level mappings between the fields of a Salesforce object and the corresponding fields in the MDM SaaS business entity. Each record in this metadata type specifies how each field in a Salesforce object corresponds to a field in an MDM SaaS business entity.
Informatica MDM SaaS Layout Setting
Defines how information is displayed and organized in the Lightning component for Salesforce objects. The Lightning component renders fields dynamically on each screen based on these layout definitions.
The Informatica MDM SaaS Layout Setting custom metedata type includes the following layout types:
- Search screen fieldset. Defines the fields and layout that users see when performing searches in the Lightning component. This layout configuration helps users quickly identify records by displaying the most relevant information in a concise format.
- Draft screen fieldset. Defines how fields appear when users create a record through the Lightning component. This layout configuration ensures that users have all necessary fields organized logically to facilitate data entry.
You can create various records by specifying field lists and grouping for different layout views.
Note: If you configure record types for Salesforce objects, map each Salesforce object record type to an MDM SaaS business entity.
Customizing an Informatica MDM SaaS Configuration custom metadata record
You can edit the existing custom metadata records or create new custom metadata records to customize the unmanaged Salesforce package for other Salesforce objects.
1From Setup, enter Custom Metadata Types in the Quick Find box.
2Click Custom Metadata Types.
3To manage the custom metadata records in Informatica MDM SaaS Configuration, click Manage Records.
The Informatica MDM SaaS Configurations page appears with the list of custom metadata records.
4To create a new custom metadata record, click New. To edit an existing metadata record, click Edit.
The Informatica MDM SaaS Configuration page appears.
5Specify details in the following fields:
Field Name
Description
Label
Name of the custom metadata record in Salesforce.
Informatica MDM SaaS Configuration Name
Unique name of the custom metadata record in Salesforce.
Business Entity
Internal ID of a business entity in MDM SaaS that you map with a Salesforce object.
Note: If you configure record types for Salesforce objects, map each Salesforce object record type to an MDM SaaS business entity.
Record Type
Record type of a Salesforce object that you map with an MDM SaaS business entity.
Note: If you haven't configured any record types for Salesforce objects, leave this field blank.
Salesforce Object Name
API name of a Salesforce object for which you configure the custom metadata record.
Source System
Internal ID of the source system in MDM SaaS.
Search Mode
Type of search to perform, such as search or match.
If you select Search, the Search API searches for similar records based on the search criteria. If you select Match, the Search Match API searches for matching records based on the match model configuration.
Display Field 1
Internal ID of a business entity field in MDM SaaS that you want to use as the name of the record on the search results screen.
Display Field 2
Internal ID of a business entity field in MDM SaaS that you want to use to include additional details for a record on the search results screen.
Display Field 3
Optional. Internal ID of a business entity field in MDM SaaS that you want to use to include additional details for a record on the search results screen.
Display Field 4
Optional. Internal ID of a business entity field in MDM SaaS that you want to use to include additional details for a record on the search results screen.
6Click Save.
Customizing an Informatica MDM SaaS Field Setting custom metadata record
You can edit the existing Informatica MDM SaaS Field Setting custom metadata records or create new custom metadata records to customize the unmanaged package for other fields in a Salesforce object.
1From Setup, enter Custom Metadata Types in the Quick Find box.
2Click Custom Metadata Types.
The Custom Metadata Types page appears.
3To manage the custom metadata records in Informatica MDM SaaS Field Setting, click Manage Records.
The Informatica MDM SaaS Field Settings page appears with the list of custom metadata records.
4To create a new custom metadata record, click New. To edit an existing metadata record, click Edit.
The Informatica MDM SaaS Field Setting page appears.
5Specify details in the following fields:
Field Name
Description
Label
Name of a custom metadata record in Salesforce.
Informatica MDM SaaS Field Setting Name
Unique name of a custom metadata record in Salesforce.
Informatica MDM SaaS Configuration
Informatica MDM SaaS Configuration that you map to the custom metadata record.
Salesforce Field API Name
API name of the Salesforce field for which you configure the custom metadata record.
Internal ID of MDM SaaS Field
Internal ID of the business entity field in MDM SaaS that you map to the Salesforce field.
Note: Map only one MDM SaaS business entity field to each Salesforce field.
Display Name of MDM SaaS Field Group
Name of the field group in the MDM SaaS business entity.
Internal ID of MDM SaaS Field Group
Internal ID of the field group in the MDM SaaS business entity.
MDM SaaS Field Group Column Order
Display order of columns for fields that belong to a field group within an MDM SaaS business entity.
For example, if you want a column to appear first, specify 1.
Note: If a field is not part of any field group, leave this field blank.
MDM SaaS Crosswalk ID
Crosswalk identifier for the MDM SaaS business entity picklist.
6Click Save.
Customizing an Informatica MDM SaaS Layout Configuration custom metadata record
You can edit the existing custom metadata records or create new custom metadata records to customize the unmanaged Salesforce package for different layout views for the Lightning component.
1From Setup, enter Custom Metadata Types in the Quick Find box.
2Click Custom Metadata Types.
The Custom Metadata Types page appears.
3To manage the custom metadata records in Informatica MDM SaaS Layout Setting, click Manage Records.
The Informatica MDM SaaS Layout Settings page appears with the list of custom metadata records.
4To create a new custom metadata record, click New. To edit an existing metadata record, click Edit.
The Informatica MDM Layout Setting page appears.
5Specify details in the following fields:
Field Name
Description
Label
Name of the custom metadata record in Salesforce.
Informatica MDM SaaS Layout Setting Name
Unique name of the custom metadata record.
Informatica MDM SaaS Configuration
Informatica MDM SaaS Configuration that you map to the custom metadata record.
Layout Type
Indicates whether the layout type is search screen fieldset or draft screen fieldset.
Section Title
Name of the section.
Use the custom labels, which are included in the extension package, to enter section title values. You can create new custom labels based on your requirements.
Note: To access custom labels, enter Custom Labels in the Quick Find box, and then select Custom Labels. A list of custom labels appears. Custom label values are separated by a semi-colon.
Field Set Name
API name of the field set that is created for the section.
Note: To access Account field sets, go to Object Manager > Account > Field Sets, and find the required field set.
Section Order
Sequence in which a section appears on the search or draft screen layout.
For example, to make a section appear first, specify 1.