You can create a data access service connector on a Secure Agent to access data directly from a database.
You can use a data access service connector to connect to the following databases:
•Databricks
Note:
Use a personal access token (PAT) to connect to the Databricks database. For more information about the limitations in connecting to Databricks, see Rules and guidelines for Databricks.
•IBM DB2
•Microsoft SQL Server
•MySQL
•Oracle
•PostgreSQL
•Snowflake
You can create a data access service connector by defining the properties and specifying variables to interact directly with the database. You can also define the actions associated with a data access service connector.
Before you create a data access service connector, you must copy the required JDBC JAR files to the following directory and restart the Secure Agent:
Download the following JDBC JAR files based on the database that you use:
Database name
JAR files
Databricks
DatabricksJDBC42.jar
IBM DB2
db2jcc4.jar
Microsoft SQL Server
sqljdbc41.jar
MySQL
mysql-connector-java-5.1.40-bin.jar
Oracle
ojdbc8.jar
Snowflake
snowflake-jdbc-<version>.jar
Note:
The JAR files must be compatible with the database version that you use.
To create a data access service connector, perform the following steps:
1In Application Integration, click New > Service Connectors.
2In the New Asset dialog box, click Data Access Service Connector using Form, and then click Create.
Defining Properties
To create a data access service connector and define the properties, perform the following steps:
1In Application Integration, click New > Service Connectors > Data Access Service Connector using Form > Create.
The data access service connector editor appears.
The following image shows the data access service connector editor:
2On the Definition tab, define the following basic properties for the data access service connector:
- Name: Required. The name by which the data access service connector is made available for processes. The name must start with a letter or number, and can contain only alphanumeric characters, multibyte characters, underscores (_), and hyphens (-). The name must not exceed 128 characters.
- Location: Required. Specify the project or folder to save the data access service connector.
- Description: Optionally, enter a description for the data access service connector.
- Agent Only: Selected by default because a data access service connector can only run on a Secure Agent.
- Use OData: Select this option to access data from a web service that uses OData. After you enable the Use OData option in a data access service connector, you can enable OData and specify the allowed users and groups for OData in the app connection that uses the data access service connector.
After you publish the app connection, you can view the OData Service URL and OData Swagger URL in the Properties Detail page of the app connection.
- Use OAuth 2.0: Select this option to enable OAuth 2.0 authentication. OAuth 2.0 is a protocol for authorization that provides specific authorization flows for web applications and helps in the secure transmission of information between the client and the server. OAuth 2.0 uses access tokens that represent the authorization to access resources on behalf of the user and enable the token issuers to access the data.
Note:
The response time might vary depending on the size of the database that you query.
You can use the OData protocol along with OAuth 2.0 authentication when you use a data access service connector to securely connect to Snowflake databases and enable data access.
Note:
When you create a data access service connector to access a Snowflake database, set the grant type to Authorization Code to use the OData protocol along with OAuth 2.0 authentication.
To use OAuth authentication, select the Use OAuth2 option and configure the following properties:
Property
Description
Grant Type
Required. Select the required grant type based on your use case.
Authorization URL
Required. Enter the OAuth authorization URL for the OAuth provider to to authorize the user request.
For example: https://login.microsoftonline.com/xxxxxx-xxxx-xxxx-xxxx-xxxxxxxxxx/oauth2/v2.0/authorize
Token Request URL
Required. Enter the OAuth token request URL that handles token requests.
For example: https://login.microsoftonline.com/xxxxxxxx-xxxx-xxxx-xxxx-xxxxxxxxxxxx/oauth2/v2.0/token
The expiration of the refresh token depends on the OAuth provider. You must re- authenticate and publish the connection before the token expires.
Note:
The refresh token doesn't apply to agent groups.
Client ID
Required. Specify the identifier value from the OAuth provider.
Client Secret
Required. Enter the client secret to connect to the OAuth provider.
Scope
Required. Specify the scope. The scope in OAuth authentication limits an application's access to a user's account. You can select multiple scopes for a single client. To enter multiple scopes, separate each value with a space.
Session Duration
Optional. Enter the number of minutes to wait before refreshing the session. This is used if you cannot obtain the token expiration from the OAuth provider. Default is 60 minutes.
Other Parameters
Optional. Enter parameters to customize the authorization request, separated with semicolons. You can provide extra information or specify requirements of the OAuth provider.
Authorization Status
Optional. Indicates the current status, the name of the user who authorized, and the last time when the authorization was completed.
Authorize Access
Click to initiate the authorization workflow using OAuth.
The data access service connector is authorized to use any service that accepts the access token issued by the OAuth 2.0 provider.
3In the Connection Properties section, define the following general properties to connect to an external database:
- JDBC Driver: Required. The fully qualified Java class name of the JDBC driver.
Based on the database, you can specify one of the following driver class names:
▪ Databricks: com.databricks.client.jdbc.Driver
▪ IBM DB2: com.ibm.db2.jcc.DB2Driver
▪ Microsoft SQL Server: com.microsoft.sqlserver.jdbc.SQLServerDriver
You can only use a personal access token (PAT) authentication method to connect to the Databricks database.
IBM DB2: jdbc:db2://<server>:<port>/<database>
▪ Microsoft SQL Server: jdbc:sqlserver://<host>:<port>;databaseName=<database>
Note:
You can use the Active Directory authentication method to connect to a Microsoft SQL Server database. To use this aunthentication type, add authentication=ActiveDirectoryPassword to the JDBC URL as shown in the following format:
For the Snowflake database, if you don't provide authenticator=oauth in the URL, the connection uses the basic authentication method.
- User Name: Required. The user name to connect to the database.
- Password: Required. The password to connect to the database. The value entered in this field is encrypted by default. In the Developer Console, the password that you enter is visible when you save the connector. After you save, close, and reopen the connector, the password appears encrypted.
Note:
When you connect to the Databricks database, enter token in the User Name field and the PAT value in the Password field.
- Schema: Enter the name of the schema that contains the tables that you want to include or exclude in the metadata. To view appropriate results, you must also enter a schema name in the app connection that uses the data access service connector.
- Include Tables: Enter the names of the tables that you want to include in the metadata. To include a list of tables, use a comma to separate multiple table names. You can also use '.*' for pattern matching. To view appropriate results, you must also mention the included table names in the app connection that uses the data access service connector.
- Exclude Tables: Enter the names of the tables that you want to exclude from the metadata. To exclude a list of tables, use a comma to separate multiple table names. You can also use '.*' for pattern matching. To view appropriate results, you must also mention the excluded table names in the app connection that uses the data access service connector.
4Optionally, in the Connection Properties section, define the following advanced properties:
- Check SQL Injection: Set this field to Yes to prevent or mitigate an SQL injection attack that can happen through malicious input parameters. Default is No. You must also configure this field in the app connection that uses the data access service connector.
Note:
Although you can use this option to prevent SQL injection attacks, it might not apply to all conditions. For more information, see SQL injection protection and security checks.
- Initial Connection Pool Size: The initial number of connections created when the pool is started. Default is 5.
- Max Active Connections: The maximum number of active connections that can be allocated from the pool simultaneously. If the value is negative, there is no limit. Default is 10.
- Min Idle Connections: The minimum number of connections that can remain idle in the pool without additional connections being created. A value of 0 means that none will be created. Default is 1.
- Max Idle Connections: The maximum number of connections that can remain idle in the pool without additional connections being released. If the value is negative, there is no limit. Default is 5.
- Max Wait (ms): The maximum number of milliseconds that the pool waits for a connection if there are none available. A value of -1 means to wait indefinitely.
- Default Transaction Isolation Level: The default state of connections created by the pool, which is one of the following states:
▪ 0 - None
▪ 1 - Read Uncommitted
▪ 2 - Read Committed
▪ 4 - Repeatable Read
▪ 8 - Serializable
- Min Evictable Idle Time (ms): The minimum amount of time an object may sit idle in the pool before it is evicted (if an evictor exists).
- Number of Objects per Eviction Run: The number of objects to test during each run of the idle object evictor thread (if an evictor exists).
- Test on Borrow: When selected, objects are validated before being borrowed from the pool. If the object cannot be validated, it is dropped from the pool, and an attempt is made to borrow another. Default is false.
- Test on Return: When selected, the borrowed objects are validated before being returned to the pool. Default is false.
- Test while Idle: When selected, the borrowed objects are validated by the idle object evictor (if one exists). If the object can't be validated, it is dropped from the pool. Default is false.
- SQL Validation Query: The SQL query that validates connections from the pool before returning them to the caller. If specified, the query must be an SQL SELECT statement that returns at least one row.
SQL injection protection and security checks
You can enable the Check SQL Injection option to protect a database by blocking SQL parameters that match certain patterns commonly used in malicious queries.
This security option checks for and prevents potentially harmful inputs in the following categories:
Logical condition checks
The queries that contain suspicious logical expressions, such as always-true or always-false conditions, or direct comparisons using AND and OR operators, which attackers often exploit in injection attacks.
Data manipulation commands
The common SQL statements that read or modify data, such as:
- SELECT
- INSERT INTO
- UPDATE
- DELETE
- UPSERT
Transaction and procedure controls
The statements that handle transactions or call stored procedures, such as:
- SAVEPOINT
- CALL
- ROLLBACK
- KILL (used to terminate processes)
Schema and database structure changes
The commands that create, alter, or delete database objects or locks, such as:
- CREATE (tables, indexes, and so on)
- ALTER (tables, indexes, and so on)
- DROP
- TRUNCATE
- LOCK and UNLOCK and lock release commands
Metadata inspection
The queries that retrieve schema information, such as:
- DESCRIBE
- DESC
Suspicious comments and statement delimiters
The queries that contain SQL comments (/* ... */, -- ...) or statement delimiters (;) commonly used in injection attempts.
Note:
Although this protection significantly reduces the risk of SQL injection, it might not apply to all conditions. You might want to apply additional security best practices and validate inputs within your application to ensure complete protection without interrupting the data flows.
Specifying Variables
To configure a data access service connector, you might need to specify variables to define output fields.
Built-in Variables
You can reference the following variables in a data access service connector using an XQuery expression:
Variable
Variable Type
Description
$VariableName
All connection properties
Input and output fields can be specified using this format.
$Response
Output field mapping
Contains the Response XML data. It is displayed on the Test Results tab of the data access service connector.
Defining Actions
On the Actions tab, you can create and describe one or more actions associated with a data access service connector.
The following image shows the Actions tab:
Click the row that you want to edit or click + to add a new row, and then enter the following information on the Action tab:
•Action Name: Enter the name that appears in lists when referencing this action in data access service connectors and connections. Do not use spaces or special characters in the action name. This is a required field.
•Category: If you have many data access service connectors, each with multiple actions, you can create categories to help users navigate within processes.
•Description: Enter a description or notes about this action.
For each action, specify additional details on the Input, SQL Binding, Output, and Test Results tabs.
Input Tab
Use the Input tab to define input data items that are unique to the service to which you are sending data.
The following image shows the Input tab:
For each item, enter the following properties:
•Name: Required. The name of the input data item.
Note:
If you use a space character in the input field name and use the input field in the SQL query on the SQL Binding tab, you might see an error.
•Label: The name of the item to display within a process. If not specified, the name is displayed.
•Type: Select the data type of the item from the list. If you select the Reference or Object List type, you can also select a Process Object.
•Required: Select if a value must be set for this parameter.
•Description: Enter a description of the parameter.
•Test with: Enter a value that Process Designer will use to test the action. If the input is an attachment, you can also upload a sample attachment file.
Use the + icon to add a new item. Click X to delete the current row.
SQL Binding Tab
For each action in a data access service connector, use the SQL Binding tab to specify multiple SQL queries to access the data from the data source. After the SQL entries are made, the tab displays details such as the SQL name, SQL text, column case of the expression, query type, maximum rows returned by the SQL query, and maximum wait time in seconds.
If you add multiple queries, the SQL statements are run in the order in which the queries are listed in the table. You can use the arrow buttons to move a query up or down. You can also delete SQL queries.
To add a row of an SQL entry, click + on the SQL Binding tab. Enter the following details for each SQL query:
SQL Name
Name of the SQL query.
SQL Text
A valid SQL statement that returns at least one row.
Column Case
Specify whether the characters in the expression must be converted into lowercase or uppercase, or remain unchanged. Default is Lowercase.
Type
Select one of the following values:
- Data Manipulation. Queries information and applies logic to it to generate a different set of data.
- Stored Procedure. Uses prepared SQL code that you can save and reuse. A stored procedure reduces the network traffic by returning multiple output fields in a single call instead of performing multiple queries to the database. When you use a stored procedure in a data access service connector, you can configure the output fields depending on the database management system (DBMS) that you use. For more information, see Output field settings for stored procedures in a data access service connector.
Maximum Rows
The maximum number of rows returned by the SQL query that can be displayed in the SQL response payload. Default is 100 rows. The maximum number of rows can't exceed 10,000 rows.
For a result set, the maximum number of rows that you configure applies to each SQL statement within the stored procedure.
Maximum Wait Time (in Seconds)
The maximum length of time in seconds that a database client can wait for a response from the database before timing out the session.
Note:
Application Integration does not perform a commit after it executes every SQL query. To help with a rollback in case of an SQL query failure, the commit is done only at the end after all the SQL queries are executed. In a few databases, implicit commit occurs for DDL statements such as CREATE TABLE, DROP TABLE, and so on. These executions can't be rolled back.
Output field settings for stored procedures in a data access service connector
When you use a stored procedure in a data access service connector, you can configure the output fields.
In a stored procedure, you can define the output fields based on the DBMS that you use, such as MySQL, SQL Server, Oracle, PostgreSQL, or DB2. You can use the output fields to return the data back to the calling application. A stored procedure reduces the network traffic by returning multiple output fields in a single call instead of performing multiple queries to the database. You can also use the Cursor data type in the output fields to return a result set or a pointer to a set of rows from a database query.
You can use the following data types in the output fields for stored procedures in a data access service connector:
•Binary
•Byte
•Clob
•Cursor
•Date
•Double
•Float
•Integer
•Long
•Short
•String
Configuring output fields in stored procedures
Perform the following steps to configure output fields when you use a stored procedure in a data access service connector:
1On the SQL Binding tab, click the + icon to add an SQL entry.
2Click the Edit icon to edit the SQL query.
The Create SQL page to configure multiple SQL queries appears.
3Enter the SQL query name.
4In the Type list, select Stored Procedure.
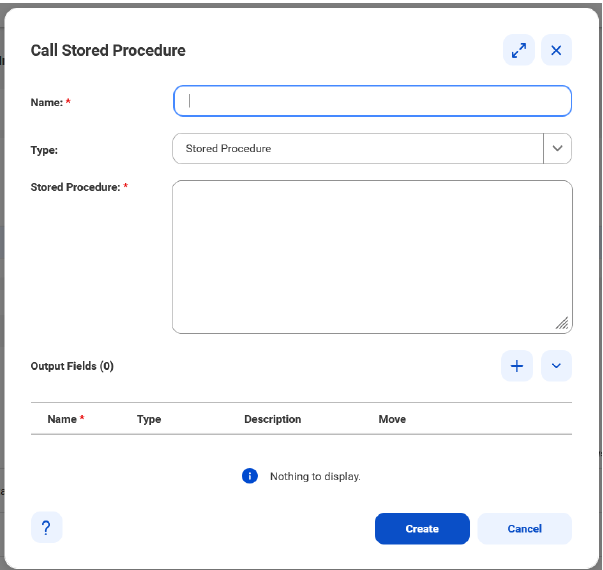
The Create SQL page gets renamed to Call Stored Procedure as shown in the following image:
5Iin the Stored Procedure field, enter the query in the following format:
<SQL statement> <stored procedure name>(?);
For example, enter the query as shown in the following sample:
CALL GetTotalSales(?)
Note:
The number of ? symbols that you provide in the Stored Procedure text box must match the number of output fields that you define in the Output Fields section. You can’t provide INOUT parameters in a stored procedure.
6In the Output Fields section, click +.
7Configure the following properties for each output field:
- Name. The name of the output field.
- Type. The type of the output field.
- Move. Click the arrows adjacent to the output field to move the field a level up or down in the Stored Procedure table.
8Select the column case.
9Enter the maximum number of rows returned by the SQL query that can be displayed in the SQL response payload.
10Enter the maximum length of time in seconds that a database client can wait for a response from the database before timing out the session.
11Click Create.
The following image shows the Call Stored Procedure page with sample values provided for a stored procedure:
In the above example, the user has entered the following query in the Stored Procedure field:
CALL GetTotalSales(?);
The corresponding output field is provided in the Output Fields section. This output field is then mapped to the output field of the service connector on the Output tab of the data access service connector properties page as shown in the following image:
The following snippet shows a sample response in the output when the CALL GetTotalSales(?) stored procedure is run:
Perform the following steps to add and edit SQL queries:
1On the SQL Binding tab, click the + icon to add an SQL entry.
An SQL entry is added to the table.
2Click the Edit icon to edit the SQL query.
The Create SQL page appears. The following image shows the Create SQL page where you can configure multiple SQL queries:
3In the Create SQLpage, configure the SQL query properties such as the SQL name, SQL query, column case of the query, query type, maximum rows, and maximum wait time.
You can use SQL queries to perform various data manipulation operations such as SELECT, INSERT, DELETE, and UPDATE. You can parameterize an input field in an SQL query. Use the following syntax to parameterize an input field at run time:
'{$<input_field_name>}'
For example, if empId is the name of an input field, enter the following SQL query to parameterize the empId field:
select * from employee.contact where id = '{$empid}'
4Click Create.
SQL query response format
In a data access service connector, the XML response for single and multiple SQL queries begins with the multiDataAccessResponse tag.
The following sample snippet shows the format as the process or data access service output:
Use the Output tab to define how the data access service connector must parse data returned from the database.
The following image shows the Output tab:
For each output data item, specify the following properties:
•Name: The name of a field into which a returned value is placed.
•Type: The data type of the value being written to the field. If the type is Object List or Reference, Process Designer displays a list of process objects from which you can choose one of the objects defined within the Process Objects tab.
•Description: Enter a description of the output field.
•Get From: Select one of the following options:
- Column: To enter a column name (which is the column name in the database table used within the output returned by the database) to be placed within the output field.
- Expression: To write an expression to parse the output returned by the database. Click f(x) to open the Expression Editor where you can type the expression.
- Result Set: To assign the complete contents of the response from the database to the output field.
- Entire Response As Attachment: To handle the entire response as an attachment.
- Attachments: To work with multiple attachments and pass the entire list of attachments to the selected variable except the part used as the payload.
Creating Process Objects
On the Process Objects tab, you can define one or more process objects for a data access service connector to group data and create a structured object. When defined in the data access service connector, the process objects are available to processes that use the data access service connector. For example, if a database returns demographic information such as name, address, and phone number, you might create a single demographic process object that contains this information.
You can associate each process object with one or more of the data elements returned by the database using the Actions/Output tab.
To create data access service connector process objects, perform the following steps:
1Create or open an existing data access service connector.
2Click the Process Objects tab.
3Click + to add a new process object or select an existing process object from the list. Each process object appears as a line item on the tab.
The following image shows the Process Objects tab:
4On the Properties tab, specify the following details for each process object:
- Name: Enter a name that identifies the process object. This name appears in the lists where the process object is available for selection. This is a required field.
- Description: Enter a description for the process object.
5On the Fields tab, specify the following details for each process object:
- Field Name: Enter a name for each field in the process object.
- Type: Select the data type of the value being written to the field using one of the built-in data types such as Text, Integer, or Date Time. If the type is Object List, you also select a process object.
- Required: Select this check box to set the field as a required field.
A required field must be included in the request payload. It can contain a value, be empty, or be null.
- Nullable: Clear this check box if the field must not accept null values. By default, the Nullable check box is selected.
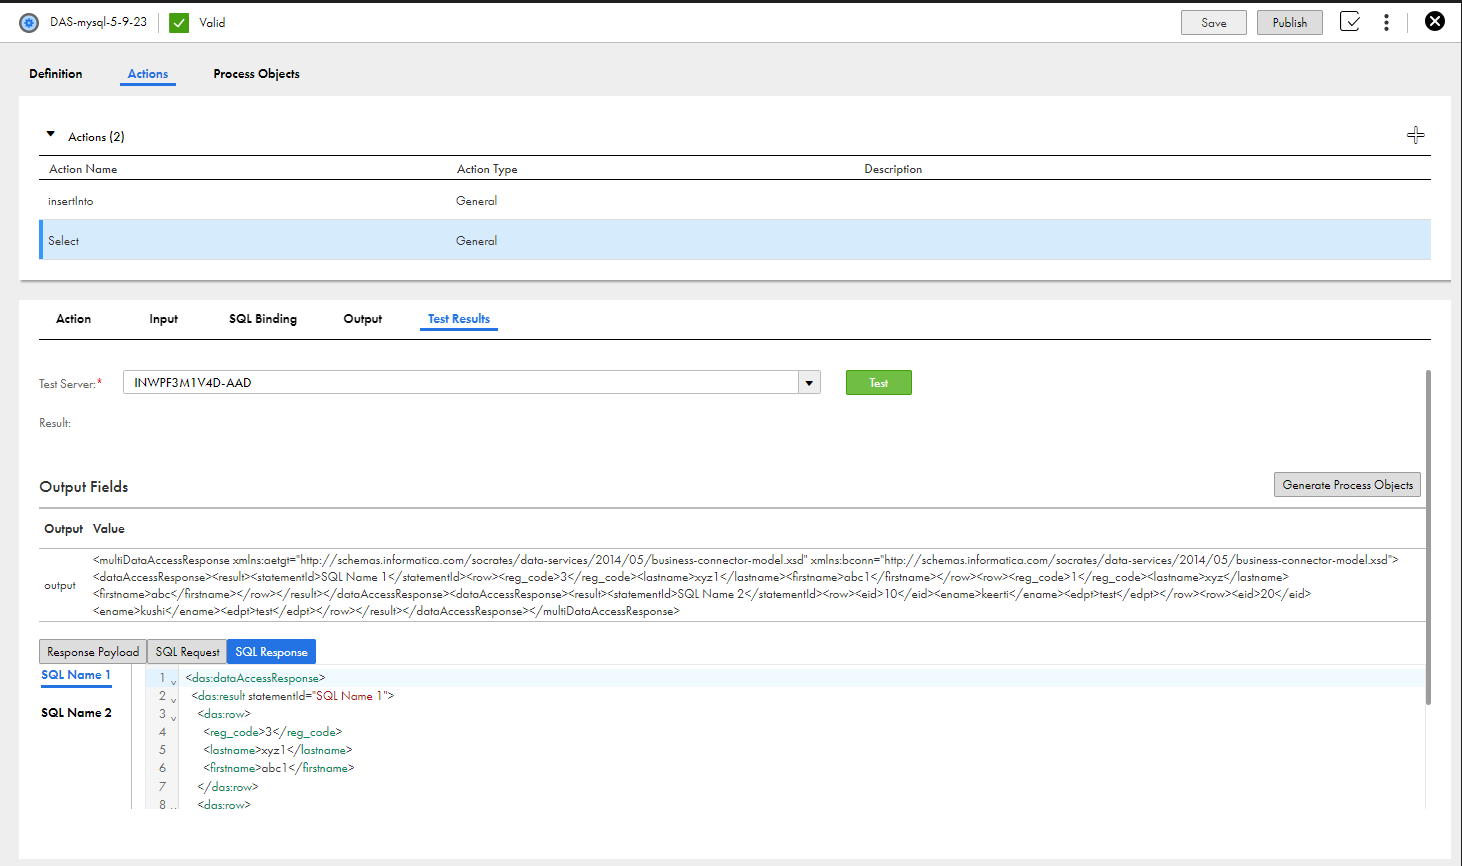
Testing the data access service connector
When you use the data access service connector editor, click Test to send a request to the database and display the response data on the Test Results tab:
•Generate Process Objects: Click to see the process objects that you have defined for the data access service connector.
•Result: Displays the status of the test.
Note:
Sometimes, a request made to the Databricks database might display a timeout error due to system latency or slow execution. Increase the value in theMax Wait (ms) field to avoid the request timeout.
•Output and Value: Shows the data returned from the database that is assigned to the fields defined on the Output tab.
•Response Payload: Shows the payload sent to Process Designer from the database (not the full response sent by the database).
•SQL Request: Shows the data sent to the database from the data access service connector. The tab displays a list of SQL names on the left pane and the corresponding data on the right pane.
•SQL Response: Shows all of the data sent back to the data access service connector from the database (whereas the response payload is only a portion of the returned data). The tab displays a list of SQL names on the left pane and the corresponding data on the right pane.
Note:
The SQL Response section displays hexadecimal values for the characters that are not allowed in XML.
If the response includes one or more attachments, you can also download the attachments.
The Response Payload and SQL Response sections show a maximum of 10,000 records. You can't specify a limit greater than 10,000 on the SQL Binding tab.
Note:
If you had configured OAuth 2.0 authentication for a service connector, the test action uses the OAuth token received from the initial authentication process. When a service call is executed at run time, before making a request, the token is automatically refreshed in the application connection on a need basis.
The following image shows the Test Results tab:
Generate Process Objects
A process object is usually tied to a specific set of elements. You may sometimes have a large number of identical objects, each of which applies to one set of elements. For example, when you define the data being returned, you create a process object whose sole purpose is to define a subset of returned data. These objects are non-reusable and can only be used by a single process object field. The object names are also the name of a field.
You can also create objects that are reusable. For example, the refType element in NetSuite has two fields: a name and an internalID. Instead of creating many objects, each of which contains these two fields, you can create a single, reusable process object.
1Click Generate Process Objects to show the process objects that you have defined for the data access service connector.
2Select the process objects that you want to make reusable and then click Next.
Process Designer displays a list of generated process objects.
3Click Finish.
Metadata parameters in response payload
To view the metadata details for a specific app connection, use the metadata parameter. The output includes contextual information about a piece of data or a data set that is stored alongside the data.
Use the following URI to view the metadata details for an app connection:
The following sample snippet shows the format of the response payload:
To successfully fetch the metadata from a database that contains a large number of tables, filter the tables by using the Include Tables or Exclude Tables field when you define the connection properties in the app connection.
OData expand parameter in response payload
After you publish an app connection, you can use the OData expand parameter to perform nested queries on the data. You can query up to one level of a navigation property in a service call.
Use the following URI with the OData expand parameter:
The following sample snippet shows the output of the expand query:
Rules and guidelines for Databricks
Consider the following rules and guidelines when you use a data access service connector to connect to a Databricks database:
•You can't use stored procedures in a data access service connector that connects to a Databricks database.
•Some requests to Databricks databases might time out randomly due to system latency or slow execution. Increase the value in the Max Wait (ms) field to avoid the request timeouts.