Using Salesforce System Services Listeners and Connectors
Salesforce Outbound Messages
Use a Salesforce outbound message (OBM) to trigger an Application Integration process.
For example, design an OBM such that a change to the Account Salesforce object triggers the CreateNewID process.
To create a Salesforce OBM, perform the following tasks:
1Download and install the Informatica Cloud Real Time for Salesforce package (the 'managed package'). For more information, see the Installing the Salesforce Managed Package topic in the Salesforce Managed Package section.
2Log in to Informatica Intelligent Cloud Services℠ and open the Application Integration service.
3Create and publish the process you want the Salesforce OBM to trigger.
4Log in to your Salesforce developer account and create a Salesforce OBM.
Salesforce OBM URL
When you invoke a process through a Salesforce OBM, Salesforce sends a message to a specific endpoint called the Salesforce OBM URL.
To view the Salesforce OBM URL for a process, perform the following steps:
1In Application Integration, create a Salesforce connection and suffix the connection name with 'Salesforce'.
For example, name the connection 'AccountDetails-Salesforce' or 'TestSalesforce' and perform steps 2 through 5 to see the Salesforce OBM URL.
Note: You cannot view the Salesforce OBM if you use 'Salesforce' anywhere else in the name except at the end.
2Save and publish the Salesforce connection.
3Create, save, and publish a process that uses the Salesforce connection..
4From the Explore page or from the Process Designer page of the process, click Actions > Properties.
5In the Properties window that appears, click the Process Properties tab to view the Salesforce OBM URL.
The following image shows a sample Process Properties tab with a Salesforce OBM URL visible:
Creating a Salesforce OBM
To create a Salesforce OBM, log in to your Salesforce developer account, create a workflow rule, and then define an OBM.
Before you create a Salesforce OBM to trigger an Application Integration process, you must perform the following tasks:
•Install the managed packaged in the Salesforce organization in which you want to create an OBM.
•Create and publish the Application Integration process you want the Salesforce OBM to trigger.
1Log in to your Salesforce developer account.
2Go to Create > Workflow & Approvals > Workflow Rule.
3Click New Rule.
4On the New Workflow Rule page, select the object you want the rule to apply to and then click Next.
5On the Configure Workflow Rule page, enter a rule name and description, set evaluation and rule criteria, and then click Save & Next.
6Go to Add Workflow action > New Outbound Message.
7On the Configure Outbound Message page, enter the required information, including the Endpoint URL. See the Salesforce OBM URL topic for information on how to obtain the Endpoint URL.
8Click Save.
The Salesforce OBM creation is complete. The Salesforce OBM you created triggers an Application Integration process according to the criteria you set.
For detailed information about configuring a Salesforce OBM, see the Salesforce documentation.
Configuring OBMs from multiple Salesforce organizations to single IICS organization
The Salesforce Managed Package uses a single sign-on mechanism by default. There must be a one-to-one relationship between a Salesforce organization and the corresponding Informatica Cloud organization. However, you might want to have more than one Salesforce organization generate OBMs intended for specific processes that run in a single Informatica Cloud organization.
To do this, configure Salesforce OBMs with the authType query parameter. The authType parameter represents the type of authorization to use and establish a relationship between an Informatica Cloud organization and multiple Salesforce organizations through the configuration of user accounts.
Note: You cannot use the authType parameter to have multiple Salesforce organizations use the same process. There must be a one-to-one relationship between the Salesforce organization and the specific process to which you are sending an OBM.
To enable the Salesforce OBM with the authType query parameter, perform the following steps:
1For each Salesforce organization that will send OBMs, create a dedicated Salesforce user account. Ensure that the Informatica Cloud Real Time for Salesforce managed package is installed in these organizations. However, you do not need to configure the package and provide an Informatica Cloud Real Time Host URL.
2To associate the Salesforce user with a specific Informatica Cloud user, perform the following steps:
aLog in to Informatica Intelligent Cloud Services (IICS), and select Administrator > Users.
bNavigate to the Informatica Cloud user that you want to associate with the Salesforce user.
cIn the Salesforce User Name and Confirm Salesforce User Name fields, enter the user name that you created in Step 1.
3Configure OBMs in Salesforce to use the authType=ICSUser query parameter. This parameter indicates the type of authorization to use when validating the Salesforce session ID and session URL in Informatica Cloud. The query parameter is a literal value. For example, you can use the following URL:
Note: You can use the authType parameter only for processes.
4In the Salesforce Outbound Message definition, perform the following steps:
aEnter the Salesforce user name in the User to send as field. This is the user name that is used while sending the message.
bSelect Include Session ID.
cAt run time, verify that the user name mentioned in step 4a matches with the Salesforce user name entered in step 2c, and the process must exist in the organization.
Note: If you use the authType=ICSUser query parameter, only one user per Salesforce organization is allowed to send the OBM. A different Salesforce user can have a corresponding user in the Informatica Cloud organization with all user roles, but any OBM sent from this user will not trigger any process. In the OBM Monitoring page in Salesforce, you see the HTTP error 403 Forbidden for the OBMs sent from a newly created user. The OBM might trigger the same process or a different process.
Configuring OBMs from a single Salesforce organization to different IICS organizations
You can use a single Salesforce account to run different processes in different Informatica Intelligent Cloud Services (IICS) organizations.
Consider that you have a Salesforce account S, and you want to trigger process A created in IICS organization A and process B created in IICS organization B using the same Salesforce account.
Use the Salesforce account S to trigger process A in IICS organization A
1Log in to the Salesforce account S and install the Informatica Cloud Real Time for Salesforce package. The managed package connects your Informatica Intelligent Cloud Services and Salesforce accounts.
2In the Guide Setup page, enter the Informatica Cloud Application Integration Host URL in the following format:
<POD-specific Cloud Application URL for Salesforce>,<Informatica Organization ID>
3Create a Salesforce connection.
4Log in to your Salesforce developer account and create a workflow rule to apply a Salesforce object. Create a Salesforce OBM to invoke process A in IICS organization A.
5Trigger the workflow rule.
Process A in IICS organization A is triggered using the Salesforce account S.
Use the Salesforce account S to trigger process B in IICS organization B
1Log in to IICS, and select Administrator > Users > Add User and create a new user in IICS organization B with Salesforce authentication as shown in the following image:
You will receive an email containing the user name and verification code to activate the user account.
Note: The user name must be the same as the Salesforce account user name, that is, S.
2Log in to the Salesforce organization S. To install a new Salesforce managed package, access the following URL:
After the installation is complete, the installed managed package appears under Installed Packages as shown in the following image:
3Click All Tabs at the top of the page.
The Integration tab appears on the All Tabs page as shown in the following image:
4Click the Integration tab, and then click Single Sign-On.
You are redirected to https://dm-us.informaticacloud.com URL and the IICS user verification page appears as shown in the following image:
Note: To verify Single Sign-On, the Salesforce user account must exist at any Point of Deployment (POD) within the https://dm-us.informaticacloud.com URL.
5Enter the verification code that you received in the email.
After successful verification, you are redirected to the IICS account.
6Use the Salesforce account S to create a workflow rule to apply a Salesforce object. Create an OBM to invoke process B in IICS organization B. Configure an OBM in Salesforce to use the authType=ICSUser query parameter. This parameter indicates the type of authorization to use when validating the Salesforce session ID and session URL in Informatica Cloud. For example, you can use the following URL:
Note: You can use the authType parameter only for processes.
7Trigger the workflow rule.
Process B in IICS organization B is also triggered using the same Salesforce account S.
For information about installing the Salesforce managed package, see Salesforce and Application Integration.
Using a Salesforce Connection
If you are using the Salesforce Managed Package, the Salesforce Connector allow you to define a connection to your Salesforce organization using one of these authentication methods:
•OAuth Connection
•OAuth JSON Web Token (JWT) Connection
•Password/Security Token Authentication
When you create a new Salesforce connection, choose the Authentication Type and provide the related connection properties.
Application Integration supports version 56.0 of the Salesforce API for password and OAuth based authentication when you create a new Salesforce connection. Version 56.0 offers various data objects and metadata types.
OAuth Connection
Salesforce supports OAuth to allow access to Salesforce.com through its API. OAuth is a standard protocol that allows secure API authorization. With OAuth, users do not need to disclose their Salesforce credentials and the Salesforce administrator can revoke the consumer's access at any time.
Application Integration supports version 56.0 of the Salesforce API for password and OAuth based authentication when you create a new Salesforce connection. Version 56.0 offers various data objects and metadata types. For example, you can use the ContactPointAddress object that represents a contact's billing or shipping address corresponding to an individual account.
Note: To use the various data objects and metadata types offered by Salesforce API version 56.0 for a Salesforce app connection, you must upgrade the managed package that is installed in Salesforce. For more information about Salesforce objects and services, see Salesforce Connector Guide.
To enable OAuth as the authentication type for a Salesforce connection, perform the following steps:
1In Application Integration, click New.
2In the New Asset dialog box, click App Connections > Create. The AppConnection page appears.
3In the Authentication section, select OAuth from the list.
4Enter the production or test URL as instructed on the screen for these required fields:
- Authorization URL. Salesforce provides a dedicated URL that handles authorization. Enter the URL for either the production or test environment to access with this connection.
- Token Request URL. Salesforce provides a dedicated URL that handles token requests. Enter the URL for either the production or test environment to access with this connection.
5In the Session Duration box, enter the number of minutes for which you want to maintain each session that was opened for this connection. Default is 60 minutes.
6Click Authorize to start the authorization process.
Note: To successfully launch the authorization process, pop-ups must be enabled in your browser. After you start the authorization process, you can cancel it prior to completion by closing the dialog box. In this case, the previous state (authorized or not authorized) is unchanged.
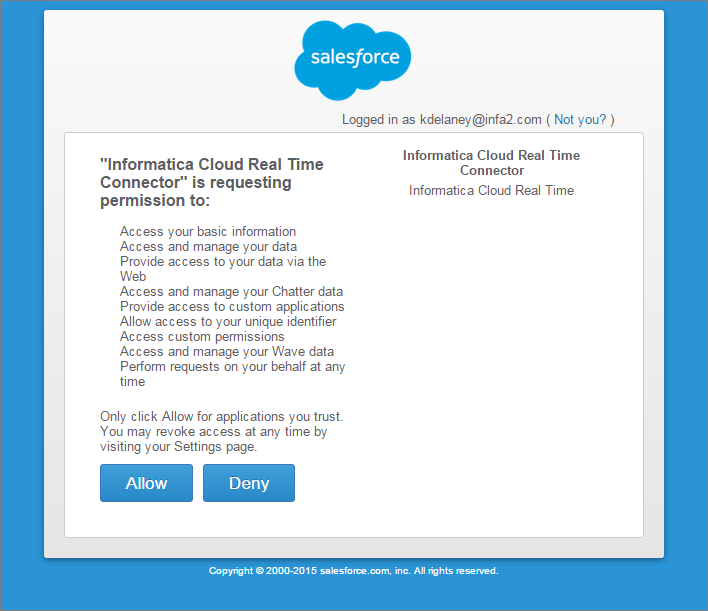
7If prompted, enter the user name and password in the Salesforce login page and click Log In to Salesforce. After your login is validated, the following page appears:
8Click Allow to complete the authorization. In the Salesforce connection properties, an Authorization Status message appears. The message includes the name of the last user who authorized the connection and the time of authorization.
Note: You must complete the authorization process within 3 minutes. Otherwise, the process times out. If that occurs, return to the connection properties and click Authorize again.
The authorization remains active as long as the connection is published, provided that the OAuth access was not revoked in Salesforce. After a session expires, it is automatically renewed in the background.
Salesforce Connected App Settings
Depending on the type of OAuth access enabled by the Salesforce administrator, you might be able to self-authorize or have pre-authorization. That option is determined by the Salesforce Connected App settings shown in the following image:
To learn more, refer to the Salesforce documentation.
OAuth JWT Connection
You can configure OAuth JSON Web Token (JWT) authentication in a Salesforce connection to connect to Salesforce.
Use OAuth JWT authentication to authorize servers to access data without logging in each time the servers exchange information. The OAuth JWT authentication uses a certificate to sign the JWT request and does not require explicit user interaction.
When you choose the OAuth JWT authentication type, configure the following properties:
•User Name. The Salesforce user name that has access to the connected app.
•Keystore File. The keystore file of the PKCS12 format.
•Keystore Password. The password to access the keystore file.
•Session Duration. The number of minutes after which the session expires.
•Consumer Key. The consumer key associated with the Salesforce connected app.
•Token Request URL. The OAuth token request URL.
•Audience. The authorization server URL of the intended audience for the token.
For more information about the OAuth JWT authentication in a Salesforce connection, see Salesforce Connector Guide.
Password/Security Token Authentication
When you choose the Password authentication type, you supply these properties:
• User Name: The username, for API access, to be used for the connection.
• Password: The password of the user associated with this connection.
• Security Token: The security token that provides this user with API access.
• Service URL: The Salesforce URL to use for the login. Be sure to specify the Soap/c WSDL (and not Soap/u).
At runtime, each connection is enabled based on the password and security token you provide.