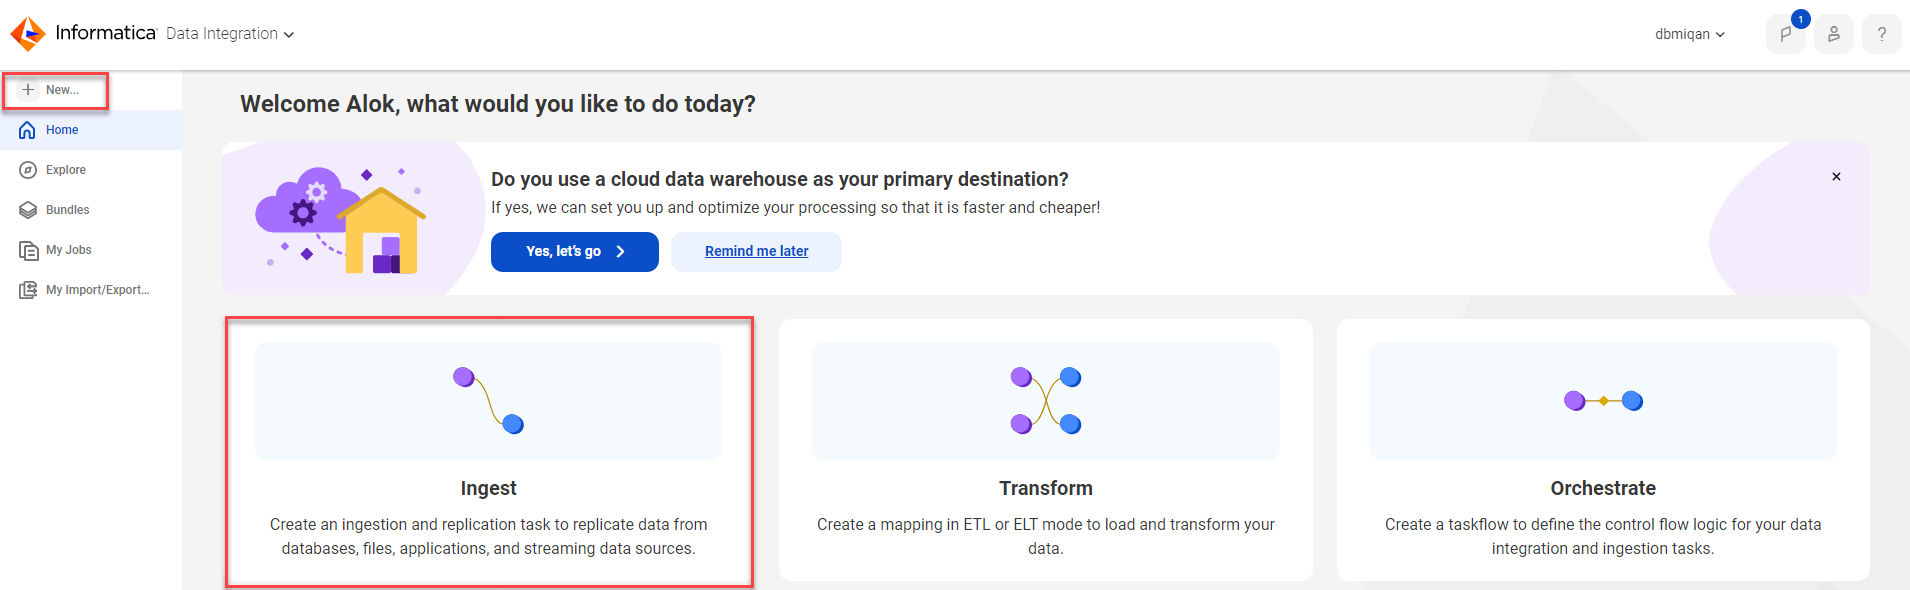
To configure application ingestion and replication tasks, click the Ingest panel on the Home page and then complete the following configuration tasks in the task configuration wizard:
1Choose a runtime environment, if you haven't set up a default runtime environment.
2Select a destination connection, or configure a new connection.
3Select a source connection, or configure a new connection.
4Specify task details for the source and target.
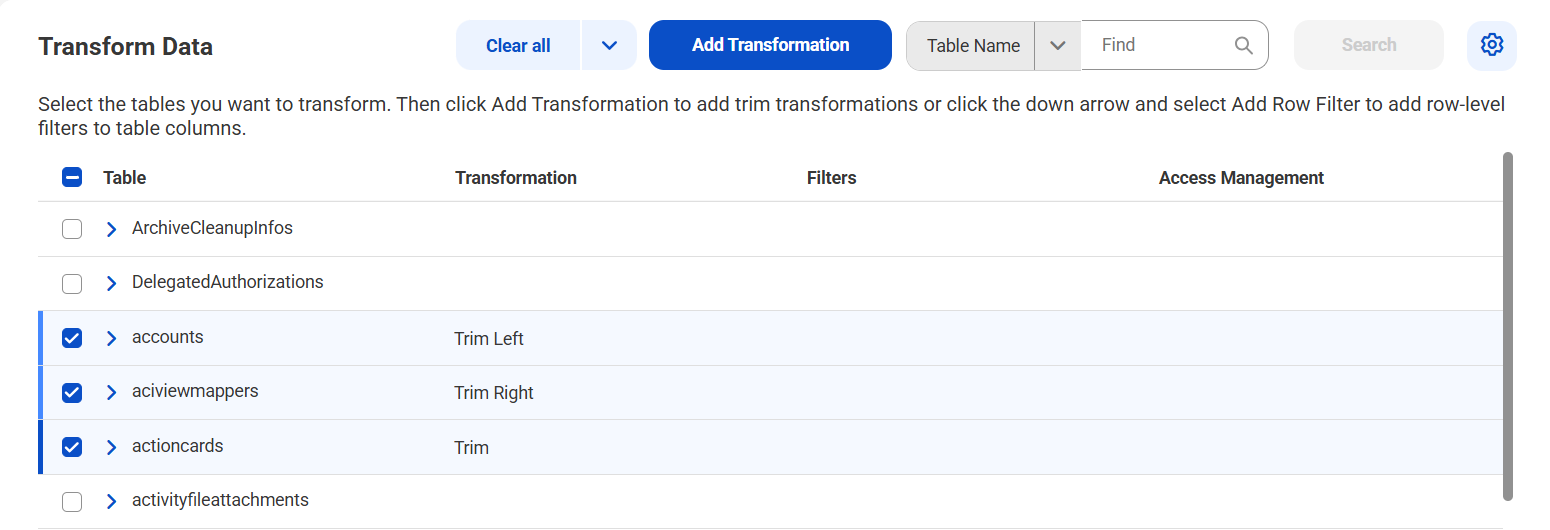
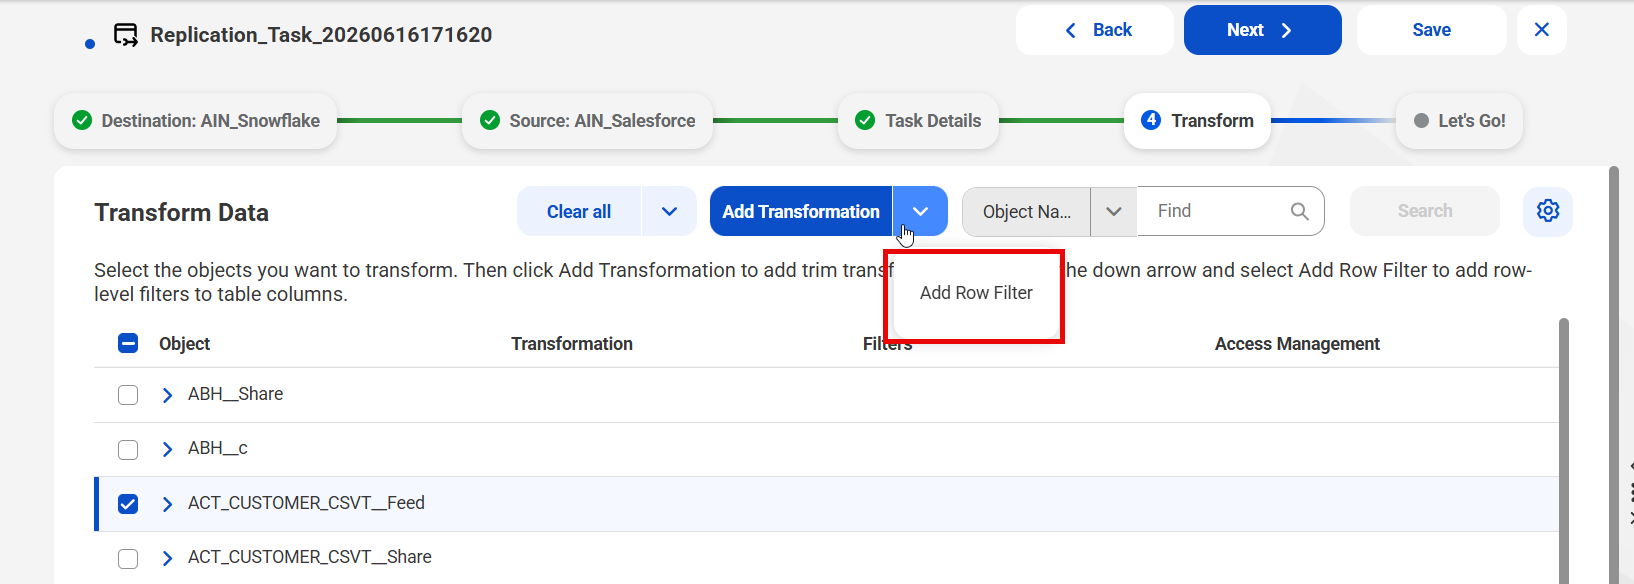
5Configure trim transformations (optional).
6Finalize the task definition by entering a task name, task definition location, runtime environment, and some optional properties. Then save the task..
Click Next or Back to navigate from one page to another. At any point, you can click Save to save the information that you have entered so far under a generated task name to the Default location in Explore. When you finalize the task definition, you can enter a custom task name and location.
After you complete all wizard pages, save the task definition. You can then click Deploy to make the task available as an executable job instance to the Secure Agent.
Before you begin
Before you configure an application ingestion and replication task, complete the following prerequisite tasks in Administrator:
•Verify that the Secure Agent in your runtime environment is running and you can access the Data Ingestion and Replication service.
•Define the source and target connections.
Starting the ingestion and replication task wizard
If the latest task wizard is enabled for your organization, you can start the wizard from the Home page.
Start the wizard in one of the following ways:
•Click the Ingest panel. Then in the Ingestion and Replication Tasks dialog box, select Application Ingestion and Replication Task or Database Ingestion and Replication Task.
•In the navigation bar on the left, click New. Then in the New Asset dialog box, click Data Ingestion and Replication and select either Application Ingestion and Replication Task or Database Ingestion and Replication Task.
If you previously selected a primary cloud data warehouse and use this method to start the wizard, the wizard does not recognize the primary cloud data warehouse as the destination. You'll need to select a destination for the task.
Note:
File Ingestion and Replication and Streaming Ingestion and Replication use the pre-existing wizard.
Primary cloud data warehouse setup
From the Data Integration Home page, you can configure the primary cloud data warehouse destination where you normally load data.
When you do this, the application ingestion and replication tasks and database ingestion and replication tasks that you create in the new wizard are automatically configured to load data to this destination. You can still change the destination if you need to.
The cloud data warehouse that you choose applies to the organization that you're currently logged into. If you have access to multiple organizations, you can configure a different primary cloud data warehouse for each organization and sub-organization.
The setup steps vary based on whether you've already configured a primary cloud data warehouse. If you've already configured one, you can change or deselect it.
Configuring a primary cloud data warehouse
Configure a primary cloud data warehouse from the Home page.
1On the Home page, click Yes, let's go in the Do you use a cloud data warehouse as your primary destination? panel.
2On the Destination page, select your cloud data warehouse type, for example, Snowflake Data Cloud or Databricks Delta, and click Next.
3On the Connect page, select a connection, or click New and enter the connection properties.
4Click Connect.
Changing or unselecting a primary cloud data warehouse
If you’ve already configured a primary cloud data warehouse, you can change or unselect it. Change or unselect a primary cloud data warehouse from the Home page.
1On the Home page, click the cloud data warehouse type in the upper right corner and select Change primary cloud data warehouse.
2If you want to change your primary cloud data warehouse, select I have a primary cloud data warehouse.
3To change the cloud data warehouse type, complete the following steps:
aClick Change next to Type.
bOn the Destination page, select the data warehouse type, and then click Next.
cOn the Connect page, select a connection, or click New and enter the connection properties.
dClick Connect.
4To change the connection, complete the following steps:
aClick Change next to Connection.
bOn the Connect page, select a connection, or click New and enter the connection properties.
cClick Connect.
5If you no longer wish to use a primary cloud data warehouse, select I don’t have a primary cloud data warehouse, and click Save.
Choose a runtime environment
The first thing you must do after starting the task wizard is to select the runtime environment to use for retrieving the source and target metadata required to define the task. If you previously set a default runtime environment, this step is skipped.
Note:
A runtime environment must have previously been configured with one or more Secure Agents in Administrator.
1In the Choose Runtime Environment dialog box, select the runtime environment you want to use.
Select Set as default if you want to use this runtime environment as the default environment for all tasks you create. Otherwise, leave the check box cleared.
2Click OK.
Note:
When you finalize the task definition on the Let's Go page, you'll be prompted to enter the runtime environment for running the task. You can use this same runtime environment or select another one.
Configure the destination connection
On the Destination page, select an existing destination connection or add a new one.
This page displays boxes for destination connections that you previously defined from the task wizard or from Administrator.
Note:
To add a new connection from the Destination page of the new wizard, you must have previously created at least one connection in Administrator.
Perform one of the following actions:
•To select an existing connection, select the box for the destination connection that you want to use. Then click Next.
•To add a new connection, complete the following steps:
1Click New Connection.
2On the New Connection page > Destination tab, select the destination connection type. Then click Next.
3On the Configure tab, enter the connection properties. To help you complete this task, the embedded Setup help on the right describes each property. To enlarge it, drag the left edge.
4When done, click Test to check that the connection definition works.
5Click Add to save it.
The new connection appears on the Destination page.
6Select the box for the new connection and click Next.
After a connection has been chosent, its name is appended to the page name at the top: Destination: <connection_name>.
To manage your connections, go to Administrator.
Tip:
As you proceed through the wizard, you can click Save to save your task entries under the generated task name at the top of the page to the Default location. On the last page of the wizard, you'll be able to enter a custom name and location for the task.
Configure the source connection
On the Source page, select an existing source connection or add a new one.
Note:
To add a new connection from the Source page, you must have previously created at least one connection in Administrator.
Perform one of the following actions:
•To select an existing connection, select the box for the source connection that you want to use. Then click Next.
•To add a new connection, complete the following steps:
1Click New Connection.
2In the New Connection dialog box > Source tab, select the source connection type. Then click Next.
3On the Configure tab, enter the connection properties. To help you complete this task, the embedded setup help on the right describes each property. To enlarge it, drag the left edge.
4Click Test to check that the connection definition works.
5Click Add to save it.
The new connection appears on the Source page.
6Select the box for the new connection and click Next.
After a connection has been chosent, its name is appended to the page name at the top: Source: <connection_name>.
Task details: Configure how to replicate data from the source
In Step 1 of Task Details, configure the data source.
Under Source Properties, set the required basic source properties. Under Source Objects or Source Tables, select the source objects or tables from which to replicate data. Then under Advanced Source Properties, set optional advanced source properties as needed. See the property descriptions for your source type:
Define source properties for the source that you selected on the Source page.
Source Properties
Configure the basic source properties:
Property
Description
Load Type
Type of load operation that you want the application ingestion and replication task to perform. You can select one of the following load types for the task:
- Initial Load: Loads data read at a specific point in time from the source application to the target in a batch operation. You can perform an initial load to materialize a target to which incremental change data will be sent.
- Incremental Load: Propagates source data changes to a target continuously or until the job is stopped or ends. The job propagates the changes that have occurred since the last time the job ran or from a specific start point for the first job run.
- Initial and Incremental Load: Performs an initial load of point-in-time data to the target and then automatically switches to propagating incremental data changes made to the same source objects on a continuous basis.
Source Objects
Select the source objects from which you want to replicate data. Use one or both of the following methods:
•On the Selected Objects tab, individually select the check box for each source object you want to include. Clear the check box for any objects you do not want to include. To select all objects, select the Object check box at the top.
The Field count for an object shows the total number of fields in the object.
If you select the objects you want to include, all the selected and unselected objects are displayed by default. To view the selected objects only, use the filter next to the object selection count and change the view from All to Selected.
To find objects or fields, you can type all or part of a name in the Find box and click Search. This value is case-sensitive. If you type the beginning of a name only, a wildcard isn't required to represent the remainder. For example, CDC, CD, and CD* return the same results. However, if the search string is within the name, include the wildcard * at the beginning. For example, *CDC returns objects and fields that include CDC anywhere in their names. To narrow the search to only object names or field names, select Object Name or Fields in the drop-down list adjacent to the Find box.
•On the Selection Rules tab, you can create inclusion and exclusion rules for objects.
To add an object rule, click the plus (+) sign in the upper right corner. In the Type field, select Include or Exclude as the rule type. Then enter a string, with or without wildcards, as the condition.
Tips:
- You can copy an existing object rule to use as a starting point for creating another rule. Click the copy icon at the right end of the row.
- You can edit an object rule directly in its row by clicking the Type or Match Condition value.
- To view the objects and fields that match a single rule, click View Objects in the row for the rule. For an Include rule, it shows the objects to be included. For an Exclude rule, it shows the objects to be excluded.
When you define a condition in a rule, use the following guidelines:
- The task wizard is case sensitive. Enter the object names or masks in the case with which they were defined.
- A mask can contain one or more wildcards. Supported wildcards are: an asterisk (*), which represents one or more characters, and a question mark (?), which represents a single character. A wildcard can occur multiple times in a mask value and can occur anywhere in the value.
- Delimiters such as quotation marks or brackets are not allowed, even if the source uses them.
- If an object name includes special characters such as a backslash (\), asterisk(*), dollar sign ($), caret (^), or question mark (?), escape each special character with a backslash (\) when you enter the rule.
Note:
If you define multiple object rules, they're processed in the order in which they're listed (top to bottom). Be sure to define them in the correct order of processing. For example, if an object rule specifies "Exclude CDC" followed by "Include C", all objects with names beginning with "C" are selected, including the CDC objects.
You can both manually select source objects and define selection rules. If you first manually select objects on the Selected Objects tab, rules are generated and displayed for those selections on the Selection Rules tab. Similarly, if you first define rules, any objects selected by those rules are displayed as selected on the Selected Objects tab.
Advanced Source Properties
To configure advanced source properties, toggle on Show Advanced Options at the top of the page. Advanced source properties are optional or have default values.
1Complete the following optional advanced properties as needed:
Property
Description
List Objects by Rule Type
Generate and download a list of the source objects that match the object selection criteria.
If you used rule-based object selection, you can select the type of selection rules to use. Options are:
- Include Rules Only
- Exclude Rules Only
- Include And Exclude Rules
Select the Include Fields check box to include fields in the list, regardless of which object selection method you used.
Click the Download icon to download the list.
Start Date
For initial load and combined initial and incremental load jobs, specify the date and time when the ingestion job should start replicating the source data.
Initial Start Poing for Incremental Load
For incremental load jobs, specify the point in the source data stream from which the ingestion job associated with the application ingestion and replication task starts extracting change records.
Note:
You must specify the date and time in Coordinated Universal Time (UTC).
CDC Interval
For incremental load and combined initial and incremental load jobs, specify the time interval in which the application ingestion and replication job runs to retrieve the change records for incremental load. The default interval is 5 minutes.
2Under Custom Properties, you can enter one or more custom properties that Informatica provides to improve performance or to meet your special requirements. To add a property, click the + icon to add a row. In the Property Name field, select a property and then enter a property value, or select the Custom option and manually enter both the property name and value.
The following table describes the properties that are available, depending on the load type:
Property
Description
Read Event Batch Size
The number of payload events written in batch to the internal event queue during CDC processing.
When the event queue is implemented as an internal ring buffer, this value is the number of payload events that the reader writes to a single internal buffer slot.
Note:
A batch size that's too small might increase contention between threads. A larger batch size can provide for more parallelism but consume more memory.
Reader Helper Thread Count
The number of reader helper threads used during CDC processing to convert change data into a canonical format that can be passed to the target.
Default value is 3. You can enter a larger value to allow more threads to be available for performing conversion processing in parallel.
Custom
Select this option to manually enter the name of a property and its value. Use this option to enter properties that Informatica Global Customer Support or a technical staff member has provided to you for a special case.
Custom properties are intended to address performance or special processing needs. A property name can contain only alphanumeric characters and the following special characters: periods (.), hyphens (-), and underscores (_).
Tip:
To delete a custom property after you've entered it, click the Delete icon at the right end of the property row.
Click Next to proceed to Step 2 of Task Details.
Configure a Microsoft Dynamics 365 source
Define source properties for the source that you selected on the Source page.
Source Properties
Configure the basic source properties:
Property
Description
Load Type
Type of load operation that you want the application ingestion and replication task to perform. You can select one of the following load types for the task:
- Initial Load: Loads data read at a specific point in time from the source application to the target in a batch operation. You can perform an initial load to materialize a target to which incremental change data will be sent.
- Incremental Load: Propagates source data changes to a target continuously or until the job is stopped or ends. The job propagates the changes that have occurred since the last time the job ran or from a specific start point for the first job run.
- Initial and Incremental Load: Performs an initial load of point-in-time data to the target and then automatically switches to propagating incremental data changes made to the same source objects on a continuous basis.
Source Tables
Select the source tables from which you want to replicate data. Use one or both of the following methods:
•On the Selected Tables tab, individually select the check box for each source table you want to include. Clear the check box for any tables you do not want to include. To select all tables, select the Table check box at the top.
The Column count for a table shows the total number of columns in the table.
If you select the tables you want to include, all the selected and unselected tables are displayed by default. To view the selected tables only, use the filter next to the table selection count and change the view from All to Selected.
To find tables or columns, you can type all or part of a name in the Find box and click Search. This value is case-sensitive. If you type the beginning of a name only, a wildcard isn't required to represent the remainder. For example, CDC, CD, and CD* return the same results. However, if the search string is within the name, include the wildcard * at the beginning. For example, *CDC returns tables and columns that include CDC anywhere in their names. To narrow the search to only table names or column names, select Table Name or Columns in the drop-down list adjacent to the Find box.
•On the Selection Rules tab, you can create inclusion and exclusion rules for tables.
To add a table rule, click the plus (+) sign in the upper right corner. In the Type field, select Include or Exclude as the rule type. Then enter a string, with or without wildcards, as the condition.
Tips:
- You can copy an existing table rule to use as a starting point for creating another rule. Click the copy icon at the right end of the row.
- You can edit a table rule directly in its row by clicking the Type or Match Condition value.
- To view the tables and columns that match a single rule, click View Objects in the row for the rule. For an Include rule, it shows the objects to be included. For an Exclude rule, it shows the objects to be excluded.
When you define a condition in a rule, use the following guidelines:
- The task wizard is case sensitive. Enter the table names or masks in the case with which they were defined.
- A mask can contain one or more wildcards. Supported wildcards are: an asterisk (*), which represents one or more characters, and a question mark (?), which represents a single character. A wildcard can occur multiple times in a mask value and can occur anywhere in the value.
- Delimiters such as quotation marks or brackets are not allowed, even if the source uses them.
- If a table name includes special characters such as a backslash (\), asterisk(*), dollar sign ($), caret (^), or question mark (?), escape each special character with a backslash (\) when you enter the rule.
Note:
If you define multiple table rules, they're processed in the order in which they're listed (top to bottom). Be sure to define them in the correct order of processing. For example, if a table rule specifies "Exclude CDC" followed by "Include C", all tables with names beginning with "C" are selected, including the CDC tables.
You can both manually select source tables and define selection rules. If you first manually select tables on the Selected Tables tab, rules are generated and displayed for those selections on the Selection Rules tab. Similarly, if you first define rules, any tables selected by those rules are displayed as selected on the Selected Tables tab.
Advanced Source Properties
To configure advanced source properties, toggle on Show Advanced Options at the top of the page. Advanced source properties are optional or have default values.
1Complete the following optional advanced properties as needed:
Property
Description
List Tables by Rule Type
Generate and download a list of the source tables that match the table selection criteria.
If you used rule-based table selection, you can select the type of selection rules to use. Options are:
- Include Rules Only
- Exclude Rules Only
- Include And Exclude Rules
Select the Include Columns check box to include columns in the list, regardless of which table selection method you used.
Click the Download icon to download the list.
Initial Start Point for Incremental Load
For incremental load jobs, customize the position in the source logs from which the application ingestion and replication job starts reading change records the first time it runs.
Note:
You must specify the date and time in Coordinated Universal Time (UTC).
CDC Interval
For incremental load and combined initial and incremental load jobs, specify the time interval in which the application ingestion and replication job runs to retrieve the change records for incremental load. The default interval is 5 minutes.
2Under Custom Properties, you can enter one or more custom properties that Informatica provides to improve performance or to meet your special requirements. To add a property, click the + icon to add a row. In the Property Name field, select a property and then enter a property value, or select the Custom option and manually enter both the property name and value.
The following table describes the properties that are available, depending on the load type:
Property
Description
Read Event Batch Size
The number of payload events written in batch to the internal event queue during CDC processing.
When the event queue is implemented as an internal ring buffer, this value is the number of payload events that the reader writes to a single internal buffer slot.
Note:
A batch size that's too small might increase contention between threads. A larger batch size can provide for more parallelism but consume more memory.
Reader Helper Thread Count
The number of reader helper threads used during CDC processing to convert change data into a canonical format that can be passed to the target.
Default value is 3. You can enter a larger value to allow more threads to be available for performing conversion processing in parallel.
Custom
Select this option to manually enter the name of a property and its value. Use this option to enter properties that Informatica Global Customer Support or a technical staff member has provided to you for a special case.
Custom properties are intended to address performance or special processing needs. A property name can contain only alphanumeric characters and the following special characters: periods (.), hyphens (-), and underscores (_).
Tip:
To delete a custom property after you've entered it, click the Delete icon at the right end of the property row.
Click Next to proceed to Step 2 of Task Details.
Configure a NetSuite source
Define source properties for the source that you selected on the Source page.
Source Properties
Configure the basic source properties:
Property
Description
Load Type
Type of load operation that you want the application ingestion and replication task to perform. You can select one of the following load types for the task:
- Initial Load: Loads data read at a specific point in time from the source application to the target in a batch operation. You can perform an initial load to materialize a target to which incremental change data will be sent.
- Incremental Load: Propagates source data changes to a target continuously or until the job is stopped or ends. The job propagates the changes that have occurred since the last time the job ran or from a specific start point for the first job run.
- Initial and Incremental Load: Performs an initial load of point-in-time data to the target and then automatically switches to propagating incremental data changes made to the same source objects on a continuous basis.
Source Tables
Select the source tables and columns from which you want to replicate data. Use one or both of the following methods:
•On the Selected Tables tab, individually select the check box for each table and column you want to include. Clear the check box for any table and column you do not want to include. To select all tables and columns, select the Table check box at the top.
The Column count for a table shows the total number of columns in the table.
Note:
If you deselect one or more columns for a table, a minus (-) appears next to the table name in the list.
If you select the tables you want to include, all the selected and unselected tables are displayed by default. To view the selected tables only, use the filter next to the table selection count and change the view from All to Selected.
To find tables or columns, you can type all or part of a name in the Find box and click Search. This value is case-sensitive. If you type the beginning of a name only, a wildcard isn't required to represent the remainder. For example, CDC, CD, and CD* return the same results. However, if the search string is within the name, include the wildcard * at the beginning. For example, *CDC returns tables and columns that include CDC anywhere in their names. To narrow the search to only table names or column names, select Table Name or Columns in the drop-down list adjacent to the Find box.
•On the Selection Rules tab, you can create inclusion and exclusion rules for tables and columns.
- To add a table rule, click the plus (+) sign in the upper right corner. In the Type field, select Include or Exclude as the rule type. Then enter a string, with or without the wildcards, as the condition.
- To add a column rule for a table, click the plus (+) sign at the right end of the table row. In the Type field, select Include or Exclude as the rule type. Then enter a string, with or without the * wildcard, as the condition.
- Validate the rule. The validation warns if your rule excludes a primary key column.
Tips:
- You can copy an existing table rule to use as a starting point for creating another rule. Click the copy icon at the right end of the row.
- You can edit a table or column rule directly in its row by clicking the Type or Match Condition value.
- To view the tables and columns that match a rule, click View Objects in the row for the rule. For an Include rule, it shows the objects to be included. For an Exclude rule, it shows the objects to be excluded.
When you define a condition in a rule, use the following guidelines:
- The task wizard is case sensitive. Enter the table and column names or masks in the case with which they were defined.
- A mask can contain one or more wildcards. Supported wildcards are: an asterisk (*), which represents one or more characters, and a question mark (?), which represents a single character. A wildcard can occur multiple times in a mask value and can occur anywhere in the value.
- Delimiters such as quotation marks or brackets are not allowed, even if the source uses them.
- If a table or column name includes special characters such as a backslash (\), asterisk(*), dollar sign ($), caret (^), or question mark (?), escape each special character with a backslash (\) when you enter the rule.
Note:
If you define multiple table rules, they're processed in the order in which they're listed (top to bottom). Be sure to define them in the correct order of processing. For example, if a table rule specifies "Exclude CDC" followed by "Include C", all objects with names beginning with "C" are selected, including the CDC object.
You can both manually select tables and columns and define selection rules. If you first manually select tables and columns on the Selected Tables tab, rules are generated and displayed for those selections on the Selection Rules tab. Similarly, if you first define rules, any tables and columns selected by those rules are displayed as selected on the Selected Tables tab. Expand the table on the Selection Rules tab to view details of the rules applied to fields.
Advanced Source Properties
To configure advanced source properties, toggle on Show Advanced Options at the top of the page. Advanced source properties are optional or have default values.
1Complete the following optional advanced properties as needed:
Property
Description
List Tables by Rule Type
Generate and download a list of the source tables that match the table selection criteria.
If you used rule-based table selection, you can select the type of selection rules to use. Options are:
- Include Rules Only
- Exclude Rules Only
- Include And Exclude Rules
Select the Include Columns check box to include columns in the list, regardless of which table selection method you used.
Click the Download icon to download the list.
Initial Start Point for Incremental Load
For incremental load jobs, customize the position in the source logs from which the application ingestion and replication job starts reading change records the first time it runs.
Note:
You must specify the date and time in Greenwich Mean Time (GMT).
CDC Interval
For incremental load and combined initial and incremental load jobs, specify the time interval in which the application ingestion and replication job runs to retrieve the change records for incremental load. The default interval is 5 minutes.
Fetch Size
Enter the number of records that the application ingestion and replication job associated with the task reads at a time from the source. The default value is 5000.
2Under Custom Properties, you can enter one or more custom properties that Informatica provides to improve performance or to meet your special requirements. To add a property, click the + icon to add a row. In the Property Name field, select a property and then enter a property value, or select the Custom option and manually enter both the property name and value.
The following table describes the properties that are available, depending on the load type:
Property
Description
Read Event Batch Size
The number of payload events written in batch to the internal event queue during CDC processing.
When the event queue is implemented as an internal ring buffer, this value is the number of payload events that the reader writes to a single internal buffer slot.
Note:
A batch size that's too small might increase contention between threads. A larger batch size can provide for more parallelism but consume more memory.
Reader Helper Thread Count
The number of reader helper threads used during CDC processing to convert change data into a canonical format that can be passed to the target.
Default value is 3. You can enter a larger value to allow more threads to be available for performing conversion processing in parallel.
Custom
Select this option to manually enter the name of a property and its value. Use this option to enter properties that Informatica Global Customer Support or a technical staff member has provided to you for a special case.
Custom properties are intended to address performance or special processing needs. A property name can contain only alphanumeric characters and the following special characters: periods (.), hyphens (-), and underscores (_).
Tip:
To delete a custom property after you've entered it, click the Delete icon at the right end of the property row.
Click Next to proceed to Step 2 of Task Details.
Configure an Oracle Fusion Cloud source
Define source properties for the source that you selected on the Source page.
Source Properties
Configure the basic source properties:
Property
Description
Load Type
Type of load operation that you want the application ingestion and replication task to perform. You can select one of the following load types for the task:
- Initial Load: Loads data read at a specific point in time from the source application to the target in a batch operation. You can perform an initial load to materialize a target to which incremental change data will be sent.
- Incremental Load: Propagates source data changes to a target continuously or until the job is stopped or ends. The job propagates the changes that have occurred since the last time the job ran or from a specific start point for the first job run.
- Initial and Incremental Load: Performs an initial load of point-in-time data to the target and then automatically switches to propagating incremental data changes made to the same source objects on a continuous basis.
Oracle Fusion Replication Approach
Select one of the following replication approaches
- Select REST to extract data from various applications of Oracle Fusion such as ERP, SCM, HCM, Sales, and Services, and transfer data to the target.
- Select BICC (Business Intelligence Cloud Connector) to extract bulk data from the source to the target.
Oracle Fusion Application
Select the application from which you want to replicate data.
Source Objects
Select the source objects from which you want to replicate data. Use one or both of the following methods:
•On the Selected Objects tab, individually select the check box for each source object you want to include. Clear the check box for any objects you do not want to include. To select all objects, select the Object check box at the top.
The Field count for an object shows the total number of fields in the object.
If you select the objects you want to include, all the selected and unselected objects are displayed by default. To view the selected objects only, use the filter next to the object selection count and change the view from All to Selected.
To find objects or fields, you can type all or part of a name in the Find box and click Search. This value is case-sensitive. If you type the beginning of a name only, a wildcard isn't required to represent the remainder. For example, CDC, CD, and CD* return the same results. However, if the search string is within the name, include the wildcard * at the beginning. For example, *CDC returns objects and fields that include CDC anywhere in their names. To narrow the search to only object names or field names, select Object Name or Fields in the drop-down list adjacent to the Find box.
•On the Selection Rules tab, you can create inclusion and exclusion rules for objects.
To add an object rule, click the plus (+) sign in the upper right corner. In the Type field, select Include or Exclude as the rule type. Then enter a string, with or without wildcards, as the condition.
Tips:
- You can copy an existing object rule to use as a starting point for creating another rule. Click the copy icon at the right end of the row.
- You can edit an object rule directly in its row by clicking the Type or Match Condition value.
- To view the objects and fields that match a single rule, click View Objects in the row for the rule. For an Include rule, it shows the objects to be included. For an Exclude rule, it shows the objects to be excluded.
When you define a condition in a rule, use the following guidelines:
- The task wizard is case sensitive. Enter the object names or masks in the case with which they were defined.
- A mask can contain one or more wildcards. Supported wildcards are: an asterisk (*), which represents one or more characters, and a question mark (?), which represents a single character. A wildcard can occur multiple times in a mask value and can occur anywhere in the value.
- Delimiters such as quotation marks or brackets are not allowed, even if the source uses them.
- If an object name includes special characters such as a backslash (\), asterisk(*), dollar sign ($), caret (^), or question mark (?), escape each special character with a backslash (\) when you enter the rule.
Note:
If you define multiple object rules, they're processed in the order in which they're listed (top to bottom). Be sure to define them in the correct order of processing. For example, if an object rule specifies "Exclude CDC" followed by "Include C", all objects with names beginning with "C" are selected, including the CDC objects.
You can both manually select source objects and define selection rules. If you first manually select objects on the Selected Objects tab, rules are generated and displayed for those selections on the Selection Rules tab. Similarly, if you first define rules, any objects selected by those rules are displayed as selected on the Selected Objects tab.
Advanced Source Properties
To configure advanced source properties, toggle on Show Advanced Options at the top of the page. Advanced source properties are optional or have default values.
1Complete the following optional advanced properties as needed:
Property
Description
List Objects by Rule Type
Generate and download a list of the source objects that match the object selection criteria.
If you used rule-based object selection, you can select the type of selection rules to use. Options are:
- Include Rules Only
- Exclude Rules Only
- Include And Exclude Rules
Select the Include Fields check box to include fields in the list, regardless of which object selection method you used.
Click the Download icon to download the list.
Include Child Objects
Get the child object data of an object using an Oracle Fusion Cloud source. This applies only for the REST replication approach and for all load types only when the target is Google Big Query.
Initial Start Point for Incremental Load
For incremental load jobs, customize the position in the source logs from which the application ingestion and replication job starts reading change records the first time it runs.
Note:
You must specify the date and time in the time zone configured for the Oracle Fusion Cloud instance.
CDC Interval
For incremental load and combined initial and incremental load jobs, specify the time interval in which the application ingestion and replication job runs to retrieve the change records for incremental load. The default interval is 5 minutes.
Fetch Size
Enter the number of records that the application ingestion and replication job associated with the task reads at a time from the source. The default value is 50000.
Enable chunking
Select this checkbox to chunk data during the extraction process in an application ingestion and replication task.
Chunking applies to initial load tasks, and in the initial portion in combined initial and incremental load tasks that use the BICC replication approach. Chunking is not applicable for CDC tasks.
Options are:
- None. Extracts data as a whole without dividing it into chunks. Default is None.
- By Primary Key. Select this option to chunk data based on a numeric primay key. This option requires that your datastore contains a single numeric primary key column without Null values.
- By Creation Date. Select this option to divide data into chunks at intervals defined by the number of days for date range extraction. This option requires selection of the Is Creation Date option in the BICC Console for a column or columns in the column list, which represent the creation date.
Number of Rows
If you select the By Primary Key chunking option, specify the number of rows to chunk extracts. Enter a positive integer. Make sure that the combination of total rows and chunk size results in no more than 250 chunks. For example, if you have 2500 rows with a chunk size of 10, it results in 250 chunks, which is the maximum chunks allowed.
Number of Days
If you select the By Creation Date chunking option, enter the number of days to set the interval for data extraction. For example, if you specify 365 days, the data is divided into segments that each cover a 365-day period, starting from the initial date. To prevent performance issues, consider specifying a larger number of days for the interval.
2Under Custom Properties, you can enter one or more custom properties that Informatica provides to improve performance or to meet your special requirements. To add a property, click the + icon to add a row. In the Property Name field, select a property and then enter a property value, or select the Custom option and manually enter both the property name and value.
The following table describes the properties that are available, depending on the load type:
Property
Description
Read Event Batch Size
The number of payload events written in batch to the internal event queue during CDC processing.
When the event queue is implemented as an internal ring buffer, this value is the number of payload events that the reader writes to a single internal buffer slot.
Note:
A batch size that's too small might increase contention between threads. A larger batch size can provide for more parallelism but consume more memory.
Reader Helper Thread Count
The number of reader helper threads used during CDC processing to convert change data into a canonical format that can be passed to the target.
Default value is 3. You can enter a larger value to allow more threads to be available for performing conversion processing in parallel.
Custom
Select this option to manually enter the name of a property and its value. Use this option to enter properties that Informatica Global Customer Support or a technical staff member has provided to you for a special case.
Custom properties are intended to address performance or special processing needs. A property name can contain only alphanumeric characters and the following special characters: periods (.), hyphens (-), and underscores (_).
Tip:
To delete a custom property after you've entered it, click the Delete icon at the right end of the property row.
Click Next to proceed to Step 2 of Task Details.
Configure a Salesforce source
Define source properties for the source that you selected on the Source page.
Source Properties
Configure the basic source properties:
Property
Description
Load Type
Type of load operation that you want the application ingestion and replication task to perform. You can select one of the following load types for the task:
- Initial Load: Loads data read at a specific point in time from the source application to the target in a batch operation. You can perform an initial load to materialize a target to which incremental change data will be sent.
- Incremental Load: Propagates source data changes to a target continuously or until the job is stopped or ends. The job propagates the changes that have occurred since the last time the job ran or from a specific start point for the first job run.
- Initial and Incremental Load: Performs an initial load of point-in-time data to the target and then automatically switches to propagating incremental data changes made to the same source objects on a continuous basis.
Salesforce API
For initial load tasks and combined initial and incremental load tasks, select the type of Salesforce API that you want to use to retrieve the source data.
Options are:
- Standard (REST) API: Replicates source fields of Base64 data type. Informatica recommends that you use the Bulk API 2.0 unless you want to ingest fields of Base64 data type or objects that are not supported by Bulk API 2.0 during initial loading of data. All incremental load activities use only the standard REST API.
- Bulk API 2.0: Excludes replication of source fields of Base64 data type. Bulk API 2.0 is the default API for initial load tasks and the initial load of the combined initial and incremental load tasks.
- Bulk API: Uses Bulk API 1.0 for primary-key chunking to achieve parallel processing in Salesforce that optimizes the performance and speed of initial and combined initial and incremental load jobs. Use this option to handle large-scale data from Salesforce.
Note:
By default, incremental load tasks can capture and replicate change data from source fields of Base64 data type.
Source Objects
Select the source objects and fields from which you want to replicate data. Use one or both of the following methods:
•On the Selected Objects tab, individually select the check box for each source object and field you want to include. Clear the check box for any objects and fields you do not want to include. To select all objects and fields, select the Object check box at the top.
The Field count for an object shows the total number of fields in the object.
Note:
If you deselect one or more fields for an object, a minus (-) appears next to the object name in the list.
If you select the objects you want to include, all the selected and unselected objects are displayed by default. To view the selected objects only, use the filter next to the object selection count and change the view from All to Selected.
To find objects or fields, you can type all or part of a name in the Find box and click Search. This value is case-sensitive. If you type the beginning of a name only, a wildcard isn't required to represent the remainder. For example, CDC, CD, and CD* return the same results. However, if the search string is within the name, include the wildcard * at the beginning. For example, *CDC returns objects and fields that include CDC anywhere in their names. To narrow the search to only object names or field names, select Object Name or Fields in the drop-down list adjacent to the Find box.
•On the Selection Rules tab, you can create inclusion and exclusion rules for objects and fields.
- To add an object rule, click the plus (+) sign in the upper right corner. In the Type field, select Include or Exclude as the rule type. Then enter a string, with or without the wildcards, as the condition.
- To add a field rule for an object, click the plus (+) sign at the right end of the object row. In the Type field, select Include or Exclude as the rule type. Then enter a string, with or without the * wildcard, as the condition.
- Validate the rule. The validation warns if your rule excludes a primary key field.
Tips:
- You can copy an existing object rule to use as a starting point for creating another rule. Click the copy icon at the right end of the row.
- You can edit an object or field rule directly in its row by clicking the Type or Match Condition value.
- To view the objects and fields that match a single rule, click View Objects in the row for the rule. For an Include rule, it shows the objects to be included. For an Exclude rule, it shows the objects to be excluded.
When you define a condition in a rule, use the following guidelines:
- The task wizard is case sensitive. Enter the object and field names or masks in the case with which they were defined.
- A mask can contain one or more wildcards. Supported wildcards are: an asterisk (*), which represents one or more characters, and a question mark (?), which represents a single character. A wildcard can occur multiple times in a mask value and can occur anywhere in the value.
- Delimiters such as quotation marks or brackets are not allowed, even if the source uses them.
- If an object or field name includes special characters such as a backslash (\), asterisk(*), dollar sign ($), caret (^), or question mark (?), escape each special character with a backslash (\) when you enter the rule.
Note:
If you define multiple object rules, they're processed in the order in which they're listed (top to bottom). Be sure to define them in the correct order of processing. For example, if an object rule specifies "Exclude CDC" followed by "Include C", all objects with names beginning with "C" are selected, including the CDC object.
You can both manually select source objects and fields and define selection rules. If you first manually select objects and fields on the Selected Objects tab, rules are generated and displayed for those selections on the Selection Rules tab. Similarly, if you first define rules, any objects and fields selected by those rules are displayed as selected on the Selected Objects tab. Expand the object on the Selection Rules tab to view details of the rules applied to fields.
Advanced Source Properties
To configure advanced source properties, toggle on Show Advanced Options at the top of the page. Advanced source properties are optional or have default values.
1Complete the following optional advanced properties as needed:
Property
Description
List Objects by Rule Type
Generate and download a list of the source objects that match the object selection criteria.
If you used rule-based object selection, you can select the type of selection rules to use. Options are:
- Include Rules Only
- Exclude Rules Only
- Include And Exclude Rules
Select the Include Fields check box to include fields in the list, regardless of which object selection method you used.
Click the Download icon to download the list.
Initial Start Point for Incremental Load
For incremental load jobs, customize the position in the source logs from which the application ingestion and replication job starts reading change records the first time it runs.
Note:
You must specify the date and time in Greenwich Mean Time (GMT).
CDC Interval
For incremental load and combined initial and incremental load jobs, specify the time interval in which the application ingestion and replication job runs to retrieve the change records for incremental load. The default interval is 5 minutes.
Fetch Size
Enter the number of records that the application ingestion and replication job associated with the task reads at a time from the source. The default value for initial load operations is 50000 and the default value for incremental load operations is 2000.
Note:
For combined initial and incremental load tasks, you must specify the fetch size separately for initial load operations and incremental load operations.
Include Base64 Fields
Select this check box to replicate the source fields of Base64 data type.
Note:
- You can replicate the Base64 fields only if you select Standard (REST) API as the Salesforce API.
- Replication of Base64 data might slow down the initial load operation of the application ingestion and replication job.
Maximum Base64 Body Size
If you selected the Include Base64 Fields check box, specify the maximum body size in megabytes (MB) for Base64 encoded data.
Include Archived and Deleted Rows
For initial load and combined initial and incremental load jobs, select this check box to replicate the archived and soft-deleted rows from the source during the initial loading of data.
Enable Partitioning
For initial load and combined initial and incremental load tasks, select this check box to partition the source objects for initial loading.
Chunk Size
If you enable partitioning of source objects,enter the number of records to be processed in a single partition. Based on the chunk size, bulk jobs are created in Salesforce. The default value is 50000 and the minimum value is 100.
2Under Custom Properties, you can enter one or more custom properties that Informatica provides to improve performance or to meet your special requirements. To add a property, click the + icon to add a row. In the Property Name field, select a property and then enter a property value, or select the Custom option and manually enter both the property name and value.
The following table describes the properties that are available, depending on the load type:
Property
Description
Read Event Batch Size
The number of payload events written in batch to the internal event queue during CDC processing.
When the event queue is implemented as an internal ring buffer, this value is the number of payload events that the reader writes to a single internal buffer slot.
Note:
A batch size that's too small might increase contention between threads. A larger batch size can provide for more parallelism but consume more memory.
Reader Helper Thread Count
The number of reader helper threads used during CDC processing to convert change data into a canonical format that can be passed to the target.
Default value is 3. You can enter a larger value to allow more threads to be available for performing conversion processing in parallel.
Salesforce Max Parallel Partition
The maximum number of partition threads that can be used to query the source for data in parallel during initial load processing or the unload phase of combined jobs.
Use this property to control the number of source partition queries that can be executed against the source at the same time. For example, if a table contains data in 100 partitions, all 100 partitions are queried at the same time by default. However, you can use this property to reduce the number of concurrent queries.
Default value is equal to the total number of partitions.
Custom
Select this option to manually enter the name of a property and its value. Use this option to enter properties that Informatica Global Customer Support or a technical staff member has provided to you for a special case.
Custom properties are intended to address performance or special processing needs. A property name can contain only alphanumeric characters and the following special characters: periods (.), hyphens (-), and underscores (_).
Tip:
To delete a custom property after you've entered it, click the Delete icon at the right end of the property row.
Click Next to proceed to Step 2 of Task Details.
Configure a Salesforce Marketing Cloud source
Define source properties for the source that you selected on the Source page.
Source Properties
Configure the basic source properties:
Property
Description
Load Type
Initial Load: Loads data read at a specific point in time from the source application to the target in a batch operation. You can perform an initial load to materialize a target to which incremental change data will be sent.
MID
Enter the unique Member Identification code assigned to your Salesforce Marketing Cloud account.
Source Objects
Select the source objects from which you want to replicate data. Use one or both of the following methods:
•On the Selected Objects tab, individually select the check box for each source object you want to include. Clear the check box for any objects you do not want to include. To select all objects, select the Object check box at the top.
The Field count for an object shows the total number of fields in the object.
If you select the objects you want to include, all the selected and unselected objects are displayed by default. To view the selected objects only, use the filter next to the object selection count and change the view from All to Selected.
To find objects or fields, you can type all or part of a name in the Find box and click Search. This value is case-sensitive. If you type the beginning of a name only, a wildcard isn't required to represent the remainder. For example, CDC, CD, and CD* return the same results. However, if the search string is within the name, include the wildcard * at the beginning. For example, *CDC returns objects and fields that include CDC anywhere in their names. To narrow the search to only object names or field names, select Object Name or Fields in the drop-down list adjacent to the Find box.
•On the Selection Rules tab, you can create inclusion and exclusion rules for objects.
To add an object rule, click the plus (+) sign in the upper right corner. In the Type field, select Include or Exclude as the rule type. Then enter a string, with or without wildcards, as the condition.
Tips:
- You can copy an existing object rule to use as a starting point for creating another rule. Click the copy icon at the right end of the row.
- You can edit an object rule directly in its row by clicking the Type or Match Condition value.
- To view the objects and fields that match a single rule, click View Objects in the row for the rule. For an Include rule, it shows the objects to be included. For an Exclude rule, it shows the objects to be excluded.
When you define a condition in a rule, use the following guidelines:
- The task wizard is case sensitive. Enter the object names or masks in the case with which they were defined.
- A mask can contain one or more wildcards. Supported wildcards are: an asterisk (*), which represents one or more characters, and a question mark (?), which represents a single character. A wildcard can occur multiple times in a mask value and can occur anywhere in the value.
- Delimiters such as quotation marks or brackets are not allowed, even if the source uses them.
- If an object name includes special characters such as a backslash (\), asterisk(*), dollar sign ($), caret (^), or question mark (?), escape each special character with a backslash (\) when you enter the rule.
Note:
If you define multiple object rules, they're processed in the order in which they're listed (top to bottom). Be sure to define them in the correct order of processing. For example, if an object rule specifies "Exclude CDC" followed by "Include C", all objects with names beginning with "C" are selected, including the CDC objects.
You can both manually select source objects and define selection rules. If you first manually select objects on the Selected Objects tab, rules are generated and displayed for those selections on the Selection Rules tab. Similarly, if you first define rules, any objects selected by those rules are displayed as selected on the Selected Objects tab.
Advanced Source Properties
To configure advanced source properties, toggle on Show Advanced Options at the top of the page. Advanced source properties are optional or have default values.
1Complete the following optional advanced properties as needed:
Property
Description
List Objects by Rule Type
Generate and download a list of the source objects that match the object selection criteria.
If you used rule-based object selection, you can select the type of selection rules to use. Options are:
- Include Rules Only
- Exclude Rules Only
- Include And Exclude Rules
Select the Include Fields check box to include fields in the list, regardless of which object selection method you used.
Click the Download icon to download the list.
Batch Size
Enter the number of records that the application ingestion and replication job associated with the task reads at a time from the source. Default is 2500.
2Under Custom Properties, you can enter one or more custom properties that Informatica provides to improve performance or to meet your special requirements. To add a property, click the + icon to add a row. In the Property Name field, select a property and then enter a property value, or select the Custom option and manually enter both the property name and value.
Custom properties are intended to address performance or special processing needs. A property name can contain only alphanumeric characters and the following special characters: periods (.), hyphens (-), and underscores (_).
Tip:
To delete a custom property after you've entered it, click the Delete icon at the right end of the property row.
Click Next to proceed to Step 2 of Task Details.
Configure an SAP source that uses the SAP OData V2 connector
Define source properties for the source that you selected on the Source page.
Source Properties
Configure the basic source properties:
Property
Description
Load Type
Type of load operation that you want the application ingestion and replication task to perform. You can select one of the following load types for the task:
- Initial Load: Loads data read at a specific point in time from the source application to the target in a batch operation. You can perform an initial load to materialize a target to which incremental change data will be sent.
- Incremental Load: Propagates source data changes to a target continuously or until the job is stopped or ends. The job propagates the changes that have occurred since the last time the job ran or from a specific start point for the first job run.
- Initial and Incremental Load: Performs an initial load of point-in-time data to the target and then automatically switches to propagating incremental data changes made to the same source objects on a continuous basis.
OData Service Name
Select the OData service endpoint from where you want to retrieve data.
The list contains a specific SAP service or a list of all available services on the SAP Gateway based on the service type you specified in the SAP OData V2 connection.
Source Tables
Select the source tables from which you want to replicate data. Use one or both of the following methods:
•On the Selected Tables tab, individually select the check box for each source table you want to include. Clear the check box for any tables you do not want to include. To select all tables, select the Table check box at the top.
The Column count for a table shows the total number of columns in the table.
If you select the tables you want to include, all the selected and unselected tables are displayed by default. To view the selected tables only, use the filter next to the table selection count and change the view from All to Selected.
To find tables or columns, you can type all or part of a name in the Find box and click Search. This value is case-sensitive. If you type the beginning of a name only, a wildcard isn't required to represent the remainder. For example, CDC, CD, and CD* return the same results. However, if the search string is within the name, include the wildcard * at the beginning. For example, *CDC returns tables and columns that include CDC anywhere in their names. To narrow the search to only table names or column names, select Table Name or Columns in the drop-down list adjacent to the Find box.
•On the Selection Rules tab, you can create inclusion and exclusion rules for tables.
To add a table rule, click the plus (+) sign in the upper right corner. In the Type field, select Include or Exclude as the rule type. Then enter a string, with or without wildcards, as the condition.
Tips:
- You can copy an existing table rule to use as a starting point for creating another rule. Click the copy icon at the right end of the row.
- You can edit a table rule directly in its row by clicking the Type or Match Condition value.
- To view the tables and columns that match a single rule, click View Objects in the row for the rule. For an Include rule, it shows the objects to be included. For an Exclude rule, it shows the objects to be excluded.
When you define a condition in a rule, use the following guidelines:
- The task wizard is case sensitive. Enter the table names or masks in the case with which they were defined.
- A mask can contain one or more wildcards. Supported wildcards are: an asterisk (*), which represents one or more characters, and a question mark (?), which represents a single character. A wildcard can occur multiple times in a mask value and can occur anywhere in the value.
- Delimiters such as quotation marks or brackets are not allowed, even if the source uses them.
- If a table name includes special characters such as a backslash (\), asterisk(*), dollar sign ($), caret (^), or question mark (?), escape each special character with a backslash (\) when you enter the rule.
Note:
If you define multiple table rules, they're processed in the order in which they're listed (top to bottom). Be sure to define them in the correct order of processing. For example, if a table rule specifies "Exclude CDC" followed by "Include C", all tables with names beginning with "C" are selected, including the CDC tables.
You can both manually select source tables and define selection rules. If you first manually select tables on the Selected Tables tab, rules are generated and displayed for those selections on the Selection Rules tab. Similarly, if you first define rules, any tables selected by those rules are displayed as selected on the Selected Tables tab.
Advanced Source Properties
To configure advanced source properties, toggle on Show Advanced Options at the top of the page. Advanced source properties are optional or have default values.
1Complete the following optional advanced properties as needed:
Property
Description
List Tables by Rule Type
Generate and download a list of the source tables that match the table selection criteria.
If you used rule-based table selection, you can select the type of selection rules to use. Options are:
- Include Rules Only
- Exclude Rules Only
- Include And Exclude Rules
Select the Include Columns check box to include columns in the list, regardless of which table selection method you used.
Click the Download icon to download the list.
Initial Start Point for Incremental Load
For incremental load jobs, customize the position in the source logs from which the application ingestion and replication job starts reading change records the first time it runs.
CDC Interval
For incremental load and combined initial and incremental load jobs, specify the time interval in which the application ingestion and replication job runs to retrieve the change records for incremental load. The default interval is 1 day.
Fetch Size
Enter the number of records that the application ingestion and replication job associated with the task reads at a time from the source.
2Under Custom Properties, you can enter one or more custom properties that Informatica provides to improve performance or to meet your special requirements. To add a property, click the + icon to add a row. In the Property Name field, select a property and then enter a property value, or select the Custom option and manually enter both the property name and value.
The following table describes the properties that are available, depending on the load type:
Property
Description
Read Event Batch Size
The number of payload events written in batch to the internal event queue during CDC processing.
When the event queue is implemented as an internal ring buffer, this value is the number of payload events that the reader writes to a single internal buffer slot.
Note:
A batch size that's too small might increase contention between threads. A larger batch size can provide for more parallelism but consume more memory.
Reader Helper Thread Count
The number of reader helper threads used during CDC processing to convert change data into a canonical format that can be passed to the target.
Default value is 3. You can enter a larger value to allow more threads to be available for performing conversion processing in parallel.
Custom
Select this option to manually enter the name of a property and its value. Use this option to enter properties that Informatica Global Customer Support or a technical staff member has provided to you for a special case.
Custom properties are intended to address performance or special processing needs. A property name can contain only alphanumeric characters and the following special characters: periods (.), hyphens (-), and underscores (_).
Tip:
To delete a custom property after you've entered it, click the Delete icon at the right end of the property row.
Click Next to proceed to Step 2 of Task Details.
Configure an SAP source that uses the SAP ODP Extractor connector
Define source properties for the SAP ECC or SAP S4/HANA source using the SAP ODP Extractor connector that you selected on the Source page.
Source Properties
Configure the basic source properties:
Property
Description
Load Type
Type of load operation that you want the application ingestion and replication task to perform. You can select one of the following load types for the task:
- Initial Load: Loads data read at a specific point in time from the source application to the target in a batch operation. You can perform an initial load to materialize a target to which incremental change data will be sent.
- Incremental Load: Propagates source data changes to a target continuously or until the job is stopped or ends. The job propagates the changes that have occurred since the last time the job ran or from a specific start point for the first job run.
- Initial and Incremental Load: Performs an initial load of point-in-time data to the target and then automatically switches to propagating incremental data changes made to the same source objects on a continuous basis.
Context
Select the context containing the source data sources that you want to replicate on the target.
SAP ODP Extractor Connector supports the following ODP providers or contexts for all load types:
Providers/Context
Source SAP System and ODPs
SAP Service Application Programming Interface (S-API)
SAP Data Sources/Extractors without Enterprise Search (ESH)
HANA
SAP HANA Information View
BW
SAP NetWeaver Business Warehouse
ABAP_CDS
ABAP Core Data Services
SAP SLT
SLT Queue
Source Data Sources
Select the data sources from which you want to replicate data. Use one or both of the following methods:
•On the Selected Data Sources tab, individually select the check box for each data source you want to include. Clear the check box for any data sources you do not want to include. To select all data sources, select the Data Source check box at the top.
The Field count for a data source shows the total number of fields in the data source.
If you select the data sources you want to include, all the selected and unselected data sources are displayed by default. To view the selected data sources only, use the filter next to the data source selection count and change the view from All to Selected.
To find data sources or fields, you can type all or part of a name in the Find box and click Search. This value is case-sensitive. If you type the beginning of a name only, a wildcard isn't required to represent the remainder. For example, CDC, CD, and CD* return the same results. However, if the search string is within the name, include the wildcard * at the beginning. For example, *CDC returns data sources and fields that include CDC anywhere in their names. To narrow the search to only object names or field names, select Data Source Name or Fields in the drop-down list adjacent to the Find box.
•Click Show Fields to display the actual columns from the SAP source. Otherwise, the columns for the selected data sources display as dummy.
•On the Selection Rules tab, you can create inclusion and exclusion rules for data sources.
To add a data source rule, click the plus (+) sign in the upper right corner. In the Type field, select Include or Exclude as the rule type. Then enter a string, with or without wildcards, as the condition.
Tips:
- You can copy an existing data source rule to use as a starting point for creating another rule. Click the copy icon at the right end of the row.
- You can edit a data source rule directly in its row by clicking the Type or Match Condition value.
- To view the data sources and fields that match a single rule, click View Objects in the row for the rule. For an Include rule, it shows the data sources to be included. For an Exclude rule, it shows the data sourcess to be excluded.
When you define a condition in a rule, use the following guidelines:
- The task wizard is case sensitive. Enter the data source names or masks in the case with which they were defined.
- A mask can contain one or more wildcards. Supported wildcards are: an asterisk (*), which represents one or more characters, and a question mark (?), which represents a single character. A wildcard can occur multiple times in a mask value and can occur anywhere in the value.
- Delimiters such as quotation marks or brackets are not allowed, even if the source uses them.
- If an object name includes special characters such as a backslash (\), asterisk(*), dollar sign ($), caret (^), or question mark (?), escape each special character with a backslash (\) when you enter the rule.
Note:
If you define multiple data source rules, they're processed in the order in which they're listed (top to bottom). Be sure to define them in the correct order of processing. For example, if a data source rule specifies "Exclude CDC" followed by "Include C", all data sources with names beginning with "C" are selected, including the CDC data source.
You can both manually select data sources and define selection rules. If you first manually select data sources on the Selected Data Sources tab, rules are generated and displayed for those selections on the Selection Rules tab. Similarly, if you first define rules, any data sources selected by those rules are displayed as selected on the Selected Data Sources tab.
Advanced Source Properties
To configure advanced source properties, toggle on Show Advanced Options at the top of the page. Advanced source properties are optional or have default values.
1Complete the following optional advanced properties as needed:
Property
Description
List Data Sources by Rule Type
Generate and download a list of the data sources that match the table selection criteria.
If you used rule-based table selection, you can select the type of selection rules to use. Options are:
- Include Rules Only
- Exclude Rules Only
- Include And Exclude Rules
Select the Include Fields check box to include fields in the list, regardless of which object selection method you used.
Click the Download icon to download the list.
Initial Start Point for Incremental Load
For incremental load jobs, customize the position in the source logs from which the application ingestion and replication job starts reading change records the first time it runs.
Note:
By default, the ingestion job retrieves the change records from the latest available position in the data stream.
CDC Interval
For incremental load and combined initial and incremental load jobs, specify the time interval in which the application ingestion and replication job runs to retrieve the change records for incremental load. The default interval is 5 minutes.
Note:
The CDC interval must be less than the data retention period configured in the SAP system for the Operational Delta Queue (ODQ).
Fetch Size
Enter the size of data that the application ingestion and replication job associated with the task reads at a time from the source. The value must be in megabytes (MB). The default value is 8.
2Under Custom Properties, you can enter one or more custom properties that Informatica provides to improve performance or to meet your special requirements. To add a property, click the + icon to add a row. In the Property Name field, select a property and then enter a property value, or select the Custom option and manually enter both the property name and value.
The following table describes the properties that are available, depending on the load type:
Property
Description
Read Event Batch Size
The number of payload events written in batch to the internal event queue during CDC processing.
When the event queue is implemented as an internal ring buffer, this value is the number of payload events that the reader writes to a single internal buffer slot.
Note:
A batch size that's too small might increase contention between threads. A larger batch size can provide for more parallelism but consume more memory.
Reader Helper Thread Count
The number of reader helper threads used during CDC processing to convert change data into a canonical format that can be passed to the target.
Default value is 3. You can enter a larger value to allow more threads to be available for performing conversion processing in parallel.
Custom
Select this option to manually enter the name of a property and its value. Use this option to enter properties that Informatica Global Customer Support or a technical staff member has provided to you for a special case.
Custom properties are intended to address performance or special processing needs. A property name can contain only alphanumeric characters and the following special characters: periods (.), hyphens (-), and underscores (_).
Tip:
To delete a custom property after you've entered it, click the Delete icon at the right end of the property row.
Click Next to proceed to Step 2 of Task Details.
Configure an SAP source that uses the SAP Mass Ingestion connector
Define source properties for the SAP ECC or SAP S4/HANA source using the SAP Mass Ingestion connector that you selected on the Source page.
Source Properties
Configure the basic source properties:
Property
Description
Load Type
Type of load operation that you want the application ingestion and replication task to perform. You can select one of the following load types for the task:
- Initial Load: Loads data read at a specific point in time from the source application to the target in a batch operation. You can perform an initial load to materialize a target to which incremental change data will be sent.
- Incremental Load: Propagates source data changes to a target continuously or until the job is stopped or ends. The job propagates the changes that have occurred since the last time the job ran or from a specific start point for the first job run.
- Initial and Incremental Load: Performs an initial load of point-in-time data to the target and then automatically switches to propagating incremental data changes made to the same source objects on a continuous basis.
Schema
For incremental load and combined initial and incremental load jobs, enter the underlying database schema that includes the source tables. Perform the following steps to enter the schema value:
- Log in to the SAP application.
- Browse to System > Status
- Check the Owner value. Enter this value in the Schema field.
Source Tables
Select the tables and columns from which you want to replicate data. Use one or both of the following methods:
•On the Selected Tables tab, individually select the check box for each table and column you want to include. Clear the check box for any table and column you do not want to include. To select all tables and columns, select the Table check box at the top.
The Column count for a table shows the total number of columns in the table.
Note:
If you deselect one or more columns for a table, a minus (-) appears next to the table name in the list.
If you select the tables you want to include, all the selected and unselected tables are displayed by default. To view the selected tables only, use the filter next to the table selection count and change the view from All to Selected.
To find tables or columns, you can type all or part of a name in the Find box and click Search. This value is case-sensitive. If you type the beginning of a name only, a wildcard isn't required to represent the remainder. For example, CDC, CD, and CD* return the same results. However, if the search string is within the name, include the wildcard * at the beginning. For example, *CDC returns tables and columns that include CDC anywhere in their names. To narrow the search to only table names or column names, select Table Name or Columns in the drop-down list adjacent to the Find box.
•On the Selection Rules tab, you can create inclusion and exclusion rules for tables and columns.
- To add a table rule, click the plus (+) sign in the upper right corner. In the Type field, select Include or Exclude as the rule type. Then enter a string, with or without the wildcards, as the condition.
- To add a column rule for a table, click the plus (+) sign at the right end of the table row. In the Type field, select Include or Exclude as the rule type. Then enter a string, with or without the * wildcard, as the condition.
- Validate the rule. The validation warns if your rule excludes a primary key column.
Tips:
- You can copy an existing table rule to use as a starting point for creating another rule. Click the copy icon at the right end of the row.
- You can edit a table or column rule directly in its row by clicking the Type or Match Condition value.
- To view the tables and columns that match a rule, click View Objects in the row for the rule. For an Include rule, it shows the objects to be included. For an Exclude rule, it shows the objects to be excluded.
When you define a condition in a rule, use the following guidelines:
- The task wizard is case sensitive. Enter the table and column names or masks in the case with which they were defined.
- A mask can contain one or more wildcards. Supported wildcards are: an asterisk (*), which represents one or more characters, and a question mark (?), which represents a single character. A wildcard can occur multiple times in a mask value and can occur anywhere in the value.
- Delimiters such as quotation marks or brackets are not allowed, even if the source uses them.
- If a table or column name includes special characters such as a backslash (\), asterisk(*), dollar sign ($), caret (^), or question mark (?), escape each special character with a backslash (\) when you enter the rule.
Note:
If you define multiple table rules, they're processed in the order in which they're listed (top to bottom). Be sure to define them in the correct order of processing. For example, if a table rule specifies "Exclude CDC" followed by "Include C", all objects with names beginning with "C" are selected, including the CDC object.
You can both manually select tables and columns and define selection rules. If you first manually select tables and columns on the Selected Tables tab, rules are generated and displayed for those selections on the Selection Rules tab. Similarly, if you first define rules, any tables and columns selected by those rules are displayed as selected on the Selected Tables tab. Expand the table on the Selection Rules tab to view details of the rules applied to fields.
Advanced Source Properties
To configure advanced source properties, toggle on Show Advanced Options at the top of the page. Advanced source properties are optional or have default values.
1Complete the following optional advanced properties as needed:
Property
Description
CDC Script
For incremental loads and combined initial and incremental loads, generate a script for enabling CDC on source tables and then run or download the script. The only available option is Enable CDC for all columns.
Click Execute to run the script if you have the required privileges. Or click the Download icon to download the script so that you can give it to your DBA to run.
List Tables by Rule Type
Generate and download a list of the source tables that match the table selection criteria.
If you used rule-based table selection, you can select the type of selection rules to use. Options are:
- Include Rules Only
- Exclude Rules Only
- Include And Exclude Rules
Select the Include Columns check box to include columns in the list, regardless of which table selection method you used.
Click the Download icon to download the list.
Enable Persistent Storage
For incremental loads and combined initial and incremental loads, select this check box to enable persistent storage of transaction data in a disk buffer so that the data can be consumed continually, even when the writing of data to the target is slow or delayed.
Benefits of using persistent storage are faster consumption of the source transaction logs, less reliance on log archives or backups, and the ability to still access the data persisted in disk storage after restarting an ingestion job.
Persisted data is stored on the Secure Agent. It is not encrypted. The Secure Agent's files and directories are expected to be secured from unwanted access by using native file system access permissions or file system support of encryption natively.
Initial Start Point for Incremental Load
For incremental load jobs, customize the position in the source logs from which the application ingestion and replication job starts reading change records the first time it runs.
Note:
By default, the ingestion job retrieves the change records from the latest available position in the data stream.
2Under Custom Properties, you can enter one or more custom properties that Informatica provides to improve performance or to meet your special requirements. To add a property, click the + icon to add a row. In the Property Name field, select a property and then enter a property value, or select the Custom option and manually enter both the property name and value.
The following table describes the properties that are available, depending on the load type:
Property
Description
Read Event Batch Size
The number of payload events written in batch to the internal event queue during CDC processing.
When the event queue is implemented as an internal ring buffer, this value is the number of payload events that the reader writes to a single internal buffer slot.
Note:
A batch size that's too small might increase contention between threads. A larger batch size can provide for more parallelism but consume more memory.
Reader Helper Thread Count
The number of reader helper threads used during CDC processing to convert change data into a canonical format that can be passed to the target.
Default value is 3. You can enter a larger value to allow more threads to be available for performing conversion processing in parallel.
Custom
Select this option to manually enter the name of a property and its value. Use this option to enter properties that Informatica Global Customer Support or a technical staff member has provided to you for a special case.
Custom properties are intended to address performance or special processing needs. A property name can contain only alphanumeric characters and the following special characters: periods (.), hyphens (-), and underscores (_).
Tip:
To delete a custom property after you've entered it, click the Delete icon at the right end of the property row.
Click Next to proceed to Step 2 of Task Details.
Configure a ServiceNow source
Define source properties for the source that you selected on the Source page.
Source Properties
Configure the basic source properties:
Property
Description
Load Type
Type of load operation that you want the application ingestion and replication task to perform. You can select one of the following load types for the task:
- Initial Load: Loads data read at a specific point in time from the source application to the target in a batch operation. You can perform an initial load to materialize a target to which incremental change data will be sent.
- Incremental Load: Propagates source data changes to a target continuously or until the job is stopped or ends. The job propagates the changes that have occurred since the last time the job ran or from a specific start point for the first job run.
- Initial and Incremental Load: Performs an initial load of point-in-time data to the target and then automatically switches to propagating incremental data changes made to the same source objects on a continuous basis.
Source Tables
Select the source tables from which you want to replicate data. Use one or both of the following methods:
•On the Selected Tables tab, individually select the check box for each source table you want to include. Clear the check box for any tables you do not want to include. To select all tables, select the Table check box at the top.
The Column count for a table shows the total number of columns in the table.
If you select the tables you want to include, all the selected and unselected tables are displayed by default. To view the selected tables only, use the filter next to the table selection count and change the view from All to Selected.
To find tables or columns, you can type all or part of a name in the Find box and click Search. This value is case-sensitive. If you type the beginning of a name only, a wildcard isn't required to represent the remainder. For example, CDC, CD, and CD* return the same results. However, if the search string is within the name, include the wildcard * at the beginning. For example, *CDC returns tables and columns that include CDC anywhere in their names. To narrow the search to only table names or column names, select Table Name or Columns in the drop-down list adjacent to the Find box.
•On the Selection Rules tab, you can create inclusion and exclusion rules for tables.
To add a table rule, click the plus (+) sign in the upper right corner. In the Type field, select Include or Exclude as the rule type. Then enter a string, with or without wildcards, as the condition.
Tips:
- You can copy an existing table rule to use as a starting point for creating another rule. Click the copy icon at the right end of the row.
- You can edit a table rule directly in its row by clicking the Type or Match Condition value.
- To view the tables and columns that match a single rule, click View Objects in the row for the rule. For an Include rule, it shows the objects to be included. For an Exclude rule, it shows the objects to be excluded.
When you define a condition in a rule, use the following guidelines:
- The task wizard is case sensitive. Enter the table names or masks in the case with which they were defined.
- A mask can contain one or more wildcards. Supported wildcards are: an asterisk (*), which represents one or more characters, and a question mark (?), which represents a single character. A wildcard can occur multiple times in a mask value and can occur anywhere in the value.
- Delimiters such as quotation marks or brackets are not allowed, even if the source uses them.
- If a table name includes special characters such as a backslash (\), asterisk(*), dollar sign ($), caret (^), or question mark (?), escape each special character with a backslash (\) when you enter the rule.
Note:
If you define multiple table rules, they're processed in the order in which they're listed (top to bottom). Be sure to define them in the correct order of processing. For example, if a table rule specifies "Exclude CDC" followed by "Include C", all tables with names beginning with "C" are selected, including the CDC tables.
You can both manually select source tables and define selection rules. If you first manually select tables on the Selected Tables tab, rules are generated and displayed for those selections on the Selection Rules tab. Similarly, if you first define rules, any tables selected by those rules are displayed as selected on the Selected Tables tab.
Advanced Source Properties
To configure advanced source properties, toggle on Show Advanced Options at the top of the page. Advanced source properties are optional or have default values.
1Complete the following optional advanced properties as needed:
Property
Description
List Tables by Rule Type
Generate and download a list of the source tables that match the table selection criteria.
If you used rule-based table selection, you can select the type of selection rules to use. Options are:
- Include Rules Only
- Exclude Rules Only
- Include And Exclude Rules
Select the Include Columns check box to include columns in the list, regardless of which table selection method you used.
Click the Download icon to download the list.
Initial Start Point for Incremental Load
For incremental load jobs, customize the position in the source logs from which the application ingestion and replication job starts reading change records the first time it runs.
Note:
You must specify the date and time in Greenwich Mean Time (GMT).
CDC Interval
For incremental load and combined initial and incremental load jobs, specify the time interval in which the application ingestion and replication job runs to retrieve the change records for incremental load. The default interval is 5 minutes.
Fetch Size
Enter the number of records that the application ingestion and replication job associated with the task reads at a time from the source. The default value is 10000.
2Under Custom Properties, you can enter one or more custom properties that Informatica provides to improve performance or to meet your special requirements. To add a property, click the + icon to add a row. In the Property Name field, select a property and then enter a property value, or select the Custom option and manually enter both the property name and value.
The following table describes the properties that are available, depending on the load type:
Property
Description
Read Event Batch Size
The number of payload events written in batch to the internal event queue during CDC processing.
When the event queue is implemented as an internal ring buffer, this value is the number of payload events that the reader writes to a single internal buffer slot.
Note:
A batch size that's too small might increase contention between threads. A larger batch size can provide for more parallelism but consume more memory.
Reader Helper Thread Count
The number of reader helper threads used during CDC processing to convert change data into a canonical format that can be passed to the target.
Default value is 3. You can enter a larger value to allow more threads to be available for performing conversion processing in parallel.
Custom
Select this option to manually enter the name of a property and its value. Use this option to enter properties that Informatica Global Customer Support or a technical staff member has provided to you for a special case.
Custom properties are intended to address performance or special processing needs. A property name can contain only alphanumeric characters and the following special characters: periods (.), hyphens (-), and underscores (_).
Tip:
To delete a custom property after you've entered it, click the Delete icon at the right end of the property row.
Click Next to proceed to Step 2 of Task Details.
Configure a Workday source
Define source properties for the source that you selected on the Source page.
Source Properties
Configure the basic source properties:
Property
Description
Load Type
Type of load operation that you want the application ingestion and replication task to perform. You can select one of the following load types for the task:
- Initial Load: Loads data read at a specific point in time from the source application to the target in a batch operation. You can perform an initial load to materialize a target to which incremental change data will be sent.
- Incremental Load: Propagates source data changes to a target continuously or until the job is stopped or ends. The job propagates the changes that have occurred since the last time the job ran or from a specific start point for the first job run.
- Initial and Incremental Load: Performs an initial load of point-in-time data to the target and then automatically switches to propagating incremental data changes made to the same source objects on a continuous basis.
Workday API
select the type of web service that you want to use to read source data. Options are:
- SOAP: Uses SOAP APIs to extract Workday data.
- RaaS: Uses Workday Report-as-a-Service (RaaS) to extract source data from custom objects and fields through custom reports. You can use Workday RaaS only in initial load jobs.
If you choose to use the SOAP API, perform the following steps:
1From the Product list, select Human Capital Management.
2From the Services list, select the Human Capital Management (HCM) services from which you want to ingest data to your target.
You can select multiple services from the Services list.
3From the Output Type list, select the format in which you want the data to be stored on the target.
The ingestion jobs extract the source data in an XML structure. Based on the format that you select, the job writes the extracted data to the target as a single object in either JSON or XML format.
If you choose to use the RaaS API, perform the following steps:
1In the Number of Reports field, select the number of reports you want to extract from the source.
2If you choose to extract a single report, in the Report Name or URL field, enter the name or URL of the custom report you want to read from the source.
3If you choose to extract multiple reports, in the Report Configuration File field, enter the path to the CSV file that you created for the list of custom reports that you want to read from the source.
Source Operations
Select the source operations from which you want to replicate data. Use one or both of the following methods:
•On the Selected Operations tab, individually select the check box for each source operation you want to include. Clear the check box for any ooperations you do not want to include. To select all operations, select the Operation check box at the top.
The Attribute count for an operation shows the total number of attributes in the operation.
If you select the operations you want to include, all the selected and unselected operations are displayed by default. To view the selected operations only, use the filter next to the operation selection count and change the view from All to Selected.
To find operations or attributes, you can type all or part of a name in the Find box and click Search. This value is case-sensitive. If you type the beginning of a name only, a wildcard isn't required to represent the remainder. For example, CDC, CD, and CD* return the same results. However, if the search string is within the name, include the wildcard * at the beginning. For example, *CDC returns operations and attributes that include CDC anywhere in their names. To narrow the search to only operation names or field names, select Operation Name or Attributes in the drop-down list adjacent to the Find box.
•On the Selection Rules tab, you can create inclusion and exclusion rules for operations.
To add an operation rule, click the plus (+) sign in the upper right corner. In the Type field, select Include or Exclude as the rule type. Then enter a string, with or without wildcards, as the condition.
Tips:
- You can copy an existing operation rule to use as a starting point for creating another rule. Click the copy icon at the right end of the row.
- You can edit an operation rule directly in its row by clicking the Type or Match Condition value.
- To view the operations and attributes that match a single rule, click View Objects in the row for the rule. For an Include rule, it shows the objects to be included. For an Exclude rule, it shows the objects to be excluded.
When you define a condition in a rule, use the following guidelines:
- The task wizard is case sensitive. Enter the source operation names or masks in the case with which they were defined.
- A mask can contain one or more wildcards. Supported wildcards are: an asterisk (*), which represents one or more characters, and a question mark (?), which represents a single character. A wildcard can occur multiple times in a mask value and can occur anywhere in the value.
- Delimiters such as quotation marks or brackets are not allowed, even if the source uses them.
- If an source operation name includes special characters such as a backslash (\), asterisk(*), dollar sign ($), caret (^), or question mark (?), escape each special character with a backslash (\) when you enter the rule.
Note:
If you define multiple operation rules, they're processed in the order in which they're listed (top to bottom). Be sure to define them in the correct order of processing. For example, if an operation rule specifies "Exclude CDC" followed by "Include C", all operations with names beginning with "C" are selected, including the CDC operations.
You can both manually select operations and define selection rules. If you first manually select operations on the Selected Operations tab, rules are generated and displayed for those selections on the Selection Rules tab. Similarly, if you first define rules, any operations selected by those rules are displayed as selected on the Selected Operations tab.
Advanced Source Properties
To configure advanced source properties, toggle on Show Advanced Options at the top of the page. Advanced source properties are optional or have default values.
1Complete the following optional advanced properties as needed:
Method
Description
List Operations by Rule Type
Generate and download a list of the sourceoperation that match the operation selection criteria.
If you used rule-based operation selection, you can select the type of selection rules to use. Options are:
- Include Rules Only
- Exclude Rules Only
- Include And Exclude Rules
Click the Download icon to download the list.
Initial Start Point for Incremental Load
For incremental load jobs, customize the position in the source logs from which the application ingestion and replication job starts reading change records the first time it runs.
Note:
You must specify the date and time in Coordinated Universal Time (UTC).
CDC Interval
For incremental load and combined initial and incremental load jobs, specify the time interval in which the application ingestion and replication job runs to retrieve the change records for incremental load. The default interval is 5 minutes.
Fetch Size
Enter the number of records that the application ingestion and replication job associated with the task reads at a time from the source. The default value is 100.
Note:
The Fetch Size field appears only for the SOAP API.
Extract Non-default Fields
Select this check box to replicate the source fields that do not contain any default value.
Note:
The Extract Non-default Fields check box appears only for the SOAP API.
2Under Custom Properties, you can enter one or more custom properties that Informatica provides to improve performance or to meet your special requirements. To add a property, click the + icon to add a row. In the Property Name field, select a property and then enter a property value, or select the Custom option and manually enter both the property name and value.
The following table describes the properties that are available, depending on the load type:
Property
Description
Read Event Batch Size
The number of payload events written in batch to the internal event queue during CDC processing.
When the event queue is implemented as an internal ring buffer, this value is the number of payload events that the reader writes to a single internal buffer slot.
Note:
A batch size that's too small might increase contention between threads. A larger batch size can provide for more parallelism but consume more memory.
Reader Helper Thread Count
The number of reader helper threads used during CDC processing to convert change data into a canonical format that can be passed to the target.
Default value is 3. You can enter a larger value to allow more threads to be available for performing conversion processing in parallel.
Custom
Select this option to manually enter the name of a property and its value. Use this option to enter properties that Informatica Global Customer Support or a technical staff member has provided to you for a special case.
Custom properties are intended to address performance or special processing needs. A property name can contain only alphanumeric characters and the following special characters: periods (.), hyphens (-), and underscores (_).
Tip:
To delete a custom property after you've entered it, click the Delete icon at the right end of the property row.
Click Next to proceed to Step 2 of Task Details.
Task details: Configure how to replicate data to the target
Configure the data target in Step 2 of Task Details.
Under Target Properties, set the required basic target properties. Then toggle on Show Advanced Options at the top of the page to set optional advanced target properties as needed. See the property descriptions for your target type:
Define target properties for the Amazon Redshift destination.
Target Properties
Define the following required Amazon Redshift target properties:
Property
Description
Target Creation
The only available option is Create Target Tables, which generates the target tables based on the source objects.
Schema
Select the target schema in which Application Ingestion and Replication creates the target tables.
Apply Mode
For incremental load and combined initial and incremental load jobs, this property indicates how source DML changes, including inserts, updates, and deletes, are applied to the target. Options are:
- Standard. Accumulate the changes in a single apply cycle and intelligently merge them into fewer SQL statements before applying them to the target. For example, if an update followed by a delete occurs on the source row, no row is applied to the target. If multiple updates occur on the same column or field, only the last update is applied to the target. If multiple updates occur on different columns or fields, the updates are merged into a single update record before being applied to the target.
- Audit. Apply an audit trail of every DML operation made on the source tables to the target. A row for each DML change on a source table is written to the generated target table along with the audit columns you select under the Advanced section. The audit columns contain metadata about the change, such as the DML operation type, time, owner, transaction ID, generated ascending sequence number, and before image.
Consider using the Audit apply mode when you want to use the audit history to perform downstream computations or processing on the data before writing it to the target database or when you want to examine metadata about the captured changes.
- Soft Deletes. Apply source delete operations to the target as soft deletes. A soft delete marks the deleted row as deleted without actually removing it from the database. For example, a delete on the source results in a change record on the target with "D" displayed in the INFA_OPERATION_TYPE column.
Consider using soft deletes if you have a long-running business process that needs the soft-deleted data to finish processing, to restore data after an accidental delete operation, or to track deleted values for audit purposes.
Note:
If you use Soft Deletes mode, you must not perform an update on the primary key in a source table. Otherwise, data corruption can occur on the target.
Note:
The Audit and Soft Deletes apply modes are available only for an SAP source with SAP Mass Ingestion connector.
The default value is Standard.
Bucket
The name of the Amazon S3 bucket that stores, organizes, and controls access to the data objects that you load to Amazon Redshift.
Data Directory or Task Target Directory
The subdirectory where Application Ingestion and Replication stores output files for jobs associated with the task. This field is called Data Directory for an initial load job or Task Target Directory for an incremental load or combined initial and incremental load job.
Advanced Target Properties
To view advanced properties, toggle on Show Advanced Options at the top of the page.
1Under Advanced Options, define any of the following optional advanced target properties that you want to use:
Property
Description
Add Last Replicated Time
Select this check box to add a metadata column that records the timestamp at which a record was inserted or last updated in the target table. For initial loads, all loaded records have the same timestamp. For incremental and combined initial and incremental loads, the column records the timestamp of the last DML operation that was applied to the target.
By default, this check box is not selected.
Add Operation Type
Select this check box to add a metadata column that records the source SQL operation type in the output that the job propagates to the target database or inserts into the audit table on the target system.
This field is available only when the Apply Mode option is set to Audit or Soft Deletes.
In Audit mode, the job writes "I" for inserts, "U" for updates, "E" for upserts, or "D" for deletes to this metadata column.
In Soft Deletes mode, the job writes "D" for deletes or NULL for inserts, updates, and upserts. When the operation type is NULL, the other "Add Operation..." metadata columns are also NULL. Only when the operation type is "D" will the other metadata columns contain non-null values.
By default, this check box is selected. You cannot deselect it if you are using Soft Deletes.
Add Operation Time
Select this check box to add a metadata column that records the source SQL operation timestamp in the output that the job propagates to the target database or inserts into the audit table on the target system.
This field is available only when the Apply Mode option is set to Audit or Soft Deletes.
By default, this check box is not selected.
Add Operation Sequence
Select this check box to add a metadata column that records a generated, ascending sequence number for each change operation that the job inserts into the target tables. The sequence number reflects the change stream position of the operation.
This field is available only when Apply Mode is set to Audit.
By default, this check box is not selected.
Add Cycle ID
Select this check box to add a metadata column that includes the cycle ID of each CDC cycle in each target table. A cycle ID is a number that's generated by the CDC engine for each successful CDC cycle. If you integrate the job with Data Integration taskflows, the job can pass the minimum and maximum cycle IDs in output fields to the taskflow so that the taskflow can determine the range of cycles that contain new CDC data. This capability is useful if data from multiple cycles accumulates before the previous taskflow run completes. By default, this check box is not selected.
Prefix for Metadata Columns
Add a prefix to the names of the added metadata columns to easily identify them and to prevent conflicts with the names of existing columns.
The default value is INFA_.
Enable Case Transformation
By default, target table names and column names are generated in the same case as the corresponding source names, unless cluster-level or session-level properties on the target override this case-sensitive behavior. If you want to control the case of letters in the target names, select this check box. Then select a Case Transformation Strategy option.
Case Transformation Strategy
If you selected Enable Case Transformation, select one of the following options to specify how to handle the case of letters in generated target table (or object) names and column (or field) names:
- Same as source. Use the same case as the source table (or object) names and column (or field) names.
- UPPERCASE. Use all uppercase.
- lowercase. Use all lowercase.
The default value is Same as source.
Note:
The selected strategy will override any cluster-level or session-level properties on the target for controlling case.
2Under Table Renaming Rules, if you want to rename the target objects that are associated with the selected source tables, define renaming rules.
aClick the + (Add new row) icon and enter a source table name or name mask and enter a corresponding target table name or name mask.
bTo define a mask, include one or more the asterisk (*) wildcards. Then, press Enter.
For example, to add the prefix "PROD_" to the names of target tables that correspond to all selected source tables, enter the * wildcard for the source table and enter PROD_* for the target table.
You can enter multiple rules.
Notes:
- If you enter the wildcard for a source table mask, you must also enter the wildcard for a target table mask.
- If a table name includes special characters, such as a backslash (\), asterisk(*), dot (.), or question mark (?), escape each special character in the name with a backslash (\).
- On Windows, if you enter target table renaming criteria that causes a target table name to exceed 232 characters in length, the name is truncated to 222 characters. Data Ingestion and Replication appends 14 characters to the name to add a date-time yyyyMMddHHmmss value, which causes the name to exceed the Windows maximum limit of 255. Ensure that the names of any renamed target tables do not exceed 232 characters.
3Under Data Type Rules, if you want to override the default mappings of source data types to target data types, define data type rules. Click the + (Add new row) icon and enter a source data type and corresponding target data type. Then press Enter.
Also, in the Source Data Type value, you can include the percent (%) wildcard to represent the data type precision, scale, or size, for example, NUMBER(%,4), NUMBER(8,%), or NUMBER(%). Use the wildcard to cover all source columns that have the same data type but use different precision, scale, or size values, instead of specifying each one individually. For example, enter FLOAT(%) to cover FLOAT(16), FLOAT(32), and FLOAT(84). You cannot enter the % wildcard in the target data type. A source data type that uses the % wildcard must map to a target data type that uses specific precision, scale, or size value. For example, you could map the source data type FLOAT(%) to a target data type specification such as NUMBER(38,10)
4Under Custom Properties, you can enter one or more custom properties that Informatica provides to improve performance or to meet your special requirements. To add a property, click the + icon to add a row. In the Property Name field, select a property and then enter a property value, or select the Custom option and manually enter both the property name and value.
The following table describes the properties that are available:
Property
Description
Writer Helper Thread Count
The number of writer helper threads that are used to convert incoming change data rows or initial unload rows to the output format configured for the target, such as Avro, CSV, or Parquet.
Default value is 2. If two threads can’t keep up with the incoming volume of data, you can increase the number of threads. Consider increasing the number of threads in the following situations: 1) the incoming volume is high, 2) multiple writer distributors are in use, or 3) some rows are very large or wide, which increases conversion time.
Note:
If you select the Auto-Tune option on the Let's Go! page of the task wizard, auto-tuning can determine the optimal thread count. You can override the value from auto-tuning by setting this custom property.
Custom
Select this option to manually enter the name of a property and its value. Use this option to enter properties that Informatica Global Customer Support or a technical staff member has provided to you for a special case.
Custom properties are intended to address performance or special processing needs. A property name can contain only alphanumeric characters and the following special characters: periods (.), hyphens (-), and underscores (_).
Tip:
To delete a custom property after you've entered it, click the Delete icon at the right end of the property row.
Click Next to proceed, or click Save.
Configure an Amazon S3 target
Define target properties for the destination that you selected on the Destination page.
Target Properties
Define the following required Amazon S3 target properties:
Property
Description
Open Table Format
Controls whether to use Open Table format to replicate data to Amazon S3 storage.
Select one of the following options:
- Apache Iceberg. Replicate data to the Amazon S3 cloud storage as Apache Iceberg tables. You can access these tables directly from Amazon S3 using the AWS Glue Catalog.
- None. Do not use Open Table format.
The default value is None.
Namespace
If you use the Apache Iceberg Open Table format, enter the name of the database in AWS Glue Catalog where you want to store and manage your Apache Iceberg tables.
Output Format
The format of the output files. Options are:
- CSV
- AVRO
- PARQUET
The default value is CSV.
Note:
Output files in CSV format use double-quotation marks ("") as the delimiter for each field.
Warehouse Base Directory
If you use the Apache Iceberg Open Table format, enter the root directory in Amazon S3 where you want to store the target files and tables.
Add Headers to CSV File
If CSV is selected as the output format, select this check box to add a header with source column names to the output CSV file.
Parquet Compression Type
If the PARQUET output format is selected, you can select a compression type that is supported by Parquet. Options are:
- None
- Gzip
- Snappy
The default value is None, which means no compression is used.
Avro Format
If you selected AVRO as the output format, select the format of the Avro schema that will be created for each source table. Options are:
- Avro-Flat. This Avro schema format lists all Avro fields in one record.
- Avro-Generic. This Avro schema format lists all columns from a source table in a single array of Avro fields.
- Avro-Nested. This Avro schema format organizes each type of information in a separate record.
The default value is Avro-Flat.
Avro Serialization Format
If AVRO is selected as the output format, select the serialization format of the Avro output file. Options are:
- None
- Binary
- JSON
The default value is Binary.
Avro Schema Directory
If AVRO is selected as the output format, specify the local directory where Application Ingestion and Replication stores Avro schema definitions for each source table. Schema definition files have the following naming pattern:
schemaname_tablename.txt
Note:
If this directory is not specified, no Avro schema definition file is produced.
File Compression Type
Controls whether to use a file compression type for output files in CSV or AVRO output format. Options are:
- None
- Deflate
- Gzip
- Snappy
The default value is None, which means no compression is used.
Encryption Type
Select the encryption type for the output files that are written to the Amazon S3 target. Options are:
- None
- Client Side Encryption
- Client Side Encryption with KMS
- Server Side Encryption
- Server Side Encryption with KMS
Note:
If you use Client Side Encryption orClient Side Encryption with KMS, the maximum size of the file that is encrypted and decrypted is 64 GB.
The default is None, which means no encryption is used.
Avro Compression Type
If AVRO is selected as the output format, you can select an Avro compression type. Options are:
- None
- Bzip2
- Deflate
- Snappy
The default value is None, which means no compression is used.
Deflate Compression Level
If Deflate is selected in the Avro Compression Type field, specify a compression level from 0 to 9. The default value is 0.
Add Directory Tags
For incremental load and combined initial and incremental load tasks, select this check box to add the "dt=" prefix to the names of apply cycle directories to be compatible with the naming convention for Hive partitioning. This check box is cleared by default.
Task Target Directory
For incremental load and combined initial and incremental load tasks, the root directory for the other directories that hold output data files, schema files, and CDC cycle contents and completed files. You can use it to specify a custom root directory for the task. If you enable the Connection Directory as Parent option, you can still optionally specify a task target directory to use with the parent directory specified in the connection properties.
This field is required if the {TaskTargetDirectory} placeholder is specified in patterns for any of the following directory fields.
Data Directory
For initial load tasks, define a directory structure for the directories where Application Ingestion and Replication stores output data files and optionally stores the schema.
The default directory pattern is {TableName)_{Timestamp}.
To customize the directory pattern, click the Edit icon to select from the following listed path types and values:
- Folder Path. Enter a folder name or use variables to create a folder name.
- Timestamp values. Select data elements Timestamp, yy, yyyy, mm, or dd. The Timestamp values are in the format yyyymmdd_hhmissms. The generated dates and times in the directory paths indicate when the initial load job starts to transfer data to the target.
- Schema Name. Select SchemaName, toUpper(SchemaName), or toLower(SchemaName).
- Table Name. Select TableName, toUpper(TableName), and toLower(TableName).
Note:
If you manually enter the directory expression, ensure that you enclose placeholders with curly brackets { }. Placeholder values are not case sensitive.
For incremental load and combined initial and incremental load tasks, define a custom path to the subdirectory that contains the cdc-data data files.
The default directory pattern is {TaskTargetDirectory}/data/{TableName}/data
To customize the directory pattern, click the Edit icon to select from the following listed path types and values:
- Folder Path. Enter {TaskTargetDirectory} for a task-specific base directory on the target to use instead of the S3 folder path specified in the connection properties.
- Timestamp values. Select data elements Timestamp, yy, yyyy, mm, or dd. The Timestamp values are in the format yyyymmdd_hhmissms. The generated dates and times in the directory paths indicate when the CDC cycle started.
- Schema Name. Select SchemaName, toUpper(SchemaName), or toLower(SchemaName).
- Table Name. Select TableName, toUpper(TableName), and toLower(TableName).
For Amazon S3 and Microsoft Azure Data Lake Storage Gen2 targets, Application Ingestion and Replication uses the directory specified in the target connection properties as the root for the data directory path when Connection Directory as Parent is selected.
For Google Cloud Storage targets, Application Ingestion and Replication uses the Bucket name that you specify in the target properties for the ingestion task.
For Microsoft Fabric OneLake targets, the parent directory is the path specified in the Lakehouse Path field in the Microsoft Fabric OneLake connection properties.
For Amazon S3 targets with Open Table format, the data directory field is not applicable. Enabling the Connection Directory as Parent includes the connection directory before the warehouse base path. If disabled, files are saved directly under the warehouse base directory.
Connection Directory as Parent
If you use the Open Table format, select this check box to use the directory value specified in the target connection properties as the parent directory. This path appends to the file path on S3 while creating the file. This check box is selected by default.
For example, if the S3 directory set in the connection is myFolderOnS3/F1 and the Warehouse Base Directory is /myFold, files are saved to myFolderOnS3/F1/myFold/<files>. However, if you do not select the Connection Directory as Parent option, files are saved directly to /myFold/<files>.
If you do not use the Open Table format, selecting this check box uses the directory value specified in the target connection properties as the parent directory for the custom directory paths specified in the task target properties. For initial load tasks, the parent directory is used in the Data Directory and Schema Directory. For incremental load and combined initial and incremental load tasks, the parent directory is used in the Data Directory, Schema Directory, Cycle Completion Directory, and Cycle Contents Directory.
This check box is selected by default. If you clear it, for initial loads, define the full path to the output files in the Data Directory field. For incremental loads, optionally specify a root directory for the task in the Task Target Directory.
Schema Directory
Specify a custom directory for storing the schema file if you want to store it in a directory other than the default directory. For initial loads, previously used values if available are shown in a list for your convenience. This field is optional.
For initial loads, the schema is stored in the data directory by default. For incremental loads and combined initial and incremental loads, the schema file is stored in the following directory by default: {TaskTargetDirectory}/data/{TableName}/schema.
You can use the same placeholders as for the Data Directory field. If you manually enter placeholders, ensure that you enclose them with curly brackets { }. If you include the toUpper or toLower function, put the placeholder name in parentheses and enclose both the function and placeholder in curly brackets, for example: {toLower(SchemaName)}
Note:
Schema is written only to output data files in CSV format. Data files in Parquet and Avro formats contain their own embedded schema.
Cycle Completion Directory
For incremental load and combined initial and incremental load tasks, the path to the directory that contains the cycle completed file.
Default is {TaskTargetDirectory}/cycle/completed.
Cycle Contents Directory
For incremental load and combined initial and incremental load tasks, the path to the directory that contains the cycle contents files.
Default is {TaskTargetDirectory}/cycle/contents.
Use Cycle Partitioning for Data Directory
For incremental load and combined initial and incremental load tasks, select this option to create a timestamp subdirectory for each CDC cycle, under each data directory.
If this option is not selected, individual data files are written to the same directory without a timestamp, unless you define an alternative directory structure.
Use Cycle Partitioning for Summary Directories
For incremental load and combined initial and incremental load tasks, select this option to create a timestamp subdirectory for each CDC cycle, under the summary contents and completed subdirectories.
List Individual Files in Contents
For incremental load and combined initial and incremental load tasks, lists individual data files under the contents subdirectory.
If Use Cycle Partitioning for Summary Directories is cleared, this option is selected by default. All of the individual files are listed in the contents subdirectory unless you can configure custom subdirectories by using the placeholders, such as for timestamp or date.
If Use Cycle Partitioning for Data Directory is selected, you can still optionally select this check box to list individual files and group them by CDC cycle.
Advanced Target Properties
To view advanced properties, toggle on Show Advanced Options at the top of the page.
1Under Advanced Options, define any of the following optional advanced target properties that you want to use:
Property
Description
Add Operation Type
Select this check box to add a metadata column that records the source SQL operation type in the output that the job propagates to the target.
For incremental loads, the job writes "I" for insert, "U" for update, or "D" for delete. For initial loads, the job always writes "I" for insert.
By default, this check box is selected for incremental load and initial and incremental load jobs, and cleared for initial load jobs.
Add Operation Time
Select this check box to add a metadata column that records the source SQL operation timestamp in the output that the job propagates to the target database or inserts into the audit table on the target system.
For initial loads, the job always writes the current date and time.
By default, this check box is not selected.
Add Orderable Sequence
Select this check box to add a metadata column that records a combined epoch value and an incremental numeric value for each change operation that the job inserts into the target tables. The sequence value is always ascending, but not guaranteed to be sequential and gaps may exist. The sequence value is used to identify the order of activity in the target records.
By default, this check box is not selected.
2Under Table Renaming Rules, if you want to rename the target objects that are associated with the selected source tables, define renaming rules.
aClick the + (Add new row) icon and enter a source table name or name mask and enter a corresponding target table name or name mask.
bTo define a mask, include one or more the asterisk (*) wildcards. Then, press Enter.
For example, to add the prefix "PROD_" to the names of target tables that correspond to all selected source tables, enter the * wildcard for the source table and enter PROD_* for the target table.
You can enter multiple rules.
Notes:
- If you enter the wildcard for a source table mask, you must also enter the wildcard for a target table mask.
- If a table name includes special characters, such as a backslash (\), asterisk(*), dot (.), or question mark (?), escape each special character in the name with a backslash (\).
- On Windows, if you enter target table renaming criteria that causes a target table name to exceed 232 characters in length, the name is truncated to 222 characters. Data Ingestion and Replication appends 14 characters to the name to add a date-time yyyyMMddHHmmss value, which causes the name to exceed the Windows maximum limit of 255. Ensure that the names of any renamed target tables do not exceed 232 characters.
3Under Custom Properties, you can enter one or more custom properties that Informatica provides to improve performance or to meet your special requirements. To add a property, click the + icon to add a row. In the Property Name field, select a property and then enter a property value, or select the Custom option and manually enter both the property name and value.
The following table describes the properties that are available, depending on the load type:
Property
Description
Writer Distributor Count
The number of distributors that can run on separate threads in parallel to process data during an initial load job or the unload phase of a combined load job when the Writer Unload Multiple Distributors custom property is set to true. Using parallel distributor threads can improve job performance, particularly for high-volume data transfers.
Default value is 3. If your system has ample resources, Informatica recommends that you set this parameter to 8.
Note:
If you select the Auto-Tune option on the Let's Go! page of the task wizard, auto-tuning can determine the optimal distributor count. You can override the value from auto-tuning by setting this custom property.
Writer Helper Thread Count
The number of writer helper threads that are used to convert incoming change data rows or initial unload rows to the output format configured for the target, such as Avro, CSV, or Parquet.
Default value is 2. If two threads can’t keep up with the incoming volume of data, you can increase the number of threads. Consider increasing the number of threads in the following situations: 1) the incoming volume is high, 2) multiple writer distributors are in use, or 3) some rows are very large or wide, which increases conversion time.
Note:
If you select the Auto-Tune option on the Let's Go! page of the task wizard, auto-tuning can determine the optimal thread count. You can override the value from auto-tuning by setting this custom property.
Writer Unload Multiple Distributors
Indicates whether multiple distributor threads can be used to process data in parallel during initial load jobs and the unload phase of combined load jobs. The distributors perform work such as uploading data files to staging areas and flushing data to the target. Set this property to true to use multiple distributor threads.
Default value is false.
Note:
If you select the Auto-Tune option on the Let's Go! page of the task wizard, auto-tuning can determine whether to use multiple distributors. You can override the value from auto-tuning by setting this custom property.
Custom
Select this option to manually enter the name of a property and its value. Use this option to enter properties that Informatica Global Customer Support or a technical staff member has provided to you for a special case.
Custom properties are intended to address performance or special processing needs. A property name can contain only alphanumeric characters and the following special characters: periods (.), hyphens (-), and underscores (_).
Tip:
To delete a custom property after you've entered it, click the Delete icon at the right end of the property row.
Click Next to proceed, or click Save.
Configure a Databricks target
Define target properties for the destination that you selected on the Destination page.
Target Properties
Define the following required Databricks target properties:
Property
Description
Target Creation
The only available option is Create Target Tables, which generates the target tables based on the source objects.
Schema
Select the target schema in which Application Ingestion and Replication creates the target tables.
Apply Mode
For incremental load and combined initial and incremental load jobs, this property indicates how source DML changes, including inserts, updates, and deletes, are applied to the target. Options are:
- Standard. Accumulate the changes in a single apply cycle and intelligently merge them into fewer SQL statements before applying them to the target. For example, if an update followed by a delete occurs on the source row, no row is applied to the target. If multiple updates occur on the same column or field, only the last update is applied to the target. If multiple updates occur on different columns or fields, the updates are merged into a single update record before being applied to the target.
- Soft Deletes. Apply source delete operations to the target as soft deletes. A soft delete marks the deleted row as deleted without actually removing it from the database. For example, a delete on the source results in a change record on the target with "D" displayed in the INFA_OPERATION_TYPE column.
After enabling Soft Deletes, any update in the source table during normal or backlog mode results in the deletion of the matching record, insertion of the updated record, and marking of the INFA_OPERATION_TYPE operation as NULL in the target table. Similarly, inserting a record in the source table during backlog mode results in marking the INFA_OPERATION_TYPE operation as E in the target table record.
Consider using soft deletes if you have a long-running business process that needs the soft-deleted data to finish processing, to restore data after an accidental delete operation, or to track deleted values for audit purposes.
- Audit. Apply an audit trail of every DML operation made on the source tables to the target. A row for each DML change on a source table is written to the generated target table along with the audit columns you select under the Advanced section. The audit columns contain metadata about the change, such as the DML operation type, transaction ID, and before image. Consider using Audit apply mode when you want to use the audit history to perform downstream computations or processing on the data before writing it to the target database or when you want to examine metadata about the captured changes.
After enabling the Audit apply mode, any update in the source table during backlog or normal mode results in marking the INFA_OPERATION_TYPE operation as E in the target table record. Similarly, inserting a record in the source table during backlog mode results in marking the INFA_OPERATION_TYPE operation as E in the target table record.
Default is Standard.
Data Directory or Task Target Directory
The subdirectory where Application Ingestion and Replication stores output files for jobs associated with the task. This field is called Data Directory for an initial load job or Task Target Directory for an incremental load or combined initial and incremental load job.
Advanced Target Properties
To view advanced properties, toggle on Show Advanced Options at the top of the page.
1Under Advanced Options, define any of the following optional advanced target properties that you want to use:
Property
Description
Add Last Replicated Time
Select this check box to add a metadata column that records the timestamp at which a record was inserted or last updated in the target table. For initial loads, all loaded records have the same timestamp. For incremental and combined initial and incremental loads, the column records the timestamp of the last DML operation that was applied to the target.
By default, this check box is not selected.
Add Operation Type
Add a metadata column that records the source SQL operation type in the output that the job propagates to the target database or inserts into the audit table on the target system.
This field is available only when the Apply Mode option is set to Audit or Soft Deletes.
In Audit mode, the job writes "I" for inserts, "U" for updates, "E" for upserts, or "D" for deletes to this metadata column.
In Soft Deletes mode, the job writes "D" for deletes or NULL for inserts, updates, and upserts. When the operation type is NULL, the other "Add Operation..." metadata columns are also NULL. Only when the operation type is "D" will the other metadata columns contain non-null values.
By default, this check box is selected and you you cannot deselect it.
Add Operation Time
Select this check box to add a metadata column that records the source SQL operation timestamp in the output that the job propagates to the target database or inserts into the audit table on the target system.
This field is available only when the Apply Mode option is set to Audit or Soft Deletes.
By default, this check box is not selected.
Add Operation Sequence
Select this check box to add a metadata column that records a generated, ascending sequence number for each change operation that the job inserts into the target tables. The sequence number reflects the change stream position of the operation.
This field is available only when Apply Mode is set to Audit.
By default, this check box is not selected.
Prefix for Metadata Columns
Add a prefix to the names of the added metadata columns to easily identify them and to prevent conflicts with the names of existing columns.
The default value is INFA_.
Create Unmanaged Tables
Select this check box if you want the task to create Databricks target tables as unmanaged tables. After you deploy the task, you cannot edit this field to switch to managed tables.
By default, this option is cleared and managed tables are created.
If you selected Personal Staging Location in the Staging Environment field in the selected Databricks target connection, this check box is disabled. You cannot use unmanaged tables in this situation.
For more information about Databricks managed and unmanaged tables, see the Databricks documentation.
Unmanaged Tables Parent Directory
If you choose to create Databricks unmanaged tables, you must specify a parent directory in Amazon S3 or Microsoft Azure Data Lake Storage to hold the Parquet files that are generated for each target table when captured DML records are processed.
Note:
To use Unity Catalog, you must provide an existing external directory.
Note:
For volume staging, provide the complete parent directory path.
Staging File Format
Select the format of the staging files in the staging environment specified in the Databricks connection. The files hold data before it's loaded into Databricks tables.
Format options are:
- CSV
- Parquet
Default is CSV.
2Under Table Renaming Rules, if you want to rename the target objects that are associated with the selected source tables, define renaming rules.
aClick the + (Add new row) icon and enter a source table name or name mask and enter a corresponding target table name or name mask.
bTo define a mask, include one or more the asterisk (*) wildcards. Then, press Enter.
For example, to add the prefix "PROD_" to the names of target tables that correspond to all selected source tables, enter the * wildcard for the source table and enter PROD_* for the target table.
You can enter multiple rules.
Notes:
- If you enter the wildcard for a source table mask, you must also enter the wildcard for a target table mask.
- If a table name includes special characters, such as a backslash (\), asterisk(*), dot (.), or question mark (?), escape each special character in the name with a backslash (\).
- On Windows, if you enter target table renaming criteria that causes a target table name to exceed 232 characters in length, the name is truncated to 222 characters. Data Ingestion and Replication appends 14 characters to the name to add a date-time yyyyMMddHHmmss value, which causes the name to exceed the Windows maximum limit of 255. Ensure that the names of any renamed target tables do not exceed 232 characters.
3Under Data Type Rules, if you want to override the default mappings of source data types to target data types, define data type rules. Click the + (Add new row) icon and enter a source data type and corresponding target data type. Then press Enter.
Also, in the Source Data Type value, you can include the percent (%) wildcard to represent the data type precision, scale, or size, for example, NUMBER(%,4), NUMBER(8,%), or NUMBER(%). Use the wildcard to cover all source columns that have the same data type but use different precision, scale, or size values, instead of specifying each one individually. For example, enter FLOAT(%) to cover FLOAT(16), FLOAT(32), and FLOAT(84). You cannot enter the % wildcard in the target data type. A source data type that uses the % wildcard must map to a target data type that uses specific precision, scale, or size value. For example, you could map the source data type FLOAT(%) to a target data type specification such as NUMBER(38,10)
4Under Custom Properties, you can enter one or more custom properties that Informatica provides to improve performance or to meet your special requirements. To add a property, click the + icon to add a row. In the Property Name field, select a property and then enter a property value, or select the Custom option and manually enter both the property name and value.
The following table describes the properties that are available, depending on the load type:
Property
Description
Writer Distributor Count
The number of distributors that can run on separate threads in parallel to process data during an initial load job or the unload phase of a combined load job when the Writer Unload Multiple Distributors custom property is set to true. Using parallel distributor threads can improve job performance, particularly for high-volume data transfers.
Default value is 3. If your system has ample resources, Informatica recommends that you set this parameter to 8.
Note:
If you select the Auto-Tune option on the Let's Go! page of the task wizard, auto-tuning can determine the optimal distributor count. You can override the value from auto-tuning by setting this custom property.
Writer Helper Thread Count
The number of writer helper threads that are used to convert incoming change data rows or initial unload rows to the output format configured for the target, such as Avro, CSV, or Parquet.
Default value is 2. If two threads can’t keep up with the incoming volume of data, you can increase the number of threads. Consider increasing the number of threads in the following situations: 1) the incoming volume is high, 2) multiple writer distributors are in use, or 3) some rows are very large or wide, which increases conversion time.
Note:
If you select the Auto-Tune option on the Let's Go! page of the task wizard, auto-tuning can determine the optimal thread count. You can override the value from auto-tuning by setting this custom property.
Writer Unload Multiple Distributors
Indicates whether multiple distributor threads can be used to process data in parallel during initial load jobs and the unload phase of combined load jobs. The distributors perform work such as uploading data files to staging areas and flushing data to the target. Set this property to true to use multiple distributor threads.
Default value is false.
Note:
If you select the Auto-Tune option on the Let's Go! page of the task wizard, auto-tuning can determine whether to use multiple distributors. You can override the value from auto-tuning by setting this custom property.
Custom
Select this option to manually enter the name of a property and its value. Use this option to enter properties that Informatica Global Customer Support or a technical staff member has provided to you for a special case.
Custom properties are intended to address performance or special processing needs. A property name can contain only alphanumeric characters and the following special characters: periods (.), hyphens (-), and underscores (_).
Tip:
To delete a custom property after you've entered it, click the Delete icon at the right end of the property row.
Click Next to proceed, or click Save.
Configure a Google BigQuery target
Define target properties for the destination that you selected on the Destination page.
Target Properties
Define the following required Google BigQuery target properties:
Property
Description
Target Creation
The only available option is Create Target Tables, which generates the target tables based on the source objects.
Schema
Select the target schema in which Application Ingestion and Replication creates the target tables.
Apply Mode
For incremental load and combined initial and incremental load jobs, this property indicates how source DML changes, including inserts, updates, and deletes, are applied to the target. Options are:
- Standard. Accumulate the changes in a single apply cycle and intelligently merge them into fewer SQL statements before applying them to the target. For example, if an update followed by a delete occurs on the source row, no row is applied to the target. If multiple updates occur on the same column or field, only the last update is applied to the target. If multiple updates occur on different columns or fields, the updates are merged into a single update record before being applied to the target.
- Audit. Apply an audit trail of every DML operation made on the source tables to the target. A row for each DML change on a source table is written to the generated target table along with the audit columns you select under the Advanced section. The audit columns contain metadata about the change, such as the DML operation type, time, owner, transaction ID, generated ascending sequence number, and before image.
Consider using the Audit apply mode when you want to use the audit history to perform downstream computations or processing on the data before writing it to the target database or when you want to examine metadata about the captured changes.
- Soft Deletes. Apply source delete operations to the target as soft deletes. A soft delete marks the deleted row as deleted without actually removing it from the database. For example, a delete on the source results in a change record on the target with "D" displayed in the INFA_OPERATION_TYPE column.
Consider using soft deletes if you have a long-running business process that needs the soft-deleted data to finish processing, to restore data after an accidental delete operation, or to track deleted values for audit purposes.
Note:
If you use Soft Deletes mode, you must not perform an update on the primary key in a source table. Otherwise, data corruption can occur on the target.
The default value is Standard.
Bucket
The name of an existing bucket container that stores, organizes, and controls access to the data objects that you load to Google Cloud Storage.
Data Directory or Task Target Directory
The subdirectory where Application Ingestion and Replication stores output files for jobs associated with the task. This field is called Data Directory for an initial load job or Task Target Directory for an incremental load or combined initial and incremental load job.
Advanced Target Properties
To view advanced properties, toggle on Show Advanced Options at the top of the page.
1Under Advanced Options, define any of the following optional advanced target properties that you want to use:
Property
Description
Add Last Replicated Time
Select this check box to add a metadata column that records the timestamp at which a record was inserted or last updated in the target table. For initial loads, all loaded records have the same timestamp. For incremental and combined initial and incremental loads, the column records the timestamp of the last DML operation that was applied to the target.
By default, this check box is not selected.
Add Operation Type
Add a metadata column that records the source SQL operation type in the output that the job propagates to the target database or inserts into the audit table on the target system.
This field is available only when the Apply Mode option is set to Audit or Soft Deletes.
In Audit mode, the job writes "I" for inserts, "U" for updates, "E" for upserts, or "D" for deletes to this metadata column.
In Soft Deletes mode, the job writes "D" for deletes or NULL for inserts, updates, and upserts. When the operation type is NULL, the other "Add Operation..." metadata columns are also NULL. Only when the operation type is "D" will the other metadata columns contain non-null values.
By default, this check box is selected and you you cannot deselect it.
Add Operation Time
Select this check box to add a metadata column that records the source SQL operation timestamp in the output that the job propagates to the target database or inserts into the audit table on the target system.
This field is available only when the Apply Mode option is set to Audit or Soft Deletes.
By default, this check box is not selected.
Add Operation Sequence
Select this check box to add a metadata column that records a generated, ascending sequence number for each change operation that the job inserts into the target tables. The sequence number reflects the change stream position of the operation.
This field is available only when Apply Mode is set to Audit.
By default, this check box is not selected.
Prefix for Metadata Columns
Add a prefix to the names of the added metadata columns to easily identify them and to prevent conflicts with the names of existing columns.
Do not include special characters in the prefix. Otherwise, task deployment will fail.
The default value is INFA_.
Enable Case Transformation
By default, target table names and column names are generated in the same case as the corresponding source names, unless cluster-level or session-level properties on the target override this case-sensitive behavior. If you want to control the case of letters in the target names, select this check box. Then select a Case Transformation Strategy option.
Case Transformation Strategy
If you selected Enable Case Transformation, select one of the following options to specify how to handle the case of letters in generated target table (or object) names and column (or field) names:
- Same as source. Use the same case as the source table (or object) names and column (or field) names.
- UPPERCASE. Use all uppercase.
- lowercase. Use all lowercase.
The default value is Same as source.
Note:
The selected strategy will override any cluster-level or session-level properties on the target for controlling case.
2Under Table Renaming Rules, if you want to rename the target objects that are associated with the selected source tables, define renaming rules.
aClick the + (Add new row) icon and enter a source table name or name mask and enter a corresponding target table name or name mask.
bTo define a mask, include one or more the asterisk (*) wildcards. Then, press Enter.
For example, to add the prefix "PROD_" to the names of target tables that correspond to all selected source tables, enter the * wildcard for the source table and enter PROD_* for the target table.
You can enter multiple rules.
Notes:
- If you enter the wildcard for a source table mask, you must also enter the wildcard for a target table mask.
- If a table name includes special characters, such as a backslash (\), asterisk(*), dot (.), or question mark (?), escape each special character in the name with a backslash (\).
- On Windows, if you enter target table renaming criteria that causes a target table name to exceed 232 characters in length, the name is truncated to 222 characters. Data Ingestion and Replication appends 14 characters to the name to add a date-time yyyyMMddHHmmss value, which causes the name to exceed the Windows maximum limit of 255. Ensure that the names of any renamed target tables do not exceed 232 characters.
3Under Data Type Rules, if you want to override the default mappings of source data types to target data types, define data type rules. Click the + (Add new row) icon and enter a source data type and corresponding target data type. Then press Enter.
Also, in the Source Data Type value, you can include the percent (%) wildcard to represent the data type precision, scale, or size, for example, NUMBER(%,4), NUMBER(8,%), or NUMBER(%). Use the wildcard to cover all source columns that have the same data type but use different precision, scale, or size values, instead of specifying each one individually. For example, enter FLOAT(%) to cover FLOAT(16), FLOAT(32), and FLOAT(84). You cannot enter the % wildcard in the target data type. A source data type that uses the % wildcard must map to a target data type that uses specific precision, scale, or size value. For example, you could map the source data type FLOAT(%) to a target data type specification such as NUMBER(38,10)
4Under Custom Properties, you can enter one or more custom properties that Informatica provides to improve performance or to meet your special requirements. To add a property, click the + icon to add a row. In the Property Name field, select a property and then enter a property value, or select the Custom option and manually enter both the property name and value.
The following table describes the properties that are available, depending on the load type:
Property
Description
Writer Distributor Count
The number of distributors that can run on separate threads in parallel to process data during an initial load job or the unload phase of a combined load job when the Writer Unload Multiple Distributors custom property is set to true. Using parallel distributor threads can improve job performance, particularly for high-volume data transfers.
Default value is 3. If your system has ample resources, Informatica recommends that you set this parameter to 8.
Note:
If you select the Auto-Tune option on the Let's Go! page of the task wizard, auto-tuning can determine the optimal distributor count. You can override the value from auto-tuning by setting this custom property.
Writer Helper Thread Count
The number of writer helper threads that are used to convert incoming change data rows or initial unload rows to the output format configured for the target, such as Avro, CSV, or Parquet.
Default value is 2. If two threads can’t keep up with the incoming volume of data, you can increase the number of threads. Consider increasing the number of threads in the following situations: 1) the incoming volume is high, 2) multiple writer distributors are in use, or 3) some rows are very large or wide, which increases conversion time.
Note:
If you select the Auto-Tune option on the Let's Go! page of the task wizard, auto-tuning can determine the optimal thread count. You can override the value from auto-tuning by setting this custom property.
Writer Unload Multiple Distributors
Indicates whether multiple distributor threads can be used to process data in parallel during initial load jobs and the unload phase of combined load jobs. The distributors perform work such as uploading data files to staging areas and flushing data to the target. Set this property to true to use multiple distributor threads.
Default value is false.
Note:
If you select the Auto-Tune option on the Let's Go! page of the task wizard, auto-tuning can determine whether to use multiple distributors. You can override the value from auto-tuning by setting this custom property.
Custom
Select this option to manually enter the name of a property and its value. Use this option to enter properties that Informatica Global Customer Support or a technical staff member has provided to you for a special case.
Custom properties are intended to address performance or special processing needs. A property name can contain only alphanumeric characters and the following special characters: periods (.), hyphens (-), and underscores (_).
Tip:
To delete a custom property after you've entered it, click the Delete icon at the right end of the property row.
Click Next to proceed, or click Save.
Configure a Google Cloud Storage target
Define target properties for the destination that you selected on the Destination page.
Target Properties
Define the following required Google Cloud Storage target properties:
Property
Description
Output Format
The format of the output files. Options are:
- CSV
- AVRO
- PARQUET
The default value is CSV.
Note:
Output files in CSV format use double-quotation marks ("") as the delimiter for each field.
Add Headers to CSV File
If CSV is selected as the output format, select this check box to add a header with source column names to the output CSV file.
Parquet Compression Type
If the PARQUET output format is selected, you can select a compression type that is supported by Parquet. Options are:
- None
- Gzip
- Snappy
The default value is None, which means no compression is used.
Avro Format
If you selected AVRO as the output format, select the format of the Avro schema that will be created for each source table. Options are:
- Avro-Flat. This Avro schema format lists all Avro fields in one record.
- Avro-Generic. This Avro schema format lists all columns from a source table in a single array of Avro fields.
- Avro-Nested. This Avro schema format organizes each type of information in a separate record.
The default value is Avro-Flat.
Avro Serialization Format
If AVRO is selected as the output format, select the serialization format of the Avro output file. Options are:
- None
- Binary
- JSON
The default value is Binary.
Avro Schema Directory
If AVRO is selected as the output format, specify the local directory where Application Ingestion and Replication stores Avro schema definitions for each source table. Schema definition files have the following naming pattern:
schemaname_tablename.txt
Note:
If this directory is not specified, no Avro schema definition file is produced.
File Compression Type
Controls whether to use a file compression type for output files in CSV or AVRO output format. Options are:
- None
- Deflate
- Gzip
- Snappy
The default value is None, which means no compression is used.
Avro Compression Type
If AVRO is selected as the output format, you can select an Avro compression type. Options are:
- None
- Bzip2
- Deflate
- Snappy
The default value is None, which means no compression is used.
Deflate Compression Level
If Deflate is selected in the Avro Compression Type field, specify a compression level from 0 to 9. The default value is 0.
Add Directory Tags
For incremental load and combined initial and incremental load tasks, select this check box to add the "dt=" prefix to the names of apply cycle directories to be compatible with the naming convention for Hive partitioning. This check box is cleared by default.
Bucket
The name of an existing bucket container that stores, organizes, and controls access to the data objects that you load to Google Cloud Storage.
Task Target Directory
For incremental load and combined initial and incremental load tasks, the root directory for the other directories that hold output data files, schema files, and CDC cycle contents and completed files. You can use it to specify a custom root directory for the task. If you enable the Connection Directory as Parent option, you can still optionally specify a task target directory to use with the parent directory specified in the connection properties.
This field is required if the {TaskTargetDirectory} placeholder is specified in patterns for any of the following directory fields.
Data Directory
For initial load tasks, define a directory structure for the directories where Application Ingestion and Replication stores output data files and optionally stores the schema.
The default directory pattern is {TableName)_{Timestamp}.
To customize the directory pattern, click the Edit icon to select from the following listed path types and values:
- Folder Path. Enter a folder name or use variables to create a folder name.
- Timestamp values. Select data elements Timestamp, yy, yyyy, mm, or dd. The Timestamp values are in the format yyyymmdd_hhmissms. The generated dates and times in the directory paths indicate when the initial load job starts to transfer data to the target.
- Schema Name. Select SchemaName, toUpper(SchemaName), or toLower(SchemaName).
- Table Name. Select TableName, toUpper(TableName), and toLower(TableName).
Note:
If you manually enter the directory expression, ensure that you enclose placeholders with curly brackets { }. Placeholder values are not case sensitive.
For incremental load and combined initial and incremental load tasks, define a custom path to the subdirectory that contains the cdc-data data files.
The default directory pattern is {TaskTargetDirectory}/data/{TableName}/data
To customize the directory pattern, click the Edit icon to select from the following listed path types and values:
- Folder Path. Enter {TaskTargetDirectory} for a task-specific base directory on the target to use instead of the S3 folder path specified in the connection properties.
- Timestamp values. Select data elements Timestamp, yy, yyyy, mm, or dd. The Timestamp values are in the format yyyymmdd_hhmissms. The generated dates and times in the directory paths indicate when the CDC cycle started.
- Schema Name. Select SchemaName, toUpper(SchemaName), or toLower(SchemaName).
- Table Name. Select TableName, toUpper(TableName), and toLower(TableName).
For Amazon S3 and Microsoft Azure Data Lake Storage Gen2 targets, Application Ingestion and Replication uses the directory specified in the target connection properties as the root for the data directory path when Connection Directory as Parent is selected.
For Google Cloud Storage targets, Application Ingestion and Replication uses the Bucket name that you specify in the target properties for the ingestion task.
For Microsoft Fabric OneLake targets, the parent directory is the path specified in the Lakehouse Path field in the Microsoft Fabric OneLake connection properties.
For Amazon S3 targets with Open Table format, the data directory field is not applicable. Enabling the Connection Directory as Parent includes the connection directory before the warehouse base path. If disabled, files are saved directly under the warehouse base directory.
Schema Directory
Specify a custom directory for storing the schema file if you want to store it in a directory other than the default directory. For initial loads, previously used values if available are shown in a list for your convenience. This field is optional.
For initial loads, the schema is stored in the data directory by default. For incremental loads and combined initial and incremental loads, the schema file is stored in the following directory by default: {TaskTargetDirectory}/data/{TableName}/schema.
You can use the same placeholders as for the Data Directory field. If you manually enter placeholders, ensure that you enclose them with curly brackets { }. If you include the toUpper or toLower function, put the placeholder name in parentheses and enclose both the function and placeholder in curly brackets, for example: {toLower(SchemaName)}
Note:
Schema is written only to output data files in CSV format. Data files in Parquet and Avro formats contain their own embedded schema.
Cycle Completion Directory
For incremental load and combined initial and incremental load tasks, the path to the directory that contains the cycle completed file.
Default is {TaskTargetDirectory}/cycle/completed.
Cycle Contents Directory
For incremental load and combined initial and incremental load tasks, the path to the directory that contains the cycle contents files.
Default is {TaskTargetDirectory}/cycle/contents.
Use Cycle Partitioning for Data Directory
For incremental load and combined initial and incremental load tasks, select this option to create a timestamp subdirectory for each CDC cycle, under each data directory.
If this option is not selected, individual data files are written to the same directory without a timestamp, unless you define an alternative directory structure.
Use Cycle Partitioning for Summary Directories
For incremental load and combined initial and incremental load tasks, select this option to create a timestamp subdirectory for each CDC cycle, under the summary contents and completed subdirectories.
List Individual Files in Contents
For incremental load and combined initial and incremental load tasks, lists individual data files under the contents subdirectory.
If Use Cycle Partitioning for Summary Directories is cleared, this option is selected by default. All of the individual files are listed in the contents subdirectory unless you can configure custom subdirectories by using the placeholders, such as for timestamp or date.
If Use Cycle Partitioning for Data Directory is selected, you can still optionally select this check box to list individual files and group them by CDC cycle.
Advanced Target Properties
To view advanced properties, toggle on Show Advanced Options at the top of the page.
1Under Advanced Options, define any of the following optional advanced target properties that you want to use:
Property
Description
Add Operation Type
Select this check box to add a metadata column that records the source SQL operation type in the output that the job propagates to the target.
For incremental loads, the job writes "I" for insert, "U" for update, or "D" for delete. For initial loads, the job always writes "I" for insert.
By default, this check box is selected for incremental load and initial and incremental load jobs, and cleared for initial load jobs.
Add Operation Time
Select this check box to add a metadata column that records the source SQL operation timestamp in the output that the job propagates to the target database or inserts into the audit table on the target system.
For initial loads, the job always writes the current date and time.
By default, this check box is not selected.
Add Orderable Sequence
Select this check box to add a metadata column that records a combined epoch value and an incremental numeric value for each change operation that the job inserts into the target tables. The sequence value is always ascending, but not guaranteed to be sequential and gaps may exist. The sequence value is used to identify the order of activity in the target records.
By default, this check box is not selected.
2Under Table Renaming Rules, if you want to rename the target objects that are associated with the selected source tables, define renaming rules.
aClick the + (Add new row) icon and enter a source table name or name mask and enter a corresponding target table name or name mask.
bTo define a mask, include one or more the asterisk (*) wildcards. Then, press Enter.
For example, to add the prefix "PROD_" to the names of target tables that correspond to all selected source tables, enter the * wildcard for the source table and enter PROD_* for the target table.
You can enter multiple rules.
Notes:
- If you enter the wildcard for a source table mask, you must also enter the wildcard for a target table mask.
- If a table name includes special characters, such as a backslash (\), asterisk(*), dot (.), or question mark (?), escape each special character in the name with a backslash (\).
- On Windows, if you enter target table renaming criteria that causes a target table name to exceed 232 characters in length, the name is truncated to 222 characters. Data Ingestion and Replication appends 14 characters to the name to add a date-time yyyyMMddHHmmss value, which causes the name to exceed the Windows maximum limit of 255. Ensure that the names of any renamed target tables do not exceed 232 characters.
3Under Custom Properties, you can enter one or more custom properties that Informatica provides to improve performance or to meet your special requirements. To add a property, click the + icon to add a row. In the Property Name field, select a property and then enter a property value, or select the Custom option and manually enter both the property name and value.
The following table describes the properties that are available, depending on the load type:
Property
Description
Writer Distributor Count
The number of distributors that can run on separate threads in parallel to process data during an initial load job or the unload phase of a combined load job when the Writer Unload Multiple Distributors custom property is set to true. Using parallel distributor threads can improve job performance, particularly for high-volume data transfers.
Default value is 3. If your system has ample resources, Informatica recommends that you set this parameter to 8.
Note:
If you select the Auto-Tune option on the Let's Go! page of the task wizard, auto-tuning can determine the optimal distributor count. You can override the value from auto-tuning by setting this custom property.
Writer Helper Thread Count
The number of writer helper threads that are used to convert incoming change data rows or initial unload rows to the output format configured for the target, such as Avro, CSV, or Parquet.
Default value is 2. If two threads can’t keep up with the incoming volume of data, you can increase the number of threads. Consider increasing the number of threads in the following situations: 1) the incoming volume is high, 2) multiple writer distributors are in use, or 3) some rows are very large or wide, which increases conversion time.
Note:
If you select the Auto-Tune option on the Let's Go! page of the task wizard, auto-tuning can determine the optimal thread count. You can override the value from auto-tuning by setting this custom property.
Writer Unload Multiple Distributors
Indicates whether multiple distributor threads can be used to process data in parallel during initial load jobs and the unload phase of combined load jobs. The distributors perform work such as uploading data files to staging areas and flushing data to the target. Set this property to true to use multiple distributor threads.
Default value is false.
Note:
If you select the Auto-Tune option on the Let's Go! page of the task wizard, auto-tuning can determine whether to use multiple distributors. You can override the value from auto-tuning by setting this custom property.
Custom
Select this option to manually enter the name of a property and its value. Use this option to enter properties that Informatica Global Customer Support or a technical staff member has provided to you for a special case.
Custom properties are intended to address performance or special processing needs. A property name can contain only alphanumeric characters and the following special characters: periods (.), hyphens (-), and underscores (_).
Tip:
To delete a custom property after you've entered it, click the Delete icon at the right end of the property row.
Click Next to proceed, or click Save.
Configure a Kafka target
Define target properties for the destination that you selected on the Destination page.
Target Properties
Define the following required Kafka target properties:
Property
Description
Use Table Name as Topic Name
Controls whether Application Ingestion and Replication writes messages that contain source data to separate topics, one for each source object, or writes all messages to a single topic.
Select this check box to write messages to separate table-specific topics. The topic names match the source table names, unless you add the source schema name, a prefix, or a suffix in the Include Schema Name, Table Prefix, or Table Suffix properties.
By default, this check box is cleared.
Include Schema Name
When Use Table Name as Topic Name is selected, this check box appears and is selected by default. This setting adds the source schema name in the table-specific topic names. The topic names then have the format schemaname_tablename.
If you do not want to include the schema name, clear this check box.
Table Prefix
When Use Table Name as Topic Name is selected, this property appears so that you can optionally enter a prefix to add to the table-specific topic names. For example, if you specify myprefix_, the topic names have the format myprefix_tablename. If you omit the underscore (_) after the prefix, the prefix is prepended to the table name.
Table Suffix
When Use Table Name as Topic Name is selected, this property appears so that you can optionally enter a suffix to add to the table-specific topic names. For example, if you specify _mysuffix, the topic names have the format tablename_mysuffix. If you omit the underscore (_) before the suffix, the suffix is appended to the table name.
Output Format
Select the format of the output file. Options are:
- CSV
- AVRO
- JSON
The default value is CSV.
Note:
Output files in CSV format use double-quotation marks ("") as the delimiter for each field.
If your Kafka target uses Confluent Schema Registry to store schemas for incremental load jobs, you must select AVRO as the format.
JSON Format
If JSON is selected as the output format, select the level of detail of the output. Options are:
- Concise. This format records only the most relevant data in the output, such as the operation type and the column names and values.
- Verbose. This format records detailed information, such as the table name and column types.
Avro Format
If you selected AVRO as the output format, select the format of the Avro schema that will be created for each source table. Options are:
- Avro-Flat. This Avro schema format lists all Avro fields in one record.
- Avro-Generic. This Avro schema format lists all columns from a source table in a single array of Avro fields.
- Avro-Nested. This Avro schema format organizes each type of information in a separate record.
The default value is Avro-Flat.
Avro Serialization Format
If AVRO is selected as the output format, select the serialization format of the Avro output file. Options are:
- Binary
- JSON
- None
The default value is Binary.
If you have a Confluent Kafka target that uses Confluent Schema Registry to store schemas, select None. Otherwise, Confluent Schema Registry does not register the schema. Do not select None if you are not using Confluent Scheme Registry.
Avro Schema Directory
If AVRO is selected as the output format, specify the local directory where Application Ingestion and Replication stores Avro schema definitions for each source table. Schema definition files have the following naming pattern:
schemaname_tablename.txt
Note:
If this directory is not specified, no Avro schema definition file is produced.
If a source schema change is expected to alter the target, the Avro schema definition file is regenerated with a unique name that includes a timestamp, in the following format:
schemaname_tablename_YYYYMMDDhhmmss.txt
This unique naming pattern ensures that older schema definition files are preserved for audit purposes.
Avro Compression Type
If AVRO is selected as the output format, you can select an Avro compression type. Options are:
- None
- Bzip2
- Deflate
- Snappy
The default value is None, which means no compression is used.
Advanced Target Properties
To view advanced properties, toggle on Show Advanced Options at the top of the page.
1Under Advanced Options, define any of the following optional advanced target properties that you want to use:
Property
Description
Add Operation Type
Select this check box to add a metadata column that includes the source SQL operation type in the output that the job propagates to the target.
The job writes "I" for insert, "U" for update, or "D" for delete.
By default, this check box is selected.
Add Operation Time
Select this check box to add a metadata column that records the source SQL operation timestamp in the output that the job propagates to the target database or inserts into the audit table on the target system.
By default, this check box is not selected.
Add Orderable Sequence
Select this check box to add a metadata column that records a combined epoch value and an incremental numeric value for each change operation that the job inserts into the target tables. The sequence value is always ascending, but not guaranteed to be sequential and gaps may exist. The sequence value is used to identify the order of activity in the target records.
By default, this check box is not selected.
Async Write
Controls whether to use synchronous delivery of messages to Kafka.
- Clear this check box to use synchronous delivery. Kafka must acknowledge each message as received before Application Ingestion and Replication sends the next message. In this mode, Kafka is unlikely to receive duplicate messages. However, performance might be slower.
- Select this check box to use asynchronous delivery. Application Ingestion and Replication sends messages as soon as possible, without regard for the order in which the changes were retrieved from the source.
By default, this check box is selected.
Producer Configuration Properties
Specify a comma-separated list of key=value pairs to enter Kafka producer properties for Apache Kafkatargets.
You can specify Kafka producer properties in either this field or in the Additional Connection Properties field in the Kafka connection.
If you enter the producer properties in this field, the properties pertain to the application ingestion and replication jobs associated with this task only. If you enter the producer properties for the connection, the properties pertain to jobs for all tasks that use the connection definition, unless you override the connection-level properties for specific tasks by also specifying properties in the Producer Configuration Properties field.
For information about Kafka producer properties, see the Apache Kafka documentation.
2Under Table Renaming Rules, if you want to rename the target objects that are associated with the selected source tables, define renaming rules.
aClick the + (Add new row) icon and enter a source table name or name mask and enter a corresponding target table name or name mask.
bTo define a mask, include one or more the asterisk (*) wildcards. Then, press Enter.
For example, to add the prefix "PROD_" to the names of target tables that correspond to all selected source tables, enter the * wildcard for the source table and enter PROD_* for the target table.
You can enter multiple rules.
Notes:
- If you enter the wildcard for a source table mask, you must also enter the wildcard for a target table mask.
- If a table name includes special characters, such as a backslash (\), asterisk(*), dot (.), or question mark (?), escape each special character in the name with a backslash (\).
- On Windows, if you enter target table renaming criteria that causes a target table name to exceed 232 characters in length, the name is truncated to 222 characters. Data Ingestion and Replication appends 14 characters to the name to add a date-time yyyyMMddHHmmss value, which causes the name to exceed the Windows maximum limit of 255. Ensure that the names of any renamed target tables do not exceed 232 characters.
3Under Custom Properties, you can enter one or more custom properties that Informatica provides to improve performance or to meet your special requirements. To add a property, click the + icon to add a row. In the Property Name field, select a property and then enter a property value, or select the Custom option and manually enter both the property name and value.
The following table describes the properties that are available:
Property
Description
Writer Helper Thread Count
The number of writer helper threads that are used to convert incoming change data rows or initial unload rows to the output format configured for the target, such as Avro, CSV, or Parquet.
Default value is 2. If two threads can’t keep up with the incoming volume of data, you can increase the number of threads. Consider increasing the number of threads in the following situations: 1) the incoming volume is high, 2) multiple writer distributors are in use, or 3) some rows are very large or wide, which increases conversion time.
Note:
If you select the Auto-Tune option on the Let's Go! page of the task wizard, auto-tuning can determine the optimal thread count. You can override the value from auto-tuning by setting this custom property.
Custom
Select this option to manually enter the name of a property and its value. Use this option to enter properties that Informatica Global Customer Support or a technical staff member has provided to you for a special case.
Custom properties are intended to address performance or special processing needs. A property name can contain only alphanumeric characters and the following special characters: periods (.), hyphens (-), and underscores (_).
Tip:
To delete a custom property after you've entered it, click the Delete icon at the right end of the property row.
Click Next to proceed, or click Save.
Configure a Microsoft Azure Data Lake Storage Gen2 target
Define target properties for the destination that you selected on the Destination page.
Target Properties
Define the following required Microsoft Azure Data Lake Storage Gen2 target properties:
Property
Description
Output Format
The format of the output files. Options are:
- CSV
- AVRO
- PARQUET
The default value is CSV.
Note:
Output files in CSV format use double-quotation marks ("") as the delimiter for each field.
Add Headers to CSV File
If CSV is selected as the output format, select this check box to add a header with source column names to the output CSV file.
Parquet Compression Type
If the PARQUET output format is selected, you can select a compression type that is supported by Parquet. Options are:
- None
- Gzip
- Snappy
The default value is None, which means no compression is used.
Avro Format
If you selected AVRO as the output format, select the format of the Avro schema that will be created for each source table. Options are:
- Avro-Flat. This Avro schema format lists all Avro fields in one record.
- Avro-Generic. This Avro schema format lists all columns from a source table in a single array of Avro fields.
- Avro-Nested. This Avro schema format organizes each type of information in a separate record.
The default value is Avro-Flat.
Avro Serialization Format
If AVRO is selected as the output format, select the serialization format of the Avro output file. Options are:
- None
- Binary
- JSON
The default value is Binary.
Avro Schema Directory
If AVRO is selected as the output format, specify the local directory where Application Ingestion and Replication stores Avro schema definitions for each source table. Schema definition files have the following naming pattern:
schemaname_tablename.txt
Note:
If this directory is not specified, no Avro schema definition file is produced.
File Compression Type
Controls whether to use a file compression type for output files in CSV or AVRO output format. Options are:
- None
- Deflate
- Gzip
- Snappy
The default value is None, which means no compression is used.
Avro Compression Type
If AVRO is selected as the output format, you can select an Avro compression type. Options are:
- None
- Bzip2
- Deflate
- Snappy
The default value is None, which means no compression is used.
Deflate Compression Level
If Deflate is selected in the Avro Compression Type field, specify a compression level from 0 to 9. The default value is 0.
Add Directory Tags
For incremental load and combined initial and incremental load tasks, select this check box to add the "dt=" prefix to the names of apply cycle directories to be compatible with the naming convention for Hive partitioning. This check box is cleared by default.
Task Target Directory
For incremental load and combined initial and incremental load tasks, the root directory for the other directories that hold output data files, schema files, and CDC cycle contents and completed files. You can use it to specify a custom root directory for the task. If you enable the Connection Directory as Parent option, you can still optionally specify a task target directory to use with the parent directory specified in the connection properties.
This field is required if the {TaskTargetDirectory} placeholder is specified in patterns for any of the following directory fields.
Data Directory
For initial load tasks, define a directory structure for the directories where Application Ingestion and Replication stores output data files and optionally stores the schema.
The default directory pattern is {TableName)_{Timestamp}.
To customize the directory pattern, click the Edit icon to select from the following listed path types and values:
- Folder Path. Enter a folder name or use variables to create a folder name.
- Timestamp values. Select data elements Timestamp, yy, yyyy, mm, or dd. The Timestamp values are in the format yyyymmdd_hhmissms. The generated dates and times in the directory paths indicate when the initial load job starts to transfer data to the target.
- Schema Name. Select SchemaName, toUpper(SchemaName), or toLower(SchemaName).
- Table Name. Select TableName, toUpper(TableName), and toLower(TableName).
Note:
If you manually enter the directory expression, ensure that you enclose placeholders with curly brackets { }. Placeholder values are not case sensitive.
For incremental load and combined initial and incremental load tasks, define a custom path to the subdirectory that contains the cdc-data data files.
The default directory pattern is {TaskTargetDirectory}/data/{TableName}/data
To customize the directory pattern, click the Edit icon to select from the following listed path types and values:
- Folder Path. Enter {TaskTargetDirectory} for a task-specific base directory on the target to use instead of the S3 folder path specified in the connection properties.
- Timestamp values. Select data elements Timestamp, yy, yyyy, mm, or dd. The Timestamp values are in the format yyyymmdd_hhmissms. The generated dates and times in the directory paths indicate when the CDC cycle started.
- Schema Name. Select SchemaName, toUpper(SchemaName), or toLower(SchemaName).
- Table Name. Select TableName, toUpper(TableName), and toLower(TableName).
For Amazon S3 and Microsoft Azure Data Lake Storage Gen2 targets, Application Ingestion and Replication uses the directory specified in the target connection properties as the root for the data directory path when Connection Directory as Parent is selected.
For Google Cloud Storage targets, Application Ingestion and Replication uses the Bucket name that you specify in the target properties for the ingestion task.
For Microsoft Fabric OneLake targets, the parent directory is the path specified in the Lakehouse Path field in the Microsoft Fabric OneLake connection properties.
For Amazon S3 targets with Open Table format, the data directory field is not applicable. Enabling the Connection Directory as Parent includes the connection directory before the warehouse base path. If disabled, files are saved directly under the warehouse base directory.
Connection Directory as Parent
Select this check box to use the directory value that is specified in the target connection properties as the parent directory for the custom directory paths specified in the task target properties.
For initial load tasks, the parent directory is used in the Data Directory and Schema Directory.
For incremental load and combined initial and incremental load tasks, the parent directory is used in the Data Directory, Schema Directory, Cycle Completion Directory, and Cycle Contents Directory.
This check box is selected by default. If you clear it, for initial loads, define the full path to the output files in the Data Directory field. For incremental loads, optionally specify a root directory for the task in the Task Target Directory.
Schema Directory
Specify a custom directory for storing the schema file if you want to store it in a directory other than the default directory. For initial loads, previously used values if available are shown in a list for your convenience. This field is optional.
For initial loads, the schema is stored in the data directory by default. For incremental loads and combined initial and incremental loads, the schema file is stored in the following directory by default: {TaskTargetDirectory}/data/{TableName}/schema.
You can use the same placeholders as for the Data Directory field. If you manually enter placeholders, ensure that you enclose them with curly brackets { }. If you include the toUpper or toLower function, put the placeholder name in parentheses and enclose both the function and placeholder in curly brackets, for example: {toLower(SchemaName)}
Note:
Schema is written only to output data files in CSV format. Data files in Parquet and Avro formats contain their own embedded schema.
Cycle Completion Directory
For incremental load and combined initial and incremental load tasks, the path to the directory that contains the cycle completed file.
Default is {TaskTargetDirectory}/cycle/completed.
Cycle Contents Directory
For incremental load and combined initial and incremental load tasks, the path to the directory that contains the cycle contents files.
Default is {TaskTargetDirectory}/cycle/contents.
Use Cycle Partitioning for Data Directory
For incremental load and combined initial and incremental load tasks, select this option to create a timestamp subdirectory for each CDC cycle, under each data directory.
If this option is not selected, individual data files are written to the same directory without a timestamp, unless you define an alternative directory structure.
Use Cycle Partitioning for Summary Directories
For incremental load and combined initial and incremental load tasks, select this option to create a timestamp subdirectory for each CDC cycle, under the summary contents and completed subdirectories.
List Individual Files in Contents
For incremental load and combined initial and incremental load tasks, lists individual data files under the contents subdirectory.
If Use Cycle Partitioning for Summary Directories is cleared, this option is selected by default. All of the individual files are listed in the contents subdirectory unless you can configure custom subdirectories by using the placeholders, such as for timestamp or date.
If Use Cycle Partitioning for Data Directory is selected, you can still optionally select this check box to list individual files and group them by CDC cycle.
Advanced Target Properties
To view advanced properties, toggle on Show Advanced Options at the top of the page.
1Under Advanced Options, define any of the following optional advanced target properties that you want to use:
Property
Description
Add Operation Type
Select this check box to add a metadata column that records the source SQL operation type in the output that the job propagates to the target.
For incremental loads, the job writes "I" for insert, "U" for update, or "D" for delete. For initial loads, the job always writes "I" for insert.
By default, this check box is selected for incremental load and initial and incremental load jobs, and cleared for initial load jobs.
Add Operation Time
Select this check box to add a metadata column that records the source SQL operation timestamp in the output that the job propagates to the target database or inserts into the audit table on the target system.
For initial loads, the job always writes the current date and time.
By default, this check box is not selected.
Add Orderable Sequence
Select this check box to add a metadata column that records a combined epoch value and an incremental numeric value for each change operation that the job inserts into the target tables. The sequence value is always ascending, but not guaranteed to be sequential and gaps may exist. The sequence value is used to identify the order of activity in the target records.
By default, this check box is not selected.
2Under Table Renaming Rules, if you want to rename the target objects that are associated with the selected source tables, define renaming rules.
aClick the + (Add new row) icon and enter a source table name or name mask and enter a corresponding target table name or name mask.
bTo define a mask, include one or more the asterisk (*) wildcards. Then, press Enter.
For example, to add the prefix "PROD_" to the names of target tables that correspond to all selected source tables, enter the * wildcard for the source table and enter PROD_* for the target table.
You can enter multiple rules.
Notes:
- If you enter the wildcard for a source table mask, you must also enter the wildcard for a target table mask.
- If a table name includes special characters, such as a backslash (\), asterisk(*), dot (.), or question mark (?), escape each special character in the name with a backslash (\).
- On Windows, if you enter target table renaming criteria that causes a target table name to exceed 232 characters in length, the name is truncated to 222 characters. Data Ingestion and Replication appends 14 characters to the name to add a date-time yyyyMMddHHmmss value, which causes the name to exceed the Windows maximum limit of 255. Ensure that the names of any renamed target tables do not exceed 232 characters.
3Under Custom Properties, you can enter one or more custom properties that Informatica provides to improve performance or to meet your special requirements. To add a property, click the + icon to add a row. In the Property Name field, select a property and then enter a property value, or select the Custom option and manually enter both the property name and value.
The following table describes the properties that are available, depending on the load type:
Property
Description
Writer Distributor Count
The number of distributors that can run on separate threads in parallel to process data during an initial load job or the unload phase of a combined load job when the Writer Unload Multiple Distributors custom property is set to true. Using parallel distributor threads can improve job performance, particularly for high-volume data transfers.
Default value is 3. If your system has ample resources, Informatica recommends that you set this parameter to 8.
Note:
If you select the Auto-Tune option on the Let's Go! page of the task wizard, auto-tuning can determine the optimal distributor count. You can override the value from auto-tuning by setting this custom property.
Writer Helper Thread Count
The number of writer helper threads that are used to convert incoming change data rows or initial unload rows to the output format configured for the target, such as Avro, CSV, or Parquet.
Default value is 2. If two threads can’t keep up with the incoming volume of data, you can increase the number of threads. Consider increasing the number of threads in the following situations: 1) the incoming volume is high, 2) multiple writer distributors are in use, or 3) some rows are very large or wide, which increases conversion time.
Note:
If you select the Auto-Tune option on the Let's Go! page of the task wizard, auto-tuning can determine the optimal thread count. You can override the value from auto-tuning by setting this custom property.
Writer Unload Multiple Distributors
Indicates whether multiple distributor threads can be used to process data in parallel during initial load jobs and the unload phase of combined load jobs. The distributors perform work such as uploading data files to staging areas and flushing data to the target. Set this property to true to use multiple distributor threads.
Default value is false.
Note:
If you select the Auto-Tune option on the Let's Go! page of the task wizard, auto-tuning can determine whether to use multiple distributors. You can override the value from auto-tuning by setting this custom property.
Custom
Select this option to manually enter the name of a property and its value. Use this option to enter properties that Informatica Global Customer Support or a technical staff member has provided to you for a special case.
Custom properties are intended to address performance or special processing needs. A property name can contain only alphanumeric characters and the following special characters: periods (.), hyphens (-), and underscores (_).
Tip:
To delete a custom property after you've entered it, click the Delete icon at the right end of the property row.
Click Next to proceed, or click Save.
Configure a Microsoft Azure Synapse Analytics target
Define target properties for the destination that you selected on the Destination page.
Target Properties
Define the following required Microsoft Azure Synapse Analytics target properties:
Property
Description
Target Creation
The only available option is Create Target Tables, which generates the target tables based on the source objects.
Schema
Select the target schema in which Application Ingestion and Replication creates the target tables. The schema name that is specified in the connection properties is displayed by default.
This field is case sensitive. Therefore, ensure that you entered the schema name in the connection properties in the correct case.
Advanced Target Properties
To view advanced properties, toggle on Show Advanced Options at the top of the page.
1Under Advanced Options, define any of the following optional advanced target properties that you want to use:
Property
Description
Add Last Replicated Time
Select this check box to add a metadata column that records the timestamp at which a record was inserted or last updated in the target table. For initial loads, all loaded records have the same timestamp. For incremental and combined initial and incremental loads, the column records the timestamp of the last DML operation that was applied to the target.
By default, this check box is not selected.
Prefix for Metadata Columns
Add a prefix to the names of the added metadata columns to easily identify them and to prevent conflicts with the names of existing columns.
Do not include special characters in the prefix. Otherwise, task deployment will fail.
The default value is INFA_.
2Under Table Renaming Rules, if you want to rename the target objects that are associated with the selected source tables, define renaming rules.
aClick the + (Add new row) icon and enter a source table name or name mask and enter a corresponding target table name or name mask.
bTo define a mask, include one or more the asterisk (*) wildcards. Then, press Enter.
For example, to add the prefix "PROD_" to the names of target tables that correspond to all selected source tables, enter the * wildcard for the source table and enter PROD_* for the target table.
You can enter multiple rules.
Notes:
- If you enter the wildcard for a source table mask, you must also enter the wildcard for a target table mask.
- If a table name includes special characters, such as a backslash (\), asterisk(*), dot (.), or question mark (?), escape each special character in the name with a backslash (\).
- On Windows, if you enter target table renaming criteria that causes a target table name to exceed 232 characters in length, the name is truncated to 222 characters. Data Ingestion and Replication appends 14 characters to the name to add a date-time yyyyMMddHHmmss value, which causes the name to exceed the Windows maximum limit of 255. Ensure that the names of any renamed target tables do not exceed 232 characters.
3Under Data Type Rules, if you want to override the default mappings of source data types to target data types, define data type rules. Click the + (Add new row) icon and enter a source data type and corresponding target data type. Then press Enter.
Also, in the Source Data Type value, you can include the percent (%) wildcard to represent the data type precision, scale, or size, for example, NUMBER(%,4), NUMBER(8,%), or NUMBER(%). Use the wildcard to cover all source columns that have the same data type but use different precision, scale, or size values, instead of specifying each one individually. For example, enter FLOAT(%) to cover FLOAT(16), FLOAT(32), and FLOAT(84). You cannot enter the % wildcard in the target data type. A source data type that uses the % wildcard must map to a target data type that uses specific precision, scale, or size value. For example, you could map the source data type FLOAT(%) to a target data type specification such as NUMBER(38,10)
4Under Custom Properties, you can enter one or more custom properties that Informatica provides to improve performance or to meet your special requirements. To add a property, click the + icon to add a row. In the Property Name field, select a property and then enter a property value, or select the Custom option and manually enter both the property name and value.
The following table describes the properties that are available:
Property
Description
Writer Helper Thread Count
The number of writer helper threads that are used to convert incoming change data rows or initial unload rows to the output format configured for the target, such as Avro, CSV, or Parquet.
Default value is 2. If two threads can’t keep up with the incoming volume of data, you can increase the number of threads. Consider increasing the number of threads in the following situations: 1) the incoming volume is high, 2) multiple writer distributors are in use, or 3) some rows are very large or wide, which increases conversion time.
Note:
If you select the Auto-Tune option on the Let's Go! page of the task wizard, auto-tuning can determine the optimal thread count. You can override the value from auto-tuning by setting this custom property.
Custom
Select this option to manually enter the name of a property and its value. Use this option to enter properties that Informatica Global Customer Support or a technical staff member has provided to you for a special case.
Custom properties are intended to address performance or special processing needs. A property name can contain only alphanumeric characters and the following special characters: periods (.), hyphens (-), and underscores (_).
Tip:
To delete a custom property after you've entered it, click the Delete icon at the right end of the property row.
Click Next to proceed, or click Save.
Configure a Microsoft Fabric Data Warehouse target
Define target properties for the destination that you selected on the Destination page.
Target Properties
Define the following required Microsoft Fabric Data Warehouse target properties:
Property
Description
Schema Path
Select the schema path where Application Ingestion and Replication creates the target tables.
Apply Mode
For incremental load and combined initial and incremental load jobs, this property indicates how source DML changes, including inserts, updates, and deletes, are applied to the target. Options are:
- Standard. Accumulate the changes in a single apply cycle and intelligently merge them into fewer SQL statements before applying them to the target. For example, if an update followed by a delete occurs on the source row, no row is applied to the target. If multiple updates occur on the same column or field, only the last update is applied to the target. If multiple updates occur on different columns or fields, the updates are merged into a single update record before being applied to the target.
- Audit. Apply an audit trail of every DML operation made on the source tables to the target. A row for each DML change on a source table is written to the generated target table along with the audit columns you select under the Advanced section. The audit columns contain metadata about the change, such as the DML operation type, time, owner, transaction ID, generated ascending sequence number, and before image.
Consider using the Audit apply mode when you want to use the audit history to perform downstream computations or processing on the data before writing it to the target database or when you want to examine metadata about the captured changes.
- Soft Deletes. Apply source delete operations to the target as soft deletes. A soft delete marks the deleted row as deleted without actually removing it from the database. For example, a delete on the source results in a change record on the target with "D" displayed in the INFA_OPERATION_TYPE column.
Consider using soft deletes if you have a long-running business process that needs the soft-deleted data to finish processing, to restore data after an accidental delete operation, or to track deleted values for audit purposes.
Note:
If you use Soft Deletes mode, you must not perform an update on the primary key in a source table. Otherwise, data corruption can occur on the target.
The default value is Standard.
Staging Lakehouse Name
The name of the intermediate storage location in the data lake where data is temporarily stored before it is loaded into Microsoft Fabric Data Warehouse.
Advanced Target Properties
To view advanced properties, toggle on Show Advanced Options at the top of the page.
1Under Advanced Options, define any of the following optional advanced target properties that you want to use:
Field
Description
Add Operation Type
Add a metadata column that records the source SQL operation type in the output that the job propagates to the target database or inserts into the audit table on the target system.
This field is available only when the Apply Mode option is set to Audit or Soft Deletes.
In Audit mode, the job writes "I" for inserts, "U" for updates, "E" for upserts, or "D" for deletes to this metadata column.
In Soft Deletes mode, the job writes "D" for deletes or NULL for inserts, updates, and upserts. When the operation type is NULL, the other "Add Operation..." metadata columns are also NULL. Only when the operation type is "D" will the other metadata columns contain non-null values.
By default, this check box is selected and you you cannot deselect it.
Add Operation Time
Select this check box to add a metadata column that records the source SQL operation timestamp in the output that the job propagates to the target database or inserts into the audit table on the target system.
This field is available only when the Apply Mode option is set to Audit or Soft Deletes.
By default, this check box is not selected.
Prefix for Metadata Columns
Add a prefix to the names of the added metadata columns to easily identify them and to prevent conflicts with the names of existing columns.
The default value is INFA_.
Enable Case Transformation
Not applicable.
Case Transformation Strategy
Not applicable.
Add Last Replicated Time
Select this check box to add a metadata column that records the timestamp at which a record was inserted or last updated in the target table. For initial loads, all loaded records have the same timestamp. For incremental and combined initial and incremental loads, the column records the timestamp of the last DML operation that was applied to the target.
By default, this check box is not selected.
Add Cycle ID
Select this check box to add a metadata column that includes the cycle ID of each CDC cycle in each target table. A cycle ID is a number that's generated by the CDC engine for each successful CDC cycle. If you integrate the job with Data Integration taskflows, the job can pass the minimum and maximum cycle IDs in output fields to the taskflow so that the taskflow can determine the range of cycles that contain new CDC data. This capability is useful if data from multiple cycles accumulates before the previous taskflow run completes. By default, this check box is not selected.
2Under Table Renaming Rules, if you want to rename the target objects that are associated with the selected source tables, define renaming rules.
aClick the + (Add new row) icon and enter a source table name or name mask and enter a corresponding target table name or name mask.
bTo define a mask, include one or more the asterisk (*) wildcards. Then, press Enter.
For example, to add the prefix "PROD_" to the names of target tables that correspond to all selected source tables, enter the * wildcard for the source table and enter PROD_* for the target table.
You can enter multiple rules.
Notes:
- If you enter the wildcard for a source table mask, you must also enter the wildcard for a target table mask.
- If a table name includes special characters, such as a backslash (\), asterisk(*), dot (.), or question mark (?), escape each special character in the name with a backslash (\).
- On Windows, if you enter target table renaming criteria that causes a target table name to exceed 232 characters in length, the name is truncated to 222 characters. Data Ingestion and Replication appends 14 characters to the name to add a date-time yyyyMMddHHmmss value, which causes the name to exceed the Windows maximum limit of 255. Ensure that the names of any renamed target tables do not exceed 232 characters.
3Under Data Type Rules, if you want to override the default mappings of source data types to target data types, define data type rules. Click the + (Add new row) icon and enter a source data type and corresponding target data type. Then press Enter.
Also, in the Source Data Type value, you can include the percent (%) wildcard to represent the data type precision, scale, or size, for example, NUMBER(%,4), NUMBER(8,%), or NUMBER(%). Use the wildcard to cover all source columns that have the same data type but use different precision, scale, or size values, instead of specifying each one individually. For example, enter FLOAT(%) to cover FLOAT(16), FLOAT(32), and FLOAT(84). You cannot enter the % wildcard in the target data type. A source data type that uses the % wildcard must map to a target data type that uses specific precision, scale, or size value. For example, you could map the source data type FLOAT(%) to a target data type specification such as NUMBER(38,10)
4Under Custom Properties, you can enter one or more custom properties that Informatica provides to improve performance or to meet your special requirements. To add a property, click the + icon to add a row. In the Property Name field, select a property and then enter a property value, or select the Custom option and manually enter both the property name and value.
The following table describes the properties that are available:
Property
Description
Writer Helper Thread Count
The number of writer helper threads that are used to convert incoming change data rows or initial unload rows to the output format configured for the target, such as Avro, CSV, or Parquet.
Default value is 2. If two threads can’t keep up with the incoming volume of data, you can increase the number of threads. Consider increasing the number of threads in the following situations: 1) the incoming volume is high, 2) multiple writer distributors are in use, or 3) some rows are very large or wide, which increases conversion time.
Note:
If you select the Auto-Tune option on the Let's Go! page of the task wizard, auto-tuning can determine the optimal thread count. You can override the value from auto-tuning by setting this custom property.
Custom
Select this option to manually enter the name of a property and its value. Use this option to enter properties that Informatica Global Customer Support or a technical staff member has provided to you for a special case.
Custom properties are intended to address performance or special processing needs. A property name can contain only alphanumeric characters and the following special characters: periods (.), hyphens (-), and underscores (_).
Tip:
To delete a custom property after you've entered it, click the Delete icon at the right end of the property row.
Click Next to proceed, or click Save.
Configure a Microsoft Fabric OneLake target
Define target properties for the destination that you selected on the Destination page.
Target Properties
Define the following required Microsoft Fabric OneLake target properties:
Property
Description
Open Mirroring
Select this checkbox to use Microsoft Fabric open mirroring. Open mirroring creates a synchronized, near real-time copy of your source data in Microsoft Fabric OneLake in the Parquet format. For more information, see Using open mirroring to replicate data to Microsoft Fabric OneLake.
Note:
Make sure to select Parquet as the output format before you enable Open Mirroring and continue with the open mirroring configurations.
Landing Zone URL
If you selected Open Mirroring, enter the unique Microsoft Fabric OneLake path where mirrored data files are stored in Parquet format before processing in Microsoft Fabric.
Note:
The rest of the fields in this table don't apply when you enable open mirroring.
Output Format
Select the format of the output file. Options are:
- CSV
- AVRO
- PARQUET
The default value is CSV. Output files in CSV format use double-quotation marks ("") as the delimiter for each field.
Note:
Open mirroring uses the Parquet output format.
Add Headers to CSV File
If CSV is selected as the output format, select this check box to add a header with source column names to the output CSV file.
Parquet Compression Type
If the PARQUET output format is selected, you can select a compression type that is supported by Parquet. Options are:
- None
- Gzip
- Snappy
The default value is None, which means no compression is used.
Avro Format
If you selected AVRO as the output format, select the format of the Avro schema that will be created for each source table. Options are:
- Avro-Flat. This Avro schema format lists all Avro fields in one record.
- Avro-Generic. This Avro schema format lists all columns from a source table in a single array of Avro fields.
- Avro-Nested. This Avro schema format organizes each type of information in a separate record.
The default value is Avro-Flat.
Avro Serialization Format
If AVRO is selected as the output format, select the serialization format of the Avro output file. Options are:
- None
- Binary
- JSON
The default value is Binary.
Avro Schema Directory
If AVRO is selected as the output format, specify the local directory where Application Ingestion and Replication stores Avro schema definitions for each source table. Schema definition files have the following naming pattern:
schemaname_tablename.txt
Note:
If this directory is not specified, no Avro schema definition file is produced.
File Compression Type
Controls whether to use a file compression type for output files in CSV or AVRO output format. Options are:
- None
- Deflate
- Gzip
- Snappy
The default value is None, which means no compression is used.
Avro Compression Type
If AVRO is selected as the output format, you can select an Avro compression type. Options are:
- None
- Bzip2
- Deflate
- Snappy
The default value is None, which means no compression is used.
Deflate Compression Level
If Deflate is selected in the Avro Compression Type field, specify a compression level from 0 to 9. The default value is 0.
Add Directory Tags
For incremental load and combined initial and incremental load tasks, select this check box to add the "dt=" prefix to the names of apply cycle directories to be compatible with the naming convention for Hive partitioning. This check box is cleared by default.
Task Target Directory
For incremental load and combined initial and incremental load tasks, the root directory for the other directories that hold output data files, schema files, and CDC cycle contents and completed files. You can use it to specify a custom root directory for the task.
This field is required if the {TaskTargetDirectory} placeholder is specified in patterns for any of the following directory fields.
Data Directory
For initial load tasks, define a directory structure for the directories where Application Ingestion and Replication stores output data files and optionally stores the schema.
The default directory pattern is {TableName)_{Timestamp}.
To customize the directory pattern, click the Edit icon to select from the following listed path types and values:
- Folder Path. Enter a folder name or use variables to create a folder name.
- Timestamp values. Select data elements Timestamp, yy, yyyy, mm, or dd. The Timestamp values are in the format yyyymmdd_hhmissms. The generated dates and times in the directory paths indicate when the initial load job starts to transfer data to the target.
- Schema Name. Select SchemaName, toUpper(SchemaName), or toLower(SchemaName).
- Table Name. Select TableName, toUpper(TableName), and toLower(TableName).
Note:
If you manually enter the directory expression, ensure that you enclose placeholders with curly brackets { }. Placeholder values are not case sensitive.
For incremental load and combined initial and incremental load tasks, define a custom path to the subdirectory that contains the cdc-data data files.
The default directory pattern is {TaskTargetDirectory}/data/{TableName}/data
To customize the directory pattern, click the Edit icon to select from the following listed path types and values:
- Folder Path. Enter {TaskTargetDirectory} for a task-specific base directory on the target to use instead of the S3 folder path specified in the connection properties.
- Timestamp values. Select data elements Timestamp, yy, yyyy, mm, or dd. The Timestamp values are in the format yyyymmdd_hhmissms. The generated dates and times in the directory paths indicate when the CDC cycle started.
- Schema Name. Select SchemaName, toUpper(SchemaName), or toLower(SchemaName).
- Table Name. Select TableName, toUpper(TableName), and toLower(TableName).
For Amazon S3 and Microsoft Azure Data Lake Storage Gen2 targets, Application Ingestion and Replication uses the directory specified in the target connection properties as the root for the data directory path when Connection Directory as Parent is selected.
For Google Cloud Storage targets, Application Ingestion and Replication uses the Bucket name that you specify in the target properties for the ingestion task.
For Microsoft Fabric OneLake targets, the parent directory is the path specified in the Lakehouse Path field in the Microsoft Fabric OneLake connection properties.
For Amazon S3 targets with Open Table format, the data directory field is not applicable. Enabling the Connection Directory as Parent includes the connection directory before the warehouse base path. If disabled, files are saved directly under the warehouse base directory.
Schema Directory
Specify a custom directory for storing the schema file if you want to store it in a directory other than the default directory. For initial loads, previously used values if available are shown in a list for your convenience. This field is optional.
For initial loads, the schema is stored in the data directory by default. For incremental loads and combined initial and incremental loads, the schema file is stored in the following directory by default: {TaskTargetDirectory}/data/{TableName}/schema.
You can use the same placeholders as for the Data Directory field. If you manually enter placeholders, ensure that you enclose them with curly brackets { }. If you include the toUpper or toLower function, put the placeholder name in parentheses and enclose both the function and placeholder in curly brackets, for example: {toLower(SchemaName)}
Note:
Schema is written only to output data files in CSV format. Data files in Parquet and Avro formats contain their own embedded schema.
Cycle Completion Directory
For incremental load and combined initial and incremental load tasks, the path to the directory that contains the cycle completed file.
Default is {TaskTargetDirectory}/cycle/completed.
Cycle Contents Directory
For incremental load and combined initial and incremental load tasks, the path to the directory that contains the cycle contents files.
Default is {TaskTargetDirectory}/cycle/contents.
Use Cycle Partitioning for Data Directory
For incremental load and combined initial and incremental load tasks, select this option to create a timestamp subdirectory for each CDC cycle, under each data directory.
If this option is not selected, individual data files are written to the same directory without a timestamp, unless you define an alternative directory structure.
Use Cycle Partitioning for Summary Directories
For incremental load and combined initial and incremental load tasks, select this option to create a timestamp subdirectory for each CDC cycle, under the summary contents and completed subdirectories.
List Individual Files in Contents
For incremental load and combined initial and incremental load tasks, lists individual data files under the contents subdirectory.
If Use Cycle Partitioning for Summary Directories is cleared, this option is selected by default. All of the individual files are listed in the contents subdirectory unless you can configure custom subdirectories by using the placeholders, such as for timestamp or date.
If Use Cycle Partitioning for Data Directory is selected, you can still optionally select this check box to list individual files and group them by CDC cycle.
Advanced Target Properties
To view advanced properties, toggle on Show Advanced Options at the top of the page.
1Under Advanced Options, define any of the following optional advanced target properties that you want to use:
Property
Description
Add Last Replicated Time
Select this check box to add a metadata column that records the timestamp at which a record was inserted or last updated in the target table. For initial loads, all loaded records have the same timestamp. For incremental and combined initial and incremental loads, the column records the timestamp of the last DML operation that was applied to the target.
By default, this check box is not selected.
Add Operation Type
Select this check box to add a metadata column that records the source SQL operation type in the output that the job propagates to the target.
For incremental loads, the job writes "I" for insert, "U" for update, or "D" for delete. For initial loads, the job always writes "I" for insert.
By default, this check box is selected for incremental load and initial and incremental load jobs, and cleared for initial load jobs.
Add Operation Time
Select this check box to add a metadata column that records the source SQL operation timestamp in the output that the job propagates to the target database or inserts into the audit table on the target system.
For initial loads, the job always writes the current date and time.
By default, this check box is not selected.
Add Orderable Sequence
Select this check box to add a metadata column that records a combined epoch value and an incremental numeric value for each change operation that the job inserts into the target tables. The sequence value is always ascending, but not guaranteed to be sequential and gaps may exist. The sequence value is used to identify the order of activity in the target records.
By default, this check box is not selected.
2Under Table Renaming Rules, if you want to rename the target objects that are associated with the selected source tables, define renaming rules.
aClick the + (Add new row) icon and enter a source table name or name mask and enter a corresponding target table name or name mask.
bTo define a mask, include one or more the asterisk (*) wildcards. Then, press Enter.
For example, to add the prefix "PROD_" to the names of target tables that correspond to all selected source tables, enter the * wildcard for the source table and enter PROD_* for the target table.
You can enter multiple rules.
Notes:
- If you enter the wildcard for a source table mask, you must also enter the wildcard for a target table mask.
- If a table name includes special characters, such as a backslash (\), asterisk(*), dot (.), or question mark (?), escape each special character in the name with a backslash (\).
- On Windows, if you enter target table renaming criteria that causes a target table name to exceed 232 characters in length, the name is truncated to 222 characters. Data Ingestion and Replication appends 14 characters to the name to add a date-time yyyyMMddHHmmss value, which causes the name to exceed the Windows maximum limit of 255. Ensure that the names of any renamed target tables do not exceed 232 characters.
3Under Custom Properties, you can enter one or more custom properties that Informatica provides to improve performance or to meet your special requirements. To add a property, click the + icon to add a row. In the Property Name field, select a property and then enter a property value, or select the Custom option and manually enter both the property name and value.
The following table describes the properties that are available, depending on the load type:
Property
Description
Writer Distributor Count
The number of distributors that can run on separate threads in parallel to process data during an initial load job or the unload phase of a combined load job when the Writer Unload Multiple Distributors custom property is set to true. Using parallel distributor threads can improve job performance, particularly for high-volume data transfers.
Default value is 3. If your system has ample resources, Informatica recommends that you set this parameter to 8.
Note:
If you select the Auto-Tune option on the Let's Go! page of the task wizard, auto-tuning can determine the optimal distributor count. You can override the value from auto-tuning by setting this custom property.
Writer Helper Thread Count
The number of writer helper threads that are used to convert incoming change data rows or initial unload rows to the output format configured for the target, such as Avro, CSV, or Parquet.
Default value is 2. If two threads can’t keep up with the incoming volume of data, you can increase the number of threads. Consider increasing the number of threads in the following situations: 1) the incoming volume is high, 2) multiple writer distributors are in use, or 3) some rows are very large or wide, which increases conversion time.
Note:
If you select the Auto-Tune option on the Let's Go! page of the task wizard, auto-tuning can determine the optimal thread count. You can override the value from auto-tuning by setting this custom property.
Writer Unload Multiple Distributors
Indicates whether multiple distributor threads can be used to process data in parallel during initial load jobs and the unload phase of combined load jobs. The distributors perform work such as uploading data files to staging areas and flushing data to the target. Set this property to true to use multiple distributor threads.
Default value is false.
Note:
If you select the Auto-Tune option on the Let's Go! page of the task wizard, auto-tuning can determine whether to use multiple distributors. You can override the value from auto-tuning by setting this custom property.
Add Source Table Name
Adds a metadata column to each target table to store the name of the respective source table.
Add Source Schema Name
Adds a metadata column to each target table to store the name of the respective source schema.
Custom
Select this option to manually enter the name of a property and its value. Use this option to enter properties that Informatica Global Customer Support or a technical staff member has provided to you for a special case.
Custom properties are intended to address performance or special processing needs. A property name can contain only alphanumeric characters and the following special characters: periods (.), hyphens (-), and underscores (_).
Tip:
To delete a custom property after you've entered it, click the Delete icon at the right end of the property row.
Click Next to proceed, or click Save.
Configure a Microsoft SQL Server target
Define Microsoft SQL Server target properties.
Target Properties
Define the following required Microsoft SQL Server target properties:
Property
Description
Target Creation
The Create Target Tables option generates the target tables based on the source tables.
Note:
After the target table is created, Application Ingestion and Replication intelligently handles the target tables on subsequent job runs. Application Ingestion and Replication might truncate or re-create the target tables depending on specific circumstances.
Schema
Select the target schema in which Application Ingestion and Replication creates the target tables. The schema name that is specified in the connection properties is displayed by default.
This field is case sensitive. Therefore, ensure that you entered the schema name in the connection properties in the correct case.
Advanced Target Properties
To view advanced properties, toggle on Show Advanced Options at the top of the page.
1Under Advanced Options, define any of the following optional advanced target properties that you want to use:
Property
Description
Add Last Replicated Time
Select this check box to add a metadata column that records the timestamp at which a record was inserted or last updated in the target table. For initial loads, all loaded records have the same timestamp. For incremental and combined initial and incremental loads, the column records the timestamp of the last DML operation that was applied to the target.
By default, this check box is not selected.
Add Cycle ID
Select this check box to add a metadata column that includes the cycle ID of each CDC cycle in each target table. A cycle ID is a number that's generated by the CDC engine for each successful CDC cycle. If you integrate the job with Data Integration taskflows, the job can pass the minimum and maximum cycle IDs in output fields to the taskflow so that the taskflow can determine the range of cycles that contain new CDC data. This capability is useful if data from multiple cycles accumulates before the previous taskflow run completes. By default, this check box is not selected.
Prefix for Metadata Columns
Add a prefix to the names of the added metadata columns to easily identify them and to prevent conflicts with the names of existing columns.
Do not include special characters in the prefix. Otherwise, task deployment will fail.
The default value is INFA_.
2Under Table Renaming Rules, if you want to rename the target objects that are associated with the selected source tables, define renaming rules.
aClick the + (Add new row) icon and enter a source table name or name mask and enter a corresponding target table name or name mask.
bTo define a mask, include one or more the asterisk (*) wildcards. Then, press Enter.
For example, to add the prefix "PROD_" to the names of target tables that correspond to all selected source tables, enter the * wildcard for the source table and enter PROD_* for the target table.
You can enter multiple rules.
Notes:
- If you enter the wildcard for a source table mask, you must also enter the wildcard for a target table mask.
- If a table name includes special characters, such as a backslash (\), asterisk(*), dot (.), or question mark (?), escape each special character in the name with a backslash (\).
- On Windows, if you enter target table renaming criteria that causes a target table name to exceed 232 characters in length, the name is truncated to 222 characters. Data Ingestion and Replication appends 14 characters to the name to add a date-time yyyyMMddHHmmss value, which causes the name to exceed the Windows maximum limit of 255. Ensure that the names of any renamed target tables do not exceed 232 characters.
3Under Data Type Rules, if you want to override the default mappings of source data types to target data types, define data type rules. Click the + (Add new row) icon and enter a source data type and corresponding target data type. Then press Enter.
Also, in the Source Data Type value, you can include the percent (%) wildcard to represent the data type precision, scale, or size, for example, NUMBER(%,4), NUMBER(8,%), or NUMBER(%). Use the wildcard to cover all source columns that have the same data type but use different precision, scale, or size values, instead of specifying each one individually. For example, enter FLOAT(%) to cover FLOAT(16), FLOAT(32), and FLOAT(84). You cannot enter the % wildcard in the target data type. A source data type that uses the % wildcard must map to a target data type that uses specific precision, scale, or size value. For example, you could map the source data type FLOAT(%) to a target data type specification such as NUMBER(38,10)
4Under Custom Properties, you can enter one or more custom properties that Informatica provides to improve performance or to meet your special requirements. To add a property, click the + icon to add a row. In the Property Name field, select a property and then enter a property value, or select the Custom option and manually enter both the property name and value.
The following table describes the properties that are available, depending on the load type:
Property
Description
Writer Distributor Count
The number of distributors that can run on separate threads in parallel to process data during an initial load job or the unload phase of a combined load job when the Writer Unload Multiple Distributors custom property is set to true. Using parallel distributor threads can improve job performance, particularly for high-volume data transfers.
Default value is 3. If your system has ample resources, Informatica recommends that you set this parameter to 8.
Note:
If you select the Auto-Tune option on the Let's Go! page of the task wizard, auto-tuning can determine the optimal distributor count. You can override the value from auto-tuning by setting this custom property.
Writer Helper Thread Count
The number of writer helper threads that are used to convert incoming change data rows or initial unload rows to the output format configured for the target, such as Avro, CSV, or Parquet.
Default value is 2. If two threads can’t keep up with the incoming volume of data, you can increase the number of threads. Consider increasing the number of threads in the following situations: 1) the incoming volume is high, 2) multiple writer distributors are in use, or 3) some rows are very large or wide, which increases conversion time.
Note:
If you select the Auto-Tune option on the Let's Go! page of the task wizard, auto-tuning can determine the optimal thread count. You can override the value from auto-tuning by setting this custom property.
Writer Unload Multiple Distributors
Indicates whether multiple distributor threads can be used to process data in parallel during initial load jobs and the unload phase of combined load jobs. The distributors perform work such as uploading data files to staging areas and flushing data to the target. Set this property to true to use multiple distributor threads.
Default value is false.
Note:
If you select the Auto-Tune option on the Let's Go! page of the task wizard, auto-tuning can determine whether to use multiple distributors. You can override the value from auto-tuning by setting this custom property.
Custom
Select this option to manually enter the name of a property and its value. Use this option to enter properties that Informatica Global Customer Support or a technical staff member has provided to you for a special case.
Custom properties are intended to address performance or special processing needs. A property name can contain only alphanumeric characters and the following special characters: periods (.), hyphens (-), and underscores (_).
Tip:
To delete a custom property after you've entered it, click the Delete icon at the right end of the property row.
Click Next to proceed, or click Save.
Configure an Oracle Cloud Object Storage target
Define target properties for the destination that you selected on the Destination page.
Target Properties
Define the following required Oracle Cloud Object Storage target properties:
Property
Description
Output Format
The format of the output files. Options are:
- CSV
- AVRO
- PARQUET
The default value is CSV.
Note:
Output files in CSV format use double-quotation marks ("") as the delimiter for each field.
Add Headers to CSV File
If CSV is selected as the output format, select this check box to add a header with source column names to the output CSV file.
Parquet Compression Type
If the PARQUET output format is selected, you can select a compression type that is supported by Parquet. Options are:
- None
- Gzip
- Snappy
The default value is None, which means no compression is used.
Avro Format
If you selected AVRO as the output format, select the format of the Avro schema that will be created for each source table. Options are:
- Avro-Flat. This Avro schema format lists all Avro fields in one record.
- Avro-Generic. This Avro schema format lists all columns from a source table in a single array of Avro fields.
- Avro-Nested. This Avro schema format organizes each type of information in a separate record.
The default value is Avro-Flat.
Avro Serialization Format
If AVRO is selected as the output format, select the serialization format of the Avro output file. Options are:
- None
- Binary
- JSON
The default value is Binary.
Avro Schema Directory
If AVRO is selected as the output format, specify the local directory where Application Ingestion and Replication stores Avro schema definitions for each source table. Schema definition files have the following naming pattern:
schemaname_tablename.txt
Note:
If this directory is not specified, no Avro schema definition file is produced.
File Compression Type
Controls whether to use a file compression type for output files in CSV or AVRO output format. Options are:
- None
- Deflate
- Gzip
- Snappy
The default value is None, which means no compression is used.
Avro Compression Type
If AVRO is selected as the output format, you can select an Avro compression type. Options are:
- None
- Bzip2
- Deflate
- Snappy
The default value is None, which means no compression is used.
Deflate Compression Level
If Deflate is selected in the Avro Compression Type field, specify a compression level from 0 to 9. The default value is 0.
Add Directory Tags
For incremental load and combined initial and incremental load tasks, select this check box to add the "dt=" prefix to the names of apply cycle directories to be compatible with the naming convention for Hive partitioning. This check box is cleared by default.
Task Target Directory
For incremental load and combined initial and incremental load tasks, the root directory for the other directories that hold output data files, schema files, and CDC cycle contents and completed files. You can use it to specify a custom root directory for the task. If you enable the Connection Directory as Parent option, you can still optionally specify a task target directory to use with the parent directory specified in the connection properties.
This field is required if the {TaskTargetDirectory} placeholder is specified in patterns for any of the following directory fields.
Connection Directory as Parent
Select this check box to use the directory value that is specified in the target connection properties as the parent directory for the custom directory paths specified in the task target properties.
For initial load tasks, the parent directory is used in the Data Directory and Schema Directory.
For incremental load and combined initial and incremental load tasks, the parent directory is used in the Data Directory, Schema Directory, Cycle Completion Directory, and Cycle Contents Directory.
This check box is selected by default. If you clear it, for initial loads, define the full path to the output files in the Data Directory field. For incremental loads, optionally specify a root directory for the task in the Task Target Directory.
Data Directory
For initial load tasks, define a directory structure for the directories where Application Ingestion and Replication stores output data files and optionally stores the schema.
The default directory pattern is {TableName)_{Timestamp}.
To customize the directory pattern, click the Edit icon to select from the following listed path types and values:
- Folder Path. Enter a folder name or use variables to create a folder name.
- Timestamp values. Select data elements Timestamp, yy, yyyy, mm, or dd. The Timestamp values are in the format yyyymmdd_hhmissms. The generated dates and times in the directory paths indicate when the initial load job starts to transfer data to the target.
- Schema Name. Select SchemaName, toUpper(SchemaName), or toLower(SchemaName).
- Table Name. Select TableName, toUpper(TableName), and toLower(TableName).
Note:
If you manually enter the directory expression, ensure that you enclose placeholders with curly brackets { }. Placeholder values are not case sensitive.
For incremental load and combined initial and incremental load tasks, define a custom path to the subdirectory that contains the cdc-data data files.
The default directory pattern is {TaskTargetDirectory}/data/{TableName}/data
To customize the directory pattern, click the Edit icon to select from the following listed path types and values:
- Folder Path. Enter {TaskTargetDirectory} for a task-specific base directory on the target to use instead of the S3 folder path specified in the connection properties.
- Timestamp values. Select data elements Timestamp, yy, yyyy, mm, or dd. The Timestamp values are in the format yyyymmdd_hhmissms. The generated dates and times in the directory paths indicate when the CDC cycle started.
- Schema Name. Select SchemaName, toUpper(SchemaName), or toLower(SchemaName).
- Table Name. Select TableName, toUpper(TableName), and toLower(TableName).
For Amazon S3 and Microsoft Azure Data Lake Storage Gen2 targets, Application Ingestion and Replication uses the directory specified in the target connection properties as the root for the data directory path when Connection Directory as Parent is selected.
For Google Cloud Storage targets, Application Ingestion and Replication uses the Bucket name that you specify in the target properties for the ingestion task.
For Microsoft Fabric OneLake targets, the parent directory is the path specified in the Lakehouse Path field in the Microsoft Fabric OneLake connection properties.
For Amazon S3 targets with Open Table format, the data directory field is not applicable. Enabling the Connection Directory as Parent includes the connection directory before the warehouse base path. If disabled, files are saved directly under the warehouse base directory.
Schema Directory
Specify a custom directory for storing the schema file if you want to store it in a directory other than the default directory. For initial loads, previously used values if available are shown in a list for your convenience. This field is optional.
For initial loads, the schema is stored in the data directory by default. For incremental loads and combined initial and incremental loads, the schema file is stored in the following directory by default: {TaskTargetDirectory}/data/{TableName}/schema.
You can use the same placeholders as for the Data Directory field. If you manually enter placeholders, ensure that you enclose them with curly brackets { }. If you include the toUpper or toLower function, put the placeholder name in parentheses and enclose both the function and placeholder in curly brackets, for example: {toLower(SchemaName)}
Note:
Schema is written only to output data files in CSV format. Data files in Parquet and Avro formats contain their own embedded schema.
Cycle Completion Directory
For incremental load and combined initial and incremental load tasks, the path to the directory that contains the cycle completed file.
Default is {TaskTargetDirectory}/cycle/completed.
Cycle Contents Directory
For incremental load and combined initial and incremental load tasks, the path to the directory that contains the cycle contents files.
Default is {TaskTargetDirectory}/cycle/contents.
Use Cycle Partitioning for Data Directory
For incremental load and combined initial and incremental load tasks, select this option to create a timestamp subdirectory for each CDC cycle, under each data directory.
If this option is not selected, individual data files are written to the same directory without a timestamp, unless you define an alternative directory structure.
Use Cycle Partitioning for Summary Directories
For incremental load and combined initial and incremental load tasks, select this option to create a timestamp subdirectory for each CDC cycle, under the summary contents and completed subdirectories.
List Individual Files in Contents
For incremental load and combined initial and incremental load tasks, lists individual data files under the contents subdirectory.
If Use Cycle Partitioning for Summary Directories is cleared, this option is selected by default. All of the individual files are listed in the contents subdirectory unless you can configure custom subdirectories by using the placeholders, such as for timestamp or date.
If Use Cycle Partitioning for Data Directory is selected, you can still optionally select this check box to list individual files and group them by CDC cycle.
Advanced Target Properties
To view advanced properties, toggle on Show Advanced Options at the top of the page.
1Under Advanced Options, define any of the following optional advanced target properties that you want to use:
Field
Description
Add Operation Type
Select this check box to add a metadata column that records the source SQL operation type in the output that the job propagates to the target.
For incremental loads, the job writes "I" for insert, "U" for update, or "D" for delete. For initial loads, the job always writes "I" for insert.
By default, this check box is selected for incremental load and initial and incremental load jobs, and cleared for initial load jobs.
Add Operation Time
Select this check box to add a metadata column that records the source SQL operation timestamp in the output that the job propagates to the target database or inserts into the audit table on the target system.
For initial loads, the job always writes the current date and time.
By default, this check box is not selected.
Add Orderable Sequence
Select this check box to add a metadata column that records a combined epoch value and an incremental numeric value for each change operation that the job inserts into the target tables. The sequence value is always ascending, but not guaranteed to be sequential and gaps may exist. The sequence value is used to identify the order of activity in the target records.
By default, this check box is not selected.
2Under Table Renaming Rules, if you want to rename the target objects that are associated with the selected source tables, define renaming rules.
aClick the + (Add new row) icon and enter a source table name or name mask and enter a corresponding target table name or name mask.
bTo define a mask, include one or more the asterisk (*) wildcards. Then, press Enter.
For example, to add the prefix "PROD_" to the names of target tables that correspond to all selected source tables, enter the * wildcard for the source table and enter PROD_* for the target table.
You can enter multiple rules.
Notes:
- If you enter the wildcard for a source table mask, you must also enter the wildcard for a target table mask.
- If a table name includes special characters, such as a backslash (\), asterisk(*), dot (.), or question mark (?), escape each special character in the name with a backslash (\).
- On Windows, if you enter target table renaming criteria that causes a target table name to exceed 232 characters in length, the name is truncated to 222 characters. Data Ingestion and Replication appends 14 characters to the name to add a date-time yyyyMMddHHmmss value, which causes the name to exceed the Windows maximum limit of 255. Ensure that the names of any renamed target tables do not exceed 232 characters.
3Under Custom Properties, you can enter one or more custom properties that Informatica provides to improve performance or to meet your special requirements. To add a property, click the + icon to add a row. In the Property Name field, select a property and then enter a property value, or select the Custom option and manually enter both the property name and value.
The following table describes the properties that are available, depending on the load type:
Property
Description
Writer Distributor Count
The number of distributors that can run on separate threads in parallel to process data during an initial load job or the unload phase of a combined load job when the Writer Unload Multiple Distributors custom property is set to true. Using parallel distributor threads can improve job performance, particularly for high-volume data transfers.
Default value is 3. If your system has ample resources, Informatica recommends that you set this parameter to 8.
Note:
If you select the Auto-Tune option on the Let's Go! page of the task wizard, auto-tuning can determine the optimal distributor count. You can override the value from auto-tuning by setting this custom property.
Writer Helper Thread Count
The number of writer helper threads that are used to convert incoming change data rows or initial unload rows to the output format configured for the target, such as Avro, CSV, or Parquet.
Default value is 2. If two threads can’t keep up with the incoming volume of data, you can increase the number of threads. Consider increasing the number of threads in the following situations: 1) the incoming volume is high, 2) multiple writer distributors are in use, or 3) some rows are very large or wide, which increases conversion time.
Note:
If you select the Auto-Tune option on the Let's Go! page of the task wizard, auto-tuning can determine the optimal thread count. You can override the value from auto-tuning by setting this custom property.
Writer Unload Multiple Distributors
Indicates whether multiple distributor threads can be used to process data in parallel during initial load jobs and the unload phase of combined load jobs. The distributors perform work such as uploading data files to staging areas and flushing data to the target. Set this property to true to use multiple distributor threads.
Default value is false.
Note:
If you select the Auto-Tune option on the Let's Go! page of the task wizard, auto-tuning can determine whether to use multiple distributors. You can override the value from auto-tuning by setting this custom property.
Custom
Select this option to manually enter the name of a property and its value. Use this option to enter properties that Informatica Global Customer Support or a technical staff member has provided to you for a special case.
Custom properties are intended to address performance or special processing needs. A property name can contain only alphanumeric characters and the following special characters: periods (.), hyphens (-), and underscores (_).
Tip:
To delete a custom property after you've entered it, click the Delete icon at the right end of the property row.
Click Next to proceed, or click Save.
Configure an Oracle target
Define target properties for the Oracle destination.
Target Properties
Define the following required Oracle target properties:
Property
Description
Target Creation
The only available option is Create Target Tables, which generates the target tables based on the source objects.
Schema
Select the target schema in which Application Ingestion and Replication creates the target tables.
Apply Mode
For incremental load and combined initial and incremental load jobs, this property indicates how source DML changes, including inserts, updates, and deletes, are applied to the target. Options are:
- Standard. Accumulate the changes in a single apply cycle and intelligently merge them into fewer SQL statements before applying them to the target. For example, if an update followed by a delete occurs on the source row, no row is applied to the target. If multiple updates occur on the same column or field, only the last update is applied to the target. If multiple updates occur on different columns or fields, the updates are merged into a single update record before being applied to the target.
- Audit. Apply an audit trail of every DML operation made on the source tables to the target. A row for each DML change on a source table is written to the generated target table along with the audit columns you select under the Advanced section. The audit columns contain metadata about the change, such as the DML operation type, time, owner, transaction ID, generated ascending sequence number, and before image.
Consider using the Audit apply mode when you want to use the audit history to perform downstream computations or processing on the data before writing it to the target database or when you want to examine metadata about the captured changes.
Note:
The Audit apply mode applies for an SAP source with SAP Mass Ingestion connector.
The default value is Standard.
Advanced Target Properties
To view advanced properties, toggle on Show Advanced Options at the top of the page.
1Under Advanced Options, define any of the following optional advanced target properties that you want to use:
Field
Description
Add Last Replicated Time
Select this check box to add a metadata column that records the timestamp in UTC format at which a record was inserted or last updated in the target table. For initial loads, all loaded records have the same timestamp. For incremental and combined initial and incremental loads, the column records the timestamp of the last DML operation that was applied to the target.
By default, this check box is not selected.
Add Operation Type
Select this check box to add a metadata column that records the source SQL operation type in the output that the job propagates to the target database or inserts into the target table.
This field is available only when the Apply Mode option is set to Audit.
In Audit mode, the job writes "I" for insert, "U" for update, or "D" for delete.
By default, this check box is selected.
Add Operation Time
Select this check box to add a metadata column that records the source SQL operation timestamp in the output that the job propagates to the target database or inserts into the audit table on the target system.
This field is available only when the Apply Mode option is set to Audit.
By default, this check box is not selected.
Add Operation Sequence
Select this check box to add a metadata column that records a generated, ascending sequence number for each change operation that the job inserts into the target tables. The sequence number reflects the change stream position of the operation.
This field is available only when Apply Mode is set to Audit.
By default, this check box is not selected.
Add Cycle ID
Select this check box to add a metadata column that includes the cycle ID of each CDC cycle in each target table. A cycle ID is a number that's generated by the CDC engine for each successful CDC cycle. If you integrate the job with Data Integration taskflows, the job can pass the minimum and maximum cycle IDs in output fields to the taskflow so that the taskflow can determine the range of cycles that contain new CDC data. This capability is useful if data from multiple cycles accumulates before the previous taskflow run completes. By default, this check box is not selected.
Prefix for Metadata Columns
Add a prefix to the names of the added metadata columns to easily identify them and to prevent conflicts with the names of existing columns.
The default value is INFA_.
Enable Case Transformation
By default, target table names and column names are generated in the same case as the corresponding source names. If you want to control the case of letters in the target names, select this check box. Then select a Case Transformation Strategy option.
Case Transformation Strategy
If you selected Enable Case Transformation, select one of the following options to specify how to handle the case of letters in generated target table (or object) names and column (or field) names:
- Same as source. Use the same case as the source table (or object) names and column (or field) names.
- UPPERCASE. Use all uppercase.
- lowercase. Use all lowercase.
The default value is Same as source.
2Under Table Renaming Rules, if you want to rename the target objects that are associated with the selected source tables, define renaming rules.
aClick the + (Add new row) icon and enter a source table name or name mask and enter a corresponding target table name or name mask.
bTo define a mask, include one or more the asterisk (*) wildcards. Then, press Enter.
For example, to add the prefix "PROD_" to the names of target tables that correspond to all selected source tables, enter the * wildcard for the source table and enter PROD_* for the target table.
You can enter multiple rules.
Notes:
- If you enter the wildcard for a source table mask, you must also enter the wildcard for a target table mask.
- If a table name includes special characters, such as a backslash (\), asterisk(*), dot (.), or question mark (?), escape each special character in the name with a backslash (\).
- On Windows, if you enter target table renaming criteria that causes a target table name to exceed 232 characters in length, the name is truncated to 222 characters. Data Ingestion and Replication appends 14 characters to the name to add a date-time yyyyMMddHHmmss value, which causes the name to exceed the Windows maximum limit of 255. Ensure that the names of any renamed target tables do not exceed 232 characters.
3Under Data Type Rules, if you want to override the default mappings of source data types to target data types, define data type rules. Click the + (Add new row) icon and enter a source data type and corresponding target data type. Then press Enter.
Also, in the Source Data Type value, you can include the percent (%) wildcard to represent the data type precision, scale, or size, for example, NUMBER(%,4), NUMBER(8,%), or NUMBER(%). Use the wildcard to cover all source columns that have the same data type but use different precision, scale, or size values, instead of specifying each one individually. For example, enter FLOAT(%) to cover FLOAT(16), FLOAT(32), and FLOAT(84). You cannot enter the % wildcard in the target data type. A source data type that uses the % wildcard must map to a target data type that uses specific precision, scale, or size value. For example, you could map the source data type FLOAT(%) to a target data type specification such as NUMBER(38,10)
4Under Custom Properties, you can enter one or more custom properties that Informatica provides to improve performance or to meet your special requirements. To add a property, click the + icon to add a row. In the Property Name field, select a property and then enter a property value, or select the Custom option and manually enter both the property name and value.
The following table describes the properties that are available, depending on the load type:
Property
Description
Writer Distributor Count
The number of distributors that can run on separate threads in parallel to process data during an initial load job or the unload phase of a combined load job when the Writer Unload Multiple Distributors custom property is set to true. Using parallel distributor threads can improve job performance, particularly for high-volume data transfers.
Default value is 3. If your system has ample resources, Informatica recommends that you set this parameter to 8.
Note:
If you select the Auto-Tune option on the Let's Go! page of the task wizard, auto-tuning can determine the optimal distributor count. You can override the value from auto-tuning by setting this custom property.
Writer Helper Thread Count
The number of writer helper threads that are used to convert incoming change data rows or initial unload rows to the output format configured for the target, such as Avro, CSV, or Parquet.
Default value is 2. If two threads can’t keep up with the incoming volume of data, you can increase the number of threads. Consider increasing the number of threads in the following situations: 1) the incoming volume is high, 2) multiple writer distributors are in use, or 3) some rows are very large or wide, which increases conversion time.
Note:
If you select the Auto-Tune option on the Let's Go! page of the task wizard, auto-tuning can determine the optimal thread count. You can override the value from auto-tuning by setting this custom property.
Writer Unload Multiple Distributors
Indicates whether multiple distributor threads can be used to process data in parallel during initial load jobs and the unload phase of combined load jobs. The distributors perform work such as uploading data files to staging areas and flushing data to the target. Set this property to true to use multiple distributor threads.
Default value is false.
Note:
If you select the Auto-Tune option on the Let's Go! page of the task wizard, auto-tuning can determine whether to use multiple distributors. You can override the value from auto-tuning by setting this custom property.
Custom
Select this option to manually enter the name of a property and its value. Use this option to enter properties that Informatica Global Customer Support or a technical staff member has provided to you for a special case.
Custom properties are intended to address performance or special processing needs. A property name can contain only alphanumeric characters and the following special characters: periods (.), hyphens (-), and underscores (_).
Tip:
To delete a custom property after you've entered it, click the Delete icon at the right end of the property row.
Click Next to proceed, or click Save.
Configure a PostgreSQL target
Define target properties for the PostgreSQL destination.
Target Properties
Define the following required PostgreSQL target properties:
Property
Description
Target Creation
The only available option is Create Target Tables, which generates the target tables based on the source objects.
Schema
Select the target schema in which Application Ingestion and Replication creates the target tables.
Advanced Target Properties
To view advanced properties, toggle on Show Advanced Options at the top of the page.
1Under Table Renaming Rules, if you want to rename the target objects that are associated with the selected source tables, define renaming rules.
aClick the + (Add new row) icon and enter a source table name or name mask and enter a corresponding target table name or name mask.
bTo define a mask, include one or more the asterisk (*) wildcards. Then, press Enter.
For example, to add the prefix "PROD_" to the names of target tables that correspond to all selected source tables, enter the * wildcard for the source table and enter PROD_* for the target table.
You can enter multiple rules.
Notes:
- If you enter the wildcard for a source table mask, you must also enter the wildcard for a target table mask.
- If a table name includes special characters, such as a backslash (\), asterisk(*), dot (.), or question mark (?), escape each special character in the name with a backslash (\).
- On Windows, if you enter target table renaming criteria that causes a target table name to exceed 232 characters in length, the name is truncated to 222 characters. Data Ingestion and Replication appends 14 characters to the name to add a date-time yyyyMMddHHmmss value, which causes the name to exceed the Windows maximum limit of 255. Ensure that the names of any renamed target tables do not exceed 232 characters.
2Under Data Type Rules, if you want to override the default mappings of source data types to target data types, define data type rules. Click the + (Add new row) icon and enter a source data type and corresponding target data type. Then press Enter.
Also, in the Source Data Type value, you can include the percent (%) wildcard to represent the data type precision, scale, or size, for example, NUMBER(%,4), NUMBER(8,%), or NUMBER(%). Use the wildcard to cover all source columns that have the same data type but use different precision, scale, or size values, instead of specifying each one individually. For example, enter FLOAT(%) to cover FLOAT(16), FLOAT(32), and FLOAT(84). You cannot enter the % wildcard in the target data type. A source data type that uses the % wildcard must map to a target data type that uses specific precision, scale, or size value. For example, you could map the source data type FLOAT(%) to a target data type specification such as NUMBER(38,10)
3Under Custom Properties, you can enter one or more custom properties that Informatica provides to improve performance or to meet your special requirements. To add a property, click the + icon to add a row. In the Property Name field, select a property and then enter a property value, or select the Custom option and manually enter both the property name and value.
The following table describes the properties that are available, depending on the load type:
Property
Description
Writer Distributor Count
The number of distributors that can run on separate threads in parallel to process data during an initial load job or the unload phase of a combined load job when the Writer Unload Multiple Distributors custom property is set to true. Using parallel distributor threads can improve job performance, particularly for high-volume data transfers.
Default value is 3. If your system has ample resources, Informatica recommends that you set this parameter to 8.
Note:
If you select the Auto-Tune option on the Let's Go! page of the task wizard, auto-tuning can determine the optimal distributor count. You can override the value from auto-tuning by setting this custom property.
Writer Helper Thread Count
The number of writer helper threads that are used to convert incoming change data rows or initial unload rows to the output format configured for the target, such as Avro, CSV, or Parquet.
Default value is 2. If two threads can’t keep up with the incoming volume of data, you can increase the number of threads. Consider increasing the number of threads in the following situations: 1) the incoming volume is high, 2) multiple writer distributors are in use, or 3) some rows are very large or wide, which increases conversion time.
Note:
If you select the Auto-Tune option on the Let's Go! page of the task wizard, auto-tuning can determine the optimal thread count. You can override the value from auto-tuning by setting this custom property.
Writer Unload Multiple Distributors
Indicates whether multiple distributor threads can be used to process data in parallel during initial load jobs and the unload phase of combined load jobs. The distributors perform work such as uploading data files to staging areas and flushing data to the target. Set this property to true to use multiple distributor threads.
Default value is false.
Note:
If you select the Auto-Tune option on the Let's Go! page of the task wizard, auto-tuning can determine whether to use multiple distributors. You can override the value from auto-tuning by setting this custom property.
Custom
Select this option to manually enter the name of a property and its value. Use this option to enter properties that Informatica Global Customer Support or a technical staff member has provided to you for a special case.
Custom properties are intended to address performance or special processing needs. A property name can contain only alphanumeric characters and the following special characters: periods (.), hyphens (-), and underscores (_).
Tip:
To delete a custom property after you've entered it, click the Delete icon at the right end of the property row.
Click Next to proceed, or click Save.
Configure a Salesforce Data 360 target
Define target properties for the destination that you selected on the Destination page.
Target Properties
Define the following required Salesforce Data 360 target properties:
Property
Description
Schema Path
The schema path where the Application Ingestion and Replication creates the target tables.
Data Space
Name of the data space in Salesforce Data 360 where you want to load data.
If you do not enter a data space, the default data space is used.
Category
The data category assigned to data from source streams when it is loaded into Salesforce Data 360.
Options are:
- Profile. Applies to customer attributes such as name, email, or address.
- Engagement. Applies to behavioral and interaction data such as website visits, email opens, clicks, and other activity logs.
- Other. Applies to data that doesn’t fit into Profile or Engagement, such as transactional records, order histories, CRM system logs, and other system or contextual data.
Event Time Field
Name of the event date and time field for engagement records if you selected the Engagement category. It defines exactly when an interaction occurred, such as a purchase, click, or login, and helps identify the most recent or relevant event.
Recorded Modified Field
The name of the recorded modified field that captures the date and time when a record was last updated if you selected the Profile or Other category.
Apply Mode
For incremental load and combined initial and incremental load jobs, this property indicates how source DML changes, including inserts, updates, and deletes, are applied to the target.
You can use only the Standard apply mode. This mode accumulates the changes in a single apply cycle and intelligently merge them into fewer SQL statements before applying them to the target. For example, if an update followed by a delete occurs on the source row, no row is applied to the target. If multiple updates occur on the same column or field, only the last update is applied to the target. If multiple updates occur on different columns or fields, the updates are merged into a single update record before being applied to the target.
Advanced Target Properties
To view advanced properties, toggle on Show Advanced Options at the top of the page.
1Under Advanced Options, define the following optional advanced target property that you want to use:
Property
Description
Ingestion Mode
The ingestion mode to load data into Salesforce 360.
You can select from the following options based on the data volume, processing speed, and near real-time requirements:
2Under Table Renaming Rules, if you want to rename the target objects that are associated with the selected source tables, define renaming rules.
aClick the + (Add new row) icon and enter a source table name or name mask and enter a corresponding target table name or name mask.
bTo define a mask, include one or more the asterisk (*) wildcards. Then, press Enter.
For example, to add the prefix "PROD_" to the names of target tables that correspond to all selected source tables, enter the * wildcard for the source table and enter PROD_* for the target table.
You can enter multiple rules.
Notes:
- If you enter the wildcard for a source table mask, you must also enter the wildcard for a target table mask.
- If a table name includes special characters, such as a backslash (\), asterisk(*), dot (.), or question mark (?), escape each special character in the name with a backslash (\).
- On Windows, if you enter target table renaming criteria that causes a target table name to exceed 232 characters in length, the name is truncated to 222 characters. Data Ingestion and Replication appends 14 characters to the name to add a date-time yyyyMMddHHmmss value, which causes the name to exceed the Windows maximum limit of 255. Ensure that the names of any renamed target tables do not exceed 232 characters.
3Under Data Type Rules, if you want to override the default mappings of source data types to target data types, define data type rules. Click the + (Add new row) icon and enter a source data type and corresponding target data type. Then press Enter.
Also, in the Source Data Type value, you can include the percent (%) wildcard to represent the data type precision, scale, or size, for example, NUMBER(%,4), NUMBER(8,%), or NUMBER(%). Use the wildcard to cover all source columns that have the same data type but use different precision, scale, or size values, instead of specifying each one individually. For example, enter FLOAT(%) to cover FLOAT(16), FLOAT(32), and FLOAT(84). You cannot enter the % wildcard in the target data type. A source data type that uses the % wildcard must map to a target data type that uses specific precision, scale, or size value. For example, you could map the source data type FLOAT(%) to a target data type specification such as NUMBER(38,10)
4Under Custom Properties, you can enter one or more custom properties that Informatica provides to improve performance or to meet your special requirements. To add a property, click the + icon to add a row. In the Property Name field, select a property and then enter a property value, or select the Custom option and manually enter both the property name and value.
The following table describes the properties that are available:
Property
Description
Writer Helper Thread Count
The number of writer helper threads that are used to convert incoming change data rows or initial unload rows to the output format configured for the target, such as Avro, CSV, or Parquet.
Default value is 2. If two threads can’t keep up with the incoming volume of data, you can increase the number of threads. Consider increasing the number of threads in the following situations: 1) the incoming volume is high, 2) multiple writer distributors are in use, or 3) some rows are very large or wide, which increases conversion time.
Note:
If you select the Auto-Tune option on the Let's Go! page of the task wizard, auto-tuning can determine the optimal thread count. You can override the value from auto-tuning by setting this custom property.
Custom
Select this option to manually enter the name of a property and its value. Use this option to enter properties that Informatica Global Customer Support or a technical staff member has provided to you for a special case.
Custom properties are intended to address performance or special processing needs. A property name can contain only alphanumeric characters and the following special characters: periods (.), hyphens (-), and underscores (_).
Tip:
To delete a custom property after you've entered it, click the Delete icon at the right end of the property row.
Click Next to proceed, or click Save.
Configure a Snowflake Data Cloud target
Define target properties for the Snowflake destination.
Target Properties
Define the following required Snowflake target properties:
Property
Description
Target Creation
The only available option is Create Target Tables, which generates the target tables based on the source objects.
Schema
Select the target schema in which Application Ingestion and Replication creates the target tables.
Stage
The name of internal staging area that holds the data read from the source before the data is written to the target tables. This name must not include spaces. If the staging area does not exist, it will be automatically created.
Note:
This field is not available if you selected the Superpipe option in the Advanced Target Properties.
Apply Mode
For incremental load and combined initial and incremental load jobs, this property indicates how source DML changes, including inserts, updates, and deletes, are applied to the target. Options are:
- Standard. Accumulate the changes in a single apply cycle and intelligently merge them into fewer SQL statements before applying them to the target. For example, if an update followed by a delete occurs on the source row, no row is applied to the target. If multiple updates occur on the same column or field, only the last update is applied to the target. If multiple updates occur on different columns or fields, the updates are merged into a single update record before being applied to the target.
- Soft Deletes. Apply source delete operations to the target as soft deletes. A soft delete marks the deleted row as deleted without actually removing it from the database. For example, a delete on the source results in a change record on the target with "D" displayed in the INFA_OPERATION_TYPE column.
After enabling Soft Deletes, any update in the source table during normal or backlog mode results in the deletion of the matching record, insertion of the updated record, and marking of the INFA_OPERATION_TYPE operation as NULL in the target table. Similarly, inserting a record in the source table during backlog mode results in marking the INFA_OPERATION_TYPE operation as E in the target table record.
Consider using soft deletes if you have a long-running business process that needs the soft-deleted data to finish processing, to restore data after an accidental delete operation, or to track deleted values for audit purposes.
- Audit. Apply an audit trail of every DML operation made on the source tables to the target. A row for each DML change on a source table is written to the generated target table along with the audit columns you select under the Advanced section. The audit columns contain metadata about the change, such as the DML operation type, transaction ID, and before image. Consider using Audit apply mode when you want to use the audit history to perform downstream computations or processing on the data before writing it to the target database or when you want to examine metadata about the captured changes.
After enabling the Audit apply mode, any update in the source table during backlog or normal mode results in marking the INFA_OPERATION_TYPE operation as E in the target table record. Similarly, inserting a record in the source table during backlog mode results in marking the INFA_OPERATION_TYPE operation as E in the target table record.
Note:
The Audit apply mode applies for SAP source with SAP Mass Ingestion connector.
Default is Standard.
Advanced Target Properties
To view advanced properties, toggle on Show Advanced Options at the top of the page.
1Under Advanced Options, define any of the following optional advanced target properties that you want to use:
Field
Description
Add Last Replicated Time
Select this check box to add a metadata column that records the timestamp at which a record was inserted or last updated in the target table. For initial loads, all loaded records have the same timestamp, except for Snowflake targets that use the Superpipe option where minutes and seconds might vary slightly. For incremental and combined initial and incremental loads, the column records the timestamp of the last DML operation that was applied to the target.
By default, this check box is not selected.
Add Operation Type
Add a metadata column that records the source SQL operation type in the output that the job propagates to the target database or inserts into the audit table on the target system.
This field is available only when the Apply Mode option is set to Audit or Soft Deletes.
In Audit mode, the job writes "I" for inserts, "U" for updates, "E" for upserts, or "D" for deletes to this metadata column.
In Soft Deletes mode, the job writes "D" for deletes or NULL for inserts, updates, and upserts. When the operation type is NULL, the other "Add Operation..." metadata columns are also NULL. Only when the operation type is "D" will the other metadata columns contain non-null values.
By default, this check box is selected and you you cannot deselect it.
Add Operation Time
Select this check box to add a metadata column that records the source SQL operation timestamp in the output that the job propagates to the target database or inserts into the audit table on the target system.
This field is available only when the Apply Mode option is set to Audit or Soft Deletes.
By default, this check box is not selected.
Add Operation Sequence
Select this check box to add a metadata column that records a generated, ascending sequence number for each change operation that the job inserts into the target tables. The sequence number reflects the change stream position of the operation.
This field is available only when Apply Mode is set to Audit.
By default, this check box is not selected.
Add Cycle ID
Select this check box to add a metadata column that includes the cycle ID of each CDC cycle in each target table. A cycle ID is a number that's generated by the CDC engine for each successful CDC cycle. If you integrate the job with Data Integration taskflows, the job can pass the minimum and maximum cycle IDs in output fields to the taskflow so that the taskflow can determine the range of cycles that contain new CDC data. This capability is useful if data from multiple cycles accumulates before the previous taskflow run completes. By default, this check box is not selected.
Prefix for Metadata Columns
Add a prefix to the names of the added metadata columns to easily identify them and to prevent conflicts with the names of existing columns.
The default value is INFA_.
Superpipe
Select this check box to use the Snowpipe Streaming API to quickly stream rows of data directly to Snowflake Data Cloud target tables with low latency instead of first writing the data to stage files. This option is available for all load types.
When you configure the target connection, select KeyPair authentication.
By default, this check box is selected. Deselect it if you want to write data to intermediate stage files.
Note:
If you enable the Superpipe option for a task that uses the Soft Deletes apply mode, make sure the source tables contain a primary key.
Merge Frequency
When Superpipe is selected, you can optionally set the frequency, in seconds, at which change data rows are merged and applied to the Snowflake target tables.
The merge frequency affects how often the stream change data is merged to the Snowflake base table. A Snowflake view joins the stream change data with the base table. Set this value to balance the costs of merging data to the base table with the performance of view join processing.
This field applies to incremental load and combined initial and incremental load tasks. Valid values are 60 through 604800 seconds. Default is 3600 seconds.
Enable Case Transformation
By default, target table names and column names are generated in the same case as the corresponding source names, unless cluster-level or session-level properties on the target override this case-sensitive behavior. If you want to control the case of letters in the target names, select this check box. Then select a Case Transformation Strategy option.
Case Transformation Strategy
If you selected Enable Case Transformation, select one of the following options to specify how to handle the case of letters in generated target table (or object) names and column (or field) names:
- Same as source. Use the same case as the source table (or object) names and column (or field) names.
- UPPERCASE. Use all uppercase.
- lowercase. Use all lowercase.
The default value is Same as source.
Note:
The selected strategy will override any cluster-level or session-level properties on the target for controlling case.
2Under Table Renaming Rules, if you want to rename the target objects that are associated with the selected source tables, define renaming rules.
aClick the + (Add new row) icon and enter a source table name or name mask and enter a corresponding target table name or name mask.
bTo define a mask, include one or more the asterisk (*) wildcards. Then, press Enter.
For example, to add the prefix "PROD_" to the names of target tables that correspond to all selected source tables, enter the * wildcard for the source table and enter PROD_* for the target table.
You can enter multiple rules.
Notes:
- If you enter the wildcard for a source table mask, you must also enter the wildcard for a target table mask.
- If a table name includes special characters, such as a backslash (\), asterisk(*), dot (.), or question mark (?), escape each special character in the name with a backslash (\).
- On Windows, if you enter target table renaming criteria that causes a target table name to exceed 232 characters in length, the name is truncated to 222 characters. Data Ingestion and Replication appends 14 characters to the name to add a date-time yyyyMMddHHmmss value, which causes the name to exceed the Windows maximum limit of 255. Ensure that the names of any renamed target tables do not exceed 232 characters.
3Under Data Type Rules, if you want to override the default mappings of source data types to target data types, define data type rules. Click the + (Add new row) icon and enter a source data type and corresponding target data type. Then press Enter.
Also, in the Source Data Type value, you can include the percent (%) wildcard to represent the data type precision, scale, or size, for example, NUMBER(%,4), NUMBER(8,%), or NUMBER(%). Use the wildcard to cover all source columns that have the same data type but use different precision, scale, or size values, instead of specifying each one individually. For example, enter FLOAT(%) to cover FLOAT(16), FLOAT(32), and FLOAT(84). You cannot enter the % wildcard in the target data type. A source data type that uses the % wildcard must map to a target data type that uses specific precision, scale, or size value. For example, you could map the source data type FLOAT(%) to a target data type specification such as NUMBER(38,10)
4Under Custom Properties, you can enter one or more custom properties that Informatica provides to improve performance or to meet your special requirements. To add a property, click the + icon to add a row. In the Property Name field, select a property and then enter a property value, or select the Custom option and manually enter both the property name and value.
The following table describes the properties that are available, depending on the load type:
Property
Description
Writer Distributor Count
The number of distributors that can run on separate threads in parallel to process data during an initial load job or the unload phase of a combined load job when the Writer Unload Multiple Distributors custom property is set to true. Using parallel distributor threads can improve job performance, particularly for high-volume data transfers.
Default value is 3. If your system has ample resources, Informatica recommends that you set this parameter to 8.
Note:
If you select the Auto-Tune option on the Let's Go! page of the task wizard, auto-tuning can determine the optimal distributor count. You can override the value from auto-tuning by setting this custom property.
Writer Helper Thread Count
The number of writer helper threads that are used to convert incoming change data rows or initial unload rows to the output format configured for the target, such as Avro, CSV, or Parquet.
Default value is 2. If two threads can’t keep up with the incoming volume of data, you can increase the number of threads. Consider increasing the number of threads in the following situations: 1) the incoming volume is high, 2) multiple writer distributors are in use, or 3) some rows are very large or wide, which increases conversion time.
Note:
If you select the Auto-Tune option on the Let's Go! page of the task wizard, auto-tuning can determine the optimal thread count. You can override the value from auto-tuning by setting this custom property.
Writer Unload Multiple Distributors
Indicates whether multiple distributor threads can be used to process data in parallel during initial load jobs and the unload phase of combined load jobs. The distributors perform work such as uploading data files to staging areas and flushing data to the target. Set this property to true to use multiple distributor threads.
Default value is false.
Note:
If you select the Auto-Tune option on the Let's Go! page of the task wizard, auto-tuning can determine whether to use multiple distributors. You can override the value from auto-tuning by setting this custom property.
Custom
Select this option to manually enter the name of a property and its value. Use this option to enter properties that Informatica Global Customer Support or a technical staff member has provided to you for a special case.
Custom properties are intended to address performance or special processing needs. A property name can contain only alphanumeric characters and the following special characters: periods (.), hyphens (-), and underscores (_).
Tip:
To delete a custom property after you've entered it, click the Delete icon at the right end of the property row.
Click Next to proceed, or click Save.
Transform the data
You can apply trim transformations to selected tables and columns to remove spaces to the left or right of character column values. You can also define row-level filter rules to filter out data rows for source tables based on column conditions you define before the data is applied to the target.
Note:
If you edit row-level filters in the task for a deployed job, you must Redeploy the job afterwards for the updated filters to take effect.
1On the Transform Data page, select the tables and columns to which you want to assign a transformation.
Note:
You can apply trim transformations and row-level filters to the same tables and columns.
2To add a trim transformation, click Add Transformation.
The How do you want to transform your data? dialog box appears.
3Click the + (Add a new row) icon to add a row. Then, in the Transformation Type list, select one of the following options:
- Trim Left. Trim spaces to the left of character column values.
- Trim Right. Trim spaces to the right of character column values.
- Trim. Trim spaces to the left of and to the right of character column values.
Click the Save icon to add the entry.
4Click Next to go to the Summary tab where you can review your transformation settings.
5If the settings are correct on the Summary tab, click Save to save them and return to the initial Transform Data page.
6To add another transformation type for a different table or set of tables, repeat steps 1 through 5.
Tip:
You can remove a transformation assignment on the Transform Data page. Select the table with the unwanted transformation and click Clear All.
7To add row-level filters to the selected tables and columns, click the down arrow next to Add Transformation and select Add Row Filter.
The Add Row Filter option is available only only for application ingestion and replication tasks that have an SAP source (with an Oracle or HANA database) and use the SAP Mass Ingestion connector or that have a Salesforce source and use the Salesforce Mass Ingestion connector. The tasks can use any load type.
The How do you want to filter your data? dialog box appears.
8Select the table and filter type to apply the filter conditions.
aFrom the set of tables you previously selected, select the table that you want to assign a filter to.
bSelect one of the following filter types:
▪ Basic
▪ Advanced
The default option is Basic.
9To add a Basic filter, complete the following substeps:
aClick the + (Add a new row) icon to add a row.
bUnder Column Name, select a column.
Columns with unsupported data types for row filtering are marked as "Not supported."
cUnder Operator, select an operator type to use with the value.
dUnder Value, select or enter a value, depending on the column type. Then click the Save icon on the right end of the row to save the condition.
The following table describes the values that are valid for each column data type supported for filtering:
Column data type
Description
INTEGER
Enter a numeric value. You can use "+" and "-" only once before the number. The value must be between -2147483648 and 2147483647.
LONG
Enter a numeric value. You can use "+" and "-" only once before the number. The value must be between -9,223,372,036,854,775,808 and 9,223,372,036,854,775,807.
BIGINT
Enter a numeric value. You can use "+" and "-" only once before the number. Maximum length is 50 digits.
BIGDEC
Enter a numeric value. You can use "+" and "-" only once before the number. A decimal is allowed. Maximum length is 50 digits.
STRING
Enter text.
DATE
Use the date picker to select the date.
TIME
Enter the value in the format HH:MM:SS.MS, with milliseconds being optional and up to a maximum length is 9 digits.
For example, 13:14:15.123456789
DATETIME
Use the date picker to select the date and time.
OFFSET_DATETIME
Use the date picker to select the date, time, and time zone.
Note:
Application Ingestion and Replication does not support BOOLEAN, BINARY, BLOB, CLOB, and graphic column data types.
eClick Validate to test the syntax of the specified condition.
fTo add another Basic condition, repeat steps a through e.
The AND operator is used to combine the multiple conditions.
gClick Save to validate and save the changes.
hWhen done defining Basic filter conditions, click OK to return to the Transform Data page.
10To define an Advanced filter that consists of multiple conditions combined with the AND or OR operator, manually enter the conditions in the box.
Note:
If you entered a Basic filter conditions for a column and then switched to the Advanced filter, the Basic condition is displayed so that you can add to it to make a more complex filter.
aUnder Column Name, select a column and click the > arrow.
The column name appears in the Filter Condition box.
Note:
For combined load tasks, do not include columns that you expect will be updated during CDC processing. If the column is updated, it might become ineligible for replication and cause unpredictable results. In this case, you'd need to Resync the job.
bIn the Filter Condition box, type one or more conditions for the selected column. Manually enter conditions using the supported syntax and the appropriate operators, which can vary based on the column data type. You can also nest conditions using parentheses. See Syntax for row-level filtering. When done, click the Save icon on the right end of the row to save the advanced filter.
The following table describes the values that are valid for each column data type supported for filtering:
Column data type
Description
INTEGER
Enter a numeric value. You can use "+" and "-" only once before the number. The value must be between -2147483648 and 2147483647.
LONG
Enter a numeric value. You can use "+" and "-" only once before the number. The value must be between -9,223,372,036,854,775,808 and 9,223,372,036,854,775,807.
BIGINT
Enter a number value. You can use "+" and "-" only once before the number. Maximum length is 50 digits.
BIGDEC
Enter a numeric value. You can use "+" and "-" only once before the number. A decimal is allowed. Maximum length is 50 digits.
STRING
Enter an input attribute in single quotes (').
DATE
Enter the value in the format YYYY-MM-DD. Enter the input attribute in single quotes (').
TIME
Enter the value in the format HH:MM:SS.MS, with milliseconds (MS) being optional and up to a maximum length is 9 digits. Enter the input attribute in single quotes (').
For example, 13:14:15.123456789
DATETIME
Enter the date and time in the following format:
YYYY-MM-DDTHH:MM:SS:MS
For example, 2024-12-31T03:04:05.123456789
Enter the input attribute in single quotes (').
OFFSET_DATETIME
Enter the date, time, and time zone in the following format:
YYYY-MM-DDTHH:MM:SS.MS+05:00
For example, 2024-03-15T10:03:04.123456789+05:00
Enter the input attribute in single quotes (').
Notes:
▪ Application Ingestion and Replication does not support BOOLEAN, BINARY, BLOB, CLOB, and graphic column data types.
▪ All date, time, and datetime values are matched against the source date and time. Time changes between Daylight Saving Time and standard time are not accommodated.
cClick Validate to test the syntax of the specified conditions.
Note:
Switching from Advanced to Basic filter type after creating or editing an Advanced filter condition, deletes all changes to the filter condition, even if you saved it.
dClick Save to validate and save the changes and then click OK to return to the Transform Data page.
Note:
Do not modify any column included in the filter after the task has been deployed. If you do so, the row-level filtering might not work properly.
The Filters column on the Transform Data page shows the applied filters as hyperlinks. Clicking the link opens the selected filter in edit mode. Tables with an advanced filter display Advanced next to their filter conditions in the Filters column.
On the Transform Data page, clicking the Clear All button at the top right hand corner removes all filters, including trim transformations and row-level filters from the selected tables.
11When done, click Next.
Syntax for row-level filtering
If you create Advanced row-level filters when you define an application ingestion and replication task, ensure that you enter the filter conditions using the correct syntax. Otherwise, filter validation is likely to fail.
Operators
In an Advanced filter, you can use the following operators within a condition, depending on the column data type:
Operator
Description
=
Equals
!=
Does not equal
>
Greater than
>=
Greater than or equal to
<
Less than
<=
Less than or equal to
IS NULL
Contains a null
IS NOT NULL
Cannot contain a null
BETWEEN x AND y
Greater than or equal to x and less than or equal to y
NOT BETWEEN %s AND %s
Not greater than or equal to x and less than or equal to y
LIKE
A comparative operative for string columns only.
Example: LIKE '%06%7__' . This condition matches against the following values: 06789, A06X789, AB06XY789", "06X789, and A06789. However, it does not match against these values: A06789Z, A0678, A6789, "".
NOT LIKE
A comparative operative for string columns only.
IN
True if the operand is equal to one of a list of expressions
NOT IN
True if the operand is NOT equal to one of a list of expressions
+ - / *
Numeric computation operators for addition, subtraction, division, and multiplication
Syntax rules
In Advanced filters, use with the following syntax rules:
•Enclose string, date, time, datetime, offset_datetime values in single quotation marks. For example: 'SomeName'
•In datetime and offset_datetime values, enter the character "T" between date and time. For example: '2024-11-15T00:00:00.000000001'
Finalize the task definition
Almost done! On the Let's Go! page, complete a few more properties. Then you can Save and Deploy the task.
1Under General Properties, set the following properties:
Property
Description
Task Name
Enter a name that you want to use to identify theapplication ingestion and replication task, if you do not want to use the generated name. Using a descriptive name will make finding the task easier later.
Task names can contain Latin alphanumeric characters, spaces, periods (.), commas (,), underscores (_), plus signs (+), and hyphens (-). Task names cannot include other special characters. Task names are not case sensitive. Maximum length is 50 characters.
Note:
If you include spaces in the task name, after you deploy the task, the spaces do not appear in the corresponding job name.
Location
The project or project\folder in Explore that will contain the task definition. If you do not specify a project, the "Default" project is used.
Runtime Environment
Select the runtime environment that you want to use to run the task. By default, the runtime environment that you initially entered when you began defining the task is displayed. You can use this runtime environment or select another one.
Tip:
To refresh the list of runtime environments, click Refresh.
The runtime environment can be a Secure Agent group that consists of one or more Secure Agents. A Secure Agent is a lightweight program that runs tasks and enables secure communication.
Alternatively, for application ingestion and replication that have selected source types, you can use a serverless runtime environment hosted on Microsoft Azure.
Note:
You cannot choose a serverless runtime environment if a local runtime environment was previously selected.
The Cloud Hosted Agent is not supported.
Select Set as default to use the specified runtime environment as your default environment for all tasks you create. Otherwise, leave this check box cleared.
Description
Optionally, enter a description you want to use for the task.
Maximum length is 4,000 characters.
Schedule
If you want to run an initial load task based on a schedule instead of manually starting it, select Run this task based on a schedule. Then select a schedule that was previously defined in Administrator.
The default option is Do not run this task based on a schedule.
Note:
This field is not available for incremental load and combined initial and incremental load tasks.
To view and edit the schedule options, go to Administrator. If you edit the schedule, the changes will apply to all jobs that use the schedule. If you edit the schedule after deploying the task, you do not need to redeploy the task.
If the schedule criteria for running the job is met but the previous job run is still active, Application Ingestion and Replication skips the new job run.
Execute in Taskflow
Select this check box to make the task available in Data Integration to add to a taskflow as an event source.You can then include transformations in the taskflow to transform the ingested data. Available for initial load and incremental load tasks with Snowflake targets that don't use the Superpipe option.
2To display advanced properties, toggle on Show Advanced Options.
3For initial load jobs that have Amazon S3, Google Cloud Storage, Microsoft Azure Data Lake Storage, or Microsoft Fabric OneLake targets, optionally clear the File Extension Based on File Type check box if you want the output data files to have the .dat extension. This check box is selected by default, which causes the output files to have file-name extensions based on their file types.
Note:
For incremental load jobs with these target types, this option is not available. Application Ingestion and Replication always uses output file-name extensions based on file type.
4Optionally, configure an apply cycle. An apply cycle is a cycle of applying change data that starts with fetching the intermediate data from the source and ends with the commit of the data to the target. For continuous replication, the source processes the data in multiple low-latency apply cycles.
For application ingestion and replication incremental load tasks that have Amazon S3, Google Cloud Storage, Microsoft Azure Data Lake Storage Gen2, or Microsoft Fabric OneLake targets, you can configure the following apply cycle options:
Option
Description
Apply Cycle Interval
Specifies the amount of time that must elapse before an application ingestion and replication job ends an apply cycle. You can specify days, hours, minutes, and seconds or specify values for a subset of these time fields leaving the other fields blank.
The default value is 15 minutes.
Note:
If you're using an Amazon S3 target with the Apache Iceberg option for the Open Table Format target property, this field is ignored.
Apply Cycle Change Limit
Specifies the number of records that must be processed before an application ingestion and replication job ends an apply cycle. When this record limit is reached, the ingestion job ends the apply cycle and writes the change data to the target.
The default value is 10000 records.
During startup, jobs might reach this limit more frequently than the apply cycle interval if they need to catch up on processing a backlog of older data.
Note:
If you're using an Amazon S3 target with the Apache Iceberg option for the Open Table Format target property, this field is ignored.
Low Activity Flush Interval
Specifies the amount of time, in hours, minutes, or both, that must elapse during a period of no change activity on the source before an application ingestion and replication job ends an apply cycle. When this time limit is reached, the ingestion job ends the apply cycle and writes the change data to the target.
If you do not specify a value for this option, an application ingestion and replication job ends apply cycles only after either the Apply Cycle Change Limit or Apply Cycle Interval limit is reached.
No default value is provided.
Note:
- Either the Apply Cycle Interval or Apply Cycle Change Limit field must have a non-zero value or use the default value.
- An apply cycle ends when the job reaches any of the three limits, whichever limit is met first.
5For incremental load jobs that have an Apache Kafka target, configure the following Checkpoint Options:
Option
Description
Checkpoint All Rows
Indicates whether an application ingestion and replication job performs checkpoint processing for every message that is sent to the Kafka target.
Note:
If this check box is selected, the Checkpoint Every Commit, Checkpoint Row Count, and Checkpoint Frequency (secs) options are ignored.
Checkpoint Every Commit
Indicates whether an application ingestion and replication job performs checkpoint processing for every commit that occurs on the source.
Checkpoint Row Count
Specifies the maximum number of messages that an application ingestion and replication job sends to the target before adding a checkpoint. If you set this option to 0, the job does not perform checkpoint processing based on the number of messages. If you set this option to 1, the job adds a checkpoint for each message.
Checkpoint Frequency (secs)
Specifies the maximum number of seconds that must elapse before an application ingestion and replication job adds a checkpoint. If you set this option to 0, an application ingestion and replication does not perform checkpoint processing based on elapsed time.
6Under Schema Drift Options, if the detection of schema drift is supported for your source and target combination, specify the schema drift option to use for each of the supported types of DDL operations.
Note:
The Schema Drift Options section appears only for incremental load and combined initial and incremental load tasks. Additionally, this section appears only for the sources that support automatic detection of schema changes.
The following table describes the schema drift options that you can set for a DDL operation type:
Option
Description
Ignore
Do not replicate DDL changes that occur on the source database to the target.
Replicate
Allow the application ingestion and replication job to replicate the DDL changes to the target.
Note:
- Add Field operations that add a primary-key field are not supported and might cause unpredictable results.
- Modify Field operations that change the NULL or NOT NULL constraint of a field are not replicated to the target.
The types of supported DDL operations are:
- Add Column
- Modify Column
- Drop Column
- Rename Column
Application ingestion and replication jobs doesn't support modifying or renaming columns for Google BigQuery target, and adding columns for Oracle targets.
Stop Job
Stop the application ingestion and replication job.
Stop Table
Stop processing the source object on which the DDL change occurred.
Note:
When one or more objects are excluded from replication because of the Stop Object schema drift option, the status of the job changes to Running with Warning. The application ingestion and replication job cannot retrieve the data changes that occurred on the source object after the job stops processing the changes. This action leads to data loss on the target. To avoid data loss, you must re-synchronize the source and target objects that the job stopped processing before you resume the application ingestion and replication job.
7Under Custom Properties, you can enter one or more custom properties that Informatica provides to improve performance or to meet your special requirements. To add a property, click the + icon to add a row. In the Property Name field, select a property and then enter a property value, or select the Custom option and manually enter both the property name and value.
The following table describes the properties that are available:
Property
Description
Number of Rows in Output File
Specify the maximum number of rows that the task writes to an output data file.
Note:
This field is not displayed for jobs that have an Apache Kafka target or if you use the Superpipe option for a Snowflake target.
For incremental load operations and combined initial and incremental load operations, change data is flushed to the target either when this number of rows is reached or when the flush latency period expires and the job is not in the middle of processing a transaction. The flush latency period is the time that the job waits for more change data before flushing data to the target. The latency period is internally set to 10 seconds and cannot be changed.
Valid values are 1 through 100000000. Default is 100000 rows.
Note:
For Microsoft Azure Synapse Analytics targets, the data is first sent to a Microsoft Azure Data Lake Storage staging file before being written to the target tables. After data is written to the target, the entire contents of the table-specific directory that includes the staging files are emptied. For Snowflake targets, the data is first stored in an internal stage area before being written to the target tables.
Note:
If you select the Auto-Tune option on the Let's Go! page of the task wizard, auto-tuning can determine whether to use multiple distributors. You can override the value from auto-tuning by setting this custom property.
Custom
Select this option to manually enter the name of a property and its value. Use this option to enter properties that Informatica Global Customer Support or a technical staff member has provided to you for a special case.
Custom properties are intended to address performance or special processing needs. A property name can contain only alphanumeric characters and the following special characters: periods (.), hyphens (-), and underscores (_).
Tip:
To delete a custom property after you've entered it, click the Delete icon at the right end of the property row.
8Click Save to save the task.
9Click Deploy to deploy a job instance for the task, or click the Actions menu button and select View Details to view or edit the task.
You can run a job with a status of Deployed from the actions menu or from the My Jobs page.