Prerequisites for Workload Identity Federation authentication
Set up the identity provider and Google Cloud before you create a Google BigQuery V2 connection that uses Workload Identity Federation (WIF) authentication.
The tasks depend on the authentication type that you select for the connection.
The following table describes the prerequisite tasks for each authentication type:
Authentication type
Identity provider
Prerequisite tasks
WIF (Authorization Code)
Okta
Set up an OAuth application and an authorization server in Okta. Register Okta with a Workload Identity Pool in Google Cloud. Assign roles to the Workload Identity Pool principal user.
WIF (Client Credentials)
Microsoft Entra ID
Review the network access requirements. Register an application in Microsoft Entra ID. Assign the Contributor role on the Azure subscription. Register Microsoft Entra ID with a Workload Identity Pool. Assign roles to the workload identity pool principal. Enable uniform bucket-level access.
After you perform the tasks, use the values that you record to configure the connection.
Prerequisites for Workload Identity Federation (Authorization Code) authentication
Set up Okta and Google Cloud before you create a Google BigQuery V2 connection that uses Workload Identity Federation (Authorization Code) authentication.
To connect to Google BigQuery, you need the following values:
•Project number
•Client ID
•Secret ID
•Authorization URL
•Access token URL
•Pool ID
•Provider ID
•Access token
To get the authorization details, create an OAuth application in the Okta identity provider with a principal user and register the Informatica redirect URL. With this setup, OAuth clients can redirect users to an authorization page and generate access and refresh tokens to connect to Google BigQuery. If the access token expires, the Informatica redirect URL attempts to connect to the Okta identity provider endpoint and retrieves a new access token. The Informatica redirect URL is outside the customer firewall.
In the Google Cloud console, create a Workload Identity Federation pool and register Okta as the provider. Then, assign roles to the principal user so that the user can directly access the Google Cloud resources.
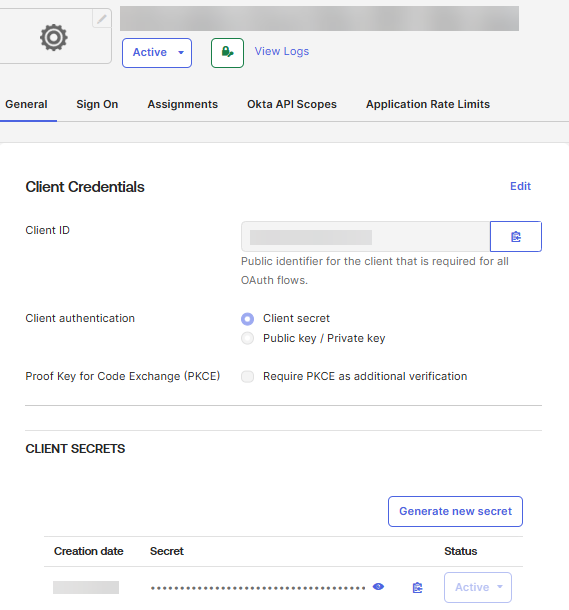
Create an OAuth application in Okta, and register the Informatica redirect URL. The application provides the client ID and client secret that you use to configure the Google BigQuery V2 connection.
Note:
The third-party information included in Informatica documentation is subject to change without prior notice. Check the third-party documentation for the most up-to-date information.
1Log in to the Okta portal as an Okta administrator.
2From the Admin console, go to Applications.
3Click Create App Integration.
4On the Create a new app integration page, perform the following steps:
aIn the Sign-in method, select OIDC - OpenID Connect.
bIn the Application type, select Web Application and click Next.
5On the New Web App Integration page, perform the following steps:
aEnter the OAuth application name in the App integration name field.
Example: Informatica Cloud Okta OIDC Web Application
bSelect Authorization Code and Refresh Token in the Grant type field.
cEnter the URIs in the Sign-in redirect URIs and Sign-out redirect URIs fields. You can enter multiple URIs.
Syntax: https://<Server name where Informatica Secure Agent is hosted>/ma/proxy/oauthcallback
dIn the Refresh Token section, select Use persistent token in the Refresh token behavior field.
eIn the USER CONSENT section, select Require consent in the User consent field.
fIn the Assignments section, perform the following steps:
aSelect an option in the Controlled access field.
bSelect Enable immediate access with Federation Broker Mode in the Enable immediate access field.
gClick Save. Okta creates the OAuth application.
6Record the values of the Client ID and CLIENT SECRET fields. You require these values to configure the Google BigQuery V2 connection.
Add an Okta authorization server
Add an authorization server in Okta, and create an access policy and rule for the OAuth application. You use the authorization endpoint and token endpoint values from this server to configure the Google BigQuery V2 connection.
Note:
The third-party information included in Informatica documentation is subject to change without prior notice. Check the third-party documentation for the most up-to-date information.
1Log in to the Okta portal as an Okta administrator.
2Go to Security > API.
3On the Authorization Servers tab, click Add Authorization Server.
4On the Add Authorization Server page, perform the following steps:
aEnter a name for the authorization server in the Name field.
Example: Informatica Cloud Okta Authorization Server
bEnter the value in the Audience field.
Syntax: gcp-workload-identity-pool://<Workload Identity Pool ID>
Note:
Ensure that you enter the same value in the identity provider field in Google Cloud console.
cEnter the description in the Description field and click Save.
dRecord the Okta issuer value, which is required for the server configuration.
5On the Settings tab, perform the following steps:
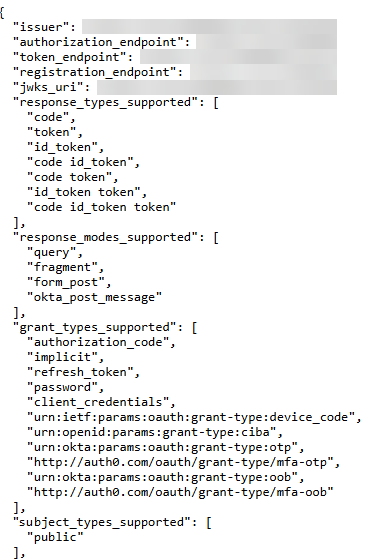
aClick Metadata URI. A JSON response output is generated.
Note:
Alternatively, you can copy the value and open it in a browser window.
bCopy the JSON response output to an advanced text editor application and record the values of the following parameters:
▪ authorization_endpoint: This value specifies the Okta authorization server issuer URI. Enter this value in the Authorization URL field of the Google BigQuery V2 connection.
▪ token_endpoint: This value specifies the Okta authorization server access token endpoint. Enter this value in the Access Token URL field of the Google BigQuery V2 connection.
▪ jwks_uri: This value specifies the Okta authorization server JSON web key sets URI.
6On the Claims tab, verify that an Access type exists with the name sub.
7On the Access Policies tab, click Add New Access Policy.
8On the Add Policy page, perform the following steps:
aEnter the policy name in the Name field.
Example: Informatica Cloud Access Policy v1
bEnter the policy description in the Description field.
cSelect the The following clients: option in the Assign to field and select the OIDC web application that you created.
Note:
You can select multiple client applications.
dClick Create Policy.
9On the Access Policies tab, click Add Rule in the newly created access policy.
10On the Add Rule page, perform the following steps:
aEnter the rule name in the Rule Name field.
bIn the IF Grant type is field, perform the following steps:
aSelect Client Credentials in the Client acting on behalf of itself field.
bSelect Authorization Code in the Core grants field.
cSelect Implicit (hybrid) and Resource Owner Password in the Other grants field.
cIn the AND User is field, select Any user assigned the app.
Note:
You can further review the access policy rules and specify restrictions for additional groups or users.
dIn the AND Scopes requested field, select Any scopes.
eVerify the default value set for the AND Access token lifetime is field and adjust the value, if required.
fClick Create rule.
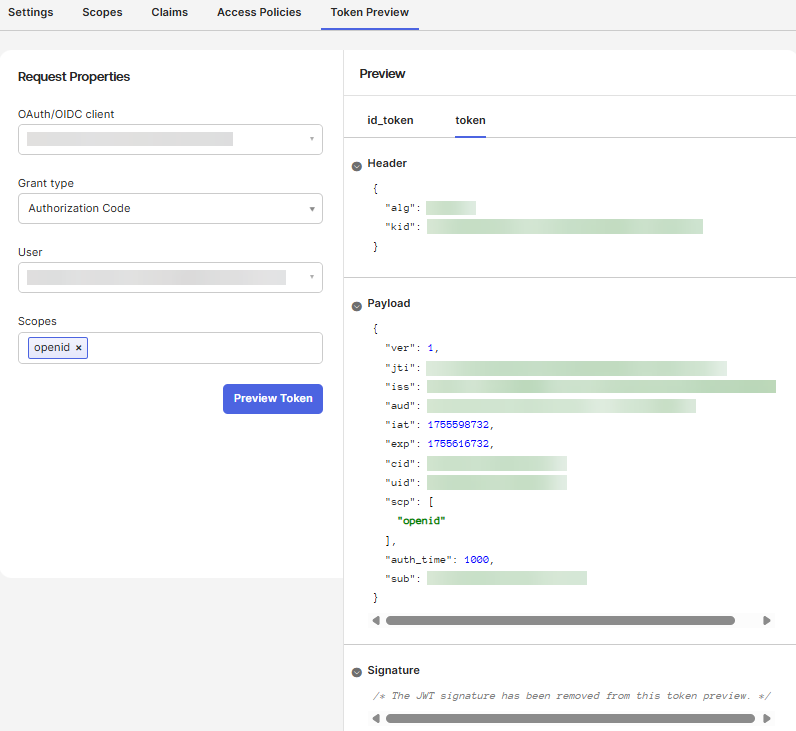
11On the Token Preview tab, perform the following steps to verify the configuration for the Okta authorization server:
aIn the Request Properties section, perform the following steps:
aSelect the Okta OIDC web application that you created in the OAuth/OIDC client field.
bSelect Authorization Code in the Grant type field.
cSelect a user in the User field.
Note:
Ensure that the selected user is a member of any of the groups associated with the OIDC web application that you created and the access policy rule set for the authorization server.
dEnter openid in the Scopes field.
eClick Preview Token.
bIn the Preview section, go to the token tab.
cIn the Payload section, verify the value of the sub claim or any other claims that you created.
Register the identity provider with Workload Identity Pool
Create a Workload Identity Pool in Google Cloud, and add Okta as an OpenID Connect provider for the pool. Record the pool ID and provider ID that you use to configure the Google BigQuery V2 connection.
Note:
The third-party information included in Informatica documentation is subject to change without prior notice. Check the third-party documentation for the most up-to-date information.
1In the Google Cloud console, go to IAM & Admin > Workload Identity Federation.
2Click Create pool.
3In the Create an identity pool section, perform the following steps:
aEnter the identity pool name in the Name field.
bEnter the identity pool ID in the Pool ID field.
cEnter the identity pool description in the Description field.
dClick Continue.
4In the Add a provider to pool section, select OpenID Connect (OIDC) in the Select a provider field.
5In the Configure provider attributes section, perform the following steps:
aEnter the identity provider name in the Provider name field.
bEnter the identity provider issuer URL in the Issuer (URL) field.
cEnsure that the JWK file (JSON) field is empty.
dSelect the Allowed audiences option.
eEnter gcp-workload-identity-pool://<identity pool ID> in the Audience 1 field.
fClick Continue.
gVerify that google.subject is populated automatically in the Google 1 field.
hEnter assertion.sub in the OIDC 1 field.
iClick Save.
6iRecord the values of Pool ID and Provider ID that you created. You require these values to configure the Google BigQuery V2 connection.
Assign required roles to Workload Identity Pool principal user
Assign roles to the Workload Identity Pool principal user so that the user can directly access the Google Cloud resources.
Note:
The third-party information included in Informatica documentation is subject to change without prior notice. Check the third-party documentation for the most up-to-date information.
1In the Google Cloud console, go to IAM & Admin > IAM > Allow.
2Click Grant Access.
3On the Grant access to "API Project" page, perform the following steps:
aEnter the IAM principal information in the New principals field.
Syntax: principal://iam.googleapis.com/projects/<Project number>/locations/global/workloadIdentityPools/<Pool ID>/subject/<email ID of the registered user>
You can find the project number in the Google Cloud console. You require this value to configure the Google BigQuery V2 connection.
bAssign the required roles for the IAM principal user.
Note:
You can assign multiple roles for the user. For a beginner user, you can assign roles such as BigQuery Admin, Storage Admin, and Workload Identity User.
4Click Save.
Prerequisites for Workload Identity Federation (Client Credentials) authentication
Before you configure a Google BigQuery V2 connection to use Workload Identity Federation (Client Credentials) authentication, perform the following tasks in order:
1Review the network access requirements.
2Register an application in Microsoft Entra ID.
3Assign the Contributor role on the Azure subscription.
4Register Microsoft Entra ID with a Workload Identity Pool.
5Assign the required roles to the Workload Identity Pool principal.
6Enable uniform bucket-level access.
After you perform these tasks, you have the following values to configure the connection:
•Tenant ID
•Client ID
•Client secret
•Application ID URI
•Project number
•Pool ID
•Provider ID
Network access requirements
The Secure Agent machine requires outbound HTTPS access to the following endpoints:
Endpoint
Purpose
login.microsoftonline.com
Request an OpenID Connect (OIDC) token from Microsoft Entra ID.
sts.googleapis.com
Exchange the Entra ID token for a federated Google access token.
iamcredentials.googleapis.com
Generate a short-lived access token for the target service account when you enable service account impersonation.
bigquery.googleapis.com
Run BigQuery jobs and queries.
storage.googleapis.com
Stage data in Google Cloud Storage buckets.
cloudresourcemanager.googleapis.com
Look up the data project when you clear the Use Data Project property and the connection resolves the project associated with the workload identity pool.
Register an application in Microsoft Entra ID
Register an application in Microsoft Entra ID to get the client ID and client secret. The connection uses these values and your tenant ID to request access tokens.
Sign in to the Microsoft Entra admin center with an account that has permissions to register applications and create client secrets.
The third-party information included in Informatica documentation is subject to change without prior notice. Check the third-party documentation for the most up-to-date information.
1Go to Entra ID > App registrations, and click New registration.
2On the Register an application page, enter a name for the application in the Name field.
3In the Supported account types field, select Single tenant only - <your tenant>.
4Click Register.
5On the application overview page, copy the Application (client) ID and Directory (tenant) ID values, and store them for later use.
6In the left pane, click Expose an API.
7Next to Application ID URI, click Set.
8In the Application ID URI field, enter the URI in the following format, and click Save:
Syntax: api://<client ID>
Microsoft Entra ID accepts an HTTPS URI only for a domain that you verify in your tenant.
9In the left pane, click Certificates & secrets.
10On the Client secrets tab, click New client secret.
11Enter a description in the Description field, select an expiry period in the Expires field, and click Add.
12Copy the client secret from the Value column, and store it securely. Don't copy the value in the Secret ID column.
Microsoft Entra ID displays the secret value only once.
13Record the values of the client ID, tenant ID, Application ID URI, and client secret. You require these values to configure the Google BigQuery V2 connection and the Workload Identity Pool.
Assign the Contributor role on the Azure subscription
Assign the Contributor role to the registered application on the Azure subscription.
The third-party information included in Informatica documentation is subject to change without prior notice. Check the third-party documentation for the most up-to-date information.
1In the Azure portal, go to Subscriptions.
2Select the subscription where you plan to create resources for Google Cloud integration.
3Click Access control (IAM).
4Click Add role assignment.
5In the Role field, select Contributor.
6In the Assign access to field, select User, group, or service principal.
7In the Select members field, search for and select the application name you registered.
8Click Save.
Register Microsoft Entra ID with a Workload Identity Pool
Create a Workload Identity Pool in Google Cloud, and add Microsoft Entra ID as an OpenID Connect provider for the pool. Then grant the registered application access to the pool.
The third-party information included in Informatica documentation is subject to change without prior notice. Check the third-party documentation for the most up-to-date information.
1In the Google Cloud console, go to IAM & Admin > Workload Identity Federation, and click Create Pool.
2Enter a name for the pool, and click Continue.
3Select OpenID Connect (OIDC) as the provider type, and click Continue.
4In the Issuer (URL) field, enter the Microsoft identity platform v2.0 token endpoint for the tenant in the following format:
10Record the full resource paths of the pool and provider, not the short IDs. You require these values to configure the Google BigQuery V2 connection.
Pool ID syntax: projects/<project number>/locations/global/workloadIdentityPools/<pool ID>
Provider ID syntax: projects/<project number>/locations/global/workloadIdentityPools/<pool ID>/providers/<provider ID>
Assign required roles to the workload identity pool principal
Grant the workload identity pool principal the Workload Identity User role. Also grant the principal roles that provide read and write access to BigQuery and Google Cloud Storage. If you enable service account impersonation, grant the pool principal the Service Account Token Creator role on the target service account.
The third-party information included in Informatica documentation is subject to change without prior notice. Check the third-party documentation for the most up-to-date information.
1In the Google Cloud console, go to IAM & Admin > IAM for the project that contains the workload identity pool.
2Click Grant Access, and add the pool principal as a new principal.
3In the Role field, assign the following roles:
- Workload Identity User
- Roles that provide read and write access to BigQuery
- Roles that provide read and write access to Google Cloud Storage
4Click Save.
5If you enable service account impersonation, go to IAM & Admin > IAM for the project that contains the target service account.
6Click Grant Access, and add the workload identity pool principal as a new principal.
7In the Role field, select Service Account Token Creator, and click Save.
8Grant the target service account the BigQuery roles that your mappings require, such as BigQuery Data Editor and BigQuery Job User, in the project where the BigQuery datasets reside.
Enable uniform bucket-level access
Enable uniform bucket-level access on the Google Cloud Storage buckets that the connection reads from and writes to. Also enable it on the staging buckets that Google BigQuery V2 uses.