A Customer Managed Secure Agent group is a runtime environment where Secure Agents run autonomously after deployment, with no dependency on a connection to IDMC.
Customer Managed Secure Agent groups allow you to retain full control over what is sent to the Secure Agents within the group, as nothing is sent automatically without you explicitly initiating the action. These groups are ideal in environments where the internet connection to IDMC is sporadic or unreliable.
For example, a data engineer at a retail bank in an emerging market can create a schedule for data integration jobs that run in an environment without constant internet connectivity. An operator on a maritime vessel can run scheduled jobs during high-latency or intermittent connectivity windows.
Secure Agents in a Customer Managed environment process jobs using definitions that were active when the job started. When the job completes, the Secure Agents synchronize the job execution results and agent logs with IDMC, if a connection is available. If not, this synchronization defers until connectivity returns.
The Customer Managed operation isn't available in standard Secure Agent groups and elastic runtime environments.
Note:
A Customer Managed Secure Agent group needs internet connectivity at least once a month for metering purposes and to install any Secure Agent updates.
Differences between Customer Managed vs standard Secure Agent groups
Customer Managed and standard Secure Agent groups are similar, with a few key differences.
Note the following key differences between the two types of Secure Agent groups:
•In standard Secure Agent groups, the flow of information occurs seamlessly between the agents and IDMC. In a Customer Managed environment, you need to synchronize all changes manually. For more information, see Synchronize the runtime environment.
•In standard Secure Agent groups, the Secure Agents automatically upgrade when a new version is available. In a Customer Managed environment, you manually check for and install the upgrades. You are alerted to available upgrades when you attempt to synchronize. For more information, see Working with Customer Managed Secure Agent groups.
•You can't use the IDMC UI or API to start, restart, or pause jobs, or to start or stop Secure Agents attached to a Customer Managed Secure Agent group.
•You need to provide a PostgreSQL database for Customer Managed Secure Agent groups to store metadata. In standard Secure Agent groups, the metadata is stored within IDMC.
Set up a Customer Managed Secure Agent group
You perform a series of setup steps to get your Customer Managed environment ready.
Perform the following steps:
1Contact Informatica Global Customer Support to license the Customer Managed functionality for your organization.
5Push tasks, schedules, and dependencies to the Secure Agents using the Synchronize Runtime Environment action. For more information, see Synchronize the runtime environment.
The Secure Agents are now fully autonomous and ready to operate in a Customer Managed environment.
Create a Customer Managed Secure Agent group
Create a Customer Managed Secure Agent group in Administrator.
Note:
You can't convert a Customer Managed Secure Agent group to a standard Secure Agent group.
1In Administrator, open the Runtime Environments page.
2Select New Runtime Environment.
3On the General page, enter a name for the Customer Managed Secure Agent group.
4Optionally, enter a description.
5Select Customer Managed Secure Agent Group as the runtime environment type.
Note:
If the option isn't visible, verify that the feature is enabled on the Settings page. For more information, see Set up a Customer Managed Secure Agent group.
6Click Next.
7On the Enable Components page, select the services to enable.
8Select the connectors to enable for the Customer Managed Secure Agent group.
9Optionally select any additional services to enable.
Note:
You can also enable services and connectors from the Actions menu after you create the Customer Managed Secure Agent group.
10Click Create.
The Customer Managed Secure Agent group appears on the Runtime Environments page.
Install Secure Agents to a Customer Managed Secure Agent group
You can install a Secure Agent to a Customer Managed Secure Agent group in your chosen environment. The procedure is virtually identical to installing to a standard Secure Agent group.
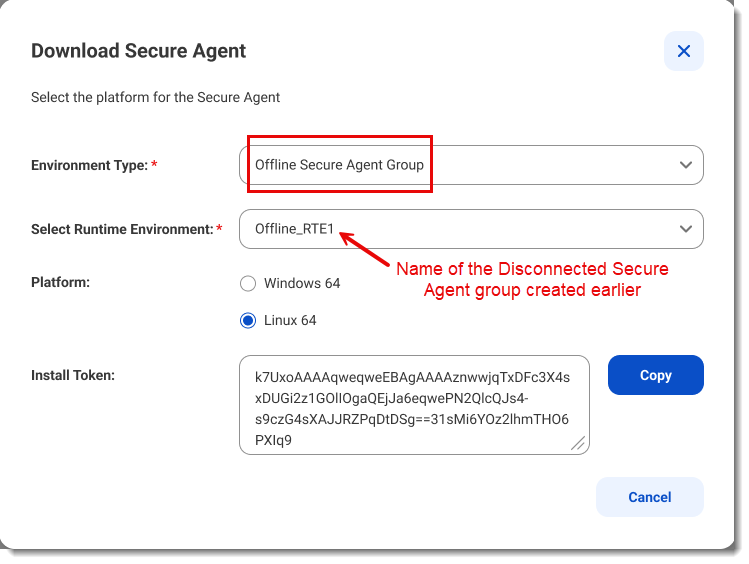
The procedure differs in the following two fields of the Download Secure Agent dialog box:
The following image shows the Download Secure Agent dialog box:
Configure a database for a Customer Managed Secure Agent group
A Customer Managed Secure Agent group uses a database that you supply to maintain its metadata store.
The database stores job metadata, schedules, execution state, service discovery information.
Use the Database Configuration tab of a Customer Managed runtime environment's details page to enter or modify connection details.
Connection Details
The following table describes the connection details:
Property
Description
Connection Name
Name of the database connection.
Database Type
PostgreSQL
Host
Domain of the database host, for example, "db-prod.example.com".
Port
Port number for the database host.
Database Name
Name of the database.
Authentication
The following table describes the authentication properties:
Property
Description
Authentication Type
Determines whether to use a Secret Vault Key or Username/Password for authentication.
Username Secret Key
For Secret Vault key, the path to the secret key for the username, for example, vault/secrets/db/username.
Password Secret Key
For Secret Vault key, the path to the secret key for the password, for example vault/secrets/db/password.
Username
For Username/Password, the username.
Password
For Username/Password, the password.
After you enter the connection details, click Test Connection to verify that the connection is successful.
To test a connection, you need at least one Secure Agent in the Customer Managed Secure Agent group.
Monitor synchronizations for a Customer Managed Secure Agent group
The Monitor tab on a Customer Managed Secure Agent Group's details page shows the status and history of runtime synchronizations. Knowing the status allows you to take corrective actions as necessary.
Customer Managed runtime environments require that you manually synchronize all changes to the Secure Agents. The Monitor tab on the details page of a Customer Managed Secure Agent group displays the status and history of these synchronizations.
Runtime synchronizations
A runtime synchronization represents a deployment of task metadata and assets that IDMC pushes to the Secure Agents running in the Customer Managed environment. The Monitor tab lists all the runtime synchronizations for the offline runtime environment.
Runtime Syncs table
The runtime synchronizations table on the Monitor tab displays the following information for each synchronization:
•A sync ID that you can select to view more details about the synchronization.
•The start and end times of the runtime synchronization, based on your user profile time zone.
•The status of the runtime synchronization.
The following table describes each status:
Status
Description
Activated
Synchronization is complete.
In Progress
Auto synchronization is in progress.
Completed Successfully
Auto synchronization was successful. Moves automatically to Activated.
Completed with Errors
Auto synchronization encountered errors and requires user response.
If the user chooses to continue synchronization despite errors, the status moves to Activated.
Cancelled
User cancelled the synchronization after errors are found.
Synchronization errors
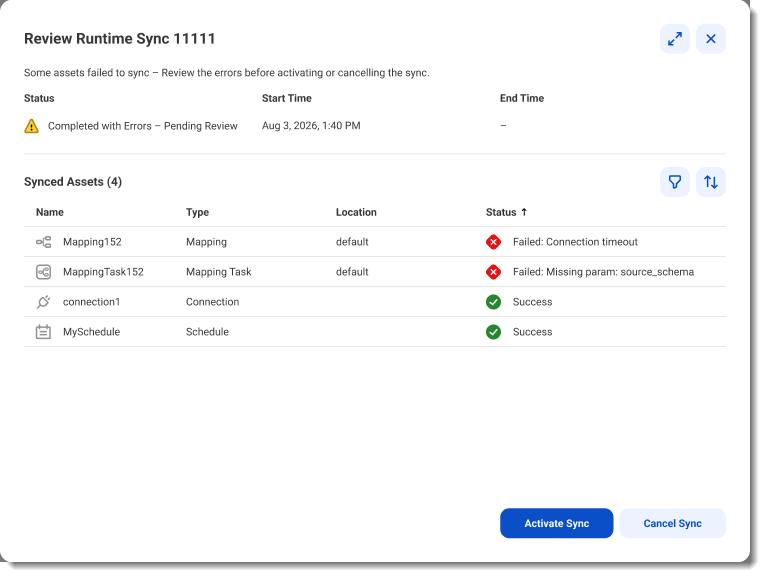
If a synchronization status shows Completed with Errors, click Pending Review in the job's review pane on the Monitor tab to view the details of the errors. The following image shows the review pane for a job named "Runtime Sync 11111:"
Review the failures and choose one of the following actions:
•To continue with the synchronization despite the errors, click Activate Sync. The "Success" assets will receive the latest versions pushed down through this synchronization. Failed assets continue to use the last successful synchronized version. After synchronization, the status moves to "Activated."
•To cancel the synchronization so that you can address the failures, click Cancel Sync. You can restart the synchronization later through the Synchronize the runtime environment action. For more information, see Synchronize the runtime environment.
Create a password to access the Customer Managed Secure Agent API
The Secure Agent API allows you to perform tasks without using the IDMC user interface. Create a separate password to allow Customer Managed Secure Agents to authenticate API calls. The password doesn't grant access to the IDMC user interface.
1In Administrator, select Settings.
2Under Customer Managed Secure Agent, create a password.
Grant access to Customer Managed Secure Agent API
To allow a user to access the Customer Managed Secure Agent API, assign a role with the appropriate feature enabled.
1In Administrator, select User Roles.
2Click Add Role and enter a role name.
3Select the Features tab and enable Offline Secure Agent API Access.
4Click Save.
5In Administrator, select Users.
6Select the user who needs the API access.
7In the Roles tab, select the role that you just created.
After you create a Customer Managed Secure Agent group, you can edit, synchronize, and delete it. You can also view dependencies, change permissions, and check for upgrades.
You can perform the following tasks from the Actions menu:
Change the name or description of the environment
To change the name or description of your Customer Managed runtime environment, select Edit Environment Properties.
Enable or disable services and connectors
You can enable a service to allow the Customer Managed runtime environment to run product features associated with the service. You can enable specific connectors to allow the environment to communicate with cloud and on-premises applications, platforms, databases, and flat files.
To enable services and connectors, select Enable or Disable Services, Connectors.
Manage configuration
To change the configuration on the Database Configuration tab, select Manage configuration.
Synchronize the runtime environment
To push changes to tasks or Secure Agents in a Customer Managed runtime environment, select Sync Runtime Environment.
Check whether upgrades are available for the Secure Agents in the Customer Managed runtime environment and then install the upgrades.
Install any upgrades as soon as possible, as you can't synchronize your Customer Managed runtime environment with outdated Secure Agents.
Tip:
The Sync Runtime Environment action automatically checks for upgrades.
To check for upgrades, select Check and install upgrades.
Delete the runtime environment
You can delete a Customer Managed runtime environment if it is no longer being used.
To delete a Customer Managed runtime environment, select Delete.
View dependencies
View dependencies to find the tasks or connections that use the Customer Managed runtime environment or to find the objects that are used by the Customer Managed runtime environment.
To view dependencies, select Show Dependencies.
Change permissions
To change permissions for a Customer Managed runtime environment, select Permissions. You can define permissions for a Customer Managed runtime environment for each user group in your organization.
The following table describes the permissions that you can set:
Permission
Description
Read
View details about the Customer Managed runtime environment and use the Customer Managed runtime environment in a task.
Update
Edit the Customer Managed runtime environment.
Delete
Delete the Customer Managed runtime environment.
Execute
Run tasks in the Customer Managed runtime environment.
Change Permissions
Change permissions for the Customer Managed runtime environment.
Synchronize the runtime environment
When you run a Customer Managed runtime environment, you manually push changes to tasks, assets, or configurations to the Secure Agents in the environment. Unlike standard runtime environments, these changes don't transmit automatically.
It's important to understand the two types of synchronizations in a Customer Managed runtime environment:
•Automatic synchronization. Secure Agents in a Customer Managed runtime environment automatically return results of jobs back to IDMC when a connection is available. This operation runs in the background, with no user interaction.
•Manual synchronization. Any changes within IDMC such as new tasks, mappings, connections, or schedules require you to manually deploy the changes to the Secure Agents. You do this using the Sync Runtime Environment option in the Actions menu of a Customer Managed runtime environment.
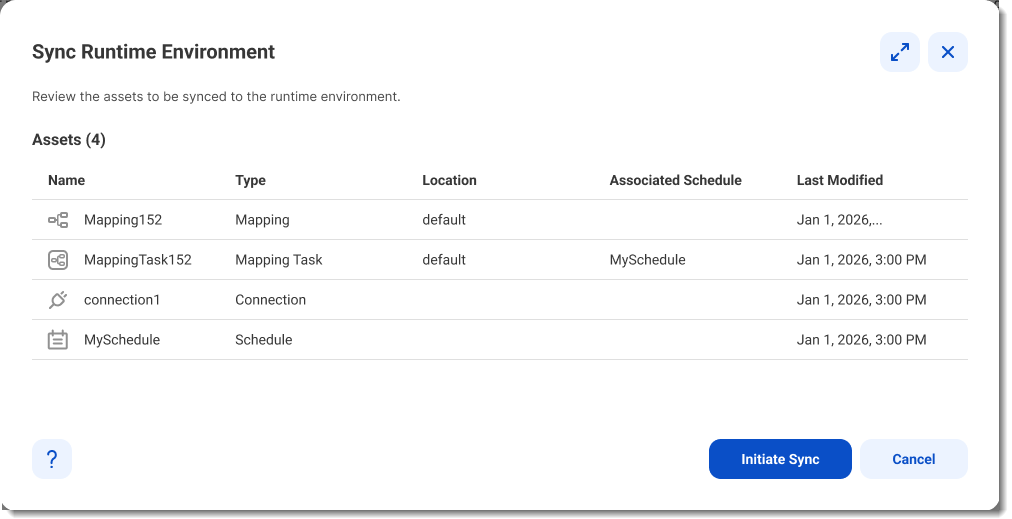
The following image shows a confirmation dialog listing a set of assets that will be synchronized:
If everything is in order, click Initiate Sync to begin the synchronization. This may take several minutes to complete and you will be notified when the process is finished.
If you need to make changes, click Cancel, make the corrections and synchronize.
Secure Agent upgrade
If your Secure Agent requires an upgrade, a banner asks you to upgrade before synchronization proceeds.
The following image shows the upgrade banner:
Click Install Upgrade to continue and then click Upgrade in the confirmation dialog to proceed with the upgrade.
Optionally, you can select to upgrade all available Customer Managed Secure Agent groups. If you don't select this option, only the agents in the current Customer Managed Secure Agent group are upgraded.