Data Integration mappings for EDI X12 and EDIFACT messages
B2B Gateway uses pre-packaged, EDI processing mappings to handle inbound and outbound EDI X12 and EDIFACT messages based on the flows that you assign to the partner. The EDI processing mappings handle the connectivity between the partner and the B2B Gateway document store.
You can define the following flows:
Inbound flow
You can use custom mappings to process the interface file that the B2B Gateway EDI processing mapping generates and places on the B2B Gateway document store to the backend system. You can define a single process-to-backend mapping to process all interface files, a mapping for each type of file that you want to process, or both mapping types. When an inbound process runs, B2B Gateway first runs the process-to-backend mappings that are defined for specific message types, and then it runs the process-to-backend mapping that is defined for the inbound flow of the partner.
Outbound flow
You can define custom backend processing mappings to extract and process the data to send to the partner from the backend system to an interface file on the B2B Gateway document store. You can define a single process-from-backend mapping to process all the messages to the interface file, a mapping for each type of file that you want to process, or both mapping types.
When an outbound process runs, B2B Gateway first runs the process-from-backend mappings that are defined for specific message types, and then it runs the process-from-backend mapping that is defined for the outbound flow of the partner. The B2B Gateway EDI processing mapping reads the messages from the B2B Gateway document store.
Note:
For both inbound and outbound flows, define each message type in one mapping only. If you define the same message type in both a message-specific backend processing mapping and in the flow's backend processing mapping,
B2B Gateway
might run messages of that message type twice. For example, if you define a process-from-backend mapping for the
810 Invoice
message type for a customer, and
810 Invoice
is also defined in the process-from-backend mapping that is defined for the outbound flow of the customer,
B2B Gateway
might run
810 Invoice
messages twice.
EDI processing mappings
B2B Gateway uses pre-packaged, EDI processing mappings for both inbound and outbound EDI message flows.
EDI processing mappings for inbound EDI messages
The source of the mapping is the incoming messages, and the target is an interface file on the B2B Gateway document store. The mapping validates the EDI message, sends technical and functional acknowledgment to the partner, converts the EDI messages to an XML interface file, and places the file in the document store.
EDI processing mappings for outbound EDI messages
The source of the mapping is the interface file that you place on the B2B Gateway document store, and the target is the target location for the partner to which to send the messages. The mapping enriches the data in the interface file with partner metadata, creates a valid EDI message file, and sends the file to the partner.
Custom mappings for EDI message exchange
To send EDI messages to partners, you must create custom mappings for outbound flows. To receive EDI messages from partners, you can optionally create custom mappings for inbound flows.
Custom mappings for inbound EDI messages
You can use custom mappings in inbound EDI message flows to process the interface file from the B2B Gateway document store to the backend system. The source of the mappings is the interface file and the target is the backend system. The mappings use a Hierarchy Parser transformation to convert the XML interface file to relational database format and places the data in the backend system.
If you use custom mappings to process the interface file to the backend system, B2B Gateway provides end-to-end tracking of inbound messages, from the partner to the backend system. If you use a different method to process the interface file to the backend system, B2B Gateway tracks the messages from the partner to B2B Gateway and does not track the messages to the backend system.
Custom mappings for outbound EDI messages
Use custom mappings in outbound EDI message flows to process outgoing messages from the backend system to an interface file on the B2B Gateway document store. The source of the mappings is the backend system and the target is the B2B Gateway connection to the location of the interface file. The mappings use a Hierarchy Builder transformation to convert the data to XML format and places the data on the document store.
Rules and guidelines for custom EDI mappings
When you develop custom Data Integration mappings to use in B2B Gateway for EDI message exchange, consider these rules and guidelines.
General rules and guidelines
The following rules and guidelines apply to both inbound and outbound flows:
•You can create the mappings after your organization is set up in Data Integration and B2B Gateway connections are available for selection when you create the mapping.
Warning:
When you set up the organization in
B2B Gateway
,
B2B Gateway
creates the connections
B2B EDI Gateway
,
B2B EDI Gateway Endpoint
, and
B2B Gateway Document Store
in the
Informatica Intelligent Cloud Services
organization. Do not rename or edit these connections. Editing a connection or changing a connection name might result in errors at run time.
•Define each message type in one mapping only. If you define the same message type in both a message-specific backend processing mapping and in the flow's backend processing mapping, B2B Gateway might run messages of that message type twice. For example, if you define a process-from-backend mapping for the 810 Invoice message type for a customer, and 810 Invoice is also defined in the process-from-backend mapping that is defined for the outbound flow of the customer, B2B Gateway might run 810 Invoice messages twice.
Rules and guidelines for inbound flows
The following rules and guidelines apply to custom mappings that you use in inbound flows:
•To use the inbound mapping option, you create process-to-backend mappings. You can define a single process-to-backend mapping to process all interface files, a mapping for each type of file that you want to process, or both mapping types. When an inbound process runs, B2B Gateway first runs the process-to-backend mappings that are defined for specific message types, and then it runs the process-to-backend mapping that is defined for the inbound flow of the partner. Message types include all the types of messages that you receive from partners. Targets include all the backend applications to which you transfer incoming messages. To handle the B2B Gateway interface file and to convert it from XML format to relational database format you add Hierarchy Parser transformations to the mappings.
•You can add multiple sources to a process-to-backend mapping. The mapping must include only one source that connects to the B2B EDI Gateway connection. You must parameterize the B2B EDI Gateway connection. You can connect other sources to any Informatica connection that isn't a B2B Gateway connection. Do not parameterize the additional connections.
Note:
Connecting additional sources to a
B2B Gateway
connection or parameterizing them might result in errors at run time.
•Do not parameterize the target connection.
Note:
Parameterizing the target connection might result in errors at run time.
•If you add parameters to the process-to-backend mapping, you can configure the mapping parameters when you create the partner flow, after you select the mapping.
•You can map the sender interchange ID and qualifier of incoming messages from the mapping source to the target. You can map the following fields:
- SENDER_INTERCHANGE_ID
- SENDER_INTERCHANGE_QUALIFIER
Rules and guidelines for outbound flows
The following rules and guidelines apply to custom mappings that you use in outbound flows:
•To convert relational data to the B2B Gateway XML interface file in the outbound flow, define custom backend processing mappings to extract and process the data to send to the partner from the backend system to an interface file on the B2B Gateway document store. You can define a single process-from-backend mapping to process all the messages to the interface file, a mapping for each type of file that you want to process, or both mapping types. When an outbound process runs, B2B Gateway first runs the process-from-backend mappings that are defined for specific message types, and then it runs the process-from-backend mapping that is defined for the outbound flow of the partner. You add Hierarchy Builder transformations to the mappings.
•Do not parameterize the source connection.
Note:
Parameterizing the source connection might result in errors at run time.
•The targets of the mapping must be the B2B EDI Gateway connection. You must parameterize the target connections.
•If you assign process-from-backend mappings to specific message types you must also create a message discovery mapping and assign it to the outbound flow of the partner.
•If you define multiple interchange IDs of the same type for a partner, you must pass the interchange ID to use in outbound flows as a parameter in the process-from-backend mapping that you assign to the partner, so that B2B Gateway can determine which partner interchange ID to use in outbound flows. You add the ID to the source that contains the message details and map it to the appropriate field in the mapping target. For more information, see Partner interchange IDs
•If you add parameters to the process-from-backend mapping, you can configure the parameter values when you create the partner flow, after you select the mapping. You can also pass the parameter values with the Run Partner REST API. When you run the partner with the API, the values that you define in the API override those that you define in the partner flow. For more information, see Run Partner REST API.
Context parameters in custom mappings
You can use input and in-out parameters as context parameters in custom mappings to add information from the gateway to inbound and outbound messages and to filter the data in inbound and outbound messages. For example, add the partner name to inbound messages, or filter outbound messages based on partner number.
Consider the following guidelines when you add the parameters:
•Add a transformation to the mapping. You can add any transformation that accepts Data Integration parameters as input. For example, an Expression transformation or a Filter transformation.
•In outbound flows, add the transformation before the target. In inbound flows, add the transformation after the source.
•Configure ports that add the data. The following table describes the port values that you can configure. Port values are not case sensitive.
Port Value
Data to Add to the Port
PARTNER_NUMBER
Partner number
PARTNER_NAME
Partner name
PARTNER_PROD_INTERCHANGE_ID
Partner production interchange ID
PARTNER_TEST_INTERCHANGE_ID
Partner test interchange ID
EVENT_ID
Event ID
Target fields in custom mappings
When the target connection in a mapping is GW_TARGET, you can map incoming fields to target fields.
The following table describes the target fields that you can map incoming fields to. Target field names are not case-sensitive.
Target Field
Description
XML_FILE_PATH
Path of the XML file
DATA
Data of the XML file
FILE_NAME
Name of the XML file
PARTNER_PROD_INTERCHANGE_ID
Partner production interchange ID
PARTNER_TEST_INTERCHANGE_ID
Partner test interchange ID
PARTNER_INTERCHANGE_QUALIFIER
Partner interchange qualifier
You map incoming fields to target fields on the Field Mapping tab of the Target transformation.
Creating a process-to-backend mapping for inbound EDI message flows
Create a process-to-backend mapping that processes incoming EDI messages in Data Integration.
A mapping can process a single message type or multiple message types. When you create a partner, you can select a mapping that contains a single message type when you add the message type for the partner. You can select a mapping that includes multiple message types when you define the inbound flow for the partner.
When you create a mapping you define the B2B Gateway document store as the source, add a filter for each message type in the mapping, add and configure a Hierarchy Parser transformation for each message type, and, for each message type, add the relevant backend systems as targets.
To define B2B Gateway as a source, you select the B2B EDI Gateway connection. You must parameterize the connection.
Optionally, you can add sources that connect to locations other than the document store. You can use any Informatica connection that isn't a B2B Gateway connection. Do not parameterize the connections.
Note:
Parameterizing connections other than
B2B Gateway
connections might result in errors at run time.
After you add all the required elements to the mapping save and validate the mapping.
Step 1. Create the mapping
Create the mapping for inbound flows.
1Click New > Mappings, and then click Create.
2In the mapping Properties panel, enter the mapping name and description, and change the location to save the mapping.
You can use alphanumeric characters and underscores (_) in the mapping name.
Step 2. Configure the sources
Configure the Source transformation to specify the B2B Gateway connection as the source object.
Optionally, add more sources to the mapping.
1Click the Source transformation on the mapping canvas.
2In the Properties panel, on the General tab, you can enter a name and description.
3Click the Source tab and then select the following options:
Option
Selection
Connection
B2B EDI Gateway
Source Type
Single Object
Object
GW_EDI_SOURCE
4Click New Parameter to the right of the Connection field.
The New Input Parameter dialog box shows.
5Enter a parameter name and then click OK.
The New Input Parameter dialog box closes. In the Properties panel, the parameter name you entered shows in the Connection field.
Note:
You must parameterize the B2B EDI Gateway connection.
6Optionally, add more Source transformations to the mapping and configure them. You can use any Informatica connection that isn't a B2B Gateway connection. Do not parameterize the connections.
Note:
Connecting additional sources to a
B2B Gateway
connection or parameterizing them might result in errors at run time.
Step 3. Create Filter transformations
Create Filter transformations to filter source data based on the message type. Create a transformation for each type of inbound message that you want to map.
1Add a Filter transformation to the mapping canvas and connect the source to the Filler transformation.
2Click the Filter tab. In the Field Name column select MESSAGE_TYPE and then, in the Value column, enter the value of the message type for which you create the filter.
Step 4. Create Hierarchy Parser transformations
Create Hierarchy Parser transformations to transform source hierarchical data to relational database data. Create a transformation for each type of inbound message that you want to map.
1Add a Hierarchy Parser transformation to the mapping canvas and connect the Filler transformation of the relevant message type to the Hierarchy Parser transformation.
2In the Properties panel select the Input Settings tab, select the File input type, and then click Select.
The Select Schema dialog box shows.
3Select the schema of the message type to add to the inbound flow. For example, if you create a mapping for an EDI X12 810 message, select the TS_810 level. Click OK.
4Click the Input Field Selection tab and map the field FILE_PATH from the Incoming Fields column to the Hierarchical Schema Input Fields column.
5Click the Field Mapping tab. In the Schema Structure table expand the interchanges element, expand the interchange element, and then map fields to the Relational Fields area.
Tip:
For details, see the "Hierarchy Parser Transformation" section of the
Data Integration Transformation Guide
.
Step 5. Configure the targets
Create target transformations to specify your backend systems as the target objects. For each message type, create the relevant backend systems as targets.
Note:
Do not parameterize the targets. Parameterizing the targets might result in errors at run time.
1Add a target to the mapping canvas and connect the Hierarchy Parser transformation of the relevant message type to the target.
If you selected multiple fields in the field mapping of the Hierarchy Parser transformation, the Select Output Group dialog box shows.
2Select the group or groups to add to the target and then click OK.
3In the Properties panel, on the General tab, you can enter a name and description.
4Click the Target tab and configure target details.
5Optionally, click the Field Mapping tab and map incoming fields to target fields.
Creating a process-from-backend mapping for outbound EDI message flows
Create a process-from-backend mapping that processes outgoing EDI messages in Data Integration.
A mapping can process a single message type or multiple message types. When you create a partner, you can select a mapping that contains a single message type when you add the message type for the partner. You can select a mapping that includes multiple message types when you define the outbound flow for the partner. To use mappings that contain a single message type you must also create a message discovery mapping and assign it to the outbound flow of the partner. For more information, see Creating a message discovery mapping for outbound EDI message flows.
When you create the mapping in Data Integration you select your backend system as the source. You add two source transformations to the mapping, a transformation for the master source and a transformation for the source that contains the message details. For example, add a source that contain the order as the master source and a details source that contains the order details.
If you define multiple interchange IDs of the same type for the partner that uses the mapping, define the interchange IDs to use in outbound flows in the source that contains the message details and map it to the interchange ID fields in the target transformations. You can map one interchange production ID and one interchange test ID. You must map at lease one interchange ID in the mapping.
If information on multiple message types appears in the same table, you add a filter for each message type. You then add and configure a Hierarchy Builder transformation for each message type, and, for each message type, add the B2B Gateway interface file as the target.
After you add all the required elements to the mapping save and validate the mapping.
Step 1. Create the mapping
Create the mapping for outbound flows in Data Integration.
1Click New > Mappings, and then click Create.
2In the mapping Properties panel, enter the mapping name and description, and change the location to save the mapping.
You can use alphanumeric characters and underscores (_) in the mapping name.
Step 2. Configure the source
Create Source transformations to specify your backend system as the source object. Create one source transformation for the master source and one source transformation for the source that contains the message details.
Note:
Do not parameterize the sources. Parameterizing the sources might result in errors at run time .
1Add a source for the master to the mapping canvas.
2In the Properties panel, on the General tab, you can enter a name and description.
3Click the Source tab and configure source details.
4Repeat steps 1 through 5 to add a source transformation for the message details.
Step 3. Create Filter transformations
If information on multiple message types appears in the same table, create Filter transformations to filter target data based on the message type. Create a transformation for each type of outbound message in the table.
1Add a Filter transformation to the mapping canvas and connect the source to the Filler transformation.
2Click the Filter tab. In the Field Name column select MESSAGE_TYPE and then, in the Value column, enter the value of the message type for which you create the filter.
3Repeat steps 1 through 2 for each message type in the table.
Step 4. Create Hierarchy Builder transformations
Create Hierarchy Builder transformations to transform source relational database data to XML data. Create a transformation for each type of outbound message that you want to map.
1Add a Hierarchy Builder transformation to the mapping canvas and connect the last transformation that you created for the relevant message type to the Hierarchy Builder transformation, that is, the Source, Filler, or Expression transformation that you created for the message type for which you are adding the Hierarchy Builder transformation.
2In the Properties panel select the Output Settings tab and then click Select.
The Select Schema dialog box shows.
3Select the schema of the message type to add to the outbound flow and then click OK.
4Click the Field Mapping tab and, in the Relational Fields area, define the relationships between the tables. Assign the following keys to the source tables:
- For each table, define the primary key.
- For the table that contains the source details, define a foreign key that points to the master source table.
5If your schema contains a single master table and a single source details table, the Hierarchy Builder transformation creates a file for each master table row. In this case, perform the following tasks to create all table rows into one hierarchy and add the hierarchy to the transformation:
aAdd a new source table to the transformation, and assign it a primary key.
bIn the master source table, for every table row, assign a foreign key that points to the primary key of the new source table.
cMap the new source table from the Relational Fields area to the following element in the Hierarchy Fields area:
▪ EDI X12 messages: interchanges element.
▪ EDIFACT messages: interchange element.
6Configure field mappings for the master table:
aMap the master table from the Relational Fields area to the following element in the Hierarchy Fields area:
▪ EDI X12 master table: Interchange element.
▪ EDIFACT master table: Loop_UNG element.
Tip:
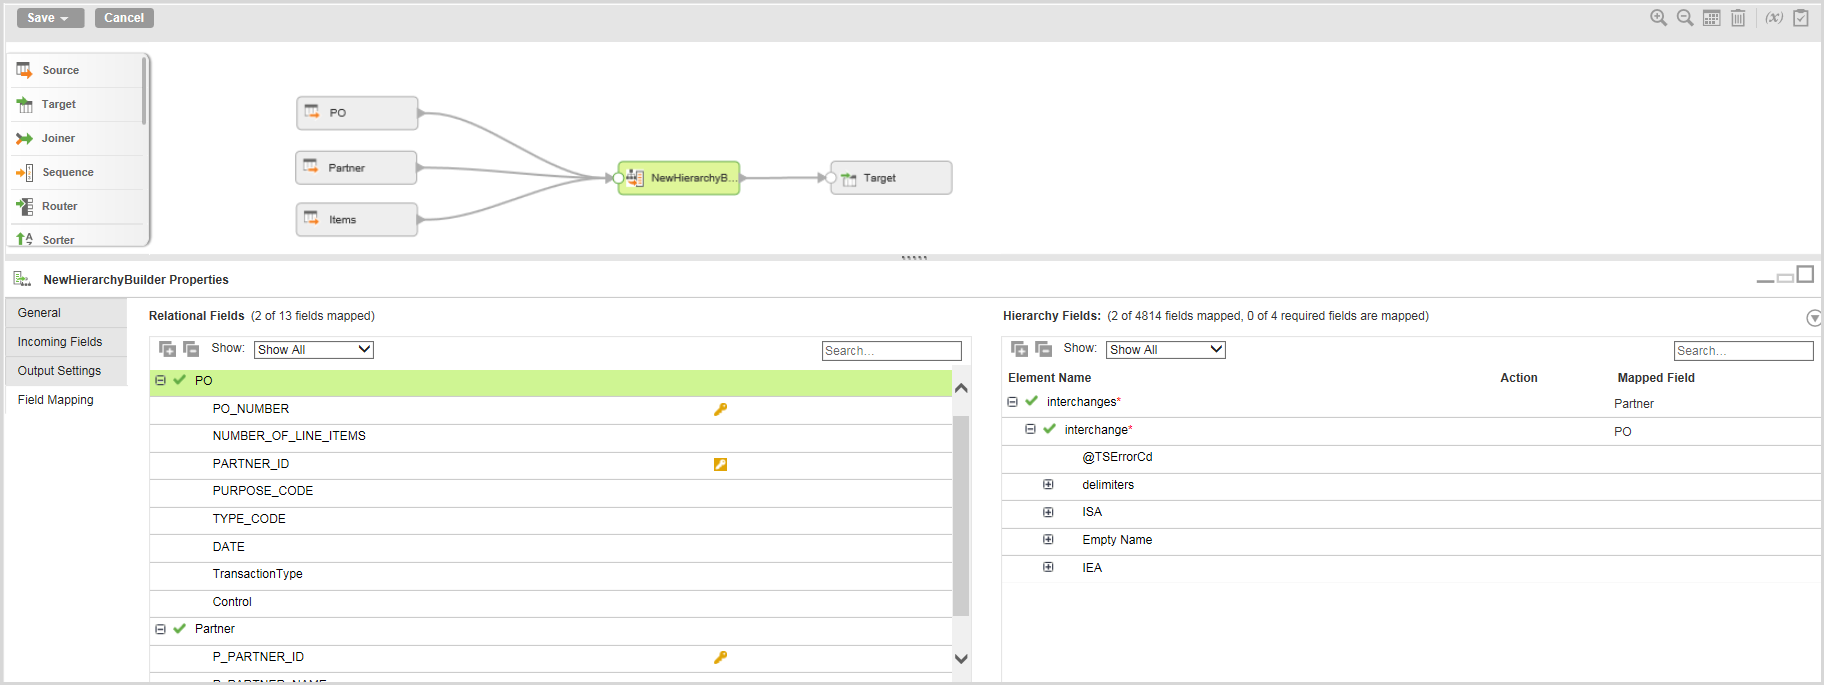
See
PO
in the sample field mappings below.
bMap the EDI data fields of the table from the Relational Fields area to the required EDI segments in the Hierarchy Fields area.
7Configure field mappings for the details table:
aMap the table from the Relational Fields area to the relevant loop in the Hierarchy Fields table.
bMap the EDI data fields of the table from the Relational Fields area to the required EDI segments in the Hierarchy Fields area.
Tip:
For details, see the "Hierarchy Builder Transformation" section of the
Data Integration Transformation Guide
.
The following image shows sample field mappings for EDI X12 messages:
Create target transformations to specify the B2B Gateway interface file as the target object. Create a target transformation for each type of message that you want to map.
1Add a target to the mapping canvas and connect the relevant Hierarchy Builder transformation to the target.
2In the Properties panel, on the General tab, you can enter a name and description.
3Click the Target tab and then select the following options:
Option
Selection
Connection
B2B EDI Gateway
Target Type
Single Object
Object
GW_TARGET
Operation
Insert
4Click New Parameter to the right of the Connection field.
The New Input Parameter dialog box shows.
5Enter a parameter name and then click OK.
The New Input Parameter dialog box closes. In the Properties panel, the parameter name you entered shows in the Connection field.
Note:
You must parameterize the B2B EDI Gateway connection.
6Click the Field Mapping tab. In the Field mapping options field, verify that the Manual option is selected, and then map the Output field in the Incoming Fields table to the DATA field in the Target Fields table.
7If you define multiple interchange IDs of the same type for the partner that uses the mapping, map the incoming fields that contain the IDs to use for the partner to one or both of the following target fields, as applicable:
Creating a message discovery mapping for outbound EDI message flows
Create a message discovery mapping that discovers messages that are ready to be sent to customers, based on the message type. Assign the message discovery mapping to partners to which you assign one or more process-from-backend mappings that contain a single message type.
When you create the mapping you select the B2B Gateway connection as the source, and the B2B Gateway XML interface file as the target, and map all the message types that you want the mapping to discover as the target fields.
After you add all the required elements to the mapping save and validate the mapping.
Step 1. Create the mapping
Create the mapping for outbound flows in Data Integration.
1Click New > Mappings, and then click Create.
2In the mapping Properties panel, enter the mapping name and description, and change the location to save the mapping.
You can use alphanumeric characters and underscores (_) in the mapping name.
Step 2. Configure the source
Create Source transformations to specify your backend system as the source object. Create one source transformation for the master source and one source transformation for the source that contains the message details.
Note:
Do not parameterize the sources. Parameterizing the sources might result in errors at run time .
1Add a source for the master to the mapping canvas.
2In the Properties panel, on the General tab, you can enter a name and description.
3Click the Source tab and configure source details.
4Repeat steps 1 through 5 to add a source transformation for the message details.
Step 3. Configure the target
Create a target transformation to specify the B2B Gateway interface file as the target object.
1Add a target to the mapping canvas and connect the source to the target.
2In the Properties panel, on the General tab, you can enter a name and description.
3Click the Target tab and then select the following options:
Option
Selection
Connection
B2B EDI Gateway
Target Type
Single Object
Object
MSG_DISCOVERY
Operation
Insert
4Click New Parameter to the right of the Connection field.
The New Input Parameter dialog box shows.
5Enter a parameter name and then click OK.
The New Input Parameter dialog box closes. In the Properties panel, the parameter name you entered shows in the Connection field.
Note:
You must parameterize the B2B EDI Gateway connection.
6Click the Field Mapping tab. In the Field mapping options field, verify that the Manual option is selected, and then map an Output field in the Incoming Fields table to the MSG_TYPE field in the Target Fields table. Map all the Output fields to the Target Fields table, each MSG_TYPE field in a separate row.